AI has genuinely compressed the time it takes to get a Shopify store from nothing to live. What it has not changed is what makes that store work in the months after launch. The split between those two things is worth being precise about, because the second half is where most first launches quietly lose money.
The production work is what collapsed: writing first drafts, laying out pages, generating a theme, filling a catalog with descriptions, producing image variants. The decisions underneath that work did not collapse. What you sell, to whom, at what price, and at what margin are still yours, and no current tool makes them for you.
What follows is a launch sequence in that order. The fast parts first, the parts that need your judgment last. We build a discount and margin app rather than a store builder, so there is a bias worth declaring up front: we think step three is the one people skip, and skipping it is expensive.
This used to be the slow part. Choose a theme, learn its section system, wrestle the settings into shape, then hire someone when it stops behaving. A category of tool now called the AI store builder automates the generic version of that job. You answer a short series of questions about what you sell, and it produces a store structure, a theme, and starter pages that you then edit.
CreateMyStore, powered by Vitals, is one of these. You choose a niche and answer a few questions, and it builds the storefront around those answers: design, logo, product pages, and imagery, with the Vitals app suite installed alongside. It works on new Shopify stores only, so it is a tool for the launch itself rather than something you point at a catalog you already have.
Treat whatever any of these tools produces the way you would treat any other generated first draft. The output will be competent and generic, because a niche and a short questionnaire cannot contain what you know about your customers. The parts worth your afternoon are the ones a generator cannot guess: your actual photography, the specific objection your homepage needs to answer, and a navigation that matches how your buyers group products rather than how a template groups them.
Descriptions are the clearest win. A model given real specifications, materials, dimensions, and use cases will write a serviceable description far faster than you will, and it will do it two hundred times without getting bored. The failure mode is equally clear. Feed it nothing but a product title and it produces fluent copy that says nothing, and a catalog of that reads exactly like what it is.
So the input matters more than the tool. Give it the spec sheet, the supplier notes, and the questions customers actually ask in your inbox. Then edit for the claims you are willing to stand behind, because a generated sentence about durability or sourcing becomes your responsibility the moment it sits on a product page.
Imagery is further along than most merchants expect for secondary assets: lifestyle backgrounds, scale references, seasonal variants of a shot you already own. It is still not a substitute for one honest photograph of the actual product. Customers returning items they felt were misrepresented is a margin problem, not a creative one.
This is the step that gets skipped, and it is the one that decides whether the rest of the launch was worth doing.
Shopify has a cost per item field on every variant. It is optional, it is empty by default, and nothing in the launch flow forces you to fill it. A store can run for a year without it and everything will appear to work. Reports populate. Orders arrive. The dashboard shows revenue climbing.
What you will not have is any way to answer the only question that matters about a promotion: did it make money? Without cost data, every analytics surface you own reports revenue and units. A campaign that sold 400 units at 30 percent off looks identical to a campaign that sold 400 units at 30 percent off and lost money on every one of them. You cannot separate the two after the fact, which means you cannot decide whether to run it again.
Fill in cost per item during catalog setup, while you are already touching every product and the supplier invoice is still in front of you. Shopify records unit cost against an order at the time the order is placed, so backfilling later fixes your future reporting but does not repair the orders you already have. Once the data is there, profit analytics can report net margin per campaign and per order instead of gross revenue.
There is a longer argument for running promotions this way in profit-first promotions. The short version is that a discount is something you buy with your own margin, and you should know the price before you agree to it.
New stores tend to open with a sitewide percentage off, because it is the easiest campaign to explain and the fastest to configure. It is also the one that teaches your first cohort of customers to wait for the next sale, and it discounts your best sellers by exactly as much as your slow movers.
The more durable opening play is a quantity-based one. Volume discounts and quantity breaks tie the discount to a larger order rather than to the calendar, so the customer earns the lower price by giving you a bigger basket. Average order value moves, per-unit fulfillment cost falls, and you have not established that your list price is negotiable.
Set the tiers against the cost data you entered in step three rather than against a round number that feels generous. The math also differs by audience, because the same tier structure behaves differently for a wholesale buyer than for a consumer. That is the subject of volume discounts for B2B vs D2C.
Three things, and they are the three that determine whether the store is still here in a year.
Positioning. A generator can produce a homepage that reads well. It cannot tell you why someone should buy this from you rather than from the store selling the same catalog for less. That answer comes from knowing something specific about a specific group of buyers, and it is the input to every other decision on this list.
Suppliers. Your unit economics are set at the moment you agree terms with whoever makes or ships your product. No amount of downstream optimization recovers a bad cost base. That is a relationship and a negotiation, and it happens entirely offline.
Margin decisions. How deep to discount, when to protect price, which products never go on sale. These are judgment calls that depend on your cash position, your inventory age, and what you are trying to learn from the campaign. Tools can show you the consequences accurately. Choosing is still yours.
Use AI for the parts of a launch that are production work, and spend the time it gives back on the parts that are not. Generate the store, generate the first draft of the catalog, then use the afternoon you saved to enter cost prices and decide what your opening offer actually is. Launches rarely go badly because the theme was mediocre. They go badly because nobody knew what the first sale cost.
--- ## Your Storefront Apps Should Speak Your Customers' Language URL: https://www.discountprime.app/blog/storefront-apps-should-speak-your-customers-language Category: Ecosystem & Platform | Author: Discount Prime Team | Published: July 22, 2026 | Updated: July 22, 2026 | Read time: 6 min | Tags: shopify, localization, shopify-markets, internationalization, storefront-widgets, product-updates > Translation apps and translated themes localize a Shopify storefront, but they cannot reach the text that lives inside another app's widgets, so discount messages often stay in English on an otherwise translated page. That mismatch erodes trust at the exact moment a shopper is deciding to buy. Storefront apps should detect the shopper's locale and render merchant-authored text in each of the store's published languages, with automatic fallback to the default. Discount Prime now does this for every widget after a Bulgarian merchant reported the gap.A merchant in Bulgaria sent us a short email that changed our roadmap. Their store looked, to them, completely finished: the theme was translated into Bulgarian, they were selling across the EU through Shopify Markets, and every product page read cleanly in their customers' language. Except for one thing. Our free shipping bar, sitting at the top of that beautifully translated page, still said "You're 25 lv away from free shipping" in English.
They were not angry. They were confused. They had translated everything they could find, so why was this one strip of text still in English? The answer turned out to be more interesting than the bug, and it points at something the whole Shopify app ecosystem gets wrong more often than it should.
When you localize a Shopify store, you reach for Shopify's own Translate & Adapt, or one of the popular translation apps. Those tools do an excellent job on the things they can see: theme content, product titles and descriptions, collections, navigation, checkout strings. They walk the parts of the storefront that Shopify exposes to them and swap the language.
What they cannot see is the text that lives inside another app's widget. A free shipping bar, a discount table on the product page, a sales badge, a cart summary line, a Buy X Get Y modal: those strings are stored by the app that renders them, not by the theme and not by Shopify's translation layer. A translation app has no way to open up a discount app's settings and rewrite its copy. So that copy stays in whatever language the merchant first typed it in, usually English, no matter how thoroughly the rest of the page is translated.
This is the gap our Bulgarian merchant fell into. They had done everything right. The tool that was supposed to translate their store simply had no reach into ours.
It is tempting to treat this as cosmetic. It is not. A storefront earns trust by being consistent, and shoppers read inconsistency as a warning sign.
Picture the page from the shopper's side. Everything is in Bulgarian: the header, the product, the reviews, the price. Then one bar near the cart is in English. The effect is not "this store also speaks English." The effect is "something here is broken," and that doubt lands at the worst possible moment, right when the shopper is deciding whether to trust you with a payment. The widgets that show discounts are, by design, the ones closest to the purchase decision. A free shipping message, a volume discount table, a free-gift offer: these exist to push someone over the line. If they are the one element that looks out of place, they undercut the very conversion they were built to create.
For a store selling into several markets, this is not an edge case. It is every non-default market, on every page, on the highest-intent element. Multiply that by the traffic Shopify Markets sends you and the cost of a single untranslated string stops looking cosmetic.
Getting this right is not about machine translation. Merchants know their markets and their own brand voice, and a discount that reads as natural in Bulgarian is not the one a generic engine produces word for word. The job of the app is not to invent the translation. It is to carry the merchant's own words to the right shopper at the right time. Concretely, that means four things:
Read the store's published languages. The merchant already declared which languages they sell in, under Settings then Languages in the Shopify admin. The app should use that list, not ask the merchant to set languages up a second time.
Let the merchant author text per language. Every string the app shows on the storefront should have a place to type its translation, in each published language, in the merchant's own words.
Detect the shopper's locale and switch automatically. On the storefront, the app should see which language the shopper is browsing in and render the matching text with no code and no theme edits, working with Shopify Markets and translated themes out of the box.
Fall back to the default, never to blank. A half-translated store is normal while a merchant is still filling things in. Any untranslated field should quietly fall back to the default language so a widget never renders empty, and the app should flag what is still missing so the merchant can finish at their own pace.
None of that is exotic. It is simply the app taking responsibility for the language of the text it puts on someone else's storefront, instead of leaving a hole that no translation app can fill.
We took the Bulgarian merchant's email as a specification. The result is widget translations that cover the entire widget set, not just a favored few.
When a store has more than one published Shopify language, a language selector now appears inside each widget's settings. The merchant switches language and types the translation for each text field: the messages in the free shipping and discount progress bars, the labels on the product-page discount table, the "Total" and "Saved on cart" lines in the cart summary, sales badge text including per-campaign custom badges, every button in the Buy X Get Y and free-gift modal, the cross-sell widget's titles and buttons, the low-stock alert, and the countdown timer's labels. On the storefront, the widget detects the shopper's current locale and renders the matching text automatically. Anything left untranslated falls back to the default, and languages with missing translations are flagged so nothing silently ships half-done. It works with Shopify Markets and translated themes, needs no code, and is included in the plan at no extra fee.
Our merchant in Bulgaria now shows the same promotions in Bulgarian that their neighbors see in their own languages, from one campaign, with nothing duplicated.
If your store serves more than one language, it is worth spending five minutes as a shopper. Switch your storefront to each language you sell in and read the pages the way a customer would, all the way to the cart. Watch for the strings that stay in your default language while everything around them changes. Some of them will belong to apps.
When you find one, the question to ask the app is simple: can I translate this into the languages my store already publishes? An app that renders on your storefront is part of your storefront, and it owes your customers the same language the rest of the page speaks. That is the standard we now hold ourselves to, because a merchant in Bulgaria was kind enough to point out that we had not been.
Ready to close the gap in your own store?
Add Discount Prime and translate every widget into the languages you already sell in. You can find the best step-by-step guide here in our help center knowledge management system.
--- ## Percent of What? How an Entire Industry Quoted the Wrong Column for a Year URL: https://www.discountprime.app/blog/percent-of-what-ai-citation-stats Category: AI & Agentic Commerce | Author: Aziz Banihashemi | Published: July 14, 2026 | Updated: July 14, 2026 | Read time: 10 min | Tags: AEO, GEO, AI search, measurement, analytics, discount reporting > Three widely quoted statistics about Reddit's share of AI citations (11.3% on ChatGPT, 21% on Google AI Overviews, 46.7% on Perplexity) are misreadings of Profound's top-ten-sources table. The real shares of total citations are 1.8%, 2.2%, and 6.6%. At least five incompatible denominators circulate under the phrase "Reddit's citation share," and the same denominator error corrupts ecommerce discount reporting.Three numbers about AI search have been repeated for a year. All three are misreadings of a single table. The AI search part is the hook. The habit underneath it is the story, and it runs straight through your discount reporting.
If you have read anything about answer engine optimization in the past year, you have met these:
Reddit is 11.3% of ChatGPT's citations.
Reddit is 21% of Google AI Overviews' citations.
Reddit is 46.7% of Perplexity's citations.
None of them is true. Not rounded wrong, not directionally wrong. Wrong by a factor of six to ten.
The actual figures come from the same study, the same page, and the same day: 1.8%, 2.2%, and 6.6%.
The source is Profound's citation patterns study, written by Nick Lafferty, published June 5, 2025 and updated that August. It covers 680 million citations from August 2024 to June 2025. It is the largest public dataset in the space.
The page contains two different kinds of table, and the industry has been quoting the wrong one.
Platform | Reddit's share of ALL citations | Reddit's share of the TOP 10 sources |
|---|---|---|
ChatGPT | 1.8% | 11.3% |
Google AI Overviews | 2.2% | 21.0% |
Perplexity | 6.6% | 46.7% |
Profound labels the second kind of table plainly:
"These percentages do not represent overall citation volume, but rather how citations are distributed among the leading sources for each platform."
The denominator of the second column is ten websites. Not the internet. When someone tells you Reddit is 46.7% of Perplexity's citations, they are telling you that Reddit is 46.7% of a ten item list that Reddit already sits at the top of by construction.
This is not a matter of interpretation. The second column is just the first column divided by the sum of the top ten.
Perplexity's ten most cited domains, as a share of all citations, are Reddit 6.6%, YouTube 2.0%, Gartner 1.0%, Yelp 0.8%, LinkedIn 0.8%, Forbes 0.7%, NerdWallet 0.6%, TripAdvisor 0.6%, G2 0.6%, and PCMag 0.5%. They add up to 14.2% of all citations. Reddit's 6.6% divided by that 14.2% is 46.5%.
The reported figure is 46.7%. Run the same arithmetic on Google AI Overviews and you get 21.4% against a reported 21.0%. Run it on ChatGPT and you get 11.0% against a reported 11.3%. Every one reproduces to within a few tenths of a point, which is exactly what you expect from source figures rounded to one decimal place.
So 46.7% was never a second measurement. It is the same 6.6%, with the internet taken out of the denominator and nine other websites put in.
Worth being fair about, because it sharpens the point rather than blunting it. Profound published both tables, labelled the difference, and added an explicit caveat. The company that had the most to gain from the flattering number is the one that printed the honest one next to it.
The error is entirely downstream, in the blog posts, agency decks, and LinkedIn threads that reprinted the bigger figure because it made the better headline. Nobody checked the denominator, because checking would have killed the pitch.
Here is the part that should worry anyone who reports on marketing performance. At least five different quantities are circulating, and all five get spoken aloud as "Reddit's citation share."
What is measured | Percent of what | Reported value | Source |
|---|---|---|---|
Share of all citations | Every citation in the dataset | 1.8% (ChatGPT) | Profound, 680M citations |
Share of the top 10 sources | Ten domains | 11.3% (ChatGPT) | Profound, same page |
Share of cited sources | The sources one tracker saw | 14.29% (early Aug 2025) | Spotlight |
Share of responses citing Reddit at all | Prompt responses | Close to 60% (early Aug 2025) | Semrush, 230K prompts |
Share of social citations only | Social platforms only | 44% (AI Overviews, Jan 2026) | Tinuiti |
From 1.8% to 60%. All five describe Reddit. All five describe AI citations. No two of them measure the same thing.
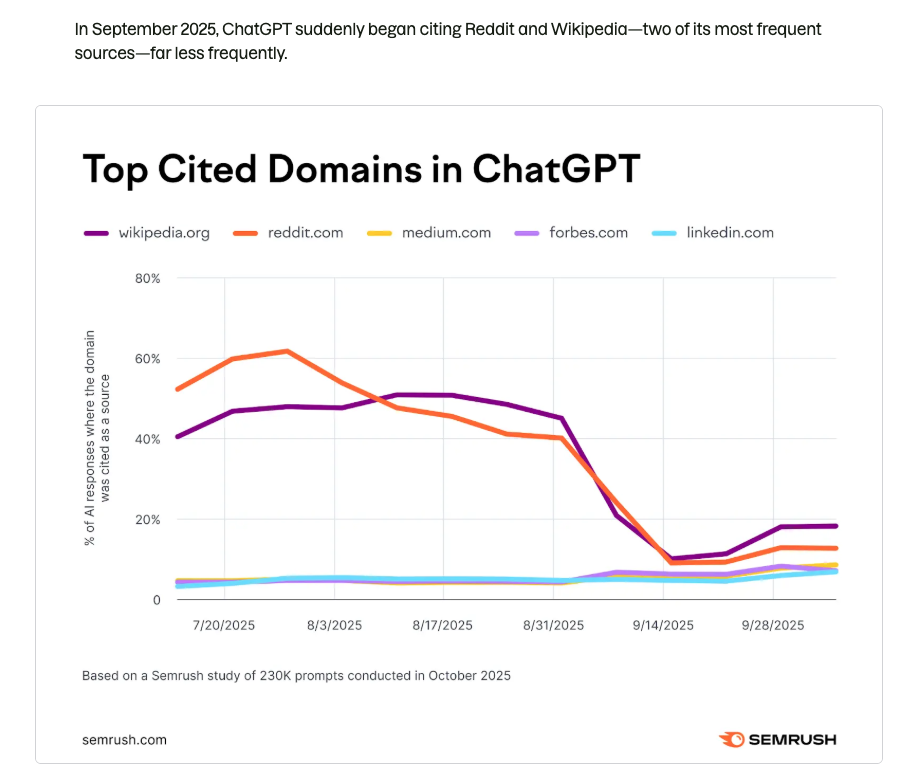
The Semrush number deserves its own warning, because it is the most quotable and the most misquoted. Semrush found that ChatGPT cited Reddit in close to 60% of prompt responses in early August, falling to around 10% by mid September. That is the percentage of answers containing at least one Reddit link. It is not Reddit's share of citations. Anyone who writes "Reddit fell from 60% of citations to 2%" has bolted one study's numerator onto another study's denominator and produced a sentence that describes nothing that exists.
The Tinuiti figure needs the same care. 44% is Reddit's share of social citations in AI Overviews, and social media was only around 13% of AI Overviews citations. Reddit is therefore about 5.7% of all citations there, not 44%.
In March 2026, Animalz published "Why We Gave Up On Reddit For AEO", and it deserves real credit: it catches the top ten problem cleanly.
"Maybe you've seen a stat that says Reddit accounts for around 47% of Perplexity's citations, but that's a misrepresentation. That number is also from Profound's data, but it says Reddit is 46.7% of Perplexity's top 10 most-cited sources, not its share of all citations."
Correct, and well caught. The same article quotes Profound's 1.8% figure for ChatGPT. Then, a few paragraphs later, it says the recovery is "still below pre-crash levels of 9-14%."
Both sentences describe Reddit in ChatGPT before the crash. They differ by a factor of five to eight. The article never reconciles them, never flags the jump, and never states which denominator the second number uses. The 14 has probably wandered in from Spotlight's 14.29% share of cited sources, which is a different measurement entirely, but the piece does not say so.
The article that exists to catch this error commits it four paragraphs later. That is not a takedown of one writer. It is evidence that the habit is systemic, and that catching it in someone else's work does not inoculate you against it in your own.
One more thing about that piece, offered as a caution rather than an accusation. Its conclusion is to invest in your own domain instead of Reddit, and it presents no comparative citation data for owned domains at all. Animalz sells Answer Engine Optimization as a service line. The single recommendation with no numbers behind it is the one the publisher monetizes. That does not make it wrong. It does mean the claim that needed the most evidence arrived with the least.
Trace the sources back and the independence starts to evaporate.
One widely shared post attributes its decline figures to Seshes.
Seshes publishes no original measurement of its own. It aggregates PromptWatch, Similarweb, and RBC, and says its own index is still to come.
RBC's much repeated fall from 29.2% to 5.3% is a bank relaying an unnamed "third-party study," with no denominator stated anywhere.
Tinuiti's citation reports are built on the Profound platform, so the "independent corroboration" of Profound's data is, in part, Profound's data.
What looks like a dozen sources converging on a conclusion is a handful of measurements being passed hand to hand, losing a denominator at every step.
These four claims circulate constantly. You will meet them in LinkedIn posts and Reddit threads, used as settled inputs to technical arguments about where to spend your content budget:
ChatGPT cites positive Reddit sentiment at 5% and negative sentiment at 6.1%.
The average Reddit post cited by AI models was written about a year earlier, and 4% date from 2019 or older.
Reddit's citation share grew at least 73% between October and January.
That growth is concentrated in technology and electronics.
Each is attributed to a named research source. I went looking for the primary documents, and I could not stand any of them up. The Profound page these first two are credited to contains no sentiment analysis and no content age analysis of any kind. The Tinuiti report the others are credited to now returns a 403, and its link serves a different quarter's report instead. What Tinuiti has published openly puts the highest Reddit share in apparel and lists technology among the biggest decliners, which points the other way.
I cannot confirm these numbers and I cannot refute them. I am including them precisely because you will see them quoted with confidence. If you are about to build a strategy on one of them, find the primary source first. I could not.
Strip out everything unverifiable and a real story remains.
The crash happened. Reddit's presence in ChatGPT fell sharply in mid September 2025. Every tracker agrees on the direction, and Reddit's stock fell in the weeks that followed.
The mechanism is plausible. Google removed its num=100 search parameter around September 10, 2025. As Kevin Indig explains, OpenAI does not crawl Google directly but buys search data from third parties who relied on that parameter, and per Ahrefs, 57.8% of Reddit's keywords rank outside the top 20. Lose results 11 through 100 and you lose most of Reddit. It is coherent.
It is not settled. Semrush's own head of organic and AI visibility says he does not think the parameter removal is the root cause, "or at least, not the only one," and suggests OpenAI may simply be rebalancing away from over-cited domains. Semrush itself declines to endorse a cause. The tidiest explanation in the space is doubted inside the company holding one of the biggest datasets on it.
The magnitude is unknown. Not disputed. Unknown. The reported declines cannot be compared because the things being measured are not the same thing.
Here is why this belongs on a Shopify blog rather than an SEO one. The exact same failure lives in discount reporting, and it costs merchants real margin.
"Our Black Friday discount drove a 40% lift." Lift over what? The previous week, which was artificially flat because customers were waiting for the sale? The same week last year, when the catalog was a third smaller? The baseline decides the answer, and the baseline is almost never stated.
"Discount codes drove 60% of revenue." No. Sixty percent of revenue had a code attached to it. Attached is not caused. This is the ecommerce version of reading a top ten share as a total share: a number that is technically accurate and completely misleading.
"Conversion rate rose 25% during the promotion." Conversion rate is a fraction. Discount hunting traffic changes the denominator. The ratio can move without a single extra sale being caused by anything you did.
And the question almost nobody asks: how many of those discounted orders would have happened anyway, at full price? A discount handed to a customer who was already going to buy is not a win. It is a margin transfer, out of your pocket and into theirs.
This is the entire reason we built profit analytics into Discount Prime the way we did, showing net margin per campaign against your real Shopify costs. A margin floor is not a safety feature. It is a device that forces the profit question to be asked before the campaign runs, instead of being reconstructed afterwards from whichever metric happens to flatter the result.
1. Ask "percent of what." If a source does not state its denominator, the number is not conservative and it is not directional. It is unusable. Discard it.
2. Choose the denominator before the campaign, not after. A metric picked once the results are in will always be the one that makes the results look good. That is not dishonesty. It is gravity.
3. Keep the negative results. The reason a bad number ran unchallenged through an entire industry for a year is that almost nobody publishes what did not work.
The 46.7% spread and the 6.6% did not, and the only difference between them was which one justified the budget.
--- ## Best Shopify Free Shipping Apps in 2026: How Discount Prime Compares URL: https://www.discountprime.app/blog/shopify-free-shipping-apps-compared Category: Analytics & Comparisons | Author: Discount Prime Team | Published: July 6, 2026 | Updated: July 6, 2026 | Read time: 8 min > A side-by-side comparison of the best Shopify free shipping apps in 2026 (Hextom Free Shipping Bar, Essential Free Shipping Upsell, USO Ultimate Special Offers, and Shopify native) versus Discount Prime, which runs shipping as a real discount engine with subsidy caps, three discount types, targeting, and a single combined progress bar designed to manage shopper cognitive load. Includes pricing, plan placement, and how long each app has been on the Shopify App Store.Free shipping is the most common promotion on Shopify, and also the easiest one to lose money on. Most tools in this category are display bars: they show a shopper how close they are to a threshold, but they never create the discount or protect your margin. Discount Prime treats shipping as a real discount type with its own controls, a margin cap, precise targeting, and a single combined progress bar designed around how shoppers actually think. This is an honest, side-by-side look at how it compares with the best free shipping apps on the Shopify App Store, where each one is strong, and where we believe Discount Prime pulls ahead.
Free shipping bars are a solved problem. What remains unresolved is the part that determines whether the promotion grows your bottom line or quietly eats it: the actual discount, the subsidy cap on heavy and remote orders, and the way you present the goal without overwhelming the shopper. Bar apps like Hextom and Essential are excellent at the nudge but lean on Shopify's native free shipping to do the work. All-in-one promotion apps like Ultimate Special Offers cover many offer types but treat shipping as one of nine. Discount Prime is built the other way around: shipping is a first-class discount engine with free, percentage, or fixed off shipping, three margin guardrails, and a combined progress bar tuned for cognitive load, all in one flat monthly plan with unlimited orders.
It helps to separate two jobs that get blurred together.
The first job is applying the discount: removing or reducing the shipping fee at checkout when a condition is met. The second job is nudging: telling the shopper how close they are to adding one more item. Shopify's native free shipping does the first job in the most basic way: an all-or-nothing threshold with no cap and no bar. The popular bar apps do the second job beautifully but delegate the first job back to Shopify. That split is fine until the day a heavy or remote order ships, and you discover the subsidy came entirely out of your margin.
Discount Prime does both jobs in one campaign and adds controls to prevent an aggressive offer from turning into a loss. You can read the full breakdown on the free shipping feature page.
This is the part almost no one talks about, so it is worth spending a moment on.
The instinct once you have rewards is to show them all. A free shipping bar here, a spend and save bar there, a gift threshold in the corner. Each one tested well on its own, so surely three is better than one. In practice the opposite happens. Every extra goal you put in front of a shopper adds a decision, and decisions have a cost. When the cart shows several competing progress meters, the shopper stops optimizing and starts ignoring. Choice overload turns a motivating nudge into visual noise.
Discount Prime uses a single combined progress bar instead. It merges your milestones, free shipping, a spend discount, an express upgrade, into one sequential track, and it surfaces the next achievable goal rather than all of them at once. A shopper who is twenty five dollars from free shipping sees exactly that, and only after they clear it does the bar reveal the next tier. This is progressive disclosure applied to promotions: one clear, reachable target at any moment, so the shopper always knows what to do next without doing arithmetic. The result is the average order value lift of a stacked offer without the decision fatigue that usually cancels it out. It is a small design choice that reflects a larger philosophy, the same profit first thinking behind our profit analytics and the reason GMV is a vanity metric.
Free shipping is never free. Someone pays the carrier, and without a cap that someone is you, on every order, including the heavy and remote ones where it hurts most. Discount Prime ships three guardrails that the display bars do not have, because a display bar never touches the discount in the first place.
The maximum shipping rate covered sets the most you will ever subsidize. On a twenty two dollar remote order with an eight dollar cap, the customer pays the extra fourteen, not you. The cap discount at product price control ensures a shipping discount never exceeds the value of the product it applies to. And auto convert to free shipping turns a fixed discount that already beats the shipping cost into simple free shipping, so you never overpay for the same result. On top of the caps, you get three discount types (free, percentage off the rate, or a fixed amount off), minimum spend or quantity conditions with both a floor and a ceiling, and targeting by country, customer segment, and purchase history. Every order is then visible line by line in profit analytics, so you can see exactly what each offer costs.
Each app below is good at its job. The right pick depends on whether you want a display bar, an all-in-one promotions suite, or a dedicated discount engine, and how much control you need over cost. Capabilities, pricing, and plan names are as of mid 2026 and change often, so confirm current details on each app's Shopify App Store listing.
Capability | |||||
|---|---|---|---|---|---|
Creates the shipping discount | Yes, a real engine | Yes, basic | No, relies on Shopify | No, relies on Shopify | Yes |
Discount types | Free, percentage, or fixed off shipping | Free shipping only | Uses Shopify free shipping | Uses Shopify free shipping | Free shipping offer |
Margin subsidy cap | Yes: max rate, cap at price, auto convert | No | No | No | No |
Conditions (min spend / qty) | Full, with min and max | Min spend | Spend goal (display) | Spend goal (display) | Min purchase |
Targeting | Country, segment, purchase history | Limited | Geo and page (bar) | Limited | Customer segments |
Progress bar | Single combined bar, cognitive load aware | No | Yes (its core feature) | Yes, with cart upsell | Limited |
All discount types in one app | Yes, 10 campaign types | No | No, bar only | No, bar plus upsell | Yes, 9 offer types |
Profit / margin reporting | Yes, per order | No | No | No | No |
Pricing model | Flat monthly, unlimited orders | Included in Shopify | Free plan; Premium about $9.99/mo | Free plan; paid tiers | About $9 to $19+/mo by Shopify plan |
On the App Store | Newer, built for 2026 Shopify | Native | Roughly a decade | Several years | Many years |
A few honest notes on the field. Hextom: Free Shipping Bar is the category benchmark for a reason: it has been live for roughly a decade, carries a 4.9 rating across thousands of reviews, and its progressive messaging is superb. Its free plan caps how many times the bar shows, and geo targeting, unlimited bars, and currency auto detection sit on the Premium plan at about $9.99 a month. Essential Free Shipping Upsell pairs the bar with an in-cart upsell that recommends products to reach the threshold, which is a genuinely smart AOV play. USO: Ultimate Special Offers has been trusted for years and offers 9 offer types in one place, with free shipping available on its paid plans that scale with your Shopify plan. What none of them do is create a percentage or fixed shipping discount, cap your subsidy on a heavy order, or report the margin each offer actually earned. That gap is the reason we built shipping the way we did.
Shopify's 2026 platform release was a genuine turning point for discount apps. The new discount and checkout capabilities let apps do things that used to be impossible or fragile, and Discount Prime shipped fast against them. Version 4.0 turned the app into a profit engine with per-campaign profit analytics, an order-level performance overview, real-time conflict management so two campaigns never silently stack, Buy X Get Y and free shipping as full discount types, and a Safe Uninstall that reverts your prices when you leave. You can see the full list on the what's new page and where it is all heading on the roadmap.
The bigger shift is direction. Discount Prime is no longer only a storefront promotions tool. It is moving deliberately toward wholesale and B2B and dropshipping, where pricing logic is harder, and the existing apps are thinner. That is why we have written so much lately about margin based dropshipping pricing, wholesale tiered pricing, and the ERP integrations that run the back office while the storefront still needs its own pricing engine. If you are comparing the whole category rather than shipping alone, our analysis of eight top discount apps and the full comparison page are the places to start.
Two recent additions show where the profit-first, B2B minded thinking goes next.
Metafield discount targeting. Size and color stop being enough the moment a catalog gets serious. Discount Prime lets you build discount rules that read your own variant metafields, and in the campaign builder you select products by metafield with live product search, so a rule stays correct as the catalog changes instead of breaking every time you add a SKU. It came directly out of a real merchant request, which we wrote up in the story of a feature that was still uploading when the merchant asked for it, and explained in depth in metafield based targeting for B2B catalogs.
Bulk discount code generation. For wholesale, affiliate, and campaign use, you can generate discount codes in bulk with a usage limit per code and set the number of times a single customer can use a given code at once. That combination, a hard cap on total redemptions plus a per-customer limit, is what keeps a bulk code drop from being abused while still being effortless to hand out. It fits naturally alongside our volume discounts, tiered pricing, and bulk discounts.
In this short video, we explain why free shipping is more than a progress bar. A good free shipping campaign should not only encourage shoppers to reach the next cart goal, but also protect the merchant’s margin with clear shipping rules, subsidy caps, and a single combined progress bar that reduces decision fatigue.
Which is the best free shipping app for Shopify in 2026? It depends on the job. For a pure display bar with a long track record, Hextom is the benchmark. For a bar plus an in-cart upsell, Essential is strong. For many promotion types within a single suite, Ultimate Special Offers is a solid all-rounder. For an actual shipping discount engine with subsidy caps, three discount types, targeting, a combined progress bar, and per-order profit reporting, Discount Prime is built for exactly that.
Do free shipping bar apps apply the discount themselves? Usually no. Bar apps such as Hextom and Essential display the progress toward a goal but rely on Shopify's native free shipping to actually remove the fee. Discount Prime creates and applies the shipping discount itself, which makes margin caps possible.
How do I stop free shipping from losing money on heavy orders? Set a maximum shipping rate covered. You define the most you will subsidize, and the customer pays anything above it, so a heavy or remote order can never exceed your target cost. Bar-only apps do not offer this because they never touch the discount.
Why one combined progress bar instead of several? Multiple competing goals increase cognitive load and lead to choice overload, causing shoppers to disengage. A single combined bar shows only the next achievable goal, which keeps the nudge motivating and lifts average order value without decision fatigue.
What plan are these features on in Discount Prime? All shipping features, the three discount types, the subsidy caps, targeting, and the combined progress bar are included in the Prime plan at a flat monthly fee with unlimited orders, alongside every other discount type. There are no per-order usage fees.
Ready to see it in action? Explore the free shipping feature, compare the whole category, or watch every feature run live on a real store in the demo store.
--- ## A Merchant Found Us Through ChatGPT and Asked for a Feature That Was Still Uploading URL: https://www.discountprime.app/blog/metafield-variant-rule-found-through-an-llm Category: Wholesale & B2B | Author: Aziz Banihashemi | Published: July 1, 2026 | Updated: July 14, 2026 | Read time: 8 min | Tags: Metafields, B2B, LLM, GEO, Shopify, Product > A B2B merchant installed Discount Prime, upgraded to the Prime plan, and asked support for an advanced product option that was, at that moment, still uploading to our servers: the Variant Metafield Rule, which targets discounts by your own variant metafields inside Tiered Unit, Wholesale/B2B, and Dropshipping pricing. The merchant found us not through the Shopify App Store but through an LLM that mapped their need onto our help documentation. This field note reflects on LLM-driven customer discovery, why clear machine-readable content matters, and how it is reshaping marketing economics for Shopify apps, where App Store keyword clicks can cost $30 to $50 each.A merchant installed Discount Prime, upgraded to the Prime plan within minutes, then opened a support chat asking for a feature by a name we did not use. The strangest part: the feature was, at that exact moment, uploading to our servers.
It started as an ordinary day and an unusual message. A new merchant had installed Discount Prime and, unusually, gone straight to the Prime plan before doing anything else. Minutes later they were in support with a single, precise question: "Where do I find the Advanced product option?"
At first we were genuinely confused. Advanced product option is not a phrase we use anywhere in the app. We asked what they meant. They explained that they had been searching for exactly this capability, had read our help documentation, upgraded to Prime specifically to get it, and now could not find it in the interface.
The request was so specific that it stopped us. This was not a shopper poking around. This was someone who knew precisely what they wanted, why they wanted it, and that we had it, more clearly than most people who have used the app for months.
Here is the part that felt almost staged. As that conversation was happening, our engineering team was mid-deployment. The feature the merchant was describing was inside the exact version being pushed to the servers.
We had published the help documentation ahead of the final release, so that when users arrived they would not be confused about a new option. What we never imagined was that a feature could have a customer before it finished loading. We told the merchant it would be live in about an hour. Exactly one hour later, they came back, confirmed they could see it, and thanked us.
The capability they wanted is the Variant Metafield Rule: the ability to choose which products a discount applies to by writing a rule against your own variant metafields, instead of hand-picking products one by one. You write a condition like "any variant where custom.material is leather," and every matching variant is included automatically, including ones you add later. It lives in the product-scope selector under the advanced, rule-based group and works within our Tiered Unit, Wholesale/B2B, and Dropshipping pricing campaigns. The full walkthrough is in our help center guide.
It was originally requested by a large B2B customer who needed their Shopify pricing driven by the structured data in their ERP, and we shipped it quickly because it solves a real, hard problem. We think it is one of the clearest points of difference between Discount Prime and the other discount apps on the market. We wrote about the design and the B2B thinking behind it in metafield-based targeting for B2B campaigns.
As the person responsible for product, the resolved ticket was satisfying. But a different question stayed with me: how did this merchant find us, and how did they understand a genuinely complex feature so precisely?
After thinking about it, I had a theory, and I tested it. We run a Discount Prime AI Assistant as a custom GPT inside ChatGPT. I asked it, in the merchant's own words, "where is the Advanced product option in Discount Prime?" It offered a few guesses, and one of them was, essentially, "you may mean this feature." It then handed back a link into our help center. The very first help-center search under that title landed on the documentation for this exact feature, with the full explanation and usage. Bingo.
The merchant had almost certainly done the same thing. They did not find us by scrolling the Shopify App Store. An LLM mapped their fuzzy need, "advanced product option," onto the precise thing we had built, and pointed them straight at it.
Lately, customer behavior has been genuinely surprising me. Merchants are discovering us not through App Store search, but through ChatGPT, Gemini, Perplexity, and the rest. And they are not arriving vague. They understand new features quickly, and they map their own requirements onto the exact capability we built, often before a human on our side has said a word.
A few things compounded to make this work: using AI in our own product development and in how we write feature content, the speed at which we ship, and, crucially, presenting information in a clear, standardized way that an LLM can actually read and reason over. That last part turns out to matter enormously.
There is a reason this capability attracts this particular customer. Wholesale and B2B merchants on Shopify have historically had to reach for Shopify Plus to get the pricing behavior they need. By adding Wholesale / B2B Pricing and Dropshipping Pricing, and letting prices and discounts apply to selling price, profit margin, or, for dropshippers, product cost, we have been able to give non-Plus stores a level of control that genuinely helps them. It is also a narrowly targeted area. As far as we can tell, nobody has shipped a version that works cleanly at high product volumes the way merchants actually need. It is not that the feature is hard to build; it is that this was the lens we chose to build through. If you run your catalog from an ERP, we go into that in more depth in our guide to ERP integrations for Shopify B2B.
I once wrote that we used to sit where we live and work, write our product information, seal it in a bottle, and throw it into the ocean of the internet, hoping the right person would find it and come to us. I told this story before about an American hat company that found us through a DevCraft Solutions blog post on Gemini.
These days, LLMs open those bottles before any human does, and they are surprisingly good at handing them to the exact people looking for what is inside. The volume through this channel is still small compared to traditional channels, but it is already remarkable, because of who arrives: a customer who, the moment they open the app, already knows what they want and where to find it.
This is changing how I think about marketing spend. A well-placed Shopify App Store ad targeting these keywords carries a suggested cost per click from Shopify's own bidding of around $30 to $50. You can win clicks at lower bids, but once you account for drop-off through the funnel, abandonment, and the lifetime value of each merchant, the economics of finding a customer through traditional advertising have shifted hard.
I cannot claim we have figured it out. But my daily observations of how our own customers behave keep surprising me, and they point in a clear direction: the content you write for machines to read is becoming as important as the content you write for people. When an LLM can cleanly understand your product and documentation, it will route the best-fit customers to you, sometimes before you have even finished shipping the thing they came for.
The Variant Metafield Rule is available on the Prime plan in Discount Prime, inside Tiered Unit, Wholesale / B2B, and Dropshipping pricing campaigns.
Related on Discount Prime: Metafield-based targeting for B2B · ERP integrations for Shopify B2B · Selling in the AI shopping era
--- ## I Analyzed 8 Top Shopify Discount Apps. Here's What's Missing in All of Them. URL: https://www.discountprime.app/blog/i-analyzed-8-top-shopify-discount-apps-heres-whats-missing-in-all-of-them Category: Analytics & Comparisons | Author: Aspedan.dev | Published: June 24, 2026 | Updated: August 7, 2026 | Read time: 5 min | Tags: product-analysis, app-review, shopify, ecommerce, saas > Across eight of the most-installed Shopify discount apps, the commodity features are saturated: all do flat, tiered, and BOGO discounts, and most do cart thresholds and BXGY, so they no longer differentiate. The real gaps are four scarce capabilities almost none of them have: margin reporting built on cost-price data (most report only GMV lift), agent-channel exposure through an MCP endpoint or agentic product feed, stacking intelligence that optimizes for margin instead of merely allowing stacking, and cross-channel coherence across web, POS, and agent channels. Merchants should compare apps on these four capabilities, not the commodity features, and ask vendors directly about each before renewing.Eight apps, dozens of features, one recurring blind spot: no one is optimizing on the signal that matters most.
This is a companion piece to the Agentic Commerce Playbook for Shopify Merchants. Over the last two quarters, I've done detailed evaluations of eight of the most-installed discount apps on the Shopify App Store. The goal was not a 'best of' list. It was a structural look at what the category collectively does well and where it fails. This piece summarizes the analysis's findings.
I will not name apps individually from my own scoring because the specific strengths and weaknesses shift too quickly to keep a published ranking accurate. The pattern across them is more durable, and it is the pattern that matters for a merchant choosing tooling or a founder benchmarking their own app. For readers who want named apps, I cite a public side-by-side comparison further down.
For each app, I evaluated coverage in five areas: campaign breadth (how many promotion types it supports), targeting precision (customer segments, geo, channel), reporting quality (what numbers it actually gives you), stacking and combining logic, and AI or agentic readiness. Then I scored each app on whether its reporting surfaced margin, not just GMV; whether it exposed campaigns to agent channels; and whether it could reason about stacking intelligently or just allowed it.
What emerged was not a simple 'app X is best' conclusion. It was a distribution of strengths across apps, with a striking amount of shared territory and a small set of capabilities that almost none of them had.
All eight apps do flat discounts, tiered quantity discounts, and BOGO. Seven of the eight do cart-level spend thresholds. Six do some variant of BXGY. Five do shipping-based campaigns in at least a basic form. The commodified core of the category (the features every merchant first thinks of when they say 'discount app') is genuinely saturated. Choosing among apps on these features alone is nearly arbitrary.
This matters because it resets the evaluation question. The features most merchants compare are not differentiators. If you are evaluating based on 'does it do tiered quantity', you will find that yes, they all do. The question is what else?
Four capabilities show up rarely across the eight, and they are the ones that will matter most over the next eighteen months.
The first is margin reporting with cost-price data; two of the eight surface it. Six do not. They report GMV lift and discount amount issued, full stop. A merchant using any of the six will struggle to answer the basic question of whether their campaign made money.
The second is agent-channel exposure. Three of the eight have shipped some form of MCP endpoint or agentic product feed integration in the last two quarters. Five have not. As agent-originated traffic grows, the first group will capture attributable orders; the second group will watch unexplained demand drift away.
The third is stacking intelligence. All eight apps allow stacking to some degree because Shopify's platform now enables it. Only two apps actively reason about which stacks maximize margin and which cause margin breaches. The other six surface a configuration page and leave the optimization to the merchant's instinct.
The fourth is cross-channel coherence. Seven of the eight treat campaigns as storefront-primary, with POS and agent channels as afterthoughts. One explicitly models the multi-channel promotion state and resolves conflicts across them. That one has a capability that is nearly impossible to retrofit into the other seven.
Some merchants sidestep the standalone-app comparison entirely and go all-in-one. Vitals, for example, bundles volume discounts, quantity breaks, and tiered pricing with 40+ other conversion tools in a single subscription, which solves a different problem: app-stack sprawl and the performance cost of multiple scripts. Judged against the four capabilities in this analysis, the all-in-one approach buys breadth rather than margin intelligence, so the right choice depends on whether your bottleneck is tooling consolidation or profit visibility.
The gap is structural. The basic discount capabilities are what merchants asked for first, and they are what every app had to ship to be viable. Margin reporting requires cost data that the platform does not surface. Agentic readiness requires protocol work that became relevant only recently. Stacking intelligence requires optimization models. Cross-channel coherence requires a data layer that most apps did not build.
Each of the four missing capabilities represents engineering and product investment that had no commercial return until the last twelve months. Apps that invested early are now in a strong position. Apps that did not are now trying to catch up against a moving target. The gap will not close uniformly. It will widen.
If you are a merchant at renewal, four questions put the vendor on an honest footing.
Does your reporting surface margin, using the cost-price data I provide?
Does your app expose active campaigns to agent channels through MCP or an equivalent mechanism?
Does your stacking logic actively optimize for margin, or does it simply allow stacking?
And does your data model treat my POS, web, and agent channels as a single coherent surface, or as three separate ones?
If the vendor answers yes to all four credibly, they are in the top quartile of the category as of mid-2026. If they answer yes to two, they are median. If fewer, they are below. None of this makes them bad tools. It means you know where the gaps are, and you can plan accordingly, either by investing in complementary tooling or by preparing to switch when the gaps start to bite.
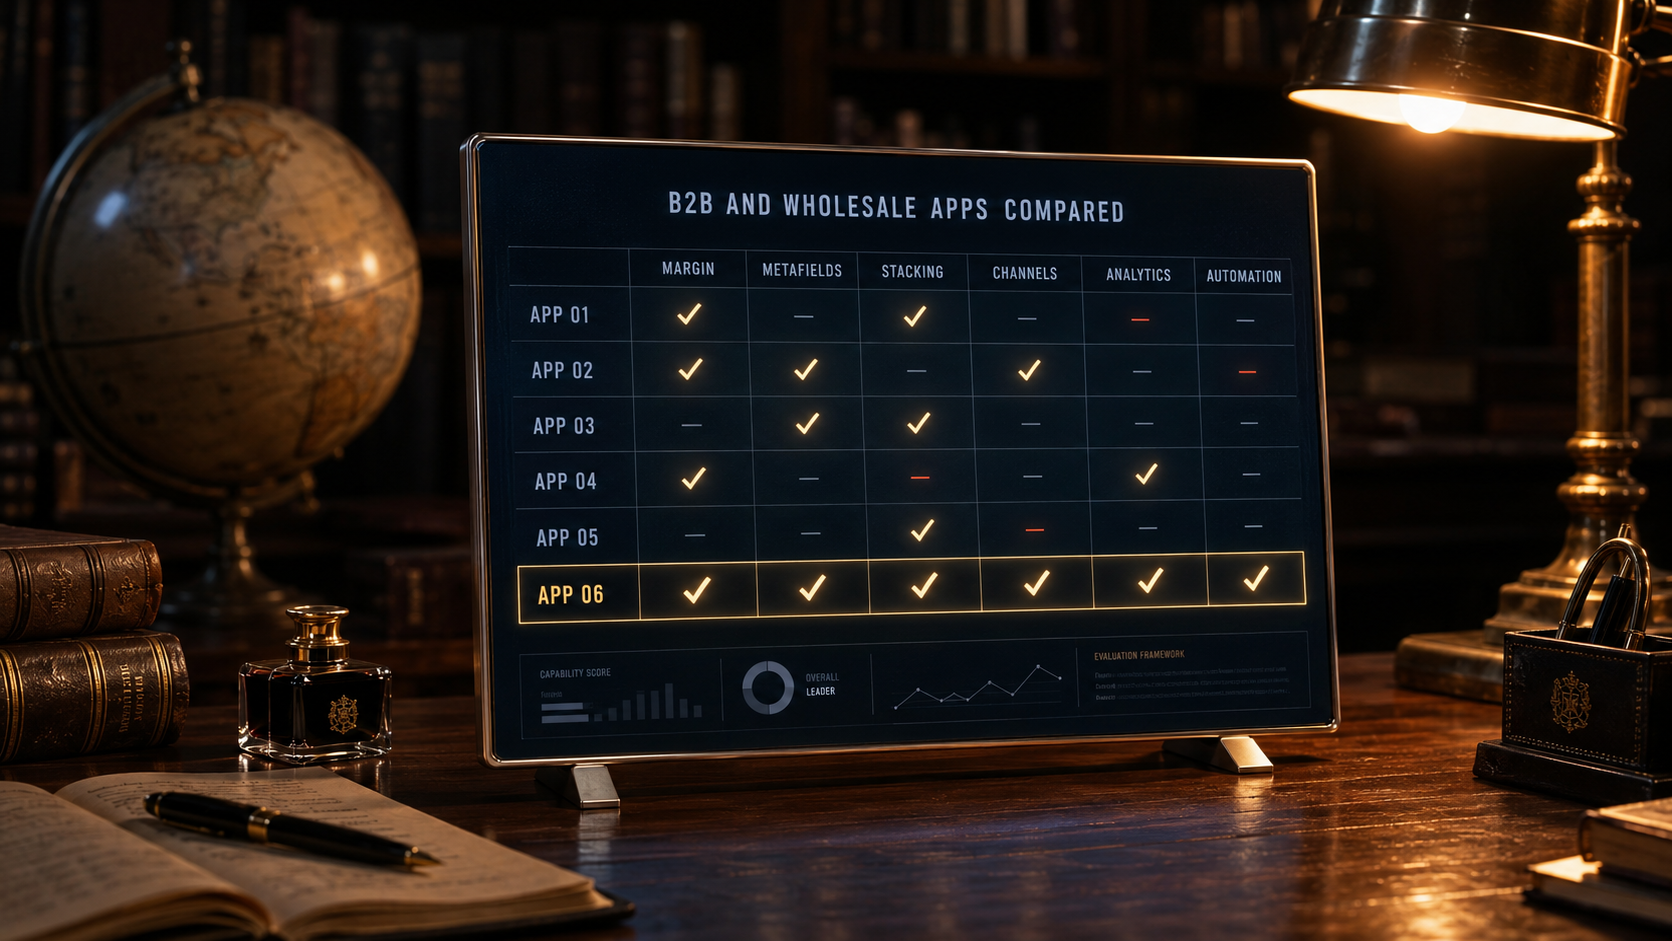
The analysis above keeps my own scoring anonymous, but a public side-by-side is useful for putting names to the pattern. A fair comparison of six Shopify B2B and wholesale apps (TradeQuote AI) scores them on seven capabilities: tiered pricing with min/max per tier, B2B accounts with approval and MOQ controls, bulk catalog repricing in one action, conflict-safe B2B plus DTC on a single install, net margin analytics per campaign, bulk discount-code generation, and metafield-based campaign targeting. Where each app lands maps cleanly onto the four gaps above.
Discount Prime is the one app built campaign-first. It reports net margin per campaign and per order from real Shopify costs, supports metafield targeting, and generates up to 1,000 unique discount codes per campaign. Its main limitation is that it is a newer entrant still building brand recognition.
BSS B2B offers a full B2B stack (custom signup, approval, MOQ rules, and segmented wholesale pricing in one app), with strong segmentation, but it does not report campaign-level margin.
Wholesale Pricing Discount B2B maps tags directly to discounts with fast CSV setup, but it has a limited campaign structure and no margin analytics or metafield targeting.
B2B Wholesale Hub bundles net terms (Net 15/30), quick order forms, and tag-driven pricing, without campaign analytics, margin tracking, or metafield targeting.
Bold Custom Pricing combines wholesale, VIP, and member pricing inside the mature Bold ecosystem, but lacks campaign margin analytics and bulk code generation at scale.
SparkLayer is an enterprise-grade B2B layer with a self-serve portal, account hierarchies, and sales-rep tools, priced at a premium and built around account-driven pricing rather than campaign or metafield logic.
The comparison's own conclusion is that there is no single winner: account-management tools and tag-based systems each cover part of the surface, while margin analytics and metafield-driven campaigns remain rare. That is the same blind spot the eight-app analysis surfaced, now with names attached. Full criteria and the per-app breakdown are at the Shopify B2B and wholesale apps comparison.
This is not a 'best of' listicle. It is a structural read of what the top eight discount apps do well and where they collectively fail. The payoff is a framework merchants can apply even to apps that aren't on the list: does your app see margin, does it see agents, does it see stacking, does it see the difference between a cart and a customer?
--- ## Non-Linear Minds, Linear Code: Why LLMs Design Brilliant Features but Implement Them for a Demo, Not for Scale URL: https://www.discountprime.app/blog/why-llms-design-brilliant-but-write-non-performant-code-at-scale Category: AI & Agentic Commerce | Author: Aziz Banihashemi | Published: June 21, 2026 | Updated: July 1, 2026 | Read time: 24 min | Tags: LLM, AI, Shopify, Performance, Software Architecture, Prompt Engineering, GraphQL > LLMs design excellent, standard-compliant feature concepts but default to non-performant, textbook code because their decoder optimizes local token likelihood over a corpus of demo-grade examples and has no implicit runtime simulator (scale blindness). Using a Shopify multi-faceted collection filter for 2,000+ products, the article shows the naive failure (Liquid loops silently capped at 50, multi-MB client fetches blocking the main thread, GraphQL queries exceeding the 1,000-point leaky-bucket ceiling) versus the architected fix (compact paginated facet index, cursor-based GraphQL, Web Worker filtering, lazy hydration). The override is constraint-driven prompting: inject role, exact data scale, platform quotas, and a worst-case bottleneck analysis required before any code.A field guide for engineers who use LLMs as architectural peers, not autocomplete. We trace the problem from the math of the decoding layer all the way down to a
{% for %}loop that takes down a storefront, and we show how to override the failure mode with constraint-driven prompting.
Ask a frontier model (Claude, GPT, Gemini) to design a feature and the output is frequently excellent. Propose an "advanced multi-faceted collection filter for a Shopify storefront" and you will get a coherent concept: faceted navigation with AND/OR semantics across product type, vendor, price band, and metafield-driven attributes; instant client-side feedback; URL-encoded filter state for shareable links; accessible keyboard navigation; and a UI that respects the Polaris design language down to the spacing tokens. The concept is standard-compliant, well-decomposed, and often genuinely creative in how it composes known patterns into something new.
Then ask the same model, in the same breath, to implement it. The output collapses. You get a single Liquid template that iterates collection.products inside a nested {% for %} loop, or a React component that fetches the entire catalog on mount and filters it in a useMemo. It is syntactically perfect. It passes a linter. It works flawlessly in a demo store with 30 products. And it falls over the moment it meets a real catalog of 2,000+ products with 3 to 5 variants each.
This is the dichotomy. The same system that reasons about the problem space with apparent depth defaults, at generation time, to the most locally probable implementation, which is almost always the textbook one. The textbook implementation is locally optimal (it is the cleanest expression of the algorithm) and globally catastrophic (it ignores the runtime environment the algorithm will actually execute in).

The paradox is sharper when you consider the machinery. The model that produced both answers is one of the most aggressively non-linear function approximators ever built. Its internal representation of "collection filter" is a high-dimensional vector that has been bent, gated, and recombined through dozens of non-linear transformations. That non-linearity is precisely what lets it synthesize a novel feature concept. And yet, without explicit constraints, the generation phase flattens into something that behaves as if it were linear and scale-blind. The intelligence is non-linear; the default code is linear, in the worst sense.
The thesis of this article: this is not a flaw you fix with a better model. It is a structural property of how these systems decode, and you manage it the way you manage any structural property of a tool, by understanding the mechanism and engineering around it. We will (1) deconstruct why the decision engine is non-linear and stochastic, (2) explain why code generation nonetheless feels linear and rigid and is afflicted by what we will call scale blindness, (3) walk a concrete Shopify case study from naive failure to architected solution, and (4) give you the exact prompt blueprint that forces the non-linear engine to optimize for performance rather than aesthetics.
To understand why the design is good and the default code is bad, you have to look at two different things the model is doing with the same weights: building a rich conditional representation of your request, and sampling a sequence of tokens from that representation. The first is where the creativity lives. The second is where scale goes to die.
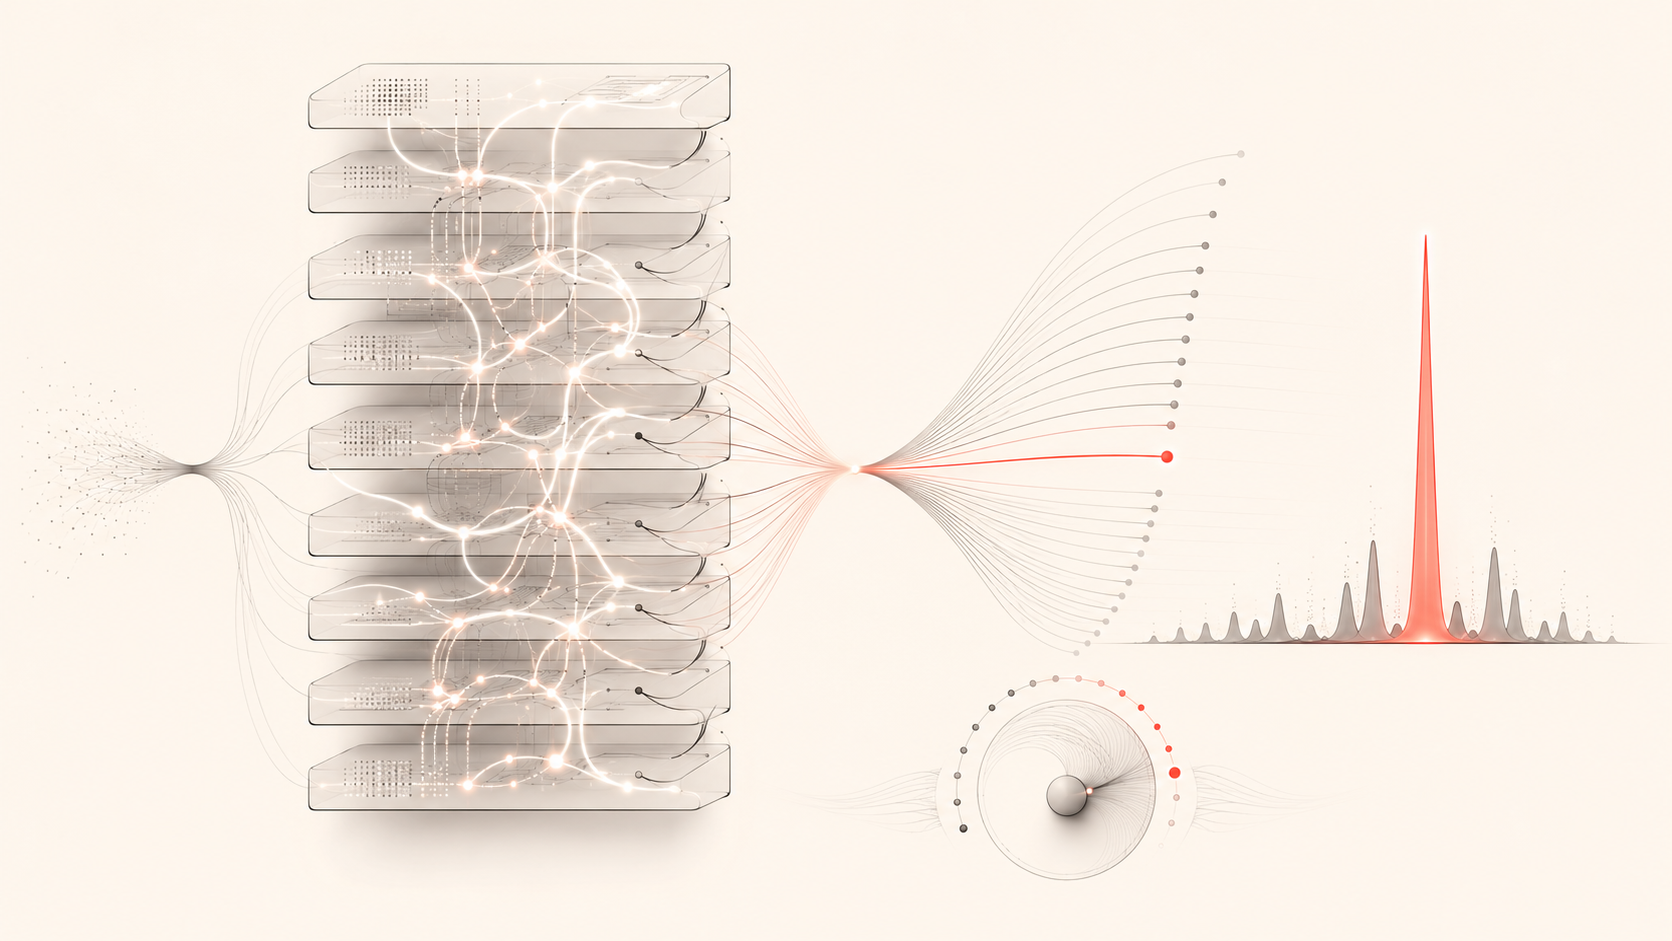
From a wide field of possibilities to a single high-probability token: the model's non-linear engine versus its peaked, low-entropy output.
A Transformer is a stack of L identical blocks, each composed of multi-head self-attention followed by a position-wise feed-forward network (FFN), with residual connections and layer normalization wrapped around both sublayers. The single most important architectural fact for our purposes is this: if you removed the non-linearities, the entire stack would algebraically collapse into one linear projection.
Consider why. A composition of linear maps is itself a linear map: if f(x) = W_1 x and g(y) = W_2 y, then g(f(x)) = W_2 W_1 x = W x for some single matrix W. Stacking 96 linear layers buys you nothing over a single layer. The depth is only meaningful because each block inserts a non-linear function that breaks this collapse. Two places do the work:
The FFN activation. Each feed-forward sublayer computes something of the form FFN(x) = W_2 · phi(W_1 x + b_1) + b_2, where phi is a non-linear activation. Modern models use smooth, gated activations rather than the older ReLU:
GeLU (Gaussian Error Linear Unit): GeLU(x) = x · Phi(x), where Phi is the standard Gaussian CDF. It is a smooth gate that lets a neuron's own magnitude probabilistically decide how much of its signal passes.
Swish / SiLU: Swish(x) = x · sigmoid(beta·x), and its gated variant SwiGLU, now common in large models, which splits the projection into a value path and a sigmoid-gated path and multiplies them. The multiplication itself is a non-linearity (a product of two learned linear projections is quadratic in the input).
These activations are what give a single FFN the capacity to approximate a curved decision boundary instead of a flat one. Stack L of them and the set of functions the network can represent becomes astronomically rich.
The attention softmax. Self-attention computes softmax(Q Kᵀ / sqrt(d_k)) V. The softmax is non-linear and, crucially, input-dependent: the weights with which the model mixes other tokens are a non-linear function of the tokens themselves. This is dynamic, content-addressed routing. The same FFN weights get fed radically different inputs depending on context, because attention re-weights what flows into them per token, per position.
The practical consequence: the model's internal representation of "collection filter on a Shopify storefront" is not a lookup. It is a point in a high-dimensional embedding space that has been folded through dozens of non-linear transformations until concepts that are semantically related (faceted search, URL state, debounce, ARIA roles, Polaris tokens) sit near each other in directions the network can act on. Feature synthesis (proposing a design that is more than the sum of memorized snippets) is this folding at work. Non-linearity is not incidental to the model's creativity; it is the substrate of it.
Engineers loosely call LLM output "random." It is not random in the mathematical sense, and the distinction matters for how you steer it.
Pure randomness is a draw from a distribution that is independent of history. A fair die is memoryless: P(X_n = 6) is 1/6 regardless of every prior roll. Formally, draws are i.i.d. (independent and identically distributed). There is no conditioning on the past.
A stochastic process is a sequence of random variables that is conditioned on history. Token generation is exactly this. The model defines a probability distribution over the next token given everything seen so far:
P(x_{n+1} | x_1, x_2, ..., x_n)
This is autoregressive. The next token is a random variable, but its distribution is strictly shaped by the prior context window. It is best understood as a high-order Markov process: the classical Markov property says P(X_{n+1} | X_n) depends only on the immediately prior state, and a Transformer generalizes this so the "state" is the entire visible context up to the model's window length. The dependence on the past is the whole point. It is why the model stays on topic, closes the brackets it opened, and finishes the function signature it started.
This reframes the design-versus-code gap precisely. When you ask for a concept, the conditional distribution P(next token | "design an advanced collection filter...") has wide, relatively flat probability mass over many plausible and creative continuations, and sampling explores that space. When you ask for an implementation, the conditional distribution P(next token | "here is the Liquid template:") becomes extremely peaked. Given {% for product in, the next tokens are almost deterministically collection.products %} because that is the overwhelmingly most probable continuation in the training distribution. The process is the same; the entropy of the conditional distribution is what changed. Code generation is a low-entropy regime, and low entropy means the model funnels toward the single most-trodden path, which is the textbook pattern.
The final hidden state for a position is projected to a vector of logits, one real number per vocabulary token. Logits are unnormalized scores. The softmax converts them into a probability distribution:
P(token_i) = exp(z_i / T) / Σ_j exp(z_j / T)
Here z_i is the logit for token i and T is the temperature. This single equation is the control surface for everything practical:
Temperature T. At T → 0 the distribution collapses onto its argmax (greedy decoding): deterministic, repetitive, "safe." At T = 1 you sample the model's native distribution. At T > 1 you flatten the distribution, raising the odds of low-probability tokens: more diverse, more novel, more likely to wander off the most-trodden path, and also more likely to be wrong. Temperature is literally a knob on the variance of the stochastic process.
Top-k sampling. Restrict sampling to the k highest-probability tokens, renormalize, then sample. Caps the tail.
Top-p (nucleus) sampling. Restrict to the smallest set of tokens whose cumulative probability exceeds p, then sample. The candidate set size adapts to how confident the model is: small when the distribution is peaked, large when it is flat.
The design takeaway is counterintuitive but important. The same sampling settings that make the design phase creative make the implementation phase dangerous. Higher temperature and a wide nucleus help the model propose a genuinely novel filter UX, because in that regime the conditional distribution is broad and exploration pays off. But in the code phase the broad-exploration setting does not magically discover a scalable architecture; the scalable architecture is not the high-probability continuation it is failing to reach, it is a continuation that does not exist anywhere in the local distribution unless scale constraints are in the context. Sampling differently cannot conjure information the prompt never supplied. This is the hinge on which the rest of the article turns: you do not fix scale-blind code by turning a knob on the decoder. You fix it by changing the conditioning, that is, the prompt.
This is the core mechanical section. We are going to take apart exactly why a non-linear engine emits linear-feeling, scale-oblivious code, and we will go deeper than "it predicts the next token." There are four distinct mechanisms stacked on top of each other, and they compound.
Natural language is forgiving. There are thousands of acceptable ways to phrase a sentence, and the conditional distribution over the next word is broad. Code is not forgiving. It is a formal language with a grammar, a type system, scope rules, and a compiler or interpreter that rejects the output categorically if a single token is wrong. The model has internalized this. Empirically and structurally, the conditional distributions during code generation are far more peaked than during prose, because the space of syntactically valid and idiomatic continuations at any point is narrow.
Now layer on the autoregressive constraint. The model emits tokens strictly left to right and cannot revise a token once emitted. There is no backtracking, no second pass, no "actually, let me restructure the data flow now that I see where this is going." Every token is committed. This is the deep reason code generation feels linear and rigid even though the engine producing it is not: the model is performing online constraint satisfaction under an irreversibility constraint. To stay valid, it must, at each step, choose the continuation that is most likely to keep the program well-formed given what it has already committed to.
The consequence is a powerful bias toward canonical structure established early. Suppose the first architectural token committed is a server-rendered Liquid loop. Every subsequent token is now conditioned on "we are inside a Liquid loop." The model will faithfully, fluently, and correctly complete a Liquid loop, because that is now the high-probability path consistent with its own prefix. The decision that mattered (loop versus paginated async fetch versus prebuilt index) was made in the first few tokens, under a distribution that favored the most common pattern, and was then locked in by autoregression. The model does not "decide on an architecture" and then implement it. It stumbles into an architecture token-by-token and then is trapped by it. This is why the first sentence of your prompt's constraints matters more than the last: it shifts the distribution before the irreversible commitments happen.
Decoding optimizes a local objective: maximize (roughly) the probability of the next token given the prefix. Even with beam search or sampling, the horizon is short and the objective is sequence likelihood, not runtime performance. There is no term anywhere in the decoding objective for "p95 latency," "main-thread blocking time," or "API cost points consumed." The loss the model was trained on was next-token cross-entropy over a corpus of human-written code. That corpus is dominated by examples optimized for readability and correctness in small contexts: tutorials, Stack Overflow answers, library quickstarts, demo apps. Scale-hardened code (the kind with cursor pagination, request coalescing, backpressure, and cache invalidation) is a small minority of the training signal, and it is rarely the simplest expression of a given feature.
So you have a generator whose objective is local-likelihood and whose training distribution over-represents simple patterns. The product of those two is a strong pull toward the implementation that a competent developer would write for a demo. That implementation is locally coherent (it reads beautifully), passes type checks, and is globally wrong for production. The model is not making a mistake by its own objective. It is doing exactly what it was optimized to do. The mismatch is between its objective (likely, valid, idiomatic tokens) and yours (code that holds up at 2,000+ products under a performance budget).
Here is the mechanism that engineers most often miss, and it is the heart of section 3.
When a senior engineer reads {% for product in collection.products %} followed by a nested loop over variants, something fires in their head automatically. They simulate. They think: "collection.products caps at 50 per page in Liquid, so either this silently truncates or it is wrapped in pagination I am not seeing; if it is the full catalog, that is 2,000 products times 4 variants, that is 8,000 iterations of server-side string rendering inside a single request, and Liquid rendering has a wall-clock budget before the storefront times out." That simulation is a learned, embodied model of a runtime. It runs in the background whether the engineer wants it to or not, because they have felt the pain of a page that times out.
The LLM has no such simulator. This is not a metaphor; it is a literal architectural fact. During generation:
It does not execute the code it is writing. There is no interpreter in the loop, no runtime, no event loop, no rendering pipeline.
It does not run load tests, profile a flame graph, or measure Interaction to Next Paint. It has never experienced a blocked main thread.
It does not maintain a cost counter against a leaky bucket, or a wall-clock budget against a Liquid render timeout, or a memory ceiling against a mobile device's heap.
What it has instead is a statistical association between certain code shapes and certain words ("this can be slow," "consider pagination for large datasets") that appears in its training data near those shapes. That association only surfaces in the output if the context makes it the probable thing to say. Absent an explicit prompt about scale, the context "implement a collection filter" does not make "first, reason about the cost of this at 8,000 iterations" a high-probability continuation, because most training examples of "implement a collection filter" do not contain that reasoning. So the model writes the loop, with no internal alarm, because there is no internal alarm to ring.
This is scale blindness: the model optimizes for local logic correctness and design-spec compliance (does it match the Polaris guidelines, does it implement faceted AND/OR semantics correctly, does it produce valid JSX) while being structurally incapable of implicitly simulating execution behavior at volume unless that behavior is made explicit in its context. Two corollaries follow, and both are important:
Compliance is not performance. A model is very good at matching a design system, because the spec ("use Polaris spacing tokens, use the Filters component, follow the IndexFilters interaction pattern") is declarative, present in the prompt, and verifiable from the text alone. Performance is none of those things by default. It is emergent, environmental, and invisible in the source. The model will reliably satisfy the part of the request that is checkable from the text and silently miss the part that is only observable at runtime.
Correctness at N=30 is the trap. The naive code is genuinely correct. It returns the right filtered set. It looks right in review. It demos perfectly. The defect is not in the logic; it is in the logic's interaction with volume, latency, and platform quotas, none of which are represented in the artifact the reviewer is reading. Scale-blind bugs are invisible precisely where humans look for bugs.
There is a fourth, subtler mechanism. Architectural quality is a long-range, global property of a codebase: the decision to paginate interacts with the cache layer, which interacts with the URL state encoding, which interacts with how the frontend hydrates. But attention, while it can in principle attend across the whole context window, is in practice strongest over local and recently-emitted tokens, and the training signal that rewards global structural coherence across a large file is weaker and rarer than the signal that rewards local line-by-line correctness. The model is far better at "this line is correct given the previous line" than at "this module's data-flow architecture is correct given the system's load profile," because the former is densely supervised by the corpus and the latter is sparsely supervised.
Put concretely: even when an LLM does emit a paginated fetch in one place, it will often, three hundred tokens later, write a .filter() over the assembled full array on the client, quietly reintroducing the very O(N) main-thread pass that pagination was supposed to avoid. The two facts ("we paginate to avoid loading everything" and "we then filter everything in memory") are not contradictory at the local token level; each is individually idiomatic. The contradiction is global, and global is exactly where the generator is weakest. This is why scale-blind failures are frequently partial and inconsistent: the model applies a scalable pattern in the spot where it is most cued and abandons it where it is not.
Stack the four mechanisms:
Low-entropy, irreversible decoding funnels the model onto the canonical pattern and locks it in early.
A local-likelihood objective trained on demo-grade code makes the canonical pattern the demo pattern.
The absence of an implicit runtime simulator means no internal alarm fires when that pattern is non-performant at volume.
Weak long-range structural supervision means even partially-good architectures are reintroduced as O(N) somewhere the model was not cued.
None of these is fixed by a bigger model or a different temperature. All four are addressed by the same intervention: inject the runtime, the scale, and the platform quotas into the context, so that the high-probability continuation becomes the scalable one and so that the model has something to "simulate" against. That is section 5. First, let us watch the failure and the fix concretely.
The feature: an advanced multi-faceted collection filter for Discount Prime, our Shopify discount and pricing app. On a collection page, the merchant's customers should be able to filter 2,000+ live products (3 to 5 variants each) across several facets at once: product type, vendor, price range, availability, and a discount-eligibility metafield that Discount Prime writes per product. The UI must follow Polaris conventions, feel instant, and keep filter state in the URL so a filtered view is shareable. The performance budget is non-negotiable: sub-second load, no main-thread jank, and strict respect for Shopify's platform quotas.
Watch what an unconstrained model produces, why it fails, and what the same model produces once scale is in the context.
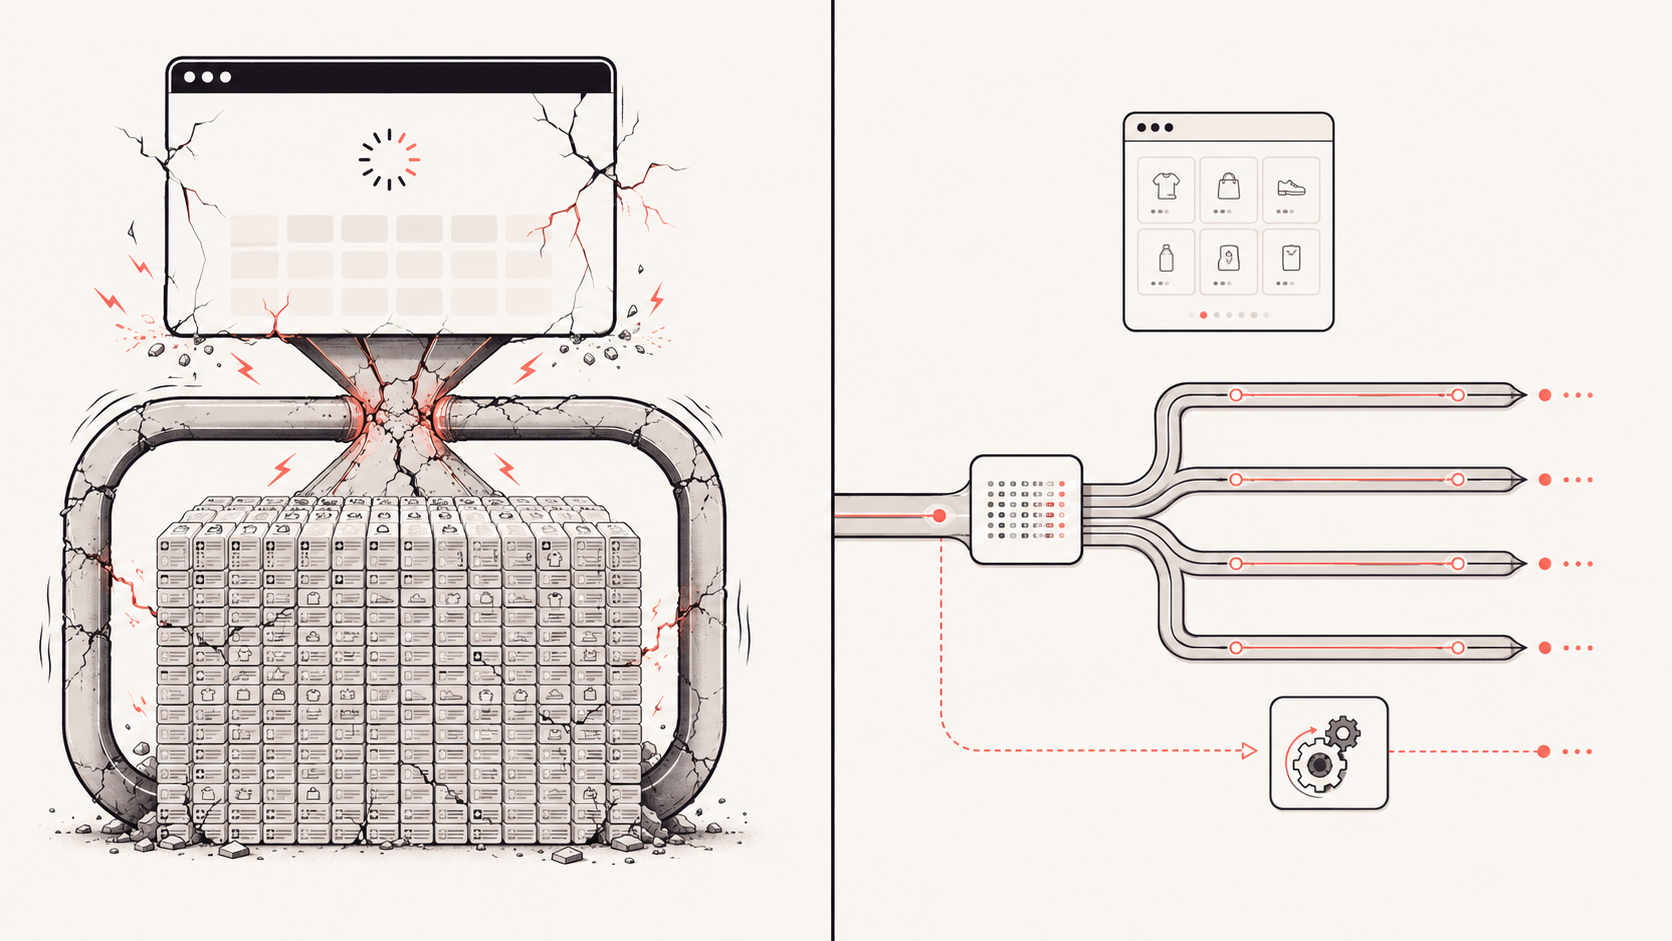
Linear failure versus architected scale: one heavy pass that blocks, against a compact, paginated, worker-offloaded flow.
Asked plainly to "build the filter," the model commits in its first tokens to server-side rendering of the full collection. The output looks like this.
{# collection-filter.liquid : naive, scale-blind version #}
<div class="dp-filter-results">
  {% assign type = current_tags %}
  {% for product in collection.products %}
    {% assign show = true %}

    {# Facet 1: product type #}
    {% if filter_type != blank and product.type != filter_type %}
      {% assign show = false %}
    {% endif %}

    {# Facet 2: vendor #}
    {% if filter_vendor != blank and product.vendor != filter_vendor %}
      {% assign show = false %}
    {% endif %}

    {# Facet 3: price band : recompute the min/max across every variant #}
    {% assign vmin = 999999 %}
    {% for variant in product.variants %}
      {% if variant.price < vmin %}{% assign vmin = variant.price %}{% endif %}
    {% endfor %}
    {% if filter_price_max != blank and vmin > filter_price_max %}
      {% assign show = false %}
    {% endif %}

    {# Facet 4: discount-eligibility metafield written by Discount Prime #}
    {% if product.metafields.discount_prime.eligible != true %}
      {% assign show = false %}
    {% endif %}

    {% if show %}
      {% render 'product-card', product: product %}
    {% endif %}
  {% endfor %}
</div>
And on the client, the React variant the model reaches for when asked to make it "dynamic":
// FilterPanel.jsx : naive, scale-blind version
import { useEffect, useMemo, useState } from "react";

export default function FilterPanel() {
  const [allProducts, setAllProducts] = useState([]);
  const [filters, setFilters] = useState({ type: null, vendor: null, maxPrice: null });

  // Pull the ENTIRE catalog on mount.
  useEffect(() => {
    fetch("/products.json?limit=2000")          // one giant payload
      .then((r) => r.json())
      .then((d) => setAllProducts(d.products));
  }, []);

  // Re-filter the entire array on every keystroke, on the main thread.
  const visible = useMemo(() => {
    return allProducts.filter((p) => {
      if (filters.type && p.product_type !== filters.type) return false;
      if (filters.vendor && p.vendor !== filters.vendor) return false;
      if (filters.maxPrice && Math.min(...p.variants.map(v => +v.price)) > filters.maxPrice) return false;
      return true;
    });
  }, [allProducts, filters]);

  return <ResultsGrid products={visible} />;
}
Both are correct. Both demo perfectly with 30 products. Here is the mathematical analysis of why they break at 2,000+, which is exactly the analysis the model did not perform because nothing in its context asked it to.
Liquid path failure.
collection.products is capped at 50 items per page in Liquid, and {% for %} loops are themselves limited to 50 iterations per page. So the naive loop is not just slow, it is silently wrong: it renders at most the first 50 products and quietly drops the other 1,950+. The merchant sees a "working" filter that omits 97% of the catalog, and nobody notices in a small demo store. To process the whole catalog you must use the {% paginate %} tag (max 250 per page, paginating no further than the 25,000th item), which means the single-template-loop architecture is structurally incapable of filtering the full set in one render.
Even bounded at 250 per page, the inner per-variant min-price loop multiplies iterations: 250 products times 4 variants is 1,000 inner iterations of string-rendering work, per page, inside one synchronous request. Liquid renders server-side within a wall-clock budget; heavy nested loops push render time up and risk the storefront render timeout, returning a degraded or error page.
Faceting server-side this way also defeats caching and CDN edge delivery, because the rendered HTML now varies by every combination of filter parameters.
Client path failure.
fetch("/products.json?limit=2000") pulls a multi-megabyte JSON payload over the wire on first paint. That is a direct hit to LCP (the largest contentful element waits on the network) and a large transfer cost on mobile.
JSON.parse of a multi-megabyte body and the subsequent setState happen on the main thread, blocking it. Then Array.prototype.filter over 2,000 objects, each spawning p.variants.map(...) and Math.min(...), runs again on the main thread on every keystroke. This is the classic INP killer: each interaction schedules a long task, the next paint is delayed, and the UI feels frozen. A long task over several thousand objects routinely blows past the 200 ms "good INP" threshold.
If you reach instead for the Storefront GraphQL API to fetch everything, you collide with the leaky bucket: the Storefront API bucket holds 2,000 cost points and refills at 1,000 per second, and a single query cannot exceed 1,000 points. A query that requests 2,000 products with variants, prices, images, and metafields has a per-field cost that, multiplied across the connection, blows the single-query ceiling outright, and a naive "load everything on mount" pattern across many users drains the bucket and gets throttled with 429/throttled responses.
The defect in every case is identical: the artifact is logically correct and environmentally catastrophic, and the environment is invisible in the source.
Now give the model the scale, the budgets, and the platform boundaries (the section 5 blueprint), and force it to write the bottleneck analysis before any code. The architecture it produces is qualitatively different. The shape of the solution is: do not render or transport the whole catalog; build a compact index, paginate the network, push filtering off the main thread, and hydrate progressively.
1. Server-side: emit a compact, cacheable facet index, not the product HTML. Instead of rendering 2,000 product cards, the Liquid layer emits a small JSON index of just the fields the filter needs (id, type, vendor, min price as an integer, eligibility flag, handle). This is built once, paginated, and cacheable because it does not vary by filter state.
{# facet-index.liquid : emit a compact index, paginate to cover the full catalog #}
{% paginate collection.products by 250 %}
  <script type="application/json" data-dp-facet-page="{{ paginate.current_page }}">
  [
    {%- for product in collection.products -%}
      {%- assign vmin = product.price_min -%}
      {
        "id": {{ product.id }},
        "h": {{ product.handle | json }},
        "t": {{ product.type | json }},
        "v": {{ product.vendor | json }},
        "p": {{ vmin }},
        "e": {{ product.metafields.discount_prime.eligible | default: false }}
      }{%- unless forloop.last -%},{%- endunless -%}
    {%- endfor -%}
  ]
  </script>
{% endpaginate %}
Note the use of product.price_min, a precomputed property, instead of an inner per-variant loop. The N×M iteration is gone. The payload per product drops from a full card to roughly five fields.
2. Network: cursor-based GraphQL pagination, never a single mega-query. When the index must come from the Storefront API rather than Liquid, the model now generates a cursor-paginated fetch that respects the leaky bucket by requesting bounded pages and only the fields it needs, keeping each query well under the 1,000-point ceiling.
// fetchFacetIndex.js : cursor-based pagination, minimal field cost
const PAGE = `
  query FacetPage($cursor: String) {
    collection(handle: "all") {
      products(first: 250, after: $cursor) {
        pageInfo { hasNextPage endCursor }
        nodes {
          id
          handle
          productType
          vendor
          priceRange { minVariantPrice { amount } }
          eligible: metafield(namespace: "discount_prime", key: "eligible") { value }
        }
      }
    }
  }`;

export async function fetchFacetIndex(client) {
  let cursor = null, hasNext = true;
  const index = [];
  while (hasNext) {
    const data = await client.request(PAGE, { cursor });   // bounded cost per call
    const conn = data.collection.products;
    for (const n of conn.nodes) {
      index.push({
        id: n.id, h: n.handle, t: n.productType, v: n.vendor,
        p: Number(n.priceRange.minVariantPrice.amount),
        e: n.eligible?.value === "true",
      });
    }
    hasNext = conn.pageInfo.hasNextPage;
    cursor = conn.pageInfo.endCursor;
    // Yield between pages so we never monopolize the bucket or the main thread.
    await new Promise((r) => setTimeout(r, 0));
  }
  return index;
}
We request only the fields the filter consumes (low per-query cost), page in bounded chunks of 250 (each query stays well under 1,000 points), and use endCursor/hasNextPage for stable cursor-based traversal instead of offset paging, which Shopify connections are built for.
3. Compute: move filtering off the main thread into a Web Worker. The index is small, but filtering it on every keystroke still belongs off the main thread to protect INP. The worker holds the index and answers filter queries; the main thread only ever touches the result slice it needs to paint.
// filter.worker.js
let index = [];
self.onmessage = (e) => {
  const { type, payload } = e.data;
  if (type === "init") { index = payload; return; }
  if (type === "query") {
    const f = payload;
    const out = [];
    for (let i = 0; i < index.length; i++) {
      const p = index[i];
      if (f.type && p.t !== f.type) continue;
      if (f.vendor && p.v !== f.vendor) continue;
      if (f.maxPrice && p.p > f.maxPrice) continue;
      if (f.eligibleOnly && !p.e) continue;
      out.push(p.id);
    }
    self.postMessage({ ids: out });   // hand back ids only; hydrate lazily
  }
};
// FilterPanel.jsx : architected version
import { useEffect, useRef, useState } from "react";

export default function FilterPanel({ facetIndex }) {
  const workerRef = useRef(null);
  const [visibleIds, setVisibleIds] = useState([]);

  useEffect(() => {
    const w = new Worker(new URL("./filter.worker.js", import.meta.url));
    w.onmessage = (e) => setVisibleIds(e.data.ids);
    w.postMessage({ type: "init", payload: facetIndex });
    workerRef.current = w;
    return () => w.terminate();
  }, [facetIndex]);

  const onChange = (filters) => {
    // Debounced, off-main-thread; the keystroke never blocks paint.
    workerRef.current?.postMessage({ type: "query", payload: filters });
    syncFiltersToURL(filters);   // shareable, debounced history update
  };

  // Only hydrate cards for the current viewport page of ids (lazy/windowed).
  return <LazyResultsGrid ids={visibleIds} pageSize={24} onChange={onChange} />;
}
4. Delivery and state: lazy hydration, windowing, and edge-cacheable index. Product cards are hydrated only for the visible window of result ids (e.g., 24 at a time) rather than all matches, keeping the DOM and the hydration cost bounded regardless of how many products match. The compact facet index is cacheable at the edge because it is filter-independent, so most visitors get it from the CDN rather than recomputing it. Filter state is encoded in the URL and updated with a debounced history.replaceState, so views are shareable without thrashing navigation.
The transformation is total, and it came from the same model. What changed was not the weights and not the temperature. What changed is that the context now contained the data scale, the performance budget, and the platform's quota mechanics, so the high-probability continuation shifted from "render the loop" to "build the index, paginate the cursor, offload the compute." We made the runtime visible, and the generator could finally "simulate" against it.
Dimension | Naive (scale-blind) | Architected (constraint-driven) |
|---|---|---|
Catalog handling | Single Liquid loop, silently capped at 50, or full-catalog client fetch | Compact paginated facet index, cursor-based GraphQL |
Main thread | Parse + filter thousands of objects per keystroke | Filtering in a Web Worker, ids only to main thread |
Network | One multi-MB payload on mount | Bounded 250-item pages, minimal fields, edge-cached index |
Shopify quotas | Single mega-query exceeds 1,000-point ceiling, drains bucket | Each query well under ceiling, paced between pages |
Core Web Vitals | High LCP, INP > 200 ms | Sub-second LCP, INP within budget, no long tasks |
Correctness at 2,000+ | Logically right, environmentally broken | Holds under load |
The fix follows directly from section 3. Because the model has no implicit runtime simulator and decodes toward the most probable (demo-grade) pattern, you must supply the runtime, the scale, and the quotas as explicit context so that the scalable pattern becomes the probable one and the model has something concrete to reason against. You are not coaxing a better mood out of the model. You are changing the conditional distribution by changing what it is conditioned on.
Four ingredients turn a scale-blind prompt into a constraint-driven one:
Role prompting that names the constraint domain. "Principal Software Architect and Performance Optimization Expert specializing in Shopify" shifts the distribution toward the corner of training data where scale reasoning actually lives. Role is not flavor; it is a prior over which subset of patterns the model samples from.
Exact data scale, stated as numbers. "2,000+ products, 3 to 5 variants each" gives the model the operands for the arithmetic it must be forced to do. Vague scale ("a lot of products") does not move the distribution; concrete N does.
Hard platform boundaries. Name the leaky bucket, the 1,000-point single-query ceiling, the Liquid 50/250 limits, and the Core Web Vitals budgets. These are the "physics" of the target runtime; stating them gives the model the walls to design within.
Worst-case-first execution order. Force a written bottleneck analysis before any code. This is the single highest-leverage instruction, because it makes the model commit its scale reasoning to tokens before the irreversible architectural commitment in section 3.1 happens. Once "this naive loop is 8,000 iterations and exceeds the render budget" is in the context, the next architectural token is no longer the loop.
Use this as a template. The bracketed slot is the only part you change per feature.
Role: You are a Principal Software Architect and Performance Optimization Expert
specializing in the Shopify Platform (Polaris Design System, Liquid Engine, and
Storefront/GraphQL APIs).

Problem Statement: I need to design a highly dynamic [INSERT FEATURE NAME, e.g.,
Advanced Multi-Faceted Collection Filter]. The UI must strictly adhere to Shopify
Polaris design guidelines and offer a highly innovative UX, but it must be
architected for extreme scale.

Hard Engineering Constraints:
1. Data Scale: The storefront contains 2,000+ live products, with an average of
   3 to 5 variants per product.
2. Performance Budgets: The solution must maintain sub-second Page Load Times, zero
   main-thread blocking (Optimized Interaction to Next Paint - INP), and minimal
   Largest Contentful Paint (LCP) impact.
3. Platform Boundaries: The architecture must absolutely respect Shopify API Rate
   Limits (Leaky Bucket Algorithm) and avoid heavy, nested Liquid loops or
   un-paginated server-side rendering cascades.

Execution Steps:
Before generating any codebase, schemas, or UI mockups, write an isolated section
titled "Performance & Scale Bottleneck Analysis". In this section, mathematically
analyze why naive, textbook implementation patterns fail under a 2,000-product load
on Shopify. Following this analysis, provide a production-ready architectural
blueprint leveraging Lazy Loading, GraphQL Cursor-Based Pagination, and Client-Side
Hydration.
Why each clause earns its place maps one-to-one onto the failure mechanisms:
The role line counters the demo-grade training bias (3.2) by shifting the sampling prior toward production-hardened patterns.
The numeric data scale gives the model operands so the bottleneck math is possible at all (3.3).
The performance budget and platform boundaries supply the runtime that the model otherwise cannot simulate (3.3); they are the missing physics.
The "analysis before code" ordering is the antidote to irreversible early commitment (3.1): it forces scale reasoning into the context before the architecture is chosen, and as a bonus it gives you an auditable artifact you can check.
The deepest change is not in the prompt template; it is in how you frame the collaboration. Treating an LLM as autocomplete (handing it a function signature and accepting the most probable body) gets you exactly the scale-blind default, because autocomplete is, definitionally, the high-probability local continuation. Treating it as a peer architect means you owe it what you would owe a senior engineer joining the project: the data volumes, the latency budgets, the platform quotas, the failure modes you have already hit. In other words, you give it the engineering SLA up front.
A useful discipline: write the non-functional requirements into the prompt the way you would write them into an Architecture Decision Record. Data scale, throughput, p95 latency target, error budget, platform rate limits, and the explicit instruction to analyze worst-case behavior before proposing a design. The model's non-linear engine is fully capable of synthesizing an enterprise-grade architecture; the case study proves it produced one from the same weights. It simply will not do so unprompted, because nothing in an unconstrained request makes the scalable pattern more likely than the textbook one, and nothing provides it with a runtime to simulate against.

The takeaway for senior engineers is therefore precise and actionable. The model's brilliance at design and its naivety at implementation are two faces of one mechanism: a non-linear representation engine sampled by a local-likelihood, scale-blind decoder. You cannot change the mechanism. You can change its conditioning. Put the runtime in the prompt, force the bottleneck analysis before the code, and the same system that wrote the loop that takes down your storefront will write the index, the cursor, and the worker that keeps it up.
Shopify Liquid paginate tag
New pagination limits for Liquid and Storefront GraphQL API (Shopify changelog)
Connecting an ERP is a milestone for a growing B2B brand. It is also the moment many merchants discover that an ERP does not, on its own, run their Shopify pricing.
There is a point in every wholesale operation where spreadsheets, manual order edits, and disconnected inventory stop working. Orders outgrow the team that keys them. Stock is wrong in two places at once. Finance cannot tell which campaigns made money. That is when merchants start evaluating an ERP, and it is the right instinct.
But it helps to be precise about what an ERP actually solves. Three different jobs are easy to blur together:
An ERP is necessary for scale. It is not sufficient for B2B pricing execution. This guide covers what an ERP does well, which ERPs pair best with Shopify, and the pricing logic that should stay inside Shopify through a tool like Discount Prime.
A good ERP becomes your operational system of record. For a Shopify merchant, it usually owns:
One nuance matters more than any other on this list. An ERP may store pricing data, a cost, a list price, a contract rate, but storing a price is not the same as executing customer-specific, campaign-based pricing logic cleanly inside Shopify's storefront and checkout. That gap is the whole point of this article.
This is not only a third-party question. Shopify runs a Global ERP Program, a set of certified enterprise ERP apps in the Shopify App Store that Shopify itself promotes for connecting an ERP directly to the store, so more complex merchants can sync data such as financials and inventory without bespoke integration work.
The program's headline certified systems are Microsoft Dynamics 365 Business Central, Oracle NetSuite, Infor, Acumatica, and Brightpearl. If you are choosing an ERP for a Shopify store, starting from this certified list lowers integration risk, because these connectors are built and maintained against Shopify's own standards.
It is worth reading Shopify's own framing closely. For B2B specifically, Shopify says external systems such as an ERP and CRM can connect with Shopify B2B to sync customer data, orders, inventory, product catalogs, and pricing information. That single sentence is the whole architecture in miniature: the ERP is important, but it is one part of the stack. It synchronizes data into Shopify. It does not, by itself, decide in real time which buyer sees which price.
That distinction is the through-line of this guide. The ERP is where data is stored and synced. The storefront is where the buying experience happens. And the pricing rules, the eligibility, the thresholds, the margin protection, and the campaign conflict control that turn synced data into the right price at the right moment run inside Shopify, through a pricing engine like Discount Prime.
There is no single best ERP. The right choice depends on catalog depth, finance complexity, whether you manufacture, and how heavily you sell B2B. Here is how the common options compare for a Shopify merchant.
Oracle NetSuite is best for mid-market and enterprise Shopify brands, multi-subsidiary businesses, complex financials, and multi-channel commerce that needs accounting, inventory, order management, and reporting in one system.
Strengths: deep ERP and mature finance, a strong fit for Shopify Plus and scaling brands, and a large partner ecosystem. Watch-outs: expensive implementation, needs an experienced partner, can be overkill for smaller merchants, and pricing and discount logic still usually lives Shopify-side.
Microsoft Dynamics 365 Business Central is best for SMB to mid-market merchants, and companies already invested in Microsoft, Office 365, Power BI, or Azure who want a finance-first ERP.
Strengths: a solid accounting and operations foundation, a familiar ecosystem, strong reporting with Power BI, and available Shopify connectors. Watch-outs: connectors must be configured carefully, complex B2B workflows can need middleware, and campaign-level discount execution is not its core job.
Acumatica is best for B2B merchants, inventory-heavy businesses, and distribution, manufacturing, and wholesale operations that want a flexible cloud ERP.
Strengths: a strong fit for B2B and distribution, good inventory and warehouse capabilities, and a flexible architecture that suits wholesale and Shopify Plus scenarios. Watch-outs: needs careful implementation, is less common than NetSuite in some Shopify ecosystems, and storefront promotion execution still needs a Shopify-native layer.
Brightpearl by Sage is best for retail and ecommerce-first brands, DTC plus wholesale brands, and omnichannel operations that want faster operational setup than traditional enterprise ERP.
Strengths: built around retail operations, with strong order, inventory, purchasing, and fulfillment workflows for scaling multichannel brands. Watch-outs: not as deep as NetSuite for enterprise finance, less suited to manufacturing-heavy use cases, and pricing campaign control may still need Shopify-side apps.
Cin7 is best for inventory-led and multichannel sellers, and wholesale and distribution businesses that care more about stock, purchasing, and order operations than full ERP finance.
Strengths: strong inventory and order management, practical for Shopify merchants, and a useful step before a full ERP. Watch-outs: it is more an inventory and operations platform than a full ERP, finance depth may require an accounting integration, and advanced pricing execution still needs Shopify-side tools.
Odoo is best for SMB and international merchants, and teams that want modular ERP at a lower cost and have technical resources or a trusted partner.
Strengths: modular and flexible, with a broad app ecosystem that can cover CRM, inventory, accounting, purchasing, and manufacturing cost-effectively. Watch-outs: implementation quality matters a lot, Shopify connector quality varies, and customization can get messy without governance.
SAP Business One is best for established wholesale, distribution, and manufacturing businesses, and companies already familiar with the SAP ecosystem that need structured ERP operations.
Strengths: a mature ERP for small and mid-sized enterprises, strong for inventory, purchasing, financials, and distribution, with solid business-process structure. Watch-outs: Shopify integration often needs a partner or middleware, it is less ecommerce-native than Brightpearl or Cin7, and implementation can be heavier than expected.
Infor is best for enterprise and industry-specific operations, and distribution, manufacturing, and complex supply-chain businesses with specialized requirements.
Strengths: strong enterprise and industry-specific ERP capabilities for operationally complex, high-volume merchants. Watch-outs: usually not the simplest choice for an SMB Shopify merchant, needs an experienced implementation team, and real-time Shopify discount execution still needs a commerce-side layer.
For earlier-stage or lighter setups: QuickBooks Online or Xero paired with an inventory app, Fulfil.io for ecommerce operations, and ERPAG or similar lightweight tools. To connect Shopify with an ERP, 3PL, or WMS, integration platforms like Pipe17, Celigo, or Patchworks often sit in the middle.
The fastest way to avoid buying the wrong tool is to decide, feature by feature, where each job should live. Use this as a planning checklist.
| Feature | Why it matters for Shopify B2B | Best handled by |
|---|---|---|
| Product and SKU sync | Keeps catalog data consistent | ERP / Shopify / PIM |
| Variant and barcode sync | Prevents fulfillment and warehouse errors | ERP / inventory system |
| Inventory sync | Prevents overselling | ERP / inventory / Shopify |
| Multi-location inventory | B2B orders pull from different warehouses | ERP / WMS / Shopify |
| Order sync | Orders must flow into finance and fulfillment | ERP |
| Fulfillment and shipment status | Staff and buyers need accurate status | ERP / WMS / 3PL / Shopify |
| Returns and refunds | Financial and stock data must stay accurate | ERP + Shopify |
| Customer records | B2B buyers have account-level terms | ERP / CRM / Shopify B2B |
| Company and location data | Shopify B2B uses companies and locations | Shopify B2B + ERP/CRM |
| Customer-specific pricing | Different buyers, different prices | Shopify B2B / ERP / pricing app |
| Price lists | Prices by group, market, or region | Shopify B2B / ERP |
| Tiered unit pricing | Wholesale buyers think in unit tiers | Pricing app (Discount Prime) |
| Quantity thresholds | Pricing depends on min/max ranges | Pricing app |
| Spend thresholds | Discounts based on cart or collection value | Pricing app |
| MOQ and max quantity logic | Wholesale needs minimums and caps | Pricing app / B2B order rules |
| Customer eligibility | Not everyone gets wholesale pricing | Pricing app |
| Metafield-based product selection | Large catalogs need dynamic targeting | Pricing app |
| Margin protection | Discounts must not drop below cost | Pricing app with cost logic |
| Campaign conflict control | Retail, B2B, coupon, shipping can overlap | Pricing app |
| Storefront pricing tables | Buyers need to see quantity breaks | Pricing app / theme widget |
| Progress bars and threshold messaging | Nudges buyers to larger orders | Pricing app / theme widget |
| Net payment terms | B2B buyers pay later | Shopify B2B / ERP / AR |
| Credit limits | Control buyer risk | ERP / AR / credit control |
| Quote or RFP workflow | Some buyers need approval first | B2B platform / ERP integration |
| Sales rep approval | Teams approve discounts or orders | B2B workflow / CRM / ERP |
| Reporting and profitability | Know if campaigns are profitable | ERP + Shopify campaign analytics |
The pattern is hard to miss. Operations, finance, and master data belong in the ERP. The lines that a B2B buyer actually sees and reacts to, the tier price, the eligibility, the threshold, the margin floor, belong inside Shopify.
An ERP can hold product costs, inventory, customer records, and price lists. But a Shopify merchant still needs real-time logic at the storefront and checkout that an ERP is not built to run:
Every one of those decisions happens in the half second between a buyer looking at a product and adding it to the cart. That is storefront territory, not back-office territory, and it is exactly where Discount Prime fits.
Discount Prime is not an ERP replacement. It is the commerce-side execution layer that sits in front of your ERP and runs the pricing your buyers experience. It handles:
The positioning is simple: your ERP manages the operational backbone, and Discount Prime manages real-time pricing and discount execution inside Shopify.
| ERP should handle | Shopify should handle | Discount Prime should handle |
|---|---|---|
| Accounting and invoices | Storefront and checkout | Customer-specific discount logic |
| Product master data | Catalog and product pages | Wholesale campaign rules |
| Purchase orders | Cart and payment | Tiered unit pricing |
| Inventory planning | B2B company accounts | Quantity and spend thresholds |
| Warehouse operations | Native catalogs | Min and max rules |
| Supplier management | B2B customer setup | Margin-protected discounts |
| Order sync and reconciliation | Native B2B price lists | Metafield-based targeting |
| Financial reporting | Conflict-safe campaigns | |
| Customer records and terms | Storefront discount messaging | |
| Credit limits | Promotion widgets and analytics |
In every one of these scenarios, the pricing execution layer stays the same. The ERP changes with your operations; Discount Prime stays the part of the stack your B2B buyers actually interact with.
That last question is the one most merchants skip, and it is the one that decides whether your wholesale campaigns actually run the way you intended.
Choosing the right ERP matters, but ERP integration alone does not solve Shopify B2B pricing. Wholesale merchants need both layers: a reliable operational system of record, and a Shopify-native pricing and discount execution layer that runs in real time at the storefront.
Discount Prime fills that second layer, helping merchants build customer-specific, margin-safe, threshold-based wholesale pricing campaigns directly inside Shopify. If your ERP manages the back office, Discount Prime can manage the pricing logic your B2B customers actually see.
Discount Prime runs Wholesale / B2B, Tiered Unit, and Dropshipping pricing campaigns natively inside Shopify, alongside any ERP.
Related on Discount Prime: Wholesale pricing · B2B pricing
--- ## When Size and Color Aren't Enough: Metafield-Based Targeting for B2B Catalogs URL: https://www.discountprime.app/blog/metafield-based-targeting-for-b2b-campaigns Category: Wholesale & B2B | Author: Discount Prime Team | Published: June 20, 2026 | Updated: July 1, 2026 | Read time: 9 min | Tags: Shopify, B2B, Metafields, Wholesale, ERP, Pricing > Metafield-Based Targeting lets B2B merchants target Shopify discounts by their own SKU-level attributes (wholesale tier, minimum order quantity, account type, material, season, lead time, inventory) stored in variant metafields and synced from an ERP, instead of only size and color variants or product-level tags and collections. Rules match at the variant level with a live preview, flag partially included products, keep exclusions subtract-only, and auto-update when a metafield changes. It works across the Tiered Unit, Wholesale / B2B, and Dropshipping Pricing campaign types and runs in a configurable app layer, so SMB and mid-market stores get SKU-level B2B pricing logic without needing Shopify Plus.The feature that became Metafield-Based Targeting did not start on a roadmap. It started in a meeting with a B2B business whose catalog refused to fit inside size and color.
We sat down with a wholesale business that runs its catalog out of an ERP. Their products were not simply "Small, Medium, Large." A single SKU carried a stack of attributes that mattered to pricing: a wholesale tier, a minimum order quantity, an account type, a material, a season code, a lead time, a customs code. None of that fits Shopify's idea of a variant, which is built around options like size and color. Yet every one of those attributes was something they wanted to run a promotion against.
That meeting is the reason Metafield-Based Targeting exists. It lets you target discounts dynamically from your own metafields, at the variant level, across the B2B campaign types: Tiered Unit, Wholesale / B2B, and Dropshipping Pricing. Your rules stay correct automatically as your catalog changes.
Most Shopify discount tools target products by collection, tag, vendor, or product type. That works until your catalog has real depth, and then two problems show up fast.
First, those signals live at the product level, not the variant level. A B2B catalog often needs the opposite: this exact variant is Gold tier, that one is Bronze; this SKU has a minimum order quantity of 12, that one does not. Product-level targeting cannot see inside the product.
Second, tags and collections are a snapshot that someone has to maintain by hand. The moment your ERP adds a season, changes a tier, or updates a lead time, your tag-based audience is stale, and nobody notices until a promotion prices the wrong things.
The data the business needed was already in Shopify. It was sitting in metafields, synced from the ERP. Nothing was acting on it.
Metafield-Based Targeting adds a new product source to the campaign builder: a variant metafield rule. Instead of picking a collection, you write a condition against any metafield you have, grouped by namespace, with the operator that fits its type.
Pick a field (wholesale tier, minimum order quantity, account type, material, season, lead time, weight, inventory on hand, anything you store), pick an operator (is equal to, is greater than, is before, contains, is true), and set a value. Numbers, money, enums, booleans, dates, and text each get the right comparison. Combine several conditions and choose whether a variant has to match all of them or any of them. The match runs at the variant level, live, with a running count of exactly how many variants and products are in.
Because the rule reads the same metafields your ERP writes, the targeting speaks your business's own language instead of Shopify's. "Discount every Gold-tier variant with a lead time under 30 days" becomes a sentence you build in the campaign, not a tagging project.
A rule engine that touches pricing has to be careful. Three choices matter most.
Auto-update keeps the campaign in sync. When a product's metafield changes, the match re-runs, so as your ERP pushes new tiers, costs, or attributes, the promotion follows automatically. The manual monthly audit disappears.
The live preview shows the truth before you save. Every matched variant is listed under its product, with a count, and products where only some variants match are flagged in amber, so you can see at a glance that a SKU is only partially included. No silent surprises at checkout.
Exclusions only ever subtract. You can remove individual variants or exclude by collection, tag, price, or specific products, but an exclusion can never quietly add a variant the rule did not match. Off-rule variants stay off. That single guardrail prevents the most dangerous failure mode in any targeting system: discounting something you never meant to.
Metafield-Based Targeting is a Prime-plan feature, and it works the same way across Tiered Unit, Wholesale / B2B, and Dropshipping Pricing, so the targeting you learn in one campaign type carries to the others.
This is built for catalogs that are too detailed for size and color. It is most valuable when your products carry real per-SKU attributes (tier, MOQ, account type, material, season, customs code, lead time, inventory state), when those attributes already live in metafields synced from an ERP or a PIM, and when your catalog is large enough that maintaining tags by hand is not realistic.
If you sell a handful of products with simple options, you do not need this, and standard collection and tag targeting will serve you well. Metafield-Based Targeting earns its place exactly when the catalog gets complicated.
The business in that meeting is not unusual. Across the Canadian market, B2B sellers run their operations on an ERP, and the ERP, not Shopify, is the system of record for what a SKU actually is.
The spectrum is wide. Large enterprises run Oracle NetSuite, Oracle, or SAP. Mid-market and smaller businesses increasingly run leaner systems like Odoo, Microsoft Dynamics 365 Business Central, Acumatica, or Sage. We compared these systems for Shopify in our guide to the best ERP integrations for Shopify B2B and wholesale. Whatever the system, the pattern is the same: the ERP holds the rich attributes (cost, tier, account eligibility, lead time, compliance codes), and the storefront needs a way to act on them without re-keying anything.
This is where Shopify's design becomes interesting. Metafields are the bridge. They let an ERP push structured, typed attributes onto products and variants, and they turn Shopify from a simple storefront into a channel that can carry an enterprise catalog's logic. Metafield-Based Targeting is what finally lets a promotion engine read across that bridge, so the ERP's definition of a SKU drives the discount directly.
Our partner team at J Trade Help studied why merchants of every size keep choosing Shopify as their B2B channel, and the answer maps cleanly onto plan structure. Their analysis is worth reading in full (Why Shopify and a real B2B discount migration case study), but the short version matters here.
Shopify reserves its deepest B2B machinery for Shopify Plus: company accounts, customer-specific catalogs, price lists, payment terms, draft orders, checkout extensibility, and Functions-level customization are Plus features. For an enterprise replatforming from Magento or SAP commerce, that is the tier. For an SMB or mid-market brand, the same research names the honest trade-off: complex contract pricing and SKU-level discount logic have historically needed either custom code or a partner app, because the native tools on lower plans do not reach that deep.
That is the gap Metafield-Based Targeting is designed to close. The SKU-level pricing logic that used to require Plus-only customization or a fragile custom build now runs in a configurable app layer a support team can own, on the plan the business already has. A growing wholesaler does not have to jump to Plus just to discount by tier or MOQ. The case study that prompted that research described exactly this: a B2B brand asking to move off custom-coded, SKU-level discount logic into something operations could manage safely. Metafield-Based Targeting is our answer to the same request.
Most discount tools target the catalog Shopify can see: collections, tags, vendors, sizes, colors. Metafield-Based Targeting targets the catalog your business actually runs on, the one defined by your ERP and stored in your metafields, and it keeps that targeting correct as the catalog moves. For a B2B store of any size, that is the difference between maintaining a promotion and trusting it.
Metafield-Based Targeting is available on the Prime plan in Discount Prime, across Tiered Unit, Wholesale / B2B, and Dropshipping Pricing.
Related on Discount Prime: Wholesale pricing · B2B pricing · Found through an LLM
--- ## We Didn't Plan Dropshipping Pricing. A Shopify Expert Talked Us Into It. URL: https://www.discountprime.app/blog/margin-based-dropshipping-pricing-for-shopify Category: Wholesale & B2B | Author: Discount Prime Team | Published: June 18, 2026 | Updated: July 1, 2026 | Read time: 6 min | Tags: Shopify, Dropshipping, Pricing, Profit Margin, Ecommerce > Most Shopify pricing apps price on selling price, so when a supplier cost rises the retail price does not move and the margin silently erodes. Dropshipping Pricing in Discount Prime prices on profit margin instead, reading Shopify's cost-per-item field, and defends it with price-floor prevention, minimum-profit protection, a fallback for missing costs, and automatic resync when costs change.Most of the features in Discount Prime started as a line on a roadmap. Dropshipping Pricing did not. It started as a complaint.
A Shopify Expert who manages a portfolio of dropshipping stores reached out to us. He was not asking for a discount tool at all. He was frustrated with something more basic: every time a supplier changed a cost, his clients' margins quietly fell apart. His stores were priced on selling price, the way almost every Shopify pricing app works, so a 12 percent jump in supplier cost did not move the retail price at all. It just ate the profit. Nobody noticed until the monthly numbers came in worse than the month before.
His exact framing stuck with the team: "I don't sell at a price. I sell at a margin. The price is just whatever keeps the margin." That one sentence reframed the whole problem for us, and it is the reason Dropshipping Pricing exists.
If you run your own inventory, pricing on selling price is fine. Your cost is mostly fixed and you know it. Dropshipping is different. The cost per item is not yours to control, it changes without warning, and it is different on almost every product. When you price a catalog of 3,000 imported products by slapping a flat percentage on the retail price, you are guessing at margin product by product, and you are wrong on most of them.
The market mostly papers over this. The popular automation apps adjust price as a markup on cost, or raise prices when stock runs low (Dynamic Markup is a good example), and sourcing platforms like Zendrop let you set a target margin inside their own ecosystem. What we kept hearing from our Expert was that none of that helped him on Shopify itself, across mixed catalogs, with the safety rails a real business needs. Shopify even ships a free "Cost per item" field that calculates true profit, and as one teardown put it, most merchants never use it. The data is sitting there. Nothing was acting on it.
So we built the service around the cost field instead of around the price tag.
The core idea is simple to say and was hard to get right: you set the outcome you want, and the app holds it for you no matter what the supplier does.
You choose what to price on. Profit margin, product cost, or selling price. The Expert's clients almost always pick profit margin, because that is the number they are actually managing.
You point it at your real cost. Cost source mapping reads Shopify's variant cost field, so the engine is working from your landed cost, not a number you typed once and forgot.
You set the markup the way you think. Percentage or fixed amount, with cent adjustment for clean or charm pricing so you are not publishing $27.43 on 800 products.
Then you turn on the part that the Expert cared about most: the guardrails.
Price floor prevention stops a price from ever dropping below a line you set. Profit protection keeps a minimum profit on every item, in dollars or percent, even when a cost spike would otherwise push the math underwater. A fallback rule decides what happens when a variant has no cost recorded at all, so a missing value never silently ships at a loss. And auto price sync re-runs the whole calculation when cost per item changes, which is the feature that turned a manual monthly audit into something that just takes care of itself.
Around that sits the same machinery the rest of Discount Prime uses: product selection by collection, tag, vendor, type, price range, specific products, or the whole store (and now metafield-based targeting for B2B catalogs); exclusions by the same filters; auto-update so newly added products fall under the rule automatically; scheduling; a sales badge; and campaign conflict management with auto-exclude so this campaign does not quietly fight another one you are running.
The honest version of the value here is not "make more money." It is "stop losing money you already earned." The Expert's stores were profitable on paper and leaking in practice. The leak was invisible because selling-price pricing hides it by design.
When you price on margin and protect it automatically, three things change. Your catalog stays correctly priced through supplier changes without anyone watching it. Your floor and minimum-profit rules mean a bad cost update degrades gracefully instead of producing a sale you regret. And the person managing the store gets their time back, which for an agency running many stores is the entire business model.
This is built for dropshippers and for the people who run stores on their behalf. It is most valuable when your costs move (imported goods, volatile suppliers, FX exposure), when your catalog is large enough that hand-pricing is not realistic, and when you are managing more than one store and need pricing to be a setting rather than a chore.
If your costs are stable and your catalog is small, you probably do not need this. We would rather tell you that than sell you a feature you will not use.
Plenty of apps will mark up your products. What we did not find, and the reason we built it, was a Shopify pricing tool that treats profit margin as the thing you manage and then defends it: floor prevention, minimum-profit protection, a defined fallback for missing costs, and automatic resync when costs change, all driven off Shopify's own cost-per-item data and applied across filtered catalogs.
That is the difference. Most tools set a price. Dropshipping Pricing holds a margin. For the Expert who talked us into building it, that distinction was the whole point, and it is still the sentence we use to describe what this feature is for.
Dropshipping Pricing is available on the Premium plan in Discount Prime.
Related on Discount Prime: Dropshipper pricing · Profit analytics
--- ## A Cowboy Hat Wholesaler Sent Us One Email. It Became Our Whole B2B Engine. URL: https://www.discountprime.app/blog/shopify-wholesale-b2b-tiered-pricing Category: Wholesale & B2B | Author: Discount Prime Team | Published: June 18, 2026 | Updated: July 1, 2026 | Read time: 8 min | Tags: Shopify, Wholesale, B2B, Pricing, Tiered Pricing > Shopify's native B2B tiered pricing needs Plus and applies at the variant level, so retailers must bulk up on one SKU. Discount Prime's Wholesale / B2B Pricing adds margin-based tiers with floor and profit protection, line-item or whole-cart thresholds, and customer and catalog targeting, plus a single winner progress bar that persuades on the product page and stays out of the way in the cart.The Wholesale/B2B Pricing feature in Discount Prime did not originate from a competitor analysis or a roadmap meeting. It came from a single email from an American wholesaler who sells cowboy hats and western hats to retailers across the country.
The email was short and specific. They wanted their retail buyers to see, right on the product page, how much more they would save by ordering more. Not a hidden discount that shows up at checkout. Not a coupon code emailed to a rep. A visible, live nudge that said: you are at this tier now, here is the next one, here is exactly what crossing it is worth.
That request sounded small. When the whole team sat down in a meeting to talk it through, with engineering, design, and product all in the room, it turned out to touch almost every hard problem in B2B pricing at once. So we treated the email as the spec, and the meeting as the design review, and Wholesale / B2B Pricing is what came out the other side.
Taking the request seriously also meant looking past the storefront. When we mapped how this wholesaler actually ran, their back office sat on Fulfil.io, the ERP handling their inventory, orders, and operations. Walking their stack end to end is what made the dividing line obvious: the ERP was the right system of record for the back office, but the tiered pricing, customer eligibility, and margin rules their buyers needed to see at the moment of purchase had to live in Shopify. If you are weighing that same split, we wrote a full guide to the best ERP integrations for Shopify B2B and wholesale.
If you have tried to run real wholesale on Shopify, you already know the walls. Native tiered and volume pricing is effectively a Shopify Plus feature, so most growing wholesalers cannot touch it on their current plan. When you can use it, volume pricing is applied at the variant level, which means a buyer has to hit the break quantity on one specific variant rather than across the order, and you are capped at ten price breaks. For a hat company with dozens of styles and sizes, "buy ten of this exact SKU" is not how a retailer orders.
The app ecosystem fills the gap, and it is crowded. Wholesale Pricing Discount, Custom Pricing: Wholesale B2B, Bold Custom Pricing, Pareto and others all do quantity breaks and tiered pricing well. What our wholesaler wanted, and what we kept finding missing, was two things on top of the breaks: pricing that protected their actual margin, and a storefront experience that actually persuaded the buyer to climb the tiers instead of just silently applying a discount they never noticed.
You decide what the discount is based on: selling price or profit margin. You choose the change mode: percentage or fixed. You choose the tier basis: quantity or spend amount. And critically, you choose whether the threshold applies to the line item or to the whole cart. That last switch is what the cowboy hat case demanded. A retailer ordering a spread of styles should be rewarded for the size of the order, not forced to bulk up on one SKU to unlock a break. You can keep adding tiers as the relationship grows.
Because tiers can be based on profit margin, the same guardrails from our dropshipping pricing work apply here. Price protection enforces a hard floor so a deep tier never crosses your minimum acceptable price. Profit protection keeps a minimum profit on every unit, in dollars or percent. And a fallback rule covers any variant missing a cost, so an aggressive wholesale tier never quietly sells something below cost. Wholesale margins are thin enough that this is not a nice-to-have.
Customer eligibility lets you open tiers to everyone, to customer segments, to specific customers, or by customer tag, so your verified retail accounts see wholesale pricing and the public does not. Product selection and exclusions use the full filter set: collection, tag, vendor, product type, price range, specific products, or the whole store. Auto-update pulls new products into the rule, scheduling and the sales badge come standard, and conflict management with auto-exclude keeps this campaign from colliding with the others you run.
Here is where that short email turned into the most interesting design decision in the product.
The wholesaler wanted a discount progress bar on the product page. Fine. But Discount Prime can run several things that all want to talk to the buyer at the same time: a product tier nudge ("add 4 more for the next price break"), an order-level discount threshold, and a free-shipping progress bar. Most apps in this space will happily stack these. Progressify, for instance, shows up to three bars at once. We tried that internally and it looked like exactly what it is: a wall of competing meters that trains the buyer to ignore all of them.
So the team committed to a rule we now call the winner model. There is one bar per page or cart. Every goal, the tier nudges, the order thresholds, the shipping bar, feeds a single priority queue, and the goal closest to unlocking wins the slot. The bar shows that one. Everything else collapses into one quiet text line, capped at two items, with anything beyond hidden behind a tappable "+N more." When a goal unlocks, the slot advances to the next one. When everything is unlocked, the bar collapses to a single success line.
The two pages behave differently on purpose. The product page is persuasion territory, so it shows the full tier ladder bound to the quantity selector: your current row is marked "In cart," one line shows the gap to the next tier, and tapping a tier sets the quantity to its minimum. The cart is checkout territory, so the bar only appears once the buyer is at least 60 percent of the way to a goal, it sits above the line items and never between the totals and the checkout button, and it never shows a tier table that would distract from completing the order.
That single decision, one combined winner bar instead of a stack, is the thing we are proudest of. It came directly from taking the wholesaler's request seriously and refusing to answer it with clutter. ## Why one bar converts better: the cognitive load problem There is a reason the winner model is not just a tidiness preference. It is a conversion decision, grounded in how people actually make choices under pressure. Cognitive load is the mental effort a shopper spends to understand a page and decide what to do next. Every extra meter, badge, and competing call to action adds to it. On a product page that is survivable, because the buyer is still exploring. In the cart and at checkout it is expensive, because the buyer has already decided to buy and now just wants to finish. Anything that makes them stop and re-read is a chance to lose the order. This is Hick's Law in practice: the more options you put in front of someone, the longer the decision takes, and the more likely they abandon it. Three stacked progress bars do not triple motivation. They split attention three ways, and a buyer who cannot tell which goal matters most usually picks none of them. The meters cancel each other out. So Discount Prime treats the two surfaces as two different jobs. The product page is where persuasion belongs, so it can carry the full tier ladder and actively coach the buyer up it. The cart is where focus belongs, so the bar stays quiet, never competes with the checkout button, and disappears entirely once it has nothing useful left to say. One clear goal at a time keeps cognitive load low exactly where conversion is most fragile, which is the whole point of the design.
Wholesale / B2B Pricing is built for merchants selling to other businesses on Shopify without paying for Plus: wholesalers, distributors, and brands running a retail and a trade channel from one store. If you are also choosing back-office systems, see our guide to ERP integrations for Shopify B2B. It is at its best when orders span many SKUs (so cart-level thresholds matter), when margins are thin enough that protection rules earn their keep, and when you want the storefront to actively move buyers up the tier ladder rather than just honor a discount quietly.
The wholesale apps on Shopify are good at breaks and custom prices. What we did not find in one place, and what came straight out of one hat company's email and one team meeting, is the combination: margin-based tiers with real floor and profit protection, line-item or whole-cart thresholds, full customer and catalog targeting, and a single winner progress bar that persuades on the product page and stays out of the way in the cart.
Most tools tell the buyer what they saved. Ours shows them what they are one step away from, in one clear bar, and then gets out of the way. That is the difference, and it started with one email we decided to take literally. ## The part that is hardest to copy: how fast the team ships Features can be cloned. Cadence is harder. The most interesting thing about Discount Prime right now is not any single setting; it is the speed at which the team turns a market signal into shipped product. The Wholesale engine started as one wholesaler's email and was shipped as a full feature. Dropshipping Pricing started as one expert's complaint. The pattern is a team that listens, decides quickly, and ships in weeks rather than quarters. Right now, new versions are landing in under two months, each with a genuine surprise rather than a patch note, and the team has put an ambitious roadmap in public for anyone to hold them to. That is the best worth watching. So far, they are moving at full speed and delivering on the plan they claimed. The open question, and the one we will keep coming back to, is whether they can keep hitting that roadmap as the surface area grows. For now, the momentum is real.
The Promo Playbook is our ongoing podcast for Shopify merchants and Shopify experts who want to stay ahead in the world of promotions and discounting. Each episode shares how we think at Discount Prime and the ideas shaping the modern, fast-moving practice of running offers that actually grow a store.
See full list of podcast here
Wholesale / B2B Pricing is available on the Prime plan in Discount Prime.
Setting up quantity rules and volume pricing in B2B, Shopify Help Center
How to Set Up Shopify Tiered Pricing for B2B, Wholesale Helper
Related on Discount Prime: Wholesale pricing · B2B pricing · ERP integrations for Shopify B2B
--- ## GMV Is a Vanity Metric: Why Your Discount App Should Report Margin Instead URL: https://www.discountprime.app/blog/gmv-is-a-vanity-metric-why-your-discount-app-should-report-margin-instead Category: Profit & Strategy | Author: Aspedan.dev | Published: June 17, 2026 | Updated: July 1, 2026 | Read time: 6 min | Tags: Shopify, Discounts, Profit Margin, Ecommerce, Analytics > GMV lift is the default discount metric because it is easy to compute, but it hides margin compression and the cannibalization of full-price sales. A campaign can raise GMV while destroying contribution margin in absolute terms. The fix is cost-price data on your top 20% of SKUs by revenue, and a report whose hero number is incremental contribution margin in dollars. *Every discount dashboard celebrates revenue uplift. Most of that uplift is dollars you lost on margin you never measured.* This is the fourth article in **The Agentic Commerce Playbook for Shopify Merchants**. The first three articles covered how to reach agents and how to design offers that work for them. This one pivots inward, to the question that should govern every campaign you run, regardless of channel: are you actually making money on it? The honest answer, for most stores, is that they do not know. Their discount dashboards report GMV lift, orders affected, and discount amount issued, none of which answer the question. A 15% GMV lift can be a successful campaign or a disaster, depending on the mix of products discounted, the margin on each, and the cannibalization of full-price sales. The dashboards do not distinguish. ## Why GMV lift is the default, and why that is wrong GMV is the default metric because it is the easiest to compute. Shopify knows the order total; it reports the order total; the discount app surfaces the difference with and without the campaign. No additional data is needed. No merchant setup. It works on every store, which is precisely why it is the default. But GMV is a top-line number, not a health number. A campaign that lifts GMV 15% while compressing margin from 42% to 29% has destroyed contribution margin in absolute terms. The store made less money on more revenue. That outcome is invisible in any report that looks only at GMV. The merchant walks away from the dashboard satisfied, schedules the next campaign, and the same pattern repeats until the quarterly P&L arrives and nobody can explain why it is soft. ## The math that turns a 12% lift into a 4% margin loss Consider a concrete example. A store sells a $100 product with a $60 cost (a 40% margin). It runs a 20% off campaign. GMV for this SKU lifts by 12% because the discount drove incremental volume. The report shows green. The actual math: each sale at $80 with a $60 cost contributes $20 in gross margin, versus $40 at full price. The 12% volume lift would need to be 100% to hold gross margin constant. A 12% lift leaves the store with less absolute margin than before, despite the apparent GMV gain. The campaign lost money on the metric that matters. The specific numbers vary. The pattern does not. Across a sufficiently large set of campaigns, the difference between GMV-reported success and margin-reported success is systematically negative. Merchants running many campaigns without margin reporting are, on average, running slightly loss-making promotional programs. They are doing it in a mood of incremental optimism, produced by a dashboard that answers a different question than the one the business cares about. ## The 80/20 path to getting cost-price data in The obvious objection is that margin reporting requires cost-price data, and most merchants do not have cost prices entered for every SKU. This is true, and it is exactly why most discount dashboards do not offer the feature. But the practical truth is that merchants do not need cost prices on every SKU to get actionable margin reporting. They need the cost of the top 20% of SKUs by revenue, which, for most stores, is over 80% of the campaign impact. The setup path is straightforward. Export your top 100 SKUs by revenue for the last quarter and enter cost prices for those (a single afternoon of work, usually). For the long tail, use category-default margins as a placeholder. Margin reports flag which categories matter and which are noise. Over the next quarter, fill in the top 500 SKUs. Inside six months, the store will have meaningful cost coverage for every campaign it is likely to run. The work is small. It is simply not a default. ## What a profit-first campaign report actually shows When a campaign report includes margins, the shape of the information changes. GMV lift becomes one number among several, and not the most important. The hero number becomes absolute contribution margin, or margin percentage, or margin-per-order, depending on the merchant's priority. The report shows which SKUs lifted profitably and which destroyed margin. It flags campaigns where the GMV gain came from a narrow set of SKUs at the expense of others through cannibalization. This kind of report produces different decisions. A campaign with 15% GMV lift but flat margin becomes a campaign to refine, not to repeat. A campaign with 3% GMV lift and 8% margin lift (possible through tight product selection) becomes a winner worth scaling. These are the judgment calls that separate operators who compound from operators who spin. ## The one number that should be at the top of your dashboard If you have to choose one metric for the top of your discount dashboard, the right one is campaign-level incremental contribution margin in dollars. It is the purest expression of whether the campaign made the business money. Every other metric feeds into it or distracts from it. The shift is not primarily technical. It is cultural. Most merchants have been trained by a decade of dashboards to accept "GMV lifted" as sufficient evidence of success. Breaking that habit, in the merchant's own head and in the merchant's tooling, is the first concrete step of a profit-first discount program. The rest of this series, and much of what separates serious discount operators from casual ones, depends on this one shift. If your report still celebrates GMV without showing margin, it is the wrong report. > Part 4 of 9 of The Agentic Commerce Playbook for Shopify Merchants. Each article in the series stands on its own, but is designed to be read in sequence. --- **Related on Discount Prime:** [Profit analytics](/profit-analytics) · [Best Shopify discount apps](/best-shopify-discount-apps) --- ## Profit-First Promotions: How to Discount Without Killing Your Margin URL: https://www.discountprime.app/blog/profit-first-promotions Category: Profit & Strategy | Author: Discount Prime Team | Published: June 10, 2026 | Updated: July 1, 2026 | Read time: 7 min | Tags: margin, promotions, shopify, pricing > Profit-first promotions start from the margin you intend to keep and work backward to the discount you can afford, instead of picking a flat percentage and hoping volume covers it. Three levers decide profitability: a margin floor (the minimum profit per order), average order value (volume and tiered discounts that reward bigger baskets), and discount conflict control (stopping automatic and code discounts from stacking into a loss). Measure margin per order, not revenue. Discount Prime runs ten discount types with real-time margin analytics and automatic conflict detection so these rules are enforced before a campaign goes live.The biggest discount and the most profitable promotion are rarely the same thing. A profit-first promotion starts from the margin you intend to keep and works backward to the discount you can actually afford.
Most merchants run promotions the same way: pick a percentage, apply it across the store, and hope volume makes up the difference. The trouble is that a flat number lands very differently across a catalog. A flat 20 percent off can erase the entire margin on a low-markup product while barely denting a high-markup one. You end up subsidizing your worst-margin SKUs the hardest, which is the opposite of what you want.
The result is the pattern we wrote about in why GMV is a vanity metric: revenue goes up, the dashboard looks green, and the quarter still comes in soft because nobody measured what the campaign did to contribution margin.
Profit-first promotions flip the model. Instead of starting from how big a discount you can advertise, you start from how much margin you need to keep, and let that decide the discount.
Almost every promotional outcome comes down to three variables. Get these right and the rest is detail.
Margin floor. The minimum profit you are willing to accept on any order. This is the single most important number in a promotion, because it is the line a discount must never cross. Without it, a deep enough discount, or two discounts stacking, can sell a product below cost without anyone noticing until the numbers come in.
Average order value. A discount that drives more units per order can be profitable even at a lower per-unit margin, because the larger basket carries the campaign. This is why volume and tiered offers usually beat flat sitewide percentages: they reward the behavior, bigger orders, that actually protects your economics.
Discount conflicts. This is the silent killer. An automatic campaign and a code-based discount can stack on the same order and double your giveaway. Most stores discover this only when they audit a strange-looking order. Conflict control is not a nice-to-have; it is the difference between a planned promotion and an accidental one.
The goal is not the biggest discount. It is the most profitable conversion.
A flat 25 percent sitewide sale is the blunt instrument. A profit-first version of the same goal might be 10 percent off at three units, 15 percent at five, with a hard margin floor so no combination ever sells below cost, scoped to the collections whose margins can absorb it. The advertised "save up to 15 percent" still pulls shoppers in, but the structure protects the downside and rewards larger orders.
The shift is not about discounting less. It is about discounting on purpose, where the math works, instead of everywhere at once.
This is exactly the layer Discount Prime is built for. It runs ten discount types, from volume and tiered unit pricing to Buy X Get Y and free shipping, in one Shopify-native app, so you can choose the mechanic that fits the margin instead of defaulting to a flat percentage. It surfaces real-time margin analytics on every campaign, so you can see the profit impact before a promotion goes live rather than after the quarter closes. And it includes conflict detection that automatically flags when two campaigns would stack, so the most common way promotions lose money never happens by accident.
In other words, the framework above stops being a spreadsheet exercise and becomes something you configure once and trust. The margin floor, the targeting, the conflict rules, and the reporting all live in the same place the discount runs.
Profitable promotions are not the ones with the loudest discount. They are the ones built backward from the margin you decided to keep, structured to reward bigger orders, and protected from stacking into a loss. Decide your floor, prefer structure over flat percentages, measure margin per order rather than revenue, and let the tooling enforce the rules so a good promotion cannot quietly become a bad one.
Discount Prime brings ten discount types, real-time margin analytics, and conflict detection into one Shopify-native app.
Related on Discount Prime: Profit analytics · Volume discounts · Wholesale pricing
--- ## Building an MCP Server for a Shopify App: A Practical Guide URL: https://www.discountprime.app/blog/building-an-mcp-server-for-a-shopify-app-a-practical-guide Category: AI & Agentic Commerce | Author: Aspedan.dev | Published: June 10, 2026 | Updated: July 1, 2026 | Read time: 6 min | Tags: mcps, ai, shopify, software-engineering, api-development > A hands-on walkthrough of exposing your Shopify app's logic to AI agents, with the design decisions that matter and the pitfalls that don't. Primary audience: Engineers and technical founders building... _A hands-on walkthrough of exposing your Shopify app's logic to AI agents, with the design decisions that matter and the pitfalls that don't._ **Primary audience:** Engineers and technical founders building Shopify apps; anyone evaluating MCP adoption **Goal of this piece:** Be the reference practical guide. Reader finishes with a working mental model and a concrete first endpoint to ship. This is a companion piece to **The Agentic Commerce Playbook for Shopify** Merchants, written for engineers. Part 2 of the series explained what MCP is at the conceptual level. This piece covers the practical work of actually exposing a Shopify app via MCP: the first endpoint to ship, the design decisions that matter, and the handful of pitfalls worth calling out before they cost you time. ### What does 'MCP server for a Shopify app' actually mean An MCP server, in the context of a Shopify app, is a small service that exposes specific app capabilities through the Model Context Protocol so that AI agents can call them. It is not a rewrite of your app. It is a thin layer that translates agent-side requests into calls against your existing app's logic, with appropriate caching and response shaping. If your app already has an internal service layer, MCP is an adapter in front of it. The server itself can run as a sidecar to your existing deployment, as a separate service, or, for smaller apps, inside the same process. The deployment shape matters less than the interface shape. What agents care about is the set of tools the server advertises, the parameters each tool accepts, and the response each tool returns. ### The minimum viable first endpoint The first endpoint to ship is intentionally unambitious: a read-only '[what promotions apply to this cart](/blog/ucp-mcp-ap2-a2a-explained-for-merchants-who-dont-code)?' query. It takes a cart description (line items, customer context, channel) and returns a list of active campaigns that would fire for that cart, along with the resulting price impact. This is the first endpoint for three reasons. It is deterministic: given the same input, it returns the same output, which is what agents reward. It is safe: read-only, with no side effects or risk of an agent accidentally running a campaign. And it is useful: it is the exact question an agent asks when reasoning about whether your offer is competitive on a given cart. Shipping this endpoint alone already places you in a small minority of discount apps as of mid-2026. ### Auth and scopes: the two mistakes to avoid on day one The first auth mistake is making the server accessible without meaningful authentication because' agents are public'. They are not. Agents act on behalf of users, and those users have merchant-specific scopes. Your MCP server needs to authenticate the agent as acting on behalf of a specific merchant, using the same access control you would enforce on any other API. The second mistake is copying your existing API's scope structure into MCP without rethinking it. MCP has its own access patterns at the tool level. A tool that reads pricing data needs only price-read scope; a tool that modifies a campaign needs campaign-write scope. Do not grant a single broad scope for 'MCP access'. Agents will not need most of it, and the broader the scope, the less comfortable platforms will be surfacing your app to their users. ### Caching and determinism: why agents punish flakiness Agents call your server many more times than a human user would. For any non-trivial agent task, the same question is often asked multiple times, once during planning, again during verification, again at checkout. If your server returns different answers to the same input on different calls, the agent treats the server as unreliable and either caches itself or routes around you heavily. The fix is explicit caching with clear invalidation. Cache responses by a hash of the request input, and invalidate by well-defined events (campaign created, cart changed, product updated). Agents are highly tolerant of caching headers; they use them. They are not tolerant of servers that look the same but behave differently. Determinism is not just a correctness concern for MCP; it is a trust signal. ### From read-only to recommend-capable The next step beyond the minimum viable endpoint is recommendation: instead of 'what applies to this cart?' the endpoint answers 'what is the best offer you can give this cart to maximize margin (or conversion, or AOV)?' This is the step where your app stops being a static reference and becomes an optimization layer that the agent actively queries during a decision. The recommended endpoint is significantly more complex than the read endpoint, because it requires the app to reason about margin floors, stacking constraints, and optimization objectives. It is also where your app becomes genuinely differentiated. A read-only server is table stakes. A recommended server is a moat. Most apps will never ship the second endpoint. The ones that do will be the ones AI-era merchants select. ### Three pitfalls not worth worrying about Three things that get disproportionate attention in MCP discussions are not actually important in the first six months of shipping. **The first is protocol-version politics**: MCP is evolving, but the core request-response pattern has been stable enough that early implementations port forward easily. Ship against the current spec; do not try to anticipate the next one. **The second is tooling choice**. Python, Node, go: it does not matter for an MCP server. Use what your app already uses. The server is thin; the language choice has minimal long-term implications. **The third is perfect semantic alignment with every agent**. You will ship and find that ChatGPT's agent, Google's agent, and Perplexity's agent each interpret your tools slightly differently. That is expected. Optimize for the most-traffic agent first, expand from there. ### What shipping this buy you A production-grade read-only MCP endpoint for a Shopify discount app can be built in four to six engineering weeks if you already have a clean internal service layer. The payoff is not immediate traffic; it is option value. When agent adoption crosses a threshold in your category (and it will, category by category), the apps with MCP exposure are the ones the agents find. The apps without it are not on the map. The work is worth doing early, while the cost is low and the positioning advantage is high. > _Companion piece to The Agentic Commerce Playbook for Shopify Merchants. Standalone, but complements the adjacent main-series article._ ### Key Angle Most MCP content is either protocol spec material or toy examples. This piece is written from the perspective of a Shopify app founder building a real read-plus-recommend endpoint. It covers the five design decisions that matter (auth, caching, determinism, rate limits, error surface) and skips the twenty that don't. --- **Related on Discount Prime:** [Profit analytics](/profit-analytics) · [Best Shopify discount apps](/best-shopify-discount-apps) --- ## The Free Shipping Threshold Playbook for Shopify Stores URL: https://www.discountprime.app/blog/free-shipping-threshold-playbook Category: Shipping | Author: Discount Prime Team | Published: June 7, 2026 | Updated: July 6, 2026 | Read time: 9 min | Tags: free shipping, aov, conversion, shopify > Free shipping is the top purchase incentive in ecommerce, but treating it as a flat cost erodes margin. Set the threshold just above your average order value (usually 15 to 25 percent higher), show a live progress bar so the goal is visible, and protect margin by capping the subsidy, excluding already-discounted orders, and watching margin per order. Pair it with volume or tiered pricing for two reasons to add to the cart, and measure AOV, attach rate, and margin per order to keep the threshold profitable. *Free shipping is the most requested incentive in ecommerce, and the most quietly mismanaged. Treated as a flat cost, it bleeds margin. Treated as a lever, it becomes one of the most reliable ways to lift average order value on Shopify.* **Quick answer:** Set your free shipping threshold about 15 to 25 percent above your current average order value, show a live progress bar so shoppers can see how close they are, and protect margin by capping the subsidy and excluding already-discounted orders. Measure average order value, attach rate, and margin per order, and revisit the number every quarter. ## Free shipping is a promotion, not a cost center Survey after survey puts free shipping at the top of what makes shoppers complete a purchase, and unexpected shipping cost at the top of why they abandon carts. That tells you two things at once: free shipping moves conversion, and the way you present it matters as much as whether you offer it. The mistake most stores make is booking free shipping as a fixed line in the P&L, a cost they absorb on every order. The better model is to treat it as a conditional promotion you tune: a threshold the shopper unlocks by adding more to the cart. Done well, the extra margin from a larger order more than pays for the shipping you cover. ## How to set the right threshold The single most important number is your current average order value (AOV). The ideal free shipping threshold sits just above it, usually **15 to 25 percent higher**. High enough that the shopper has to add something to qualify, low enough that the goal still feels reachable. A worked example. If your AOV is $60, a threshold around $70 to $75 asks most shoppers to add one more item. Set it at $50 and you give away shipping on orders that already cleared the bar. Set it at $120 and most carts never get close, so the offer does nothing except train shoppers to wait for a better deal. ### AOV-to-threshold reference Use your own AOV as the anchor and start near the middle of the range, then adjust with your order distribution. | Current AOV | Conservative (15%) | Recommended (20%) | Aggressive (25%) | | --- | --- | --- | --- | | $40 | $46 | $48 | $50 | | $60 | $69 | $72 | $75 | | $80 | $92 | $96 | $100 | | $100 | $115 | $120 | $125 | | $150 | $173 | $180 | $188 | For a sharper number, look at the distribution, not just the average. If a lot of orders cluster between $55 and $65, a $69 threshold captures that cluster perfectly. Re-check it every quarter, because as AOV drifts the right threshold drifts with it. ## Protect the margin while you do it A threshold lifts AOV, but free shipping still costs real money, and on heavy or remote orders it can cost more than the margin on the extra item. Three guardrails keep it profitable: - **Cap what you subsidize.** Cover up to a set shipping amount and let the customer pay anything above it, so a heavy or far-flung order cannot run away from you. - **Exclude already-discounted orders.** Stacking free shipping on top of a coupon compounds the giveaway. Decide whether the two can combine, and usually they should not. - **Mind the floor.** If a deep discount plus free shipping pushes an order below your acceptable margin, the campaign is costing you money even as the dashboard shows more revenue. Watch margin per order, not just order count. ### The one formula to check first Before you launch, confirm the extra margin covers the shipping you give away: > **Added margin per qualifying order = (extra units added to reach the threshold) x (margin per unit) - (shipping cost you subsidize)** If that number is positive across a typical basket, the threshold pays for itself. If it is negative, raise the threshold, cap the subsidy, or tighten which orders qualify. ## Show the progress A threshold the shopper cannot see does almost nothing. The lift comes from a visible, live goal. A progress bar that reads "You are $12 away from free shipping" reliably increases units per order, because it turns an abstract rule into a concrete, almost game-like target. Two placements matter and behave differently. In the cart, the bar is a gentle nudge that updates as items go in. On the product page, it can prompt the add in the first place. Keep the message to one clear line, and once the shopper crosses the threshold, switch the bar to a confident "You unlocked free shipping" rather than leaving a half-finished meter on screen. For a deeper look at why a single, focused bar converts better than several competing ones, see our piece on [the psychology of the discount progress bar](/blog/shopify-wholesale-b2b-tiered-pricing). ## Set it up in Shopify The mechanics are straightforward once the strategy is set: 1. **Find your true AOV.** In Shopify admin, open Analytics and read average order value over the last 90 days, not just last week. 2. **Pick the threshold** from the table above, starting near the 20 percent mark. 3. **Decide the qualifying rules.** Which markets, which customers, and whether discounted carts are excluded. 4. **Turn on a cart progress bar** so the remaining amount is always visible. 5. **Cap the subsidized shipping amount** to protect heavy and remote orders. 6. **Watch it for two weeks**, then adjust up or down based on margin per order. ## Segment the offer Free shipping does not have to be one rule for everyone. Thresholds can vary by market, because shipping costs and competitor norms differ by country. They can vary by customer, so a first-time buyer sees a sharper incentive than a loyal repeat customer who already converts. And they can be scoped to a collection, so the offer pushes the categories where the extra unit actually carries margin. ## The mistakes that quietly cost you - Setting the threshold below your AOV, so you fund shipping on orders you would have won anyway. - Setting it so high it feels unreachable, which kills the nudge and can increase abandonment. - Hiding the offer in a banner instead of showing live progress in the cart. - Forgetting to exclude discounted orders, so promotions stack into a loss. - Setting it once and never revisiting it as AOV and shipping costs move. ## Measure what matters Judge a free shipping threshold by three numbers, not by how popular it feels. Average order value tells you whether the nudge is working. Attach rate, the share of orders that added an item to qualify, tells you how strong the pull is. And margin per order tells you whether the lift is profitable after the shipping you covered. If AOV rises but margin per order falls, the threshold is too generous and needs to move up. This is the same profit-first discipline we cover in [why GMV is a vanity metric](/blog/gmv-is-a-vanity-metric-why-your-discount-app-should-report-margin-instead). ## Frequently asked questions **What is the best free shipping threshold for a Shopify store?** Set it just above your current average order value, usually 15 to 25 percent higher, so most shoppers have to add one item to qualify but the goal still feels reachable. Recheck it each quarter as your AOV moves. **Does free shipping actually increase average order value?** Yes, when it is conditional and visible. A threshold with a live progress bar that shows how far the shopper is from free shipping reliably raises units per order by turning the rule into a concrete goal. **How do I offer free shipping without losing money?** Cap the shipping amount you subsidize, exclude already-discounted orders, and watch margin per order rather than order count. If a discount plus free shipping pushes an order below your acceptable margin, raise the threshold or tighten the rules. **Should free shipping stack with other discounts?** Usually not. Stacking free shipping on top of a coupon compounds the giveaway. Exclude already-discounted orders unless you have deliberately modeled the combined margin. ## Bringing it together A free shipping threshold is at its best when it is not alone. Pair it with volume or tiered pricing and you give the shopper two reasons to add more to the cart: a better unit price and free delivery. Add margin-aware rules underneath, and the whole thing stays profitable while it grows order value. That combination, a visible goal on top and margin protection underneath, is the difference between free shipping as a cost you dread and free shipping as a lever you pull on purpose. --- *Discount Prime runs margin-safe free shipping thresholds, progress bars, and volume pricing natively inside Shopify.* ### Sources - [Cart Abandonment Rate Statistics, Baymard Institute](https://baymard.com/lists/cart-abandonment-rate) - [Free shipping strategies, Shopify](https://www.shopify.com/blog/free-shipping) --- **Related on Discount Prime:** [Free shipping](/free-shipping) · [Volume discounts](/volume-discounts) · [Profit analytics](/profit-analytics) --- ## Selling in the AI Shopping Era: What Merchants Need to Know URL: https://www.discountprime.app/blog/selling-in-the-ai-shopping-era Category: AI & Agentic Commerce | Author: Discount Prime Team | Published: June 4, 2026 | Updated: July 1, 2026 | Read time: 8 min | Tags: ai, llmo, seo, ecommerce > Shoppers increasingly start with an AI assistant instead of a search bar, so the merchants an assistant can read are the ones it recommends. Make your store machine-readable with schema.org structured data, factual product descriptions, and explicit current pricing. Make promotions legible by building them as clear rules (buy 3 save 15 percent, free shipping over $50) rather than vague sale banners. Optimize for the answer with FAQ content, page summaries, and named entities. Discount Prime models discounts as explicit, structured rules that an AI assistant can read, compare, and surface. *The search bar is no longer the front door. A growing share of shoppers now start with an AI assistant, ask for a recommendation, and buy what it surfaces. If a machine cannot read your store, you are invisible in that conversation.* ## The storefront is moving from search to answers For two decades, ecommerce optimized for one behavior: a person typing keywords into a search box and scanning a page of blue links. That behavior is changing. Shoppers increasingly open ChatGPT, Perplexity, Gemini, or Shopify's own shopping assistants and ask a question in plain language, like "find me the best bulk deal on organic cotton tees" or "which of these has free shipping over $50." They expect a direct answer, not a list to sift through. This is the start of agentic commerce, where an AI acts on the shopper's behalf and in some cases completes the purchase. We go deeper on that shift in [agent-native pricing](/blog/agent-native-pricing-what-happens-when-your-customer-is-an-llm) and on the new protocols behind it in [UCP, MCP, AP2, and A2A explained](/blog/ucp-mcp-ap2-a2a-explained-for-merchants-who-dont-code). The practical takeaway for a merchant today is simpler: the winner of that conversation is whoever the machine can most easily understand and recommend. ## Make your store machine-readable An AI assistant does not see your theme. It sees data. Three things decide whether it can represent you accurately. **Structured data.** Mark up product and offer pages with schema.org types (Product, Offer, AggregateRating, FAQPage). This is the difference between an assistant guessing your price and knowing it. Structured data is how a machine reconciles your page into facts it can quote. **Clear, factual descriptions.** Write product copy a model can extract entities from: what it is, what it is made of, who it is for, what problem it solves. Marketing adjectives do not travel; concrete attributes do. "Organic combed cotton, 180 gsm, unisex sizing XS to 3XL" is legible. "Buttery-soft everyday essential" is not. **Explicit, current pricing and promotions.** Keep price, availability, and active offers stated plainly and kept up to date. An assistant will not infer a sale from a banner image; it reads the structured offer. ## Make your promotions legible to a machine This is where most stores quietly lose the AI shopper. A vague "Sale!" graphic means nothing to a model. A promotion described in plain, structured language means everything. "Buy 3, save 15 percent" or "free shipping over $50" is something an assistant can parse, compare against rivals, and surface to a buyer who asked for exactly that. The lesson: the clearer and more structured your discount mechanics, the more often an AI can recommend them. Offers built as explicit rules, like quantity breaks, tiered prices, and thresholds, are far more machine-legible than a one-off coupon buried in an email. ## Optimize for the answer, not just the click Classic SEO chases rankings. Answer-engine and generative-engine optimization chase being the answer the model gives. The tactics overlap but the emphasis shifts: 1. **Answer real questions.** Add FAQ content, marked up as FAQPage, that addresses the exact questions buyers ask. Assistants lift these almost verbatim. 2. **Summarize the takeaway.** Lead each page with a short, plain summary of what it offers. Models reward content they can compress without losing meaning. 3. **Name your entities.** State the brands, categories, materials, and use cases your products relate to, so the model can place you in the right consideration set. 4. **Keep it consistent.** Your structured data, your visible copy, and your actual checkout must agree. Contradictions make a model distrust the source. ## Where Discount Prime fits Most of this comes down to one thing: making your offers explicit, structured, and current so a machine can read them. That is exactly how Discount Prime models discounts. Instead of a coupon code or a banner, a campaign is a defined rule, a volume break, a tiered unit price, a spend threshold, or a Buy X Get Y, with clear conditions and a clear reward. Those rules are inherently more legible to an AI assistant than a vague sale, and they stay current automatically as the campaign runs. The same structure that protects your margin on the storefront, the thread this blog keeps coming back to, also makes your offers easier for an answer engine to surface. A promotion a machine can read is a promotion a machine can recommend. ## The takeaway The merchants who win the AI shopping era will not be the ones with the loudest banners. They will be the ones whose products and offers are the easiest for a machine to understand, compare, and recommend. Structure your product data, state your prices and promotions explicitly, answer the questions buyers actually ask, and build your discounts as clear rules rather than vague sales. The storefront is becoming a conversation, and legibility is how you get invited into it. --- *Discount Prime turns promotions into explicit, structured rules with clear conditions and rewards, the kind an AI assistant can read, compare, and surface.* ### Sources - [Intro to how structured data works, Google Search Central](https://developers.google.com/search/docs/appearance/structured-data/intro-structured-data) - [Schema.org Product type](https://schema.org/Product) --- **Related on Discount Prime:** [Agent-native pricing](/blog/agent-native-pricing-what-happens-when-your-customer-is-an-llm) · [UCP, MCP, AP2, A2A explained](/blog/ucp-mcp-ap2-a2a-explained-for-merchants-who-dont-code) · [Best Shopify discount apps](/best-shopify-discount-apps) --- ## Agent-Native Pricing: What Happens When Your Customer Is an LLM URL: https://www.discountprime.app/blog/agent-native-pricing-what-happens-when-your-customer-is-an-llm Category: AI & Agentic Commerce | Author: Aspedan.dev | Published: June 3, 2026 | Updated: July 1, 2026 | Read time: 5 min | Tags: agentic-commerce, ecommerce, ai, pricing-strategy, shopify > The pricing psychology that works on humans does not always work on agents. The ones that do are different, specific, and underused. Primary audience: Shopify merchants experimenting with AI channels,... _The pricing psychology that works on humans does not always work on agents. The ones that do are different, specific, and underused._ **Primary audience:** Shopify merchants experimenting with AI channels, pricing strategists, revenue ops leaders **Goal of this piece:** Introduce agent-specific promotion framings as a distinct discipline. Merchant finishes by being able to articulate at least two promotion types that work better for agents than for humans. This is the third article in The **Agentic Commerce Playbook for Shopify** Merchants. The first two articles argued that your promotions are invisible to agents and explained the protocols that enable agent-channel commerce. This one goes a layer deeper. Assume the plumbing is in place. Assume your campaigns are reaching agents. What should the campaigns themselves look like? The answer is that the promotion mechanics you have used on humans for the last decade were shaped by human attention. Agents are not human-attention machines. They are patient query executors that parse structured information and optimize against a user's stated goal. A promotion designed for one audience fails on the other (not dramatically, just quietly) by producing lower conversion for reasons that are never obvious from a dashboard. ### Why agents don't respond to urgency the way humans do Countdown timers, stock-running-low banners, and flash-sale framings evolved to interrupt a distracted human's drift toward abandonment. They work because a human is weighing the offer against the cognitive cost of continuing to think. An artificial scarcity cue tips that weighing. Agents do not weigh cognitive cost. They evaluate the offer against explicit criteria that the user provided. A countdown is noise. A scarcity banner is noise. A one-day window is either relevant or irrelevant; the agent does not find it more compelling because the timer is moving. This is not a criticism of urgency mechanics. On human traffic, they still work. It is a warning that applying them to agent traffic adds nothing and may actively harm your feed's signal-to-noise. Some agents explicitly downrank offers that rely heavily on urgency, because urgency is a heuristic humans use to detect manipulative merchandising. ### The four promotion types that translate cleanly to agents Four promotion structures work well in the agent channel because they are parseable and deterministic. **The first is structured quantity pricing.** '2-for-$38' is an offer an agent can evaluate precisely: for a user asking 'find me two of this', the agent can compute that the structured offer beats buying two individually. Tiered quantity discounts in general (for example, 'buy 3 get 20% off the third') work for the same reason. **The second is threshold-based shipping.** 'Free shipping over $40' is a deterministic condition that an agent can include in its total-cost calculation. It performs well in agent channels because it changes the cart's numeric outcome in a way the agent can verify. **The third is bundle pricing.** A pre-defined bundle at a specific price is a single item from the agent's perspective. The agent is not choosing three products; it is choosing one bundle. If the bundle price beats the sum of the components by a defensible margin, it wins on the comparison. **The fourth is condition-scoped discounts that the agent can evaluate without having to guess.** 'First-time customer: 10% off' is such a case: the agent either knows or can be told whether the user is a first-time customer. The clearer the condition, the better the agent can reason over it. ### The three that don't, and why pushing them harder backfires Three promotion types translate poorly. **BOGO in its classic form is one.** 'Buy one get one' is ambiguous to an agent unless the structure is explicit about which item is discounted, at what percentage, and under what condition. A well-structured BOGO is fine; the loose marketing framing is not. **Gift-with-purchase is another.** A gift has unclear value to an agent's cost calculation. The agent does not know how much the user values the gift, and the user has typically not specified a preference. Most agents conservatively ignore gift-with-purchase as a meaningful variable. **Flash sales framed around urgency are the third.** The discount itself is fine; it is the framing that fails to carry into the agent context. The underlying offer should still be structured and exposed; the 'for the next four hours' copy will not move the needle. ### The translation layer: same campaign, two framings None of this implies you should redesign your human-channel promotions. The pattern that works is a translation layer. The campaign is defined once, in the merchant's operational terms, and the presentation differs by channel. A '48-hour flash sale at 20% off' on the storefront becomes '20% off site-wide through June 5' in the agent feed: same offer, different framing appropriate to the audience. The tooling to do this is not widely available. Most discount apps publish a single representation of a campaign and rely on the storefront or the agent to figure out what to do with it. The apps that will matter in the next phase are those that automatically generate channel-specific representations, so merchants do not need to split their campaigns into two sets manually. ### A simple test to run on your next flash sale If you want to see this dynamic directly, run the following experiment on your next promotional campaign. Create two feed representations of the same underlying offer. - In one, include the urgency framing, the flash-sale copy, the scarcity cues: the full human-channel presentation. - In the other, strip all of that and leave only the structured numeric claim. Serve each to a subset of agent queries over a one-week window. Compare the conversion of the agent-originated orders for each. What most merchants find when they run this is that the structured version converts meaningfully better in the agent channel, often by 10 to 25 percent on a clean test. The difference compounds over months, because it is not noise; it is a consistent effect driven by the agent's information diet. The merchants who understand this early will have a measurable advantage by the end of 2026. > _Part 3 of 9, The Agentic Commerce Playbook for Shopify Merchants. Each article in the series stands on its own, but is designed to be read in sequence._ --- **Related on Discount Prime:** [Buy X Get Y](/bxgy) · [Profit analytics](/profit-analytics) --- ## Shipping at the Highest Resolution: Checkout Customization for Shopify Plus URL: https://www.discountprime.app/blog/shipping-at-the-highest-resolution-checkout-customization-for-shopify-plus Category: Shipping | Author: Aspedan.dev | Published: June 2, 2026 | Updated: July 1, 2026 | Read time: 8 min | Tags: conversion-rate-optimizer, shipping-strategy, checkout-optimization, ecommerce-enterprise, shopify-plus > Shipping at the Highest Resolution: Checkout Customization for Shopify Plus At the Plus tier, shipping decisions can live inside the checkout itself, the last surface where profit, experience, and pol... ### Shipping at the Highest Resolution: Checkout Customization for Shopify Plus _At the Plus tier, shipping decisions can live inside the checkout itself, the last surface where profit, experience, and policy meet._ This is the ninth and final article in The Profit-First Discount Playbook for Shopify Merchants. We have moved from the foundation conflict rules through the planning, protection, geography, measurement, design, policy, and optimization layers of a modern discount program. Everything in the first eight articles applies to every Shopify store, regardless of plan. This article is different. It is about a capability that becomes available only on [**Shopify Plus**](https://www.shopify.com/ca/landing/plus-ppc), and it is the capability that makes the rest of the stack reach all the way to the moment of purchase: checkout customization for shipping. ### The plan difference that actually matters The jump from standard Shopify plans to Shopify Plus unlocks several things: higher throughput limits, dedicated support, and organizational features. Most merchants who move to Plus do it for one or more of those reasons. But the Plus-only capability that most directly affects profit and is most underused is full access to checkout customization, including the shipping step. On standard Shopify plans, the checkout is powerful but not fully programmable. You configure rates, you ship through carriers, and the checkout presents the rates you configured. The logic ends at the rate card. Plus, the checkout becomes a programmable surface. The rates you present, the order in which they appear, the copy associated with them, and the hidden logic that decides which rate a given customer sees are all addressable. This is not a cosmetic difference. It is where the profit-first stack from the previous eight articles connects to the customer experience. ### What checkout customization unlocks for shipping Consider the final three decisions any customer faces at checkout: which shipping option they choose, whether to add anything in response to a shipping-related offer, and whether to complete the order. Each of those decisions has a marginal consequence. On standard Shopify, the rates presented are a static list. Plus, with checkout customization, they are the output of a live evaluation. Concretely, this means: The rate presented may vary by customer. A loyalty tier member sees a different default rate than a new customer. A member approaching their next tier threshold may see a motivational upgrade offer. A customer in a market where you subsidize shipping sees that reflected in the rate list, while a customer in a market you've excluded sees the standard rates. The rate presented may vary by cart. A cart carrying fragile items defaults to a different carrier service. A cart over a threshold sees free shipping surfaced as the primary rate rather than as a secondary line. A cart that is one unit away from a threshold sees a subtle prompt explaining the benefit of crossing it, not as a pop-up, not as an intrusive upsell, but as information presented at the precise moment the customer is making the decision. The rate presented can depend on your margin model. This is the most quietly powerful capability. When the profit guard from Article 3 evaluates a cart, it can reason about checkout shipping behavior, and the checkout surface can respond. If a particular rate would push the margin below the floor on this cart, the checkout can either reprice the rate, hide it, or select a different default. **No support ticket. No broken experience. A deterministic, margin-aware rate presentation.** ### The customer-experience win It would be reasonable to wonder whether all this logic at checkout risks a worse experience, a checkout that feels too variable, too engineered, too complex. In practice, the opposite is true: complexity at the checkout today is not coming from customization; it is coming from the absence of it. The confusing checkouts are the ones where five rates appear for a domestic order, two of which look identical, leaving the customer to parse them. The checkouts that feel unfair are the ones where a threshold promotion is running, but the shipping rate doesn't reflect it. The checkouts that feel cluttered are the ones where every customer sees every option, because the system has no capacity to hide what doesn't apply. A well-customized checkout is simpler from the customer's view, not more complex. Fewer rates. More relevant rates. Clearer framing of the threshold they are near. A checkout that feels like it was designed for them, because to a meaningful extent, it was. ### What this does to the stack Checkout customization on Plus is the last surface on which the profit-first stack operates. Every layer we have discussed conflict, simulation, profit guard, market selection, analytics, custom mechanics, safety rules, and shipping policy culminates here. The conflict rules in [Article 1](/blog/why-your-discount-stack-is-silently-killing-your-margin) ensure that the shipping and product offers produce a coherent final price. The simulation from [Article 2](/blog/stop-launching-promotions-on-hope-dry-run-simulation) has already told you whether the combined behavior produces a healthy margin. The profit guard from [Article 3](/blog/the-profit-floor-run-aggressive-campaigns-without-selling-at-a-loss) watches the live cart. The market rules from [Article 4](/blog/the-hidden-cost-of-global-why-some-shipping-markets-quietly-eat-your-profit) determine which shipping options are eligible at all. The attribution from [Article 5](/blog/if-you-cant-attribute-a-discount-you-cant-defend-it-order-level-analytics) logs the outcome for analysis. The custom mechanics in [Article 6](/blog/beyond-off-designing-discount-mechanics-that-actually-match-how-people-buy) shaped the offers themselves-the safety rules from [Article 7](/blog/discount-safety-rails-stop-losing-money-to-abuse-and-unintended-stacking) close off the exploit patterns. The shipping optimization from [Article 8](/blog/shipping-is-a-profit-lever-not-a-cost-line-how-to-start-treating-it-that-way) sets the policy. And checkout customization: **here is how the customer encounters it as a clean, appropriate, margin-aware shipping experience.** This is the difference between operating a discount program and operating a margin-controlled commerce program. Plus-tier checkout customization completes that transition. ### Why most Plus stores underuse this Having the Plus checkout is not the same as having a Plus checkout strategy. Most Plus stores have the capability and have not built the logic on top of it, for the same structural reason most stores run uncontrolled discount stacks: the tooling they use at the campaign layer does not extend to the checkout layer, so the work has to be done twice, once in the promotional engine and once in a separate customization project. A platform designed as a full profit-first stack closes this gap. The same rules that govern conflict resolution, profit floors, market scoping, and shipping policy also drive the checkout behavior. There is no separate project. The checkout customization is the execution surface of the rules you have already written, not a parallel codebase. When that is true, Plus checkout customization stops being a rarely used advanced feature and becomes the natural endpoint of your promotional logic. ### What to look for in your tooling If you are a Plus merchant, three questions matter here. Does your discount platform extend into Shopify Plus checkout customizations natively, or does it stop at the cart? Can the shipping rate presentation show the rates, the order, and the default, all driven by the same rules that drive your promotional logic? And does the analytics layer from [Article 5](/blog/if-you-cant-attribute-a-discount-you-cant-defend-it-order-level-analytics) surface checkout-level behavior alongside cart-level behavior so that you can reason about the whole funnel? If the platform stops at the cart, you have the first eight articles of this playbook but not the ninth. For many merchants, that is acceptable. For Plus merchants running meaningful international shipping programs or complex tiered loyalty structures, it is the difference between capturing the available margin and leaving it at checkout. ### Closing the series Nine articles back, this series opened with a claim: most discount apps treat discounts as independent objects, and the consequences of that choice show up in the margin you never measured. Every article since has pointed at one layer of the structural alternative a profit-first discount program, where every promotion is an explicit object with explicit relationships to every other, protected by a live margin floor, scoped intelligently by geography, measured at order-level, expressed through the right mechanic, guarded by coherent safety policy, extended to shipping, and at the Plus tier executed directly in the checkout. The individual capabilities matter. The compounding matters more. Stores that adopt one of these layers see an improvement. Stores that adopt all of them change how promotions function within the business from a recurring risk to be managed to a controlled lever that reliably adds to contribution margin, campaign after campaign. That is the playbook. Every feature described in this series exists inside Discount Prime today; the series has treated them as a set of ideas for any merchant building a profit-first discount program, because the ideas are portable. But the compound effect is what we have been building in the product. If any of this has reframed how you're thinking about your own discount program, that is exactly the point of writing it. **_End of series → The Profit-First Discount Playbook: nine layers of control, from conflict rules to Plus-tier checkout customization. Thank you for reading._** > _Part 9 of 9 - The Profit-First Discount Playbook for Shopify Merchants. Each article in the series stands on its own, but is designed to be read in sequence._ ### Want to put the profit-first playbook into practice? [Discount Prime](https://apps.shopify.com/discountprime) is where the capabilities of this series [conflict management](/blog/why-your-discount-stack-is-silently-killing-your-margin), [before/after simulation](/blog/stop-launching-promotions-on-hope-dry-run-simulation), [Profit Guard](/blog/the-profit-floor-run-aggressive-campaigns-without-selling-at-a-loss), [market-level shipping intelligence](/blog/the-hidden-cost-of-global-why-some-shipping-markets-quietly-eat-your-profit), [order-level attribution](/blog/if-you-cant-attribute-a-discount-you-cant-defend-it-order-level-analytics), [custom mechanics](/blog/if-you-cant-attribute-a-discount-you-cant-defend-it-order-level-analytics), [safety rules](/blog/discount-safety-rails-stop-losing-money-to-abuse-and-unintended-stacking), [shipping optimization](/blog/shipping-is-a-profit-lever-not-a-cost-line-how-to-start-treating-it-that-way), and Shopify Plus checkout customization come together as one working system. You can install it from the Shopify App Store and start with whichever layer matters most to your business today. > **_More from the aspedan team →_** [_Aspedan blog_](/blog)_ > We write about commerce infrastructure, profit-aware tooling, and the ideas behind what we build. If this series resonated with you, the rest of the blog is written in the same spirit for operators who want their promotional calendar to defend margin, not just drive volume._ --- **Related on Discount Prime:** [Free shipping](/free-shipping) · [Profit analytics](/profit-analytics) --- ## Shipping Is a Profit Lever, Not a Cost Line: How to Start Treating It That Way URL: https://www.discountprime.app/blog/shipping-is-a-profit-lever-not-a-cost-line-how-to-start-treating-it-that-way Category: Shipping | Author: Aspedan.dev | Published: May 28, 2026 | Updated: July 1, 2026 | Read time: 8 min | Tags: fulfillment-optimization, shipping-strategy, shopify, logistics, ecommerce-margin > Shipping Is a Profit Lever, Not a Cost Line: How to Start Treating It That Way Shipping decisions get made in spreadsheets and quietly executed at checkout. A profit-first discount engine brings shipp... ### Shipping Is a Profit Lever, Not a Cost Line: How to Start Treating It That Way _Shipping decisions get made in spreadsheets and quietly executed at checkout. A profit-first discount engine brings shipping into the same control surface as the rest of your promotional stack._ If you have been reading this series in order, you have seen a progression: conflict rules, simulation, profit guards, market selection, analytics, custom mechanics, safety rules. Each article has treated a piece of the discount program as a first-class object that deserves explicit design. Shipping for most Shopify stores does not receive this treatment. It lives as a cost line in a fulfillment spreadsheet. It gets tuned once a quarter. It is discussed when the rate card changes; otherwise, it is treated as a constant. Meanwhile, the shipping decisions threshold, rate, subsidy, and carrier determine the margin of almost every order that goes through your checkout. > This article is the case for treating shipping with the same rigor as every other component of your discount stack. ### The default state: shipping by absence of decision Most stores arrive at their current shipping policy by accumulation rather than design. An initial decision was made early on to use a flat rate, free over some threshold, calculated by the carrier, and it has been left mostly unchanged since. Occasional pushes have adjusted the free-shipping threshold. Occasional experiments have toggled a promotion. The core policy has not been revisited because no one has the capacity to reopen it, and no tool has emerged as an opportunity. The consequence is a shipping posture that made sense two years ago, in a different cost environment, with a different AOV, against a different carrier contract. Each order under that posture looks fine. In aggregate, it is quietly the largest controllable margin lever in the business. ### What shipping optimization actually means Shipping optimization, inside a modern discount engine, is the capability to treat shipping not as a flat cost but as an outcome of policy that is set centrally, evaluated against the profit rules you have already defined, and executed consistently at checkout across every campaign and every market. > **Concretely, that means four things.** **First, shipping offers are campaigns**. Free shipping above a threshold is a campaign. Flat-rate shipping during a specific window is a campaign. Reduced-rate shipping for members is a campaign. Each one has a scope, a combinability declaration, and a measurable impact on margin. It is not an unstructured setting on the storefront; it is a first-class entity in your promotional calendar. **Second, shipping costs are inputs to the profit model.** The Profit Guard from Article 3 cannot reason about margin unless it knows the landed shipping cost on the specific order, the destination, the weight, and the carrier. If your shipping costs are locked in a separate system, the guard is flying blind on the single largest variable cost in the order. A profit-first platform brings shipping cost data into the same evaluation surface as product cost. **Third, shipping is scoped by market**, as we covered in [Article 4](/blog/the-hidden-cost-of-global-why-some-shipping-markets-quietly-eat-your-profit), and by customer segment, campaign, and cart composition. The same 'free shipping above $ 75' offer can be active for a loyalty tier and inactive for new customers, active in one market and inactive in another, active on a specific product category and inactive on another. These combinations are not exotic; they are what a sophisticated shipping program looks like. A tool that only lets you toggle 'free shipping threshold' as a single global setting is compressing a two-dimensional problem into a one-dimensional slider. **Fourth, shipping performance is measured with the same attribution** rigor we described in [Article 5](/blog/if-you-cant-attribute-a-discount-you-cant-defend-it-order-level-analytics). Every order that benefited from a shipping-related campaign has an attributable shipping subsidy line, visible in the order-level breakdown. At the end of the month, you can answer the question 'how much margin did our shipping promotions cost, and how much incremental revenue did they bring' without reconstructing the answer from exports. ### Where the real profit hides Most Shopify stores could meaningfully improve contribution margin by doing three things in their shipping program, and each of them requires the program to be structured rather than ad-hoc. **The first is threshold optimization**. The free-shipping threshold is not supposed to be a hunch; it is supposed to be the point at which the uplift in crossed carts covers the subsidy on the carts that would have been ordered anyway. That number varies by store; it moves with AOV and drifts with cost inflation. A store that revisits its threshold quarterly, with a simulation of crossed-cart uplift against real history, consistently finds an optimum that is neither where the tool defaults it nor where intuition placed it. **The second is differentiated offers**. A single flat rate applied to every market and every cart is rarely optimal. A policy that varies flat in high-density domestic zones, tiered by weight in shipping-heavy categories, and free-over-threshold in specific markets only captures more margin. For most stores, the blocker is not the insight. It is that their tool does not let them express the policy without writing code. A profit-first discount platform removes that blocker. **The third is promotion-aware shipping**. When a campaign runs, shipping behavior should respond. During a BOGO campaign, your effective AOV shifts, which means your free-shipping threshold is effectively lower. During a tiered-volume campaign, customers are already being drawn toward larger carts. Your shipping offer can either reinforce that or layer in a way that overpays. A platform that treats shipping as a campaign lets you wire those responses explicitly rather than hoping the interaction comes out right. ### Shipping and the rest of the stack Shipping is the capability that most tightly exercises every earlier piece of this series. Conflict management ([Article 1](/blog/why-your-discount-stack-is-silently-killing-your-margin)) matters because shipping offers will routinely touch product discounts, cart discounts, and tier benefits on the same cart. Without explicit combinability rules, shipping interactions produce the bulk of support tickets in many stores. Simulation ([Article 2](/blog/stop-launching-promotions-on-hope-dry-run-simulation)) matters because threshold tuning without simulation is a guess. The right threshold is the one that, when run against your actual history, produced the best margin outcome, and that's a computation, not a hunch. Profit Guard ([Article 3](/blog/the-profit-floor-run-aggressive-campaigns-without-selling-at-a-loss)) matters because a shipping subsidy is often the last layer that tips a cart below margin, and the guard needs to know it's there. Without shipping as an input, the guard makes decisions on incomplete information. Market selection ([Article 4](/blog/the-hidden-cost-of-global-why-some-shipping-markets-quietly-eat-your-profit)) matters because shipping economics are, for practical purposes, a function of geography. The market layer is where most of the shipping profitability signal actually lives. Analytics ([Article 5](/blog/if-you-cant-attribute-a-discount-you-cant-defend-it-order-level-analytics)) matters because, without attributable shipping subsidies in the order breakdown, you cannot tell which shipping offers paid for themselves. Reporting aggregate shipping costs tells you nothing about the offers. Custom mechanics ([Article 6](/blog/beyond-off-designing-discount-mechanics-that-actually-match-how-people-buy)) and safety rules ([Article 7](/blog/discount-safety-rails-stop-losing-money-to-abuse-and-unintended-stacking)) both apply directly. Shipping is a mechanic class; abuse of shipping (threshold gaming, same-day returns of threshold-qualifying items) is among the most common targets of safety rules. Put together, this is why shipping optimization, properly defined, is the capability that most stores can improve the most, with the lowest downside risk, once the rest of the discount stack is in place. ### What to look for in your tooling When you evaluate a platform's shipping capabilities, ask three questions. Can shipping offers be declared and managed as campaigns with scoping, combinability, and measurable performance rather than as a single global setting? Are shipping cost inputs integrated into the profit evaluation surface so that the profit guard can reason about the landed margin? And do shipping promotions appear in order-level analytics as attributable contributions, not as a hidden component inside a generic 'shipping' bucket? ### Where this leads For most Shopify stores, the shipping optimization described here is where the series ends - it is the final profit lever, and the rest is execution. But for Shopify Plus merchants, there is one more layer of control available, and it is the subject of the ninth and final article in this series: checkout customization for shipping on Shopify Plus. That's where the control surface we've described extends into the checkout flow itself. **_Up next in the series → Checkout Customization for Shopify Plus: extending shipping control directly into the checkout flow._** > _Part 8 of 9 - The Profit-First Discount Playbook for Shopify Merchants. Each article in the series stands on its own, but is designed to be read in sequence._ ### Want to put the profit-first playbook into practice? [Discount Prime](https://apps.shopify.com/discountprime) is where the capabilities of this series [conflict management](/blog/why-your-discount-stack-is-silently-killing-your-margin), [before/after simulation](/blog/stop-launching-promotions-on-hope-dry-run-simulation), [Profit Guard](/blog/the-profit-floor-run-aggressive-campaigns-without-selling-at-a-loss), [market-level shipping intelligence](/blog/the-hidden-cost-of-global-why-some-shipping-markets-quietly-eat-your-profit), [order-level attribution](/blog/if-you-cant-attribute-a-discount-you-cant-defend-it-order-level-analytics), [custom mechanics](/blog/if-you-cant-attribute-a-discount-you-cant-defend-it-order-level-analytics), [safety rules](/blog/discount-safety-rails-stop-losing-money-to-abuse-and-unintended-stacking), [shipping optimization](/blog/shipping-is-a-profit-lever-not-a-cost-line-how-to-start-treating-it-that-way), and Shopify Plus checkout customization come together as one working system. You can install it from the Shopify App Store and start with whichever layer matters most to your business today. > **_More from the aspedan team →_** [_Aspedan blog_](/blog)_ > We write about commerce infrastructure, profit-aware tooling, and the ideas behind what we build. If this series resonated with you, the rest of the blog is written in the same spirit for operators who want their promotional calendar to defend margin, not just drive volume._ --- **Related on Discount Prime:** [Free shipping](/free-shipping) · [Profit analytics](/profit-analytics) --- ## Sidekick Pulse vs. Third-Party Shopify Apps: Cooperate or Compete? URL: https://www.discountprime.app/blog/sidekick-pulse-vs-third-party-shopify-apps-cooperate-or-compete Category: AI & Agentic Commerce | Author: Aspedan.dev | Published: May 27, 2026 | Updated: July 1, 2026 | Read time: 5 min | Tags: platform-strategy, saas, ai-assistant, shopify, startup > Shopify's merchant-side AI can now create discounts. Apps that try to beat it at that will lose. Apps that let you call them will win. Primary audience: Founders of Shopify apps in the discount, bundl... _Shopify's merchant-side AI can now create discounts. Apps that try to beat it at that will lose. Apps that let you call them will win._ **Primary audience:** Founders of Shopify apps in the discount, bundle, pricing, and loyalty categories **Goal of this piece:** Offer a clear strategic framework for a decision every app founder is quietly making. The reader walks away with a yes/no answer for their own product. This is a companion piece to The Agentic Commerce Playbook for Shopify Merchants. The Winter 2026 edition of Shopify shipped Sidekick Pulse, a merchant-side AI assistant that can create coupons, segments, and campaigns via voice or text commands. For app founders in the discount and promotions category, Sidekick is the most direct competitive event of the year. This piece is about how to read it. ### What Sidekick actually does in the discount workflow Sidekick Pulse is not a competitor to a discount app in the traditional sense. It does not run its own discount engine. It sits above Shopify's native capabilities and orchestrates them with natural-language commands. A merchant tells Sidekick, 'run 15% off site-wide for the next 48 hours, but exclude the sale section,' and Sidekick creates the underlying discount objects using the platform's native tools. That is powerful, and it handles a substantial share of the small-to-medium merchant's campaign workload. What it does not do (at least not in the current generation) is reason about margin floors, run profit-optimized stacking, manage cross-channel orchestration, or expose live campaigns to agentic product feeds. It covers the 'create a simple campaign' step well. It does not cover the 'make sure the campaign is actually a good idea' step. ### The three places Sidekick stops There are three structural limits on what Sidekick will do over the next two years, and understanding them is the central strategic question. The first is data. Sidekick reasons over what Shopify knows natively. It does not know your supplier cost, your warehouse holding cost per SKU, your seasonal margin floors, or your category-specific return rates unless you have configured those somewhere accessible. Any decision that depends on that data is a decision Sidekick cannot fully make. The second is optimization. Sidekick creates campaigns. It does not evaluate which of the five possible campaigns would lift the margin the most on your current inventory and customer mix. That is an optimization problem requiring merchant-specific models. The platform will not build those per-merchant. It is an app-layer responsibility. The third is interoperability. Sidekick orchestrates Shopify-native features. It does not orchestrate the agentic feed, the MCP endpoint, the cross-channel coherence that a serious merchant now needs. The scope of what an agent-ready promotion requires is wider than Sidekick's territory. ### The MCP tool pattern as a cooperative strategy The single strategic move that changes the math for a discount app is to [expose itself as an MCP tool](/blog/building-an-mcp-server-for-a-shopify-app-a-practical-guide) that Sidekick can call. When Sidekick encounters a merchant request that exceeds its own capability (for example, 'create a campaign that maximizes margin, respects the stacking rules, and exposes offers to AI agents'), it can delegate to an app if that app has published itself as callable. This is the same pattern that has played out in every dominant-platform-with-assistant combination for the last twenty years. Apps that let the assistant call them become more valuable as the assistant grows. Apps that try to replace the assistant lose distribution and spend their time rebuilding what the platform ships for free. The second path looks brave and is losing by default. ### Why 'compete directly' is the worst move for small teams. There is a temptation for an app founder watching Sidekick eat into their top-of-funnel to respond by building a better general-purpose AI assistant inside the app. It sounds coherent. AI is where value is accruing, so build AI. In practice, for a small team, this is a commitment to losing. Shopify has more data, deeper integration, broader distribution, and a faster retail-to-AI loop than any third-party app is likely to match. Building a general-purpose merchant assistant against Sidekick is a losing game for nearly everyone who tries it. The winning game is to be the specialist Sidekick calls. That means depth in one territory (profit-aware discount optimization, cross-channel promotion orchestration, margin-protected stacking) and exposure in the interfaces the platform assistant uses. A focused specialist that Sidekick reaches for is more durable than a general assistant competing for the same screen. ### How to position your app in six months The concrete work is narrower than the strategic framing suggests. A discount or promotions app that wants to be in the cooperative position in six months needs three things: - **an MCP endpoint with the app's core capabilities exposed in a form an assistant can call;** - **a registration pattern so that Sidekick knows the app is available; and documentation positioned for LLM discovery, not just human readers.** #### The engineering effort is real but bounded. The strategic effort (letting go of the ambition to 'be the AI' and settling into 'be the tool the AI uses') is the harder part. The apps that make this shift early will compound as Sidekick adoption grows. The apps that spend the next year fighting Sidekick head-on will discover the ground moved beneath them faster than they expected. Cooperate or compete is not a rhetorical question. It is a category-defining call that every founder in this space is making, whether consciously or not. > _Companion piece to The Agentic Commerce Playbook for Shopify Merchants. Standalone, but complements the adjacent main-series article._ ### Key Angle The instinct when a platform ships a competing feature is to fight or flee. This piece argues that the better move for discount apps is neither. It's to become the execution layer Sidekick calls. Apps that expose themselves as MCP tools become more valuable as Sidekick adoption grows. Apps that try to replace Sidekick become a smaller, slower version of it. --- **Related on Discount Prime:** [Best Shopify discount apps](/best-shopify-discount-apps) · [Profit analytics](/profit-analytics) --- ## Discount Safety Rails: Stop Losing Money to Abuse and Unintended Stacking URL: https://www.discountprime.app/blog/discount-safety-rails-stop-losing-money-to-abuse-and-unintended-stacking Category: Discounts & Promotions | Author: Aspedan.dev | Published: May 26, 2026 | Updated: July 1, 2026 | Read time: 7 min | Tags: promotional-strategies, ecommerce-security, fraud-prevention, customer-experience, shopify > Discount Safety Rails: Stop Losing Money to Abuse, Unintended Stacking, and Edge Cases Every discount program eventually attracts behavior you didn't design for. Safety rules are how you close those g... ### Discount Safety Rails: Stop Losing Money to Abuse, Unintended Stacking, and Edge Cases _Every discount program eventually attracts behavior you didn't design for. Safety rules are how you close those gaps without clawing back the experience for your best customers._ We are seven articles into this series on profit-first discounting. The previous article closed with a warning: the more expressive your discount mechanics, the more edge cases you'll create. This article is about closing those edge cases without retreating to a plain, uninteresting promotional calendar. Discount safety rules are the policy layer of your discount engine. They are the rules that sit outside any individual campaign and define, in cross-cutting terms, what is allowed and what is not, regardless of which promotion the customer is trying to use. ### The patterns that quietly drain margin Every mature e-commerce operation eventually encounters the same small set of exploit patterns, even without overt bad actors. **Code sharing**. A welcome code designed for first-time buyers is posted on a deal site, and suddenly, a meaningful percentage of your new-customer discount is claimed by people on their tenth order using a different email address. **Serial return-and-reorder**. A returns policy combined with a loyalty tier produces customers who buy during a promotion, return at full refund, and re-order at the discounted tier, capturing margin on both sides of the cycle. **Threshold gaming**. A free-shipping-at-$75 promotion, combined with a liberal return policy, produces a consistent pattern of $80 carts, with one item always returned after shipping has been fulfilled, effectively moving your free-shipping floor to $60. **Code stacking via shared accounts**. Two codes that are not supposed to be combined are combined when one customer submits two orders using two logins with the same payment method. **Unintended stacking through layer ambiguity**. A customer ends up with a combination of a tier discount, a cart discount, and a shipping subsidy that, under your conflict rules, was technically legal but produces a blended margin you never sanctioned. > None of these is catastrophic individually. All of them compound at scale. And none of them can be fully prevented by campaign-level design alone, because they exploit patterns that span multiple campaigns and sessions. ### What discount safety rules actually are A safety rule is a cross-campaign constraint. It is not part of any one promotion; it is a property of your entire discount program. Think of the conflict rules we discussed in Article 1 as the 'grammar' of your promotions. Safety rules are the 'sentence length, tone, and publication policy.' In a profit-first discount engine, safety rules should cover at a minimum: **Customer-level eligibility**: rules that declare a given promotion or class of promotions is available only to customers who meet or do not meet certain history criteria, new versus existing, account age, prior order count, prior return rate, and tier membership. **Frequency limits**: constraints on how often a promotion can be used by the same customer, the same email, the same household (inferred by shipping address), or the same payment method. **Cross-campaign ceilings**: a limit on the total discount value applicable to a single order, regardless of which campaigns contributed a belt-and-suspenders backstop behind your conflict rules and Profit Guard. **Time-window constraints**: rules about how close together a customer can use promotions, or how promotions behave during specific periods (launches, sales, blackout windows). > Geographic and channel constraints: rules that govern where a discount is valid, which channels can distribute it, and which cannot. **Code issuance and redemption controls**: limits on code generation volume, single-use versus reusable codes, and visibility of the code itself. Individually, each of these is straightforward. What makes a safety rules system valuable is that all of them compose, and they are expressed at a higher level than any individual campaign. Hence, the behavior is consistent across your promotional calendar, even as individual campaigns come and go. ### Why retrofitting this is hard? Most discount tooling grows safety rules by accretion. A new exploit appears. A feature is added to block that specific exploit. Six months later, another exploit appears. Another feature has been added. Two years in, the merchant has fifteen scattered toggles with overlapping semantics and no clear policy. A platform built with safety rules as a first-class concept presents them as a coherent policy surface, one place to see what your program's rules are, one place to reason about whether a given behavior is possible, one place to write new rules without tangling the old ones. This is a much smaller distinction to describe than to use. When you need to audit your discount program for a compliance review, a finance review, or an incident investigation, the difference between a policy surface and a pile of toggles is the difference between a two-hour meeting and a two-week project. ### Safety rules and customer experience The worst safety rules are invisible to you and insulting to your customer. A code that silently fails at checkout, a promotion that quietly doesn't apply, an error message that reads like the system blamed the user, these are where crude fraud controls ruin customer experience for the 99% of customers who were never going to exploit anything. Well-designed safety rules have two properties. They are enforced server-side, not as surface-level form validation. And they surface to the customer as clear, non-accusatory messaging when appropriate, or silently as scope narrowing when the customer was never going to be eligible in the first place. A returning customer who is ineligible for a new-customer promotion should not see that promotion, not click a code, and be told they are ineligible. This matters for the same reason market exclusion from Article 4 mattered. The goal is not to erect visible obstacles. The goal is to quietly keep the program profitable while ensuring every eligible customer receives exactly the offer they are supposed to receive. There is also a change-management benefit to treating safety rules as a first-class surface. When a rule is added, the system records when it was added, why, and by whom. When an exception is granted for a specific customer segment or a specific partner campaign, the exception itself is an auditable object, not a note in a Slack thread. For merchants operating at any real scale, this kind of auditability is not optional; finance teams, compliance teams, and partner-program managers all need to be able to answer the question 'what was the policy on this date?' And 'the policy' must be something they can read, not something they have to reconstruct from toggles spread across seven different settings pages. ### What to look for in your tooling Ask whether the tool separates safety rules from campaign-specific logic. Ask whether you can express customer-level eligibility and frequency limits across campaigns, not just within one. Ask whether there is a cross-campaign total discount ceiling that acts as a final backstop. Ask whether rule enforcement is server-side. And ask whether the rules are auditable and whether you can, on demand, generate the list of currently active safety rules and their coverage. If the answer to those is 'we have discount code usage limits,' the tool has one safety rule and is marketing it as a system. ### Where this leads We have now covered the full promotion, design, and protection layers. What remains is the area where most Shopify merchants leave the most money on the table without realizing it: shipping. Shipping is usually treated as a cost to be covered or a discount to be given. The next article argues it is a profit lever that deserves the same structural treatment as every other part of your discount stack. **_Up next in the series → Shipping Optimization: treating shipping as a first-class profit lever, not a cost line._** > _Part 7 of 9 - The Profit-First Discount Playbook for Shopify Merchants. Each article in the series stands on its own, but is designed to be read in sequence._ ### Want to put the profit-first playbook into practice? [Discount Prime](https://apps.shopify.com/discountprime) is where the capabilities of this series [conflict management](/blog/why-your-discount-stack-is-silently-killing-your-margin), [before/after simulation](/blog/stop-launching-promotions-on-hope-dry-run-simulation), [Profit Guard](/blog/the-profit-floor-run-aggressive-campaigns-without-selling-at-a-loss), [market-level shipping intelligence](/blog/the-hidden-cost-of-global-why-some-shipping-markets-quietly-eat-your-profit), [order-level attribution](/blog/if-you-cant-attribute-a-discount-you-cant-defend-it-order-level-analytics), [custom mechanics](/blog/beyond-off-designing-discount-mechanics-that-actually-match-how-people-buy), safety rules, shipping optimization, and Shopify Plus checkout customization come together as one working system. You can install it from the Shopify App Store and start with whichever layer matters most to your business today. > **_More from the aspedan team →_** [_Aspedan blog_](/blog)_ > We write about commerce infrastructure, profit-aware tooling, and the ideas behind what we build. If this series resonated with you, the rest of the blog is written in the same spirit for operators who want their promotional calendar to defend margin, not just drive volume._ --- **Related on Discount Prime:** [Profit analytics](/profit-analytics) · [Best Shopify discount apps](/best-shopify-discount-apps) --- ## Beyond % Off: Designing Discount Mechanics That Actually Match How People Buy URL: https://www.discountprime.app/blog/beyond-off-designing-discount-mechanics-that-actually-match-how-people-buy Category: Discounts & Promotions | Author: Aspedan.dev | Published: May 21, 2026 | Updated: July 1, 2026 | Read time: 7 min | Tags: shopify, discount-design, merchandising, ecommerce-strategy, conversion-optimization > Beyond Percentage Off: Designing Discount Mechanics That Match Buyer Behavior The shape of a discount is a strategic choice. Stores that can configure the mechanic, not just the value, consistently ou... ### Beyond Percentage Off: Designing Discount Mechanics That Match Buyer Behavior _The shape of a discount is a strategic choice. Stores that can configure the mechanic, not just the value, consistently outperform stores that can only change the number._ If you've been following this series, we've now covered conflict management, simulation, live profit guards, market-level scoping, and order-level analytics. That's the profit-control backbone. In this article, we turn from defense to design. Because once your stack is protected, the question becomes what to run. And the choice is much wider than most merchants treat it to be. ### The tyranny of the percentage discount Most discount tooling pushes you toward a small set of defaults. Percentage off. Fixed amount off. Free shipping. Maybe a BOGO with a handful of rigid configurations. The interface rewards simplicity, which is fine for early-stage stores, but it quietly shapes how you think about promotions as a number to tune, rather than as a mechanism to design. A percentage discount is a blunt instrument. It pulls demand forward. It rewards customers who were going to convert anyway. It produces almost no selection effect on cart composition. And in most categories, once you exceed a threshold, usually around 20%, it starts doing damage to brand perception that no analytics dashboard will tell you about. The alternative is not 'run fewer discounts.' The alternative is to treat the mechanism itself as the strategic variable. ### What 'custom template' actually means A modern discount engine should give you a library of discount mechanics, each with its own logic, and let you configure that logic precisely. Not 'the system has BOGO' but 'the system lets you define BOGO where buy is scoped to these products, get is scoped to those products, get quantity is conditional on buy quantity, and the get value can be a percentage of the lowest, highest, or specific line.' Each mechanic shifts customer behavior differently. A flat 15% off the cart is one thing. A tiered 'spend more, save more' 10% at $75, 15% at $125, 20% at $200 is a fundamentally different animal: it creates visible, crossable thresholds that pull cart size up without paying the 20% cost on every order. A bundle 'any three from this collection for 25% off' is different still: it encourages composition, which favors inventory balance and affinity products. A progressive gift-with-purchase, a gift at $100, an upgraded gift at $150 taps into psychological dynamics that a percentage discount cannot touch. Custom templates are the surface area through which you express these mechanics. And the depth of that surface area is the difference between running promotions as a recurring chore and running them as an expressive design discipline. ### Matching mechanic to moment Different campaigns have different purposes. The mechanic should serve the purpose. A new customer welcome promotion is about a single conversion. A simple fixed-amount-off 'save $10 on your first order over $40' tends to outperform a percentage here, because a dollar amount anchors more clearly in the customer's mind at low cart sizes, and it protects your margin on the small orders that define a first purchase. A volume-driving campaign during a slower period needs a mechanic that rewards larger carts asymmetrically. Tiered discounts excel here. The top tier does the storytelling; the bottom tier does the volume; the middle tier does most of the actual work. A clearance motion on aging inventory needs a mechanic who is steeped in the target products and invisible on everything else. Category-scoped percentage discounts, or bundle mechanics that force aging inventory to move as part of a composite offer, better serve the merchandising goal than a storewide cut that also discounts your freshest SKUs. A loyalty reward is not really a discount; it's a recognition mechanism. A member-only mechanic, configured as a tier with its own pricing, is visible only when logged in and communicates something a generic discount code cannot. None of these is more sophisticated than the others in isolation. They are appropriate to different moments. The operational unlock is that your platform lets you pick the right one without code, without workarounds, and without collapsing every promotion back into 'percentage off.' The traps to avoid are those that sound clever on the pitch but misfire in execution. A tier whose top threshold almost no customers actually reach becomes aspirational branding rather than a functional mechanic; you are not moving volume; you are decorating the storefront. A bundle whose composition is too narrow will sit unused, because most of your traffic doesn't walk in with three specific items in mind. A member-only price visible to logged-out traffic devalues the membership it was supposed to reward. Each of these is a design error, and each becomes visible the moment you run the mechanic through simulation against real carts, which is, again, why the layers of this series depend on each other rather than standing alone. ### Where this plays with the rest of the stack Custom templates don't replace the earlier pieces in this series - they depend on them. The richer your mechanic library, the more complex the interactions between campaigns become, which is why conflict management had to be the first article. A tiered cart discount combined with a bundle promotion has a nontrivial resolution order. Without a conflict model, the complexity collapses into chaos. With one, the complexity becomes expressiveness. The richer your mechanics, the more important simulation becomes, because the intuitions you've built around flat percentages will not transfer. Simulating a tiered mechanic against your history tells you which threshold placement maximizes uplift without over-rewarding carts that would have crossed the threshold anyway. The richer your mechanics, the more valuable order-level analytics becomes, because a bundle's performance is not captured in the same numbers as a percentage campaign's. The attribution layer needs to know which template shape is applied so that performance reporting is apples-to-apples. ### A note on what this is not Custom templates are not the same as 'discount codes with more fields.' A field-heavy discount UI with thirty toggles and no underlying mechanic model is the worst of both worlds. It looks powerful, and it is actually brittle. What matters is the underlying mechanic: is there a clean conceptual model for tiered, bundled, progressive, conditional, and member-scoped discounts, and can each be configured without writing code or abusing the code field? The right test is simple. Describe the promotion you want to run in business language. Can you set it up in the tool in the same language? If you are translating from 'spend more, save more at three clean tiers' into 'three stacked percentage discount codes with complicated eligibility filters,' the tool is forcing you into a shape that will break something downstream. ### What to look for in your tooling Three questions. Does the platform give you first-class mechanic templates, tiered, bundle, BOGO with composable buy/get logic, progressive gift-with-purchase, member-only pricing, not as workarounds but as explicit campaign types? Can you configure each of them without code, and have the configuration validate cleanly against your conflict and profit rules? And does the analytics layer report on performance by mechanic type so that you can compare apples-to-apples across your calendar? ### Where this leads Expressive mechanics are powerful. Powerful mechanics create edge cases. Edge cases, at checkout, become abuse vectors for customers who intentionally or unintentionally combine campaigns in ways that defeat your intent. The seventh article in this series looks at discount safety rules: the policy layer that closes off the exploits that would otherwise eat your margin without showing up as a campaign you launched. **_Up next in the series → Discount Safety Rules: the guardrails that stop abuse, unintended stacking, and edge-case exploits before they hit your margin._** > _Part 6 of 9 - The Profit-First Discount Playbook for Shopify Merchants. Each article in the series stands on its own, but is designed to be read in sequence._ ### Want to put the profit-first playbook into practice? [Discount Prime](https://apps.shopify.com/discountprime) is where the capabilities of this series [conflict management](/blog/why-your-discount-stack-is-silently-killing-your-margin), [before/after simulation](/blog/stop-launching-promotions-on-hope-dry-run-simulation), [Profit Guard](/blog/the-profit-floor-run-aggressive-campaigns-without-selling-at-a-loss), [market-level shipping intelligence](/blog/the-hidden-cost-of-global-why-some-shipping-markets-quietly-eat-your-profit), [order-level attribution](/blog/if-you-cant-attribute-a-discount-you-cant-defend-it-order-level-analytics), [custom mechanics](/blog/beyond-off-designing-discount-mechanics-that-actually-match-how-people-buy), safety rules, shipping optimization, and Shopify Plus checkout customization come together as one working system. You can install it from the Shopify App Store and start with whichever layer matters most to your business today. > **_More from the aspedan team →_** [_Aspedan blog_](/blog)_ > We write about commerce infrastructure, profit-aware tooling, and the ideas behind what we build. If this series resonated with you, the rest of the blog is written in the same spirit for operators who want their promotional calendar to defend margin, not just drive volume._ --- **Related on Discount Prime:** [Volume discounts](/volume-discounts) · [Tiered pricing](/tiered-pricing) · [Buy X Get Y](/bxgy) --- ## UCP, MCP, AP2, A2A, Explained for Merchants Who Don’t Code URL: https://www.discountprime.app/blog/ucp-mcp-ap2-a2a-explained-for-merchants-who-dont-code Category: AI & Agentic Commerce | Author: Aspedan.dev | Published: May 20, 2026 | Updated: July 1, 2026 | Read time: 6 min | Tags: shopify, protocol, ecommerce, agentic-commerce, ai > The four protocols that will quietly decide which Shopify merchants show up in the AI shopping era, in plain language. Primary audience: Shopify merchants, non-technical founders, marketing leaders tr... _The four protocols that will quietly decide which Shopify merchants show up in the AI shopping era, in plain language._ **Primary audience:** Shopify merchants, non-technical founders, marketing leaders trying to brief engineers **Goal of this piece:** Become the go-to non-technical explainer on the agentic-commerce protocol stack. This is the second article in The **Agentic Commerce Playbook for Shopify** Merchants. The opening article argued that AI agents are a new checkout surface and that most merchants are invisible to them. This article zooms in on the plumbing that makes the surface work. There are four protocols involved, and their acronyms are everywhere: UCP, MCP, AP2, A2A. You do not need to implement any of them yourself, but you do need tooling that speaks all four. This piece is the plain-language version of what each one is, what it does, and what happens if any is missing. ### The problem the protocols solve When a human buys on your storefront, the whole interaction lives inside one system: the browser, the Shopify platform, and your payment processor. When an AI agent buys on behalf of a human, the interaction crosses three or four systems that do not share a database. The agent needs to discover what you sell, price it correctly, pay for it, and, increasingly, coordinate with other agents along the way. None of that is possible without standard protocols. UCP, MCP, AP2, and A2A are the four that matter right now. Each covers one of those steps. ### UCP: the shared language for prices and promotions The Universal Commerce Protocol, co-authored by Shopify and Google, is the structured vocabulary agents use to read a merchant's offerings. It defines how a product is described, how variants are expressed, how prices and promotions are formatted, and how shipping is declared. If the storefront is your shop's public face, UCP is your shop's machine face. It is the thing agents read before they recommend you. What this means in practice: if your store produces a UCP feed that is rich and accurate, your products show up in agent-surfaced answers with the full picture. If your UCP feed is thin (for instance, missing the promotions field), your products appear with a subset of your real offer, which is often why another merchant beats you in the agent's recommendation. ### MCP: How agents ask questions and get answers The Model Context Protocol is a request-response standard. It lets an agent send a specific question to a system and receive a corresponding answer. In the context of Shopify apps, MCP is how an agent can ask '[what promotions apply to this cart](/blog/building-an-mcp-server-for-a-shopify-app-a-practical-guide)?' and get a deterministic answer from the app that manages your discounts. UCP is broadcast: a static-ish feed the agent reads. MCP is conversational: the agent pulls specific information from a specific source in real time. The two work together. UCP tells the agent your store exists and what you sell; MCP lets the agent interrogate details at the moment of decision. For a merchant, MCP matters because it is the only way for live promotion logic to reach an agent. If your discount app does not expose an MCP endpoint, no agent will ever see the specifics of your live campaigns, no matter how good your UCP feed is. ### AP2: money and authorization without handing over a card The Agent Payments Protocol is how agents pay. It is a descendant of the decade of work on payment tokenization, extended to give an agent the ability to authorize a transaction on behalf of its user without the user handing over their payment method to the agent itself. AP2 covers authorization scope, amount limits, recurring authorization, and the audit trail required for disputes. For the merchant, AP2 is mostly transparent because your payment processor handles it. What you care about is that your checkout supports agent-initiated AP2 payments. If it does not, the agent simply does not finalize with you. It finds another store whose checkout does. ### A2A: agents talking to agents, so you don't repeat yourself The Agent-to-Agent protocol is the most subtle of the four. It covers how agents delegate tasks among themselves. In practice, when a user tells a shopping agent Find me a birthday gift under $50 that ships by Friday', that agent may delegate the actual merchant query to a specialized sub-agent, which in turn may delegate shipping-time estimation to another. A2A is how those delegations stay coherent. For a merchant, A2A matters when you are trying to understand why an order arrived with an unexpected attribution chain, or why your offer was shown alongside certain competitors. The coordination happens at this layer. You do not write A2A code. You ask your tooling whether it captures the trail. ### What happens when one is missing The four protocols are compound. Each has a distinct failure mode if it is missing or thin. A thin UCP feed means your store is present but underdescribed, so you lose on comparison. No MCP means your campaigns are invisible, so you lose on relevance. No AP2 means the agent cannot complete the purchase, so you lose the order entirely. No A2A awareness means you cannot explain your own attribution data, so you lose the ability to learn. Most Shopify merchants have a reasonable UCP feed today because Shopify automatically generated it. A growing number have MCP exposure through discount apps that recently shipped it. AP2 support is nearly universal among mainstream payment processors. A2A awareness is the thinnest layer in the average tool stack, because it is the newest and requires attribution work that most apps have not yet done. ### The three-minute checklist You do not need to understand these protocols at a technical level. You do need to ask your tooling four questions. - Is my UCP feed populated with live promotion data, not just static product data? - Does my discount app expose an MCP endpoint that agents can query? - Does my checkout support agent-initiated AP2 payment flows? - Does my attribution layer capture the A2A trail, so I can see which agent chain originated each order? **If the answer to all four is yes, you are in a small minority today.** **If the answer is no or 'I don't know', the next quarter of work is already outlined for you.** The rest of this series will go deeper into each of these. This piece is the map. Keep it handy. > _Part 2 of 9, The Agentic Commerce Playbook for Shopify Merchants. Each article in the series stands on its own, but is designed to be read in sequence._ ### Key Angle Most protocol explainers are either too technical (RFC-like) or too vague (buzzword soup). This piece picks exactly four protocols, explains what each does from a merchant's perspective, and shows the concrete failure mode if any of them are missing. The takeaway: a merchant doesn't need to implement any of these themselves, but they do need tooling that speaks all four. --- **Related on Discount Prime:** [Best Shopify discount apps](/best-shopify-discount-apps) · [Free shipping](/free-shipping) --- ## If You Can't Attribute a Discount, You Can't Defend It: Order-Level Analytics URL: https://www.discountprime.app/blog/if-you-cant-attribute-a-discount-you-cant-defend-it-order-level-analytics Category: Analytics & Comparisons | Author: Aspedan.dev | Published: May 19, 2026 | Updated: July 1, 2026 | Read time: 7 min | Tags: ecommerce-analytics, marketing-measurement, discount-tracking, shopify, attribution > If You Can't Attribute a Discount, You Can't Defend It Aggregate reporting lies by omission. Order-level discount breakdown is how you finally tell which campaigns paid for themselves. Everything we'v... ### If You Can't Attribute a Discount, You Can't Defend It _Aggregate reporting lies by omission. Order-level discount breakdown is how you finally tell which campaigns paid for themselves._ Everything we've built in the first four articles of this series gives you control. Conflict management lets you decide what applies. Simulation lets you test it. Profit Guard lets you enforce a floor. Market selection lets you scope it by geography. Control without measurement is blind. This article is about measurement, specifically, the kind of measurement most discount apps structurally cannot give you. This will change every conversation you have about promotional strategy for the rest of your time as an operator. ### Most merchants accept the reporting. Look at a typical Shopify report on promotional performance. You will see the total discount given over a period, the total revenue, and the total orders. You will see how many times a specific discount code was used. You might see a revenue-per-order comparison against a baseline window. You will not see per-order attribution unless you have built custom reporting. Per-order attribution is the answer to a question that is surprisingly hard to express in most systems: for this specific order, which campaigns contributed what? The welcome discount was five dollars. The tier benefit was three-fifty. The free-shipping subsidy was, effectively, another five. And the cart-level percentage was seven. That order gave away twenty dollars in margin across four distinct mechanisms and earned back forty-two dollars in gross profit. Across the campaign, across the month, which of those four mechanisms was the one that actually paid for itself? Without a per-order breakdown, you cannot answer that question. You can only observe the aggregate, and aggregates are how unprofitable tactics survive for years. ### What dynamic analytics should give you? A discount engine that treats measurement seriously produces three outputs that most do not. **First, every order includes a decomposition of every discount applied to it**, at the line-item level where relevant. Not 'discount: $20.' But 'campaign X: -$8.00 on line 1 and line 2; loyalty tier: -$3.50 on subtotal; shipping subsidy: -$5.00; cart-level promotion: -$3.50.' Each of those is attributable back to a specific campaign, with a specific policy, and ultimately to a specific strategic intent. **Second, analytics are dynamic, meaning they can be sliced along any dimension of your campaign structure. By campaign**. By combine. By customer segment. By market. By channel. By product. By discount mechanism type. The point is not to produce a fixed report; it is to let you ask the question that matters today, against the data you actually have, with the answer returning in seconds rather than in the two-week round trip of a data team ticket. **Third, tracking is continuous, not a post-mortem**. The system tells you, during the life of a campaign, how performance is tracking against the simulation you ran before launch. If the simulation predicted a 12% AOV lift and a 3% margin cost, and the first ten days show a 9% AOV lift and a 4% margin cost, you need to know that now, not at the end of the month when you're choosing the next campaign. ### The questions this lets you answer. With order-level attribution, the conversations that operators have with their data change. A few examples of what becomes possible: You can tell the difference between campaigns that generated incremental orders and campaigns that subsidized orders that were going to happen anyway. A cohort of orders in which the discount's contribution to cart value was low, say, under 5%, and that occurred in customer segments with strong baseline conversion rates, is probably a segment that did not need the discount. Attribution surfaces this. You can compare the effective gross margin of every combination you run. Two promotions that stack legally under your conflict rules produce a measurable margin outcome; two that do not produce a different one. At the end of the month, you know which combine earned its keep. You can identify channels or customer segments where a specific campaign is consistently the highest-contribution discount, and reallocate promotional spend accordingly. If your welcome campaign is carrying your paid-social acquisition cohort and barely touching your organic cohort, that's a strategic input you'd want to be acting on. You can reconcile promotional P&L with finance. This is the quiet, unglamorous value. When your CFO asks how much margin the month's campaigns cost, and whether that cost was paid back, you can answer with a number that comes from the same ledger as the orders, not from a reconstructed spreadsheet. The organizational effect of per-order attribution warrants explicit naming. Executive conversations about promotions, at most stores, revolve around a handful of vague claims: 'the campaign drove traffic,' 'the campaign lifted AOV,' 'the campaign brought back churned customers.' Each of these is unfalsifiable without attribution. With attribution, each claim becomes a testable statement, reported against a clean ledger. Over a few cycles, the team's intuition recalibrates: the campaigns that always got credit but never earned it shrink, and the quiet campaigns that consistently earned margins grow. None of this requires a bigger data team. It requires data that is structured correctly at the source. ### Why can't most platforms produce this Order-level discount attribution requires the discount engine to persist its reasoning, not just its result. When a cart is priced, most systems write the final price. A profit-first system writes the final price and the path - the sequence of rules that produced it, with the contribution of each. This is an architectural decision made long before the reporting UI is drawn. A tool built solely on Shopify's native discount primitives will struggle because those primitives do not natively preserve the attribution chain in a queryable form. A tool built with profit measurement as a first-class goal produces a structured record of every decision, enabling dynamic analytics downstream. > This is also why, when you see a competitor’s analytics that look thin, the explanation is rarely ‘they didn’t build the UI.’ It’s usually ‘they didn’t capture the data.’ ### What to look for in your tooling When evaluating analytics on a discount platform, ignore the dashboards. Look at a single order. Can you see, for that order, the full decomposition of discounts by campaign, in order? Can you export that decomposition? Can you group across orders by any of the dimensions campaign, combine, market, segment, or product, and get a per-campaign margin result? Is the data live or a daily batch? > If the answer to any of those is ‘no,’ the reports you’re being shown are summarizing something you cannot actually drill into. That means your promotional strategy is being tuned on shadows. ### Where this leads Once you can measure what each discount actually did, the natural next question is how the discount is structured. The mechanic matters 'percentage off the cart' is not the same as 'tiered discount on qualifying items', which is not the same as 'fixed dollar off after a condition.' The sixth article in this series looks at custom discount templates and how the ability to choose precisely how a discount works changes which campaigns you can express and which ones move the needle. **_Up next in the series → Custom Discount Templates: why 'how this discount works' is as important as 'how much.'_** > _Part 5 of 9 - The Profit-First Discount Playbook for Shopify Merchants. Each article in the series stands on its own, but is designed to be read in sequence._ ### Want to put the profit-first playbook into practice? [Discount Prime](https://apps.shopify.com/discountprime) is where the capabilities of this series [conflict management](/blog/why-your-discount-stack-is-silently-killing-your-margin), [before/after simulation](/blog/stop-launching-promotions-on-hope-dry-run-simulation), [Profit Guard](/blog/the-profit-floor-run-aggressive-campaigns-without-selling-at-a-loss), [market-level shipping intelligence](/blog/the-hidden-cost-of-global-why-some-shipping-markets-quietly-eat-your-profit), [order-level attribution](/blog/if-you-cant-attribute-a-discount-you-cant-defend-it-order-level-analytics), custom mechanics, safety rules, shipping optimization, and Shopify Plus checkout customization come together as one working system. You can install it from the Shopify App Store and start with whichever layer matters most to your business today. > **_More from the aspedan team →_** [_Aspedan blog_](/blog)_ > We write about commerce infrastructure, profit-aware tooling, and the ideas behind what we build. If this series resonated with you, the rest of the blog is written in the same spirit for operators who want their promotional calendar to defend margin, not just drive volume._ --- **Related on Discount Prime:** [Profit analytics](/profit-analytics) · [Best Shopify discount apps](/best-shopify-discount-apps) --- ## The Hidden Cost of Global: Why Some Shipping Markets Quietly Eat Your Profit URL: https://www.discountprime.app/blog/the-hidden-cost-of-global-why-some-shipping-markets-quietly-eat-your-profit Category: Shipping | Author: Aspedan.dev | Published: May 14, 2026 | Updated: July 1, 2026 | Read time: 7 min | Tags: shopify, retailglobal, profit-margin, international-ecommerce, shipping-strategy > The Hidden Cost of Going Global: Why Some Shipping Markets Quietly Eat Your Profit The geography your promotions serve is part of your P&L. A profit-first platform treats unprofitable destinations as... ### The Hidden Cost of Going Global: Why Some Shipping Markets Quietly Eat Your Profit _The geography your promotions serve is part of your P&L. A profit-first platform treats unprofitable destinations as a first-class problem, not a line item._ Across the first three articles in this series, the focus has been on the [cart conflict resolution](/blog/why-your-discount-stack-is-silently-killing-your-margin) between promotions, [simulation of those promotions](/blog/stop-launching-promotions-on-hope-dry-run-simulation) against history, and a [live margin floor](/blog/the-profit-floor-run-aggressive-campaigns-without-selling-at-a-loss) at checkout. Each layer operates on the content of a single order. But profitability on **Shopify** has a dimension that most discount tools never model: where the order is going. Two identical carts going to two different countries are not in the same order. One of them costs you meaningfully more to fulfill. One of them has a higher return rate, a higher chargeback rate, or a higher duty-adjustment cost. One of them requires a currency conversion that eats another point or two. And when a promotion is running, especially one that includes shipping, those differences decide whether the order is profitable at all. ### The assumption nobody questions Most discount tools assume geography is somebody else's problem. You set up a campaign, you declare it available in 'All regions' or in your Shopify Markets configuration, and the promotion goes wherever you ship. The margin math, if it's done at all, is done at the aggregate level, in a spreadsheet, after the fact. This works when your cost structure is roughly uniform. It stops working the moment your shipping economics diverge meaningfully between markets. And for most stores serving more than two or three countries, they always do. Free shipping above a $75 threshold might be wildly profitable in your home country, marginal in two adjacent markets, and loss-making in three farther ones. A 20% storewide discount might absorb just fine into domestic margin, clip the international margin to zero, and turn specific remote markets into negative-margin territory once you factor in landed cost. None of this shows up in the campaign; the campaign is one thing, applied uniformly. It shows up only in the blended result, weeks later, after you've absorbed the losses. ### What market-level profit control looks like A platform that treats market selection as a first-class concept does three things differently. **First, it lets you scope every campaign to a specific set of markets, not** as an afterthought or an advanced setting, but as a normal property of the promotion. A BOGO campaign is available in these markets. A free-shipping-above-threshold campaign is available in those markets. A 20% seasonal promotion is available globally except in these three markets, where fulfillment economics don't support it. The policy is explicit. The scoping is visible. **Second, it can automatically exclude markets where the promotion would be unprofitable based on cost inputs, shipping zones, and your declared margin floor**. This is the 'automatic' part. Rather than manually auditing 40 markets every time you launch a campaign, you declare a rule. This promotion must maintain X margin per order, evaluate every shipping market against that rule, and suppress the promotion in markets where it cannot clear the floor. **Third, it keeps the customer experience coherent in markets where the promotion is excluded.** Customers there still see standard pricing, still check out successfully, still transact, but they don't receive a promotion that wouldn't have made sense on their order: no broken codes, no surprise at checkout, no support churn. ### The promotions this change Free shipping is the most obvious. Free shipping, as a marketing lever, is powerful. Free shipping, as a global policy applied uniformly, is a slow margin drain in half the markets you offer it. A market-aware discount engine lets you run the free-shipping promotion aggressively in markets where shipping economics absorb it, and silently withhold it in markets where it would make orders unprofitable. You get the uplift where it pays off. You don't pay for it where it doesn't. Storewide discounts behave similarly. A 25% campaign looks clean on paper. Against your home-market cost structure, it holds margin. In a remote market where fulfillment adds another 8 to 12 percentage points to landed cost, the same 25% turns unit economics red. An intelligent discount layer lets you keep the campaign live in the markets where it's sustainable and either reduce its depth or exclude it in the markets where it isn't. Threshold-based combinations, such as 'gift above $100' and 'upgrade shipping above $150', depend even more heavily on market economics because the thresholds themselves have different meanings across markets. A $100 cart in your home market is a common size; in a smaller market, it may be rare, and the customers who reach it are atypical. Market-aware scoping is how you ensure the promotion runs where it actually changes customer behavior at a sustainable cost. There's a softer benefit that matters for long-term growth: the markets you quietly withhold a promotion from are not markets you abandon. They still check out. They still see your catalog. Over time, if their fulfillment economics improve, a regional 3PL, a bulk-shipping partner, or a lane optimization, you can flip the promotion on without a re-launch, a marketing announcement, or any signal to the customer that anything has changed. The exclusion was silent on the way in; the inclusion is silent on the way back. That's the right posture for a sustainable international program. ### Why most tools don't do this Market exclusion based on profitability requires two things most discount apps lack: native integration with Shopify Markets at the campaign-rule level, and cost data structured by market. Without the first, you're limited to the coarse allow-lists Shopify exposes. Without the second, you can't express 'unprofitable' in terms that the tool can reason about; all you have is 'available' or 'not available,' with no intelligence about why. This is the intersection of the conflict management and profit guard ideas from earlier in the series, extended one dimension further. Conflict management declares relationships between promotions. Profit Guard declares a floor at the cart. Market selection declares scope at the geography layer. Together, they form a three-dimensional control surface: what promotions interact, what margin a cart can land at, and what markets the campaign is allowed to reach. ### What to look for in your tooling Three questions cut through the noise. Can every campaign be scoped to a specific subset of Shopify Markets, as a first-class property? Can that scoping be automated, meaning the platform itself can exclude markets where the campaign would not clear your margin floor, based on cost inputs? And does the exclusion behavior preserve a clean customer experience in excluded markets - no broken checkouts, no confusing error states? If any of those answers are 'work around it manually' or 'upgrade to our enterprise tier,' you are running aggregated promotions in a disaggregated cost world. ### Where this leads With conflict control at the promotion layer, simulation at the planning layer, a profit floor at the cart layer, and market scoping at the geography layer, you have a working profit-protected discount system. The next question becomes measurement. Which of these promotions actually moved the margin? Which customer cohorts responded? What dollar of discount produced what dollar of gross profit? That is what the fifth piece in this series addresses: dynamic analytics, order-level discount breakdown, and attribution. **_Up next in the series → Dynamic Analytics: how order-level discount breakdown turns promotional performance from anecdote into a measurable, attributable line item._** > _Part 4 of 9 - The Profit-First Discount Playbook for Shopify Merchants. Each article in the series stands on its own, but is designed to be read in sequence._ ### Want to put the profit-first playbook into practice? [Discount Prime](https://apps.shopify.com/discountprime) is where the capabilities of this series [conflict management](/blog/why-your-discount-stack-is-silently-killing-your-margin), [before/after simulation](/blog/the-profit-floor-run-aggressive-campaigns-without-selling-at-a-loss), [Profit Guard](/blog/the-profit-floor-run-aggressive-campaigns-without-selling-at-a-loss), [market-level shipping intelligence](/blog/the-hidden-cost-of-global-why-some-shipping-markets-quietly-eat-your-profit), order-level attribution, custom mechanics, safety rules, shipping optimization, and Shopify Plus checkout customization come together as one working system. You can install it from the Shopify App Store and start with whichever layer matters most to your business today. > **_More from the aspedan team →_** [_Aspedan blog_](/blog)_ > We write about commerce infrastructure, profit-aware tooling, and the ideas behind what we build. If this series resonated with you, the rest of the blog is written in the same spirit for operators who want their promotional calendar to defend margin, not just drive volume._ --- **Related on Discount Prime:** [Free shipping](/free-shipping) · [Profit analytics](/profit-analytics) --- ## The Profit Floor: How to Run Aggressive Campaigns Without Selling at a Loss URL: https://www.discountprime.app/blog/the-profit-floor-run-aggressive-campaigns-without-selling-at-a-loss Category: Profit & Strategy | Author: Aspedan.dev | Published: May 12, 2026 | Updated: July 1, 2026 | Read time: 6 min | Tags: shopify, profit-margin, promotions, margin-protection, pricing-strategy > A live profit floor (Profit Guard) evaluates every cart at checkout in real margin and prevents any order from shipping below the floor you set, no matter how discounts align. It lets merchants run deeper, more aggressive campaigns because the loss-making tail of orders is clipped automatically. *Your best campaign and your worst order can live in the same promotion. A live margin floor prevents bad orders from ever shipping.* So far in this series, we have covered two capabilities that matter before a promotion goes live. [Conflict management](/blog/why-your-discount-stack-is-silently-killing-your-margin), which lets you declare how every campaign relates to every other. [Simulation](/blog/stop-launching-promotions-on-hope-dry-run-simulation), which lets you test those relationships against your actual order history before shipping them. Both are in the planning stage. But planning has limits. Customer behavior is not fully knowable. Edge cases exist. The specific basket a specific customer builds on a Tuesday afternoon is not in your historical data, and sometimes that basket is the one that breaks your model. This is where a live margin floor, a Profit Guard, earns its place in the stack. It is the thing that sits at the checkout itself, watching every order as it forms, and enforcing the rule your finance team wishes every merchandiser had written down: no order ships below this margin, no matter what combination of discounts lined up to produce it. ## The almost-profitable promotion Consider a promotion that performs beautifully in simulation. 95% of the orders would have cleared your margin floor with room to spare. The average uplift looks excellent. You ship it. For 99% of actual orders, reality matches the simulation. Then a customer builds a cart that was never in your history. A mix of promotional SKUs, a product at the end of its price-lifecycle, a shipping destination that costs more than your blended average, and a loyalty tier that your simulation did not fully capture because this customer just crossed the tier threshold yesterday. Everything resolves legally under your conflict rules. Every discount is one you declared. And the final margin on that order is negative. Without a Profit Guard, that order ships. You find it weeks later, if you find it at all, in analytics. With a Profit Guard, that order either trims the discount back to the floor you defined, or triggers a fallback behavior: suppress a secondary promotion, revert shipping to standard cost, or exclude the line that tipped it. The decision is made at the cart, in real time, based on the specific configuration the customer built. ## What Profit Guard actually does A real profit guard has three properties. It is live: it runs at the moment the cart is priced, not as a post-hoc report. It is per-order: it evaluates the actual cart, not an average. And it is policy-driven: you define what happens when the floor is reached, and the system executes that policy consistently. That last property is what separates a guard from a warning. A warning tells you something is wrong. A guard intervenes. Depending on your configuration, the intervention can be as gentle as suppressing the lowest-priority discount until the cart clears the floor, or as firm as capping total discount at a fixed percentage of the cart value. The right intervention depends on your brand and your category. The important thing is that the intervention exists and is deterministic. ## Why most discount apps cannot do this Most discount tooling operates on the discount value rather than the order margin. This is a subtle distinction with massive consequences. A tool that only sees discount value can tell you this promotion is 20% off, but it cannot tell you, at the moment of checkout, whether 20% off this specific product to this specific customer in this specific market leaves you with a positive margin. It does not have the cost of goods sold. It does not have the landed shipping cost for that destination. It does not know what the cart actually earns. A profit-aware guard is structurally different. It is integrated with cost data, either COGS on the product, blended cost ratios at the category level, or dynamic landed-cost models that include fulfillment and payment processing. It is priced in real margin, not an apparent discount. That is what allows it to make useful decisions at the cart. ## The campaigns you can run once you have a floor The practical effect of a Profit Guard is not that you run smaller promotions. It is that you run larger ones, more confidently. The storewide 25% campaign that you held back to 15% because you were worried about the tail of deeply stacked orders is now safe to run at 25%, because you know the tail is clipped at your floor. The [BOGO-plus-free-shipping](/bxgy) combination that you excluded as too risky is now expressible, because the guard will trim it on the specific orders where it would otherwise break margin. The aggressive loyalty tier you wanted to offer your top 5% of customers, but could not justify, you can offer it, because the math on any individual cart is held within a safe band, regardless of what else happens to be running. The goal here is not to maximize generosity. It is to remove the self-imposed ceiling on promotional depth that exists only because you cannot trust the tail of the distribution. A guard lets you trust the tail. There is a second effect, quieter but just as important: the internal conversation about promotions changes. Merchandising, marketing, and finance are no longer negotiating against a single depth number that each team interprets differently. They agree on a floor below which no orders ship, and then design campaigns above it. Merchandising gets to propose the depth they believe will move product; finance gets an enforced guarantee that individual orders will not break the margin model; marketing gets the freedom to run richer offers. ## Combined with simulation, this is decisive The combination of simulation and profit guard is the point at which discount management becomes a true margin-protected system. Simulation tells you what a campaign would have done to the orders you already know about. The profit guard handles orders you may not yet know about. Together, they give you a two-layer defense: the top layer catches systemic risk before launch, the bottom layer catches tail risk at the cart. Most stores have neither layer. They run promotions, they watch aggregate numbers, and they absorb the tail as a cost of doing business. In a low-growth environment, or a category with thin margins, that absorbed tail is often the difference between a profitable year and a flat one. ## What to look for in your tooling When evaluating a platform for live margin control, three questions matter. Is the guard priced in real margin, meaning it integrates with cost data and evaluates the cart's actual profitability, or is it a simplified cap on the discount percentage? Is the intervention policy configurable, so you decide what happens when the floor is reached? And is it deterministic, so two identical carts always resolve the same way? A discount percentage cap is not a profit guard. A profit guard is a guard on profit. You can see the same idea applied across campaigns in [profit analytics](/profit-analytics), where net margin is calculated per campaign and per order from your real Shopify cost prices. ## Where this leads Profit Guard protects you on any cart, anywhere. But some of your margin problems are not about the cart; they are about the shipping destination itself. Some markets are unprofitable to ship to, no matter how well your promotions resolve, and most discount tools have no concept of this. In the next article, we look at [market selection and the automatic exclusion of unprofitable shipping markets](/blog/the-hidden-cost-of-global-why-some-shipping-markets-quietly-eat-your-profit), the fourth piece of the profit-first playbook. *Part 3 of 9 - The Profit-First Discount Playbook for Shopify Merchants. Each article in the series stands on its own, but is designed to be read in sequence.* ## Want to put the profit-first playbook into practice? [Discount Prime](https://apps.shopify.com/discountprime) enforces a margin floor at checkout and brings [profit analytics](/profit-analytics) and conflict-safe campaigns together as one Shopify-native system, so you can run aggressive offers without selling below cost. --- **Related on Discount Prime:** [Profit analytics](/profit-analytics) · [Best Shopify discount apps](/best-shopify-discount-apps) --- ## Stop Launching Promotions on Hope: How Dry-Run Simulation Changes Campaign Planning URL: https://www.discountprime.app/blog/stop-launching-promotions-on-hope-dry-run-simulation Category: Profit & Strategy | Author: Aspedan.dev | Published: May 7, 2026 | Updated: July 1, 2026 | Read time: 6 min | Tags: shopify, promotions, simulation, campaign-planning, profit-margin > Dry-run simulation runs a campaign or a stacking combination against your real historical orders before launch, producing a side-by-side ledger of revenue and margin. It replaces hope-based releases with evidence and catches combinations that look good on paper but break under load. *If you can simulate a campaign against your real order history before it goes live, your relationship with promotions fundamentally changes.* The [first article in this series](/blog/why-your-discount-stack-is-silently-killing-your-margin) argued that conflict management is the foundation of profitable discounting. Once you can deterministically declare which promotion wins in any scenario, you can plan campaigns with intent rather than fear. But having control over what applies is only half of the problem. The other half is knowing, before you go live, whether the campaign you designed will actually do what you want it to do. This is where most discount tools go silent. They help you build the promotion. They help you schedule it. They might even help you preview the price on a single product. What they cannot tell you is the one thing that actually matters to the business: if this campaign had been live over the last thirty days, on the orders that actually happened, what would it have done to revenue and to margin? ## The hope-based release cycle Without simulation, every promotion is a bet placed with live money. The bet looks like this: we designed a campaign, we believe it will increase conversion, we believe the uplift in volume will outpace the gross margin hit, and we will find out whether we were right in about two weeks when the data is clean. If we were wrong, we will adjust next time. This is how most teams operate, and it works in the narrow sense that stores survive it. What it costs you is invisible. It costs you the campaigns you did not run because you were not confident, the ones you ran too timidly because you hedged the depth, and the ones you ran too aggressively because nobody modeled the combinatorics. It costs you the optimal version of your calendar that you never discovered. ## What before-and-after execution actually is A mature discount engine treats simulation as a first-class operation. You build a campaign or a combination, meaning a specific stacking relationship between two or more campaigns, and the engine runs it against your actual historical orders. Not synthetic data. Not a sample. The real sequence of carts that your customers actually checked out with, over the window you choose. The output is not a graph. It is a side-by-side ledger. For the same set of orders, here is what each customer paid, the margin, and the total revenue under current conditions and under this proposed campaign. You can slice by product, customer segment, market, or channel. You can see the orders where the campaign helped, the ones where it had no effect, and the ones where it would have tipped the cart into unprofitable territory. For combinations, where most of the real risk lies, this is transformative. A combination is not a single discount; it is the relationship between two or more discounts. Simulating that relationship against historical data is how you find the edge cases that only arise when two campaigns overlap. ## The campaigns you could not have run before Once the simulation is available, the campaigns you can plan change shape. A [tiered volume discount](/volume-discounts) that you were hesitant to deepen can be tested against last quarter's orders. You see exactly how many carts would have crossed the new threshold, how much incremental AOV you would have captured, and whether the larger cut at the top tier is actually paid for by the volume uplift or whether it cannibalizes margin on orders that were going to hit that basket anyway. A [BOGO campaign](/bxgy) that you want to combine with [free shipping](/free-shipping) over a threshold can be simulated as a combination. You see the percentage of BOGO-eligible carts that also cross the shipping threshold, the blended margin on those orders, and whether the incremental conversion on almost-qualifying carts is worth the margin hit on the ones that were already going to ship. A loyalty tier promotion you want to run on top of a seasonal storewide offer can be modeled either way, with the tier combined or excluded, against your real customer base. You are no longer debating the policy in the abstract. You are looking at two simulated outcomes on the same orders. What surprises most teams the first time they run a simulation is not the promotions that obviously fail, but the ones that look great in the calendar and break under load. A hero campaign paired with an always-on loyalty tier, both well-designed individually, can sometimes produce a combination whose blended margin is materially worse than either on its own. Intuition does not catch this. The math catches it, but only if the math is run on the orders you actually have, not on a plausible-looking sample. ## Why this beats just testing it live A/B testing a promotion on live traffic has a legitimate role, but it is expensive when the test itself is a loss. If your campaign is net-negative on margin, the A/B test costs you real profit every hour it runs. Simulation is not a replacement for live measurement, customer behavior is the only ground truth, but it is the only honest way to filter out campaigns that never should have launched. Think of simulation as the profit equivalent of a build step. You would not ship code to production without compiling it. Why would you ship a discount to your live checkout without running it against the orders you know you had? ## The profit math, one layer deeper In the [previous article](/blog/why-your-discount-stack-is-silently-killing-your-margin), we looked at how unintentional stacking can turn a nominal 15% campaign into an effective 23.5% discount on overlapping orders. Simulation is how you put numbers on that scenario, specifically for your business. Run the 15% storewide campaign, combined with your loyalty tier, against last quarter. You will see the real overlap, not the assumed one. You will see the exact number of orders where both would have applied. You will see the blended margin on those orders. And you will be able to make a clean decision: leave them combinable and accept the math; make them exclusive and route loyalty customers to the tier; or introduce a ceiling that caps the combined discount at a floor you define. That last option only exists if your platform lets you express it and lets you simulate it before you ship it. ## What to look for in your tooling When you evaluate a discount platform for simulation, the meaningful questions are narrow. Does the simulation run against real historical orders, or against a sampled or synthetic proxy? Can you simulate interactions among two or more campaigns, not just a single promotion? Does the output include margin, not just revenue and discount? And can you compare scenarios side by side, so the question becomes which campaign to ship, not whether to ship at all? Most tools that advertise a preview give you a calculator for a single product. A platform built for profit gives you a ledger of what would have happened to your store. ## Where this leads Conflict management decides what applies. Simulation decides whether it should. The third piece of this puzzle is what happens at checkout: the real-time guardrail that prevents any single order, no matter how the promotions align, from shipping below your profit floor. That is [Profit Guard](/blog/the-profit-floor-run-aggressive-campaigns-without-selling-at-a-loss), and it is the subject of the next article in this series. *Part 2 of 9 - The Profit-First Discount Playbook for Shopify Merchants. Each article in the series stands on its own, but is designed to be read in sequence.* ## Want to put the profit-first playbook into practice? [Discount Prime](https://apps.shopify.com/discountprime) brings simulation, [profit analytics](/profit-analytics), and conflict-safe campaigns together as one Shopify-native system, so you can plan promotions on evidence instead of hope. --- **Related on Discount Prime:** [Profit analytics](/profit-analytics) · [Volume discounts](/volume-discounts) --- ## Why Your Discount Stack Is Silently Killing Your Margin (and How to Stop It) URL: https://www.discountprime.app/blog/why-your-discount-stack-is-silently-killing-your-margin Category: Profit & Strategy | Author: Aspedan.dev | Published: April 28, 2026 | Updated: July 1, 2026 | Read time: 6 min | Tags: shopify, discount-strategy, profit-margin, promotions, conflict-detection > Most Shopify margin leaks come not from the promotions you launch but from the ones that silently stack on top of each other. Conflict management makes every promotion's combinability explicit and resolves overlaps deterministically, so discounts never quietly compound below your floor. *Most Shopify stores lose profit not to the promotions they run, but to the ones that quietly run on top of each other.* You can tell which Shopify stores are maturing by how they talk about discounts. Early-stage operators talk about the biggest offer they can run. Maturing operators talk about what happens when two offers touch. Because the truth nobody advertises is this: most margin leaks do not come from the promotions you launch. They come from the combinations you never designed: the 15% welcome code that silently stacks on top of the [volume discount](/volume-discounts), the free-shipping threshold that triggers during a BOGO window, the VIP tier that quietly pulls a second cut on top of a seasonal campaign. None of these feels dramatic when they happen. Each one looks like a normal order. They add up. This is the first article in a nine-part series, The Profit-First Discount Playbook for Shopify Merchants. The series walks through the capabilities a modern discount engine needs to protect profit at scale: conflict management, dry-run simulation, live margin protection, market-level shipping intelligence, analytics attribution, custom mechanics, safety rules, shipping optimization, and checkout customization on Shopify Plus. We are starting with conflict management because everything else depends on it. ## The quiet failure mode of most discount apps Shopify's native discount system, and most of the apps built on top of it, treat discounts as independent objects. You create a promotion. It runs. Another team, another week, another campaign, someone creates a second promotion. That one also runs. Whether or not they are meant to coexist is not a question the system asks. In the best case, this works out. In the typical case, one of three things happens. Either both discounts apply where they should have been mutually exclusive, and you quietly ship orders below your intended floor. Or one discount blocks the other in a way customers do not understand, and support tickets pile up. Or your team writes a rat's nest of promo codes and eligibility checks, trying to simulate conflict rules by hand, and misses edge cases at checkout. The reason this keeps happening is that, in most tooling, conflict management is implicit. It is something the merchant is expected to model in their own head. It is not modeled by the platform. ## What conflict management actually means A conflict management layer does three things your discount stack cannot do on its own. First, it gives every promotion an explicit relationship to every other promotion. Not a default relationship. This campaign combines with that one. This one excludes those two. This one is a fallback only if nothing higher-priority applies. Conflict is not a side-effect of how discounts are written; it is a first-class property of the campaign itself. Second, it enforces a deterministic resolution order. When two eligible discounts would otherwise apply to the same line, the system does not silently pick one. It applies your rule. You know which one wins, which one defers, and which one is suppressed before the order is placed. Third, it makes the conflict visible. A merchant running conflict-aware tooling can look at a product, a cart state, or a customer segment and see exactly which promotions are currently competing for that scenario and which one will be awarded. This is the part most tools do not offer. ## How conflict control changes the campaigns you can actually run Once conflict is controllable, the shape of your calendar changes. You stop running promotions serially out of fear, and you start running them in parallel with intent. A [volume discount](/volume-discounts) on a hero SKU can run alongside a seasonal storewide campaign because you have declared that the volume discount takes priority on its specific products, and the seasonal campaign covers everything else. A VIP customer tier can coexist with a new-customer welcome promotion because you have declared them mutually exclusive. New customers get the welcome offer, VIP customers get the tier benefit, and no one is accidentally getting both. A [BOGO campaign](/bxgy) can sit on top of a free-gift-with-purchase promotion because you have defined which one occupies the cart position and which one layers on. The merchants who get this right are not discounting less. They are discounting more deliberately, and keeping the margin they thought they were keeping. ## The margin math people do not want to do Consider a storewide 15% campaign running during a month when you also have a recurring loyalty tier that gives 10% off to repeat buyers. If these two stack on 20% of your orders, a realistic overlap for any brand with a meaningful repeat rate, your effective discount on those orders is not 15%. It is not 10%. It is 23.5% (1 minus 0.85 times 0.90). On a product with a 40% gross margin, that one percentage point of unintentional stack is the difference between a profitable order and a loss-leader. Across a month, that difference compounds into real money, and it never shows up in the promotion's reported performance because the second discount is not the campaign, it is the tier running in the background. Conflict control is how you stop these compounded discounts from hiding in plain sight. You decide, up front, that new-visitor welcome offers do not combine with loyalty tiers. The system enforces it. You see it in the checkout simulation. You see it on the order. You see it in reporting. Nothing is accidental. Once conflict is explicit, handoffs become cleaner. A new member of the merchandising team can review the promotional calendar and understand how each campaign is allowed to behave relative to every other campaign, without reverse-engineering anything. That clarity compounds, turning discount management from a senior-operator dependency into a process that survives turnover. ## What to look for in your tooling If you are evaluating a discount layer today, three questions cut through the marketing copy. Can every promotion explicitly declare its combinability at the campaign level, rather than duct-taping codes together? Is there a priority model that resolves every conflict deterministically, so two eligible promotions never produce two different outcomes on two similar carts? And can you preview, for a given product, customer, or cart, which promotions are currently competing and which will win? Most tools will answer yes to one of those. A platform built around profit will answer yes to all three. This is the baseline. Everything else in the series, simulation, profit floors, market control, and analytics, is built on top of it. ## Where this leads Once you have conflict under control, the next problem becomes knowing, before you go live, whether the campaign you just designed will actually do what you want. That is the subject of the [second article in this series](/blog/stop-launching-promotions-on-hope-dry-run-simulation): before-and-after execution, running your campaigns and combinations against your actual historical orders so you see the profit impact before customers ever see the promotion. Conflict management tells you which promotion applies. Simulation tells you whether you should have launched it at all. *Part 1 of 9 - The Profit-First Discount Playbook for Shopify Merchants. Each article in the series stands on its own, but is designed to be read in sequence.* ## Want to put the profit-first playbook into practice? [Discount Prime](https://apps.shopify.com/discountprime) brings real-time conflict detection, [profit analytics](/profit-analytics), and margin-based discounting together as one Shopify-native system, so the ideas in this series run on your store instead of living in a spreadsheet. --- **Related on Discount Prime:** [Profit analytics](/profit-analytics) · [Best Shopify discount apps](/best-shopify-discount-apps) --- ## Three Years of Discount Prime: From Side Project to Profit Platform URL: https://www.discountprime.app/blog/three-years-of-discount-prime-side-project-to-profit-platform Category: Build in Public | Author: Discount Prime Team | Published: April 14, 2026 | Updated: July 15, 2026 | Read time: 5 min | Tags: build-in-public, shopify, discount-prime, product-timeline, profit-first > Discount Prime turned three in April 2026. It began as volume discounts and quantity breaks on Shopify Functions and grew into a profit-first pricing platform: free shipping, BXGY, tiered and B2B pricing, discount and profit analytics, dropshipper margin rules, dry-run simulation, a profit floor, and metafield targeting. The theme shifted from discounting more to protecting margin. *You can tell how a product matured by what it stopped being about. Ours stopped being about bigger discounts and started being about the profit underneath them.* Three years ago this month, the first commit for Discount Prime landed. It was a side project with a narrow idea: let any Shopify store run real volume discounts without duplicate variants or Shopify Plus. Today it is a profit-first pricing platform that a lot of stores run their entire promotion strategy on. This post is the full timeline, the honest through line, and a note about what happens to this blog next. ## Where it started: two features and one bet The app went live on the Shopify App Store in October 2023, six weeks before that year's BFCM, which in hindsight was either brave or careless. It launched with exactly two things: volume discounts and quantity breaks. Buy more, pay less per unit, displayed on the product page, applied natively. The bet that mattered was not a feature. It was the foundation. We built on Shopify Functions from the first commit, when many discount tools still ran on Scripts. Functions works on every plan and lives inside Shopify's own discount engine. That single decision is why the platform's transition years, right up to the Scripts shutdown announced this March, mostly happened to other apps and not to ours. We would make it again without hesitating. ## The full feature timeline Three years of shipping, in order: - **October 2023: volume discounts and quantity breaks.** The launch. Buy-more-save-more pricing, no duplicate variants. - **December 2023: free shipping discounts with a progress bar.** The first non-discount mechanic, and the first taste of nudging carts toward a threshold. - **February 2024: buy X get Y.** BOGO and gift-with-purchase logic that does not confuse the customer at checkout. - **March 2024: tiered pricing.** Structured price tiers customers could actually parse, built on the three-tier rule. - **May 2024: B2B and customer-specific pricing.** Tag-based wholesale and VIP pricing without needing Shopify Plus. This one came straight out of support tickets. - **September 2024: discount analytics.** The first time merchants could see which campaigns were doing anything at all. It should have shipped sooner. - **February 2025: profit analytics.** The turn. Revenue reporting is table stakes; margin is the story. This is where the app stopped being a discount tool and started being a profit tool. - **March 2025: dropshipper margin-based pricing.** Pricing rules that understand thin margins, for stores where a careless discount erases the whole spread. - **June 2025: dry-run simulation.** Test a campaign against real order patterns before it goes live, instead of finding out in production. - **September 2025: profit floor.** A hard stop that blocks orders which would sell below cost. The most opinionated feature we have shipped. - **January 2026: metafield-based targeting.** Target products by what they are, not where they sit in a collection. Read that list top to bottom and the shift is obvious. The first year answers "how do I discount?" The second and third answer "how do I discount without losing money?" ## The through line: from discounting more to keeping margin Year one gave merchants more ways to discount. That was the easy part, and honestly the crowded part. Plenty of apps help you cut a price. Year two and three were about the harder and less glamorous question: did that discount actually make money? Analytics showed you the answer, profit analytics showed you the answer in margin terms, dry-run simulation let you see the answer before committing, and the profit floor refused to let the answer go negative. Each of those features exists because a discount is only as good as the profit it leaves behind, and most stores were flying blind on that number. The uncomfortable lesson across three years is that the exciting features (new discount types) mattered less to our best merchants than the defensive ones (the tools that stop a promotion from quietly costing more than it earns). We built the flashy stuff first and the important stuff second. If we started over, we would invert that. ## What three years taught us **Support is the roadmap.** B2B pricing, the profit floor, dropshipper rules, all of them came from merchants describing the same workaround until we finally listened. The roadmap was never ours to invent. It was in the ticket queue the whole time. **Defaults beat toggles.** Early versions exposed every option we could imagine. Merchants do not want fifteen switches. They want the app to have an opinion. Most of our best releases removed choices rather than adding them. **Margin is the only metric that survives contact with reality.** Revenue flatters. A store can grow revenue and shrink profit at the same time, and a discount app that only reports revenue is helping it do exactly that. Everything we are proud of building points at margin. ## What happens to this blog now For a while, this archive has been catching up, telling the story of three years in order so it reads as one continuous line. That catch-up ends here. This is the last of the backfill. Starting with the next post, later this month, the blog goes live and current. Same operator-to-operator voice, same profit-first lens, but written in the present tense about what is actually happening in Shopify discounting as it happens. If you have read this far, that is the archive worth following. You can browse everything, past and upcoming, at [the blog](/blog). To every merchant who installed in the early days, filed a bug at an unreasonable hour, or told us bluntly that a feature was confusing: the app is what it is because you did. See our [profit analytics](/profit-analytics) and [volume discounts](/volume-discounts) for where three years of that feedback landed, revisit the [two-year roadmap-debt post](/blog/two-years-in-the-roadmap-debt-of-a-small-shopify-app) for the middle of the story, and if you are arriving from a legacy tool, our [Scripts migration map](/blog/shopify-scripts-is-being-turned-off-the-migration-map) is where to start. Year four begins now. --- ## Shopify Scripts Is Finally Being Turned Off: The Migration Map URL: https://www.discountprime.app/blog/shopify-scripts-is-being-turned-off-the-migration-map Category: Ecosystem & Platform | Author: Discount Prime Team | Published: March 24, 2026 | Updated: July 15, 2026 | Read time: 5 min | Tags: shopify, shopify-scripts, shopify-functions, migration, ecosystem > Shopify announced on March 12, 2026 that Scripts is shutting down. Script editing ends April 15, 2026, and Scripts stop running on June 30, 2026. Line item, shipping, and payment Scripts must move to Shopify Functions. Inventory your Scripts now, map each to a Functions equivalent, and rebuild before the June cutoff. *Every Shopify store still running Scripts now has a date on the calendar, and June 30 does not negotiate.* On March 12, 2026, Shopify confirmed what the platform's direction had signaled for years: Scripts is being turned off. Script editing ends on April 15, 2026, and existing Scripts stop running on June 30, 2026. If any part of your checkout depends on a line item, shipping, or payment Script, you have a migration to complete before summer, and the honest version is that the earlier deadline is the one that bites, because after April 15 you can no longer touch the Scripts you still have. This post is the map. What is shutting down, when, what replaces it, and a checklist to move each Script to Shopify Functions without breaking checkout on the way. ## What is actually shutting down, and when Scripts is the legacy system that let Shopify Plus merchants write Ruby that ran inside checkout to customize discounts, shipping options, and payment methods. It was powerful and it was Plus-only, which is exactly why Shopify has spent years replacing it with something that works for everyone. Three dates matter: | Date | What happens | What it means for you | | --- | --- | --- | | March 12, 2026 | Shutdown announced | The clock starts. Begin your Script inventory now. | | April 15, 2026 | Script editing ends | You can no longer create or edit Scripts. Whatever exists is frozen. | | June 30, 2026 | Scripts stop running | Any behavior a Script enforced disappears from checkout. Hard cutoff. | The trap is the gap between the two later dates. After April 15 your Scripts still run but you cannot change them, so if you find a bug or need a tweak during migration, your only path is to rebuild in Functions. Treat April 15 as your real deadline to have replacements built and tested, not June 30. ## What replaces Shopify Scripts Shopify Functions is the successor, and it is not a like-for-like port. It is a better foundation. Functions run custom logic natively inside Shopify's discount, shipping, and payment engines, they work on every plan rather than Plus only, and they coexist with the discount combinations system Shopify shipped in 2023. This is the same shift the platform made when it deprecated checkout.liquid: custom behavior moves out of legacy runtimes and into native extension points. Most merchants will not write Functions by hand. The practical path is an app that ships Functions-based logic you configure in an admin, the same way you would have configured a Script, but without the Ruby, the Plus requirement, or the maintenance. Discount Prime has run entirely on Functions since day one, which is why for discount Scripts the migration is mostly a matter of rebuilding the rule in a settings panel rather than in code. ## The migration checklist Work through this in order. The first two steps are the ones stores skip and regret. 1. **Inventory every active Script.** Open the Script Editor and list every line item, shipping, and payment Script that is published. Note what each one does in plain language. Behavior that silently stops on June 30 is invisible until a customer hits it, so write it all down now while you can still read the code. 2. **Classify each Script by type.** Line item Scripts handle product and cart discounts. Shipping Scripts hide, rename, or reprice delivery options. Payment Scripts hide or reorder payment methods. Each type maps to a different Functions surface, so grouping them tells you what you are actually migrating. 3. **Map each Script to a Functions equivalent.** For most discount logic (percentage off, tiered pricing, quantity breaks, buy X get Y, customer-specific pricing), a Functions-based discount app covers it directly. For shipping and payment customization, use a Functions app built for those surfaces. Flag any bespoke Ruby that has no clean equivalent for extra planning time. 4. **Rebuild in a test environment first.** Recreate each rule and confirm it produces the same cart total, the same shipping options, and the same payment methods as the Script did. Do not rebuild live during BFCM-adjacent traffic or on a store you cannot afford to break. 5. **Run both in parallel briefly, then cut over.** Where possible, validate the Functions version against the Script on real carts before you retire the Script. Confirm discount combinations behave, because Functions respects the combinations settings and old Scripts predate them. 6. **Turn off the Script and document what you built.** Once the Functions version is verified, disable the Script so the two cannot both fire. Record which Function now owns which behavior, so the next person who audits your checkout is not reverse-engineering it in June. ### A worked example Suppose a Plus store runs a line item Script: "spend over $200, take 10% off the cart; wholesale-tagged customers take 20%." That is two rules. In a Functions-based app you recreate it as a cart-value discount at 10% with a $200 threshold, plus a customer-tag rule at 20% for the wholesale segment, and you set the combination behavior so the two never stack into 30%. Total rebuild time is minutes, the logic now runs on every plan, and you have gained combination control the Script never had. The hard part was not the rebuild. It was knowing the Script existed, which is why the inventory comes first. ## Why this is a good deadline, not just a chore Scripts asked you to maintain Ruby that only Plus could run and that lived outside Shopify's native discount engine. Functions runs inside it, on every plan, alongside combinations and checkout extensibility. Stores that made this move early spent the platform's transition years watching migrations happen to other people. If you are migrating now, you are not just avoiding a June 30 outage. You are moving onto the surface Shopify is actually building on. ## Landing on Functions with Discount Prime If your Scripts are discount Scripts, Discount Prime is the Functions-native place they land. You rebuild [volume discounts](/volume-discounts), tiered pricing, and customer-specific rules in an admin panel, keep full control over how discounts combine, and see margin impact in [profit analytics](/profit-analytics) once campaigns run, none of which required Plus or Ruby. If you are still comparing options, our roundup of the [best Shopify discount apps](/best-shopify-discount-apps) lays out the Functions-based field. For the platform context behind this shift, see our earlier note on the [August 28 checkout deadline](/blog/august-28-is-the-real-checkout-deadline), and for where the app itself began, [how Discount Prime launched](/blog/discount-prime-is-live-on-the-shopify-app-store). You can install from the Shopify App Store and rebuild your first Script today. --- ## Discount Display Settings: Where and How to Show the Deal URL: https://www.discountprime.app/blog/discount-display-settings-where-and-how-to-show-the-deal Category: Discounts & Promotions | Author: Discount Prime Team | Published: March 10, 2026 | Updated: July 15, 2026 | Read time: 5 min | Tags: shopify, discount-display, product-page, strikethrough-pricing, cart-messaging > A discount only lifts conversion if buyers see it before they decide. Show volume and quantity offers as a tier table near the quantity selector, use strikethrough pricing and a restrained badge for savings, and add cart messaging that nudges shoppers just below a tier. Placement beats the size of the discount. *A discount the customer never notices is a price cut you paid for and got no credit for.* If you want a discount to lift conversion, the buyer has to see it before they decide, not after. The most common reason a volume or quantity offer underperforms is not that the numbers are wrong. It is that the offer only surfaces in the cart, long after the shopper chose a quantity and moved on. Display is not decoration. It is where the discount does its work. This guide covers the three surfaces that matter: the price itself, the badge, and the cart. Get all three right and a modest discount outperforms a deeper one that stays hidden. ## Where to show a discount on a Shopify product page The product page is where quantity gets decided, so it is where the offer belongs. A shopper looking at a single unit will not go hunting for a bulk deal. You have to put the ladder in front of them. The pattern that works is a compact tier table or bar sitting right next to the quantity selector. Each row shows a quantity break and the resulting per-unit price: buy 1 for $20, buy 3 for $18 each, buy 6 for $16 each. Per-unit framing matters here, because "$16 each" reads as a better deal than "save $24 on 6" for anyone buying consumables or supplies. The table answers the only question the buyer is actually asking: what do I pay if I take more? Keep it above the fold on mobile. If the tier table sits below a fold of description text, it may as well be in the cart. ## Strikethrough pricing and the compare-at anchor Strikethrough pricing crosses out the original price and shows the discounted price beside it. On Shopify this is usually driven by the compare-at price field, and it is the single most efficient way to make a saving feel real. The mechanism is anchoring. A price of $16 means nothing on its own. A price of ~~$20~~ $16 tells the buyer exactly what they are gaining. The struck figure sets the reference point, and the live figure looks like a win against it. Two rules keep this honest and effective. First, the compare-at price should be a price the product genuinely sold at, not an inflated number, because inflated anchors erode trust and, in several regions, break pricing law. Second, do not leave a strikethrough running permanently. A price that is always on sale stops being a sale and just becomes the price, which trains buyers to distrust the anchor. ## Badges: say the saving in one glance A badge is the shorthand version of the deal, meant to be read in under a second from a collection grid or the top of the product page. It should carry one number and nothing else. The question is which number. Show whichever looks larger to the buyer at that price point: - **Under about $50, lead with the percentage.** On a $32 item, "25% off" reads bigger than "$8 off," even though they describe the same saving. - **Above about $50, lead with the dollar amount.** On a $260 item, "$40 off" lands harder than "15% off." - **Pick per price band, then stay consistent within a collection.** Mixing formats across neighboring products makes the grid look noisy and makes shoppers do math you do not want them doing. Restraint matters. One badge reads as a deal. Three stacked badges read as a clearance rack, and clearance framing pulls down the perceived quality of everything around it. ## Cart messaging: recover the orders that stalled just below a tier Some shoppers land one unit short of a break. Cart messaging is the nudge that closes that gap. A short line such as "Add 2 more to save 10%" or "You are $12 from free shipping" turns an abstract tier into a concrete, achievable next step at the exact moment the buyer is reviewing the order. This is the highest-leverage message in the whole flow, because the shopper is already committed to buying. You are not persuading them to purchase. You are showing them a better version of the purchase they already chose. Keep it specific and quantitative. "Save more when you buy more" is wallpaper. "Add 1 more for $16 each instead of $18" is a decision. ### A worked example Say a shopper adds 2 units of a $20 product to the cart. Your tiers are 3 for $18 each and 6 for $16 each. Without cart messaging, they check out at $40 and you earned $40. With a message that reads "Add 1 more to pay $18 each, not $20," a meaningful share will take the third unit. That order becomes 3 units at $18, or $54. You discounted the unit price by 10 percent and grew the order value by 35 percent. The display, not the discount, produced the lift. ## The display mistakes that quietly cost you **Showing the offer only in the cart.** By the time the cart loads, the quantity decision is already made. The deal has to appear on the product page. **A tier table nobody can parse.** Five tiers in a cramped table is worse than two clear ones. Show the breaks that matter and let the per-unit price do the talking. **Permanent strikethroughs.** An anchor that never moves stops anchoring. Schedule the end of a promotion when you create it. **Inconsistent badge formats.** Percentage on one product, dollars on the next, both on a third. Consistency inside a collection is what makes the grid readable. ## Setting this up with Discount Prime Discount Prime renders your offer where it earns its keep. Quantity tiers on a product show as a clean tier table by the quantity selector, savings appear as strikethrough pricing and a single badge, and cart messaging nudges shoppers who stalled one unit short of the next break, all without duplicate variants. Design the [volume discount](/volume-discounts) or [quantity break](/quantity-breaks) once, and the display follows automatically. For the structure behind the numbers, start with our [complete guide to volume discounts](/blog/volume-discounts-on-shopify-the-complete-guide), and if you sell in case packs, see [unit pricing and bundles](/blog/unit-pricing-and-bundles-selling-by-the-case). You can install the app from the Shopify App Store and have a first campaign live in minutes. --- ## Unit Pricing and Bundles: Selling by the Case Without Confusing Anyone URL: https://www.discountprime.app/blog/unit-pricing-and-bundles-selling-by-the-case Category: Discounts & Promotions | Author: Discount Prime Team | Published: February 24, 2026 | Updated: July 15, 2026 | Read time: 6 min | Tags: bundles, unit-pricing, case-packs, margin > Selling by the case works when the per-unit price is obvious and the bundle math protects margin. Show the effective price per unit next to the case price, align packs to how you actually ship, and check margin at your deepest tier. Done right, case pricing lifts average order value without confusing shoppers or eroding profit. *A case pack fails not when the price is wrong, but when the shopper cannot tell, in one glance, what they are paying per unit.* Selling by the case, the multipack, or the bundle is one of the most reliable ways to lift average order value, and one of the easiest to get quietly wrong. The mechanics are simple: offer more units at a better per-unit price. The failures are all about clarity and margin. If the shopper has to do arithmetic to understand the deal, they skip it. If you set the bundle price on the headline number without checking the cost of everything inside it, you erode profit. This guide covers how to structure case and bundle pricing so neither happens. The short version: show the per-unit price next to every pack size, align packs to how you actually ship, and verify margin at your deepest tier. Get those three right and case pricing does exactly what you want. ## Case packs vs bundles: not the same thing These get used interchangeably and they should not be, because they solve different problems. A **case pack** is a quantity of the *same* product sold together: a 12-pack of the same candle, a case of 24 identical cans. It rewards a shopper for buying more of one item, and it is really a quantity break with a fixed pack size. If you want the fuller treatment of quantity-based pricing, we compared the approaches in [quantity breaks vs volume discounts](/blog/quantity-breaks-vs-volume-discounts-shopify). A **bundle** is a set of *different* products sold as one offer: a starter kit, a "complete the look" set, a curated box. It lifts order value by pairing complementary items at a combined price, and its margin math is different because you are stacking the cost of several distinct SKUs. The pricing principles overlap, but the failure modes differ. Case packs fail on display clarity. Bundles fail on margin. We will take each. ## Make the per-unit price impossible to miss The single most important element of case pricing is the effective per-unit price, shown right next to the pack price. Buyers of consumables and supplies think in cost per unit, not in percentage off. "That is $2.50 each instead of $3.20" lands harder than "save 22 percent," because it matches the number the customer is already using to judge value. When you sell the same product in several sizes, per-unit display becomes non-negotiable. Put the sizes side by side with the per-unit math done for the shopper: | Pack size | Pack price | Per unit | What it signals | | --- | --- | --- | --- | | Single | $3.20 | $3.20 | Try it | | 6-pack | $17.40 | $2.90 | The everyday choice | | Case of 12 | $30.00 | $2.50 | Best value, stock up | A shopper reads that table in two seconds and understands the entire offer. No calculator, no friction. Notice the middle option is designed to be the obvious everyday pick, with the case there to make it look reasonable and to catch the stock-up buyer. That is the same three-tier logic that works for [volume discounts](/volume-discounts), applied to fixed pack sizes. ## Align packs to how you actually ship A case pack that does not match your fulfillment reality creates work at both ends. If you physically pack 12 to a carton, your case should be 12, not 10 and not 15. When the pack size matches the carton, picking is clean, inventory is honest, and the buyer orders in a unit you actually stock. This matters even more for B2B and bulk buyers, who order in cases and pallets and expect the pricing to speak their language. We went deep on this for wholesale in [bulk discounts for B2B buyers](/blog/bulk-discounts-for-b2b-buyers-pricing-big-carts): align the breaks to real case and pallet quantities so the buyer never has to convert your tiers into their carton math. The same discipline applies to consumer multipacks, just at smaller numbers. ## Protect the margin inside the bundle Bundles are where margin quietly leaks, because the discount is usually set on the headline price while the cost lives in the components underneath. Here is a worked example. Say you build a starter kit from three items: - Item A: retails $20, costs you $8 - Item B: retails $15, costs you $6 - Item C: retails $10, costs you $5 Sold separately that is $45 retail on $19 of cost, a healthy $26 of gross margin. Now you bundle all three for $36, a tidy 20 percent off the combined retail. The headline looks fine. But run the real math: $36 revenue minus $19 cost is $17 of margin, and your margin rate just fell from 58 percent to 47 percent. If Item C was already thin, a "20 percent" bundle can quietly turn your best-value offer into your worst-margin order. The fix is to price the bundle from the combined cost up, not the combined retail down. Decide the margin you need on the *bundle*, then set the price to hit it, and confirm your deepest case tier still clears your floor. This is exactly why cost data belongs under every discount decision, and why our [profit analytics](/profit-analytics) reports margin at the order level, so a bundle that looks generous on the surface cannot go underwater without you seeing it. ## Targeting bundles and cases precisely Once your data is structured, you can aim these offers by attribute rather than by hand-built lists. With metafield-based targeting, you can run a case-pack promotion across every product carrying a given line or season value, or exclude thin-margin items by their margin band, without assembling a collection for each campaign. Attribute targeting keeps the offer pointed at exactly the right SKUs and keeps the thin ones out of a deal that would sink them. ## The clarity checklist Before you publish a case or bundle offer, confirm: 1. **The per-unit price is shown** next to every pack size. 2. **The pack quantity matches** how you physically ship. 3. **The option count is small**, usually three, so the choice is easy. 4. **Margin is verified** at the deepest tier using fully loaded component cost. 5. **A floor is set** so no order slips below your threshold. Miss the first three and you lose the sale to confusion. Miss the last two and you win the sale but lose the profit. ## Setting this up with Discount Prime Case packs, multipacks, and bundles all run on the same foundation: clear per-unit display and honest margin math. Discount Prime handles the [bulk discounts](/bulk-discounts) and [quantity breaks](/quantity-breaks) natively through Shopify Functions, shows per-unit pricing on the product page without duplicate variants, and reports margin so your bundles cannot quietly go underwater. You can find the app on the Shopify App Store and have your first case-pack offer live in a few minutes. --- ## Shopify Editions Winter '26: Reading the Signals for Pricing and Promotions URL: https://www.discountprime.app/blog/shopify-editions-winter-26-signals-for-pricing Category: Ecosystem & Platform | Author: Discount Prime Team | Published: February 10, 2026 | Updated: July 15, 2026 | Read time: 5 min | Tags: shopify-editions, ecosystem, platform, discount-strategy > Shopify Editions Winter '26 continues the platform's move toward Functions-native logic, structured product data, and AI-assisted commerce. For pricing and discounts the signal is consistent: custom logic belongs in Functions, clean metafield data is now infrastructure, and margin discipline matters more as AI surfaces compare offers. Read the release as direction, not just a feature list. *Read a Shopify Editions release for its features and you will be busy for a week; read it for its direction and you will know what to build for the next two years.* Shopify Editions Winter '26 has landed, and like every edition it arrives as a wall of announcements. The useful move is not to catalog all of them. It is to ask what the release signals about where the platform is taking commerce, and then to act on the two or three shifts that actually touch how you price, discount, and check out. Through that lens, Winter '26 is consistent with everything Shopify has been telling merchants for a while: custom logic belongs in Functions, structured product data is now infrastructure, and margin discipline matters more every quarter. This is our read for pricing and discount merchants specifically. We do the same filtering every edition, most recently for [Winter '25](/blog/shopify-editions-winter-25-where-discounting-is-going) and the AI-heavy [Summer '25 Horizon release](/blog/shopify-editions-summer-25-horizon-ai-and-discounts), because the trend line across editions says more than any single feature. ## The three signals that matter for pricing **Functions is the settled home for custom logic.** Every recent edition has deepened Shopify Functions, and Winter '26 keeps that going. The message has not wavered: if your discounts, checkout rules, or pricing logic depend on custom behavior, that behavior belongs in Functions, not in Scripts or theme patches. With Scripts formally being wound down this year, this is no longer a preference, it is the path. The stores that bet on Functions early are watching platform shifts happen to other apps, not to them. **Structured product data is becoming core.** The platform keeps investing in metafields, metaobjects, and structured catalog data, and Winter '26 continues that investment. This is not a niche developer concern anymore. Structured data now drives storefront display, search, AI surfacing, and, as of last month in our own app, discount targeting. Clean, populated metafields are turning into table stakes for running precise promotions. **AI is reading your offer before a human does.** Following the Horizon release, AI-assisted and agentic commerce keep advancing. The practical consequence for pricing is subtle but real: your offer is increasingly parsed by software that compares it against alternatives before a shopper ever sees a product page. That rewards clarity and consistency, per-unit pricing that makes sense, offers that are legible, margins that hold, and it quietly punishes the sloppy, stacked, hard-to-parse discount. ## What to actually do about it Editions can trigger feature FOMO. Resist it. The right response to a release is one or two concrete changes, not a scramble to touch everything. **Keep your discount logic Functions-native.** If any part of your pricing still runs on Scripts or a theme hack, this is the year to move it. Functions works on every plan, applies natively in cart and checkout, and coexists with discount combinations. This is the foundation under our own [volume discounts](/volume-discounts), and it is the safest place for custom logic to live going forward. **Populate your product data now.** Define and fill the metafields that describe your catalog: season, product line, material, launch date, an internal margin band. Even a modest set unlocks better filtering today and precise, attribute-based promotions immediately, since metafield targeting is already live. Structured data is the input; everything downstream is only as good as it. **Make margin explicit, not implicit.** As AI surfaces compare offers and as targeting gets more precise, the cost of a sloppy discount rises. Know your fully loaded cost per product and set a hard floor beneath your campaigns so no single order goes underwater. Our [profit analytics](/profit-analytics) and profit floor exist for exactly this: precise targeting is only an asset if it cannot become an unprofitable one. ## A quick way to triage any Editions release When the announcement drops, run each item through three questions and discard anything that fails all three. | Question | If yes | If no | | --- | --- | --- | | Does it change how I price or discount? | Read it closely | Skip it | | Does it change how checkout behaves? | Check for migration work | Skip it | | Does it change what data I need to maintain? | Plan a data task | Skip it | Most of any edition will fail all three for your specific store, and that is fine. The two or three items that pass are where your attention belongs. This triage keeps you responding to the platform's direction instead of drowning in its feature count. ## The through-line across editions Step back across the last few releases and the story is coherent. Shopify is consolidating custom logic into Functions, making structured data a first-class citizen, and building toward a commerce layer that AI can read and act on. For a pricing and discount merchant, none of that is a threat. It is an invitation to be more precise: target promotions by what products are, protect margin with explicit floors, and keep your logic on the platform's supported path. Winter '26 does not change that direction. It confirms it. And the stores that were already Functions-native, already populating metafields, and already watching margin will find that this edition mostly validates decisions they made months ago. ## Setting this up with Discount Prime If Winter '26 has you rethinking anything, make it the boring, durable stuff: get your discount logic onto Functions, populate the metafields that describe your catalog, and put a hard floor under every campaign. Discount Prime runs natively on Shopify Functions, targets by metafield, and enforces a profit floor, so the direction this edition points toward is already the direction the app is built for. You can find it on the Shopify App Store. --- ## New: Metafield-Based Targeting for Campaigns URL: https://www.discountprime.app/blog/new-metafield-based-targeting-for-campaigns Category: Discounts & Promotions | Author: Discount Prime Team | Published: January 27, 2026 | Updated: July 15, 2026 | Read time: 4 min | Tags: metafields, product-launch, discounts, targeting > Discount Prime now targets campaigns by Shopify metafield. Instead of building a collection to hold a promotion, you point a campaign at an attribute like season or margin band, and the discount matches every product carrying that value at checkout. Targeting reads metafields natively through Shopify Functions, so it stays accurate as your catalog changes. *You should be able to say "put every thin-margin accessory on sale" without first building a collection to hold products you already tagged with exactly that fact.* Metafield-based targeting is live in Discount Prime today. You can now point a discount campaign at a Shopify metafield instead of a collection, choose the value you want, and let the discount apply to every product carrying that attribute. No hand-built list, no maintenance, no duplicating information your products already hold. The targeting reads metafields natively at checkout through Shopify Functions, so it stays accurate as your catalog moves. If you read our [concept guide on metafields for merchandising](/blog/metafields-for-merchandising-target-products-by-what-they-are) earlier this month, this is the feature that concept was pointing at. Here is what shipped and how to use it. ## What metafield targeting does Until now, targeting a Discount Prime campaign meant choosing products or collections. That is fine when your promotion maps cleanly to a collection, but promotions rarely do. You end up building a throwaway collection to hold "everything from last spring" or "every low-margin SKU," then maintaining it by hand while the real information already lives in a metafield on each product. Metafield targeting removes that middle step. You pick a metafield by namespace and key, pick a value, and the campaign matches every product where that value is present. Set a campaign to `custom.season = "Spring 2025"` and it covers your entire spring line, across every category, with nothing to assemble. Set it to `custom.margin_band = "thin"` and you can carve those items *out* of a sitewide sale by attribute instead of remembering each SKU. Because the match happens at checkout against live metafield values, the campaign self-corrects. Add a new product with the right season value next week and it is covered automatically. Change a value and the product drops out. The promotion tracks the data instead of a snapshot of it. ## How to set it up The flow is short if your metafields are already populated. 1. **Confirm your metafield definitions.** In Shopify Admin under Settings, make sure the fields you want to target, such as season, material, or margin band, are defined and filled in on your products. 2. **Create or edit a campaign.** In Discount Prime, choose metafield as the targeting type. 3. **Select the namespace, key, and value.** For example, namespace `custom`, key `season`, value `Spring 2025`. 4. **Set the discount and, if you want, a guardrail.** Attach your quantity tiers or percentage, and pair it with a profit floor so no matched order slips below margin. 5. **Preview and publish.** Check the matched product set before you go live. If your metafields are not populated yet, do that first. Define the field, bulk-edit or import the values, then come back and target it. The attribute data is the input; the targeting is only as precise as the data behind it. ## A worked example Say you want a 20 percent clearance on last spring's line, but three of those products already run thin. Historically that is a manual collection plus a mental note to exclude three SKUs, which is exactly the kind of note that gets forgotten under BFCM pressure. With metafield targeting it becomes two rules that maintain themselves: - Target `custom.season = "Spring 2025"` at 20 percent off. - Attach a profit floor so any order that would fall below your margin threshold is stopped. The season match pulls in the whole line automatically. The [profit floor](/profit-analytics) catches the thin items without you listing them. Targeting decides *which* products; the floor decides *how deep*. Together they let you be precise about coverage and safe about margin at the same time. ## Why we built it on Functions Reading arbitrary metafields at checkout is not something the native discount engine does, and it is not something Scripts could do well outside Plus. Building it on Shopify Functions means metafield targeting works on standard plans, applies natively in cart and checkout, and coexists with the discount combinations and guardrails you already run. It is the same architecture behind our [volume discounts](/volume-discounts), and the same reason we could add attribute targeting without asking you to change plans or bolt on a workaround. This also keeps targeting honest about timing. As we covered in [scheduled sales](/blog/scheduled-sales-start-and-end-times-deserve-respect), a campaign is only as good as the boundaries around it, and reading live data at checkout means a metafield-targeted sale starts and stops on exactly the products it should, exactly when it should. ## Setting this up with Discount Prime If your product data is structured, metafield targeting turns a half-hour of collection-building into a two-minute campaign. If it is not yet, define your season, line, and margin-band fields, populate them once, and every future promotion gets easier. Metafield-based targeting is available now in Discount Prime through Shopify Functions, on every plan. You can find the app on the Shopify App Store and target your next campaign by what your products actually are. --- ## Metafields for Merchandising: Target Products by What They Are, Not Where They Sit URL: https://www.discountprime.app/blog/metafields-for-merchandising-target-products-by-what-they-are Category: Discounts & Promotions | Author: Discount Prime Team | Published: January 13, 2026 | Updated: July 15, 2026 | Read time: 5 min | Tags: metafields, merchandising, product-data, discounts > Metafields are structured attribute fields on Shopify products, such as season, material, or margin band. Because they describe what a product is rather than which collection it sits in, metafields are a more durable way to target merchandising and, soon, discounts. This guide explains how metafields work and why attribute targeting beats manual collections. *Most stores discount by collection because that is the tool in front of them, not because a collection is the right way to describe what is actually on sale.* A metafield is a structured attribute stored directly on a Shopify product: its season, its material, its product line, its internal margin band. The important idea is this. Collections tell you where a product sits in your catalog. Metafields tell you what the product is. And when you want to run a promotion on "everything from last spring" or "every low-margin accessory," what a product *is* turns out to be far more useful than which list you happened to file it under. This is a concept guide. Shopify has supported metafields for years, and getting your product data structured now pays off across search, theme display, and, shortly, discount targeting. Let's cover how metafields work and why attribute-based merchandising is worth the setup. ## What a metafield actually is A metafield is a custom field attached to a Shopify object, most often a product or variant. Each one has a namespace, a key, and a typed value, so `custom.season = "Spring 2026"` is readable both by a human and by software. You define the field once in Shopify Admin under Settings, then fill in the value on each product the way you would fill in a price or a title. The reason metafields exist is that Shopify cannot ship a built-in field for every attribute every merchant tracks. A coffee roaster wants roast level. A clothing brand wants fabric weight. A supplement store wants serving count. Metafields are the escape hatch: a consistent, queryable place to record the attributes that make your catalog yours. ## Why collections are the wrong tool for promotions Collections are lists. You either add products by hand or write a rule based on the handful of conditions Shopify exposes, such as product type, tag, or price. That works until your promotion needs a slice the collection rules do not cleanly cut. Consider a spring clearance. You want every product from last spring's line, regardless of category, marked down. With collections you either build and maintain a manual "Spring 2025" list, which drifts the moment someone edits a product, or you tag hundreds of items and hope the tag stays consistent. Either way you are duplicating information the product should already carry. With a `season` metafield, the answer is already on every product. "Everything where season equals Spring 2025" is a precise, self-maintaining slice. Nothing to hand-build, nothing to drift. The attribute travels with the product even as it moves in and out of collections through the year. ## Collections vs metafields for targeting | Dimension | Collection | Metafield | | --- | --- | --- | | What it represents | A list of products | An attribute on the product | | Answers the question | Where does this sit? | What is this? | | Maintenance | Manual or rule-based, drifts | Set once per product, travels with it | | Overlap handling | A product lives in many lists | One clear value per key | | Best for | Storefront navigation | Precise, durable targeting | Neither is wrong. Collections are the right structure for how shoppers browse your store. Metafields are the right structure for how you slice your catalog behind the scenes, especially for promotions that cut across the way products are merchandised on the front end. ## The metafields worth setting up first You do not need dozens. A few high-value fields cover most merchandising and promotion needs. **Season or drop.** The single most useful promotional attribute. Lets you clear last season without touching this season, and without a manual list. **Material or product line.** Enables "all leather goods" or "everything in the core line" as a targetable slice, cutting across categories. **Launch date.** Distinguishes new arrivals from aging stock, which is the difference between protecting a launch and clearing a long-tail SKU. **Margin band.** An internal, non-public field, for example `high`, `standard`, or `thin`. This is quietly the most valuable one for discounting, because it lets you exclude thin-margin items from a sitewide promotion by attribute instead of remembering each SKU. Pair it with the margin data in [profit analytics](/profit-analytics) so the band reflects real cost, not a guess. Define these in Admin, then populate them in bulk with the editor or a CSV import. Populating a few hundred products is an afternoon, and you only do it once per product. ## Where discount targeting comes in Here is the honest boundary today. Shopify stores your attribute data faithfully in metafields, but native Shopify discounts still target products and collections, not arbitrary metafield values. So having a clean `season` or `margin_band` field does not, by itself, let you say "discount every thin-margin item." The discount engine cannot read the field. Closing that gap takes a discount system built on Shopify Functions that can read metafield values at checkout and match a campaign against them. That is exactly what we are building. Metafield-based targeting is coming to Discount Prime, and when it lands you will be able to point a campaign at an attribute directly, no hand-built collection in between. We will walk through it in detail in [the launch note](/blog/new-metafield-based-targeting-for-campaigns). The practical takeaway for right now: structure the data first. The stores that will get the most out of attribute targeting are the ones whose season, line, and margin fields are already populated when the feature arrives. This is the same reason we keep pushing merchants to respect the mechanics that make a campaign precise, the way we did with [scheduled sales](/blog/scheduled-sales-start-and-end-times-deserve-respect). Precise targeting starts with clean inputs. ## Setting up for what is next Spend the time now. Define your season, material, product line, launch date, and margin band metafields, then populate them across the catalog. Even before attribute-based discount targeting is live, structured data improves storefront filtering and theme display, and it makes your eventual campaigns far easier to aim. When metafield targeting ships, you will be ready to run promotions on what your products *are*, and Discount Prime, which already handles [volume discounts](/volume-discounts) natively through Shopify Functions, is where that targeting will live. You can find the app on the Shopify App Store. --- ## January Is for B2B: Why Wholesale Buyers Restock After the Holidays URL: https://www.discountprime.app/blog/january-is-for-b2b-why-wholesale-buyers-restock Category: B2B & Wholesale | Author: Discount Prime Team | Published: December 16, 2025 | Updated: July 15, 2026 | Read time: 5 min | Tags: b2b, wholesale, seasonal-strategy, tiered-pricing > January is the strongest B2B reorder window of the year because retail buyers sell through holiday inventory and rebuild shelves in the new fiscal quarter. Stores that publish clear wholesale tiers, sensible case packs, and tag-gated pricing before the new year capture those reorders instead of losing them to a competitor. *The retail calendar has a quiet second peak, and it lands in the first two weeks of January when your wholesale buyers are staring at empty shelves.* If you sell to other businesses, January is not a slow month. It is your strongest reorder window of the year. Retail buyers spend December selling through the inventory they stocked for the holidays, and they walk into January with thin shelves and a fresh quarter of budget. The suppliers who capture those reorders are the ones whose wholesale pricing was already clear, already live, and already easy to order against before the new year started. This post explains why the January restock happens, what wholesale buyers actually need from your pricing, and how to set it up so the reorder comes to you. ## Why January is the B2B restock window Three things line up at once in early January, and each one pushes toward a reorder. **Shelves are empty.** A retailer that merchandised hard for November and December has sold through its holiday stock. The floor and the stockroom are both lighter than they have been since summer. Empty shelves are a restock trigger on their own. **Budgets reset.** Many retailers run on a calendar fiscal year or a quarter that starts in January. That means fresh open-to-buy dollars, the budget a buyer is allowed to spend on new inventory. December's spend is closed; January's is open. **The pace slows down enough to plan.** December is execution. January is planning. Buyers finally have the hours to review what sold, decide what to reorder, and place structured purchase orders instead of reactive ones. Put those together and you get a buyer who has room on the shelf, money to spend, and time to think, all in the same two weeks. That is as motivated as a wholesale account gets. ## What wholesale buyers actually need from your pricing A B2B reorder is not an impulse buy. The person placing it is building a purchase order they have to justify, so they need your pricing to be legible and stable. Three things matter most. **Per-unit clarity.** A wholesale buyer thinks in landed cost per unit, not in percentage off. "This case lands at $6.40 a unit" is a number they can mark up and defend. Show the per-unit price at each quantity break, not just a total discount. **Case-pack alignment.** Wholesale moves in cases and pallets, not single units. If you pack 12 to a case, your first tier should start at 12, not 10. Pricing that does not match how you actually ship forces the buyer to do conversion math, and math is friction. **Predictability.** A retail shopper reacts to a limited-time sale. A wholesale buyer plans around stable pricing. If your wholesale tiers move every month, you make forecasting impossible and you push careful buyers toward suppliers they can model. Set the tiers and leave them alone. ## A worked example: pricing the reorder Say you supply a candle that retails for $24 and you pack it 12 to a case. Here is a wholesale tier structure a buyer can read at a glance. | Order quantity | Per-unit price | Effective discount | Typical buyer | | --- | --- | --- | --- | | 1 case (12 units) | $10.00 | Base wholesale | New or small account | | 4 cases (48 units) | $9.20 | 8% off base | Established boutique | | 12 cases (144 units) | $8.40 | 16% off base | Multi-location or chain | Notice what this does. The minimum order is a full case, so you never pick a single unit. The middle tier is the one you want most accounts to land on, and the top tier makes it look reasonable. And every row is expressed per unit, because that is the number the buyer marks up. At $9.20 landed, a $24 retail keeps healthy room for both of you. Before you set the deepest tier, check it against your own cost. A 16% wholesale break is only safe if your margin at that price still clears fulfillment and overhead. This is exactly where margin visibility earns its keep, and our [profit analytics](/profit-analytics) exists so the number you discount to is a number you actually chose. ## How to set this up before the new year You want wholesale pricing live and gated before the last week of December, because that is when buyers start drafting January orders. A simple sequence: 1. **Tag your verified wholesale accounts.** Assign a single customer tag, such as `wholesale`, to every approved B2B buyer. Retail shoppers never see wholesale pricing; tagged accounts always do. 2. **Attach quantity tiers to case packs.** Build your breaks at real case and pallet quantities so the pricing matches your fulfillment. 3. **Set a minimum order quantity.** Make the MOQ one full case so small, unprofitable orders never reach your pick line. 4. **Publish the per-unit price at each tier.** Give buyers the number they will actually plan against. Tag-gated pricing like this runs on standard Shopify through Shopify Functions, so you do not need Plus to do it. Our [B2B pricing](/b2b-pricing) and [wholesale pricing](/wholesale-pricing) tools handle the tagging and the tiers, and [bulk discounts](/bulk-discounts) covers the case-and-pallet math for big carts. ## The mistake that loses the January order The most common way to lose a January reorder is not a pricing mistake, it is a timing mistake. Stores that spend December in holiday-sale mode often forget to flip attention to their wholesale channel until the retail rush ends, and by then the purchase orders are already written. If you ran a heavy consumer promotion this season, plan its wind-down deliberately, the way we covered in [post-holiday pricing](/blog/post-holiday-pricing-how-to-exit-a-sale), and make sure the B2B pivot happens on the same schedule. The same discipline that keeps consumer sales from leaking codes, which we walked through in [segment-first BFCM](/blog/segment-first-bfcm-vip-early-access-without-leaking-codes), is what keeps wholesale pricing where it belongs: visible to the accounts that earned it, invisible to everyone else. ## Setting this up with Discount Prime If January is your restock season, spend an afternoon in December getting the tiers right. Tag your wholesale accounts, align your breaks to case packs, and set a minimum order that protects your pick line. Discount Prime runs all of it natively through Shopify Functions, so verified buyers see wholesale pricing the moment they log in. You can find the app on the Shopify App Store and have your January pricing live before the first purchase order lands. --- ## BFCM 2025 Postmortem: What Three Seasons of Data Tell Us URL: https://www.discountprime.app/blog/bfcm-2025-postmortem-three-seasons-of-data Category: Build in Public | Author: Discount Prime Team | Published: December 9, 2025 | Updated: July 15, 2026 | Read time: 4 min | Tags: build-in-public, bfcm, trends, profit-strategy, postmortem > Across three BFCM seasons, Shopify merchant sales rose from $9.3B in 2023 to $11.5B in 2024, and 2025 continued the upward direction of travel. The durable lesson is not the headline number but that stores which targeted discount depth by segment and product protected margin better than those that discounted flat. *The BFCM headline number goes up every year. Whether your margin does is a completely separate question, and it is the one worth studying.* We have now watched three BFCM seasons from inside a discount app, and the most useful thing we can offer is not a prediction, it is a pattern. Shopify merchant sales ran $9.3 billion over BFCM 2023 and $11.5 billion over BFCM 2024. This year continued the same direction of travel. But the number that grows in the press release is not the number that shows up in a store's December bank balance, and the gap between those two has taught us more than the totals ever did. ## The trend that matters is not the total It is easy to read the rising headline as good news and stop there. More sales, bigger weekend, everyone wins. But the total is a measure of volume, not health. A store can post its best-ever revenue weekend and enter December with less profit than the year before, and plenty do. The interesting variable across three seasons was never how big the weekend got. It was how much of each store's revenue survived contact with its own discounts. Watched that way, the three years tell a consistent story. The stores that struggled were not the ones that discounted too little or too much in aggregate. They were the ones that discounted flat, applying a single rate to every order regardless of who placed it or what it contained. ## What got more expensive each year Here is the pattern as we saw it develop. | Season | Shopify merchant sales | What we saw at store level | |---|---|---| | BFCM 2023 | $9.3 billion | Flat sitewide still common; margin damage visible but tolerated as the cost of the weekend | | BFCM 2024 | $11.5 billion | More stores carving out thin-margin products; the cost of a flat rate becoming harder to ignore | | BFCM 2025 | Upward, figure not stated | Targeting more mainstream; stores that varied depth held margin visibly better than those that did not | The direction is the point. Flat sitewide discounting did not fail suddenly. It got a little more expensive every year, as discovery got cheaper and more of a store's BFCM traffic arrived already intending to buy. The more high-intent buyers a weekend attracts, the more a flat discount pays to people who did not need it. Three seasons of that compounding is why targeting stopped being a sophistication and started being table stakes. ## The three habits that held up Across all three years, the stores that came out ahead shared the same handful of habits, and none of them was clever. **They planned combinations before the season.** The margin damage we saw most often was never the intended discount. It was two offers meeting in a cart because nobody had decided whether they should. Stores that mapped their combinations in advance simply did not have that failure mode. **They targeted depth instead of applying a flat rate.** Deeper [volume tiers](/volume-discounts) where a bigger cart justified it, segment pricing for the customers who were coming anyway, and shallower or no discount on thin-margin products. Same discount budget, spent where it changed a decision. **They set a floor.** A [profit floor](/profit-analytics) meant the long tail of carts nobody models, the odd quantities and currency edges and stored codes, could not quietly cost them. Three years running, the stores with a floor slept better and lost less. ## What we are watching into next year Two things feel early but real. First, the same targeting logic that protects margin also produces cleaner data, and stores that ran targeted offers this year came out of the weekend actually able to say which offers worked, because the discounts were not smeared evenly across everything. Second, more of the traffic itself is arriving through channels that read before the shopper does, including AI assistants summarizing options. That does not change the discount math, but it raises the value of a store whose pricing is coherent enough to be summarized correctly. The through-line across three seasons is simple enough to end on. The weekend keeps getting bigger, and that is the least controllable and least important fact about it. What you control is the structure of the discount, and the stores that treated BFCM as a margin problem rather than a revenue problem have been the ones still smiling in December, three years in a row. For the strategic frame behind this year's results, our [targeted-not-sitewide argument](/blog/bfcm-2025-the-year-of-targeted-not-sitewide-discounts) laid out the bet before the season, and the [BFCM 2024 playbook](/blog/bfcm-2024-discount-playbook-deep-or-wide) is where the deep-or-wide thinking started. If you run one thing differently next year, make it the plan, not the depth. --- ## 48 Hours to BFCM: A Calm Checklist URL: https://www.discountprime.app/blog/48-hours-to-bfcm-a-calm-checklist Category: Discounts & Promotions | Author: Discount Prime Team | Published: November 25, 2025 | Updated: July 15, 2026 | Read time: 4 min | Tags: bfcm, checklist, shopify, discount-setup, pre-launch > Two days before BFCM the job is verification, not building. Confirm every offer starts and ends on the right timezone, test the real cart in incognito, check that combinations resolve as planned, make sure the discount is visible before checkout, and set a profit floor so unusual carts cannot go below margin. *Two days out, the work is not building anything new. It is confirming that what you already built does exactly what you think it does.* You are 48 hours from BFCM. If your offers are not set by now, adding more will hurt you more than help. So this is not a build list. It is a verification list, short on purpose, that you can run in under an hour. The goal is a store you can stop worrying about, because you checked the five things that actually break. ## The calm checklist 1. **Confirm every start and end time, in your store's timezone.** Open each scheduled offer and read the actual timestamps out loud. A sale set on the wrong timezone opens hours early or ends hours late, and nobody notices until it already happened. Confirm what happens to a cart that is open at the boundary. 2. **Test a real cart in an incognito window.** Your admin session sees prices, tags, and drafts a shopper never will. Open a private window, add the products a real customer would, and watch the discount apply as an anonymous buyer. Do it once on desktop and once on mobile, because most of your BFCM traffic is a phone. 3. **Check that combinations resolve the way you planned.** Build a cart that triggers two offers at once: your hero offer plus free shipping, or a volume tier plus a code. Confirm the result is the number you intended, not a deeper one. If you mapped a combination matrix earlier this season, this is where you prove it holds. If an old automatic discount is still combinable, this is where you catch it. 4. **Make sure the discount is visible before checkout.** A discount a customer cannot see until the final step does not lift conversion, it just costs margin. Confirm the offer shows on the product page and in the cart, not only at checkout. Your [free shipping progress](/free-shipping) and [volume tiers](/volume-discounts) should be legible before the buyer commits. 5. **Set the floor, then freeze.** Confirm a [profit floor](/profit-analytics) is active so any unusual cart, an odd quantity, a currency edge, a stored code, cannot drop an order below your margin line. Then stop. Late edits are the single most common source of weekend margin damage, because they go in untested. Lock it and walk away. ## What to deliberately not do Do not add a new offer tonight. Do not deepen a discount because a competitor's email just landed. Do not extend anything before it has even started. Every one of those decisions is being made under pressure, and pressure is exactly the condition your calm setup was built to survive. If something is genuinely broken, fix that one thing and re-run step two. If nothing is broken, you are done. A store that is quietly correct on Wednesday needs nothing from you on Thursday except attention to the parts you cannot automate: replies, restocks, and rest. ## After you run it Keep one tab open on your analytics for the weekend, not to change things, but to watch which offers actually carried the volume and at what real margin. That note is next year's plan. For the deeper version of step three, our guide to [planning your BFCM discount stack](/blog/your-bfcm-discount-stack-plan-the-combinations) is the combination matrix this checklist assumes you already built, and if you do find a conflict tonight, [last-minute BFCM fixes for discount conflicts](/blog/last-minute-bfcm-fixes-discount-conflicts) covers exactly how to catch and clear it before the weekend. --- ## Segment-First BFCM: VIP Early Access Without Leaking Codes URL: https://www.discountprime.app/blog/segment-first-bfcm-vip-early-access-without-leaking-codes Category: B2B & Wholesale | Author: Discount Prime Team | Published: November 11, 2025 | Updated: July 15, 2026 | Read time: 4 min | Tags: b2b-wholesale, vip-early-access, customer-tags, bfcm, private-discounts > A shared VIP early-access code leaks to deal sites within hours and becomes a public discount. Gate early access by customer tag with private automatic discounts instead, so the offer applies to who the buyer is, not to a string anyone can paste, and never escapes the segment you built it for. *A VIP code sent to a thousand loyal customers is not a private offer. It is a public one with a delay.* The appeal of VIP early access is exclusivity: your best customers and wholesale accounts get in before the crowd, at a price the crowd will not see. The moment you deliver that through a shared discount code, the exclusivity is gone. One recipient posts it, a deal aggregator indexes it, and by the time your official sale starts your "VIP" price is the public price. The fix is to stop gating by a string anyone can paste and start gating by who the customer actually is. Tag the segment, attach a private automatic discount, and the offer can never leave the list. ## Why the code always leaks A discount code is a shared secret, and shared secrets do not stay secret at scale. Send one code to a thousand people and you have not made a private offer, you have published one to a thousand potential distributors. It only takes one. Within hours the code reaches the coupon sites that exist specifically to harvest exactly this, and now the code cannot tell your VIP from a stranger who searched for it, because a code has no idea who is typing it. It rewards knowledge of the string, not membership in your segment. That breaks two things at once. The margin math you did for a small VIP list is now running against your entire BFCM traffic. And the exclusivity you were actually selling, the feeling of being early and chosen, evaporates the instant the price is everywhere. ## Gate by identity, not by knowledge The alternative is to make the price a property of the customer rather than a property of a code. You tag the customers who belong in the segment, and you attach an [automatic discount that applies to that tag](/b2b-pricing). A logged-in VIP sees the early-access price with nothing to enter. Everyone else sees the normal price. There is no code, so there is no string to leak, so there is nothing for a deal site to publish. This is the same mechanism that makes [wholesale pricing](/wholesale-pricing) work without a separate storefront, pointed at a holiday use case. The customer's identity, expressed as a tag, is the key. The offer is bound to the person, and a person cannot be pasted into a forum. ## A three-segment early-access plan Here is a concrete shape for a store running early access before the public BFCM sale. | Segment | Tag | Access window | Offer | Why it is gated | |---|---|---|---|---| | VIP retail | `vip` | 48 hours early | Deeper volume tiers, first pick of limited stock | Rewards loyalty, keeps depth off the public rate | | Wholesale | `wholesale` | 72 hours early | Negotiated case pricing, no public visibility | Pricing is confidential and account-specific | | Lapsed / win-back | `winback` | 24 hours early | Single reactivation offer | Spends discount on demand you do not already own | Each row is one tag and one rule. None of them is a code. The wholesale row is the one that matters most to get right, because wholesale prices are often contractual and must never appear publicly. Tag-gating is not just convenient there, it is the correct way to keep negotiated pricing private while still letting those accounts restock early. ## The details that make it hold **Tags have to be clean going in.** Segment-first pricing is only as good as the tags behind it. Before the window opens, audit the tag: who is in it, who should be, who slipped in from an old import. A wrong tag is a wrong price. **Require login for the segment price.** The automatic discount should key off the authenticated customer's tag, so the price is tied to being signed in as that customer, not to visiting a URL. This is what closes the loophole a shareable link would reopen. **Floor the whole thing.** VIP depth plus a volume tier plus free shipping can compound further than you modeled. A [profit floor](/profit-analytics) under the segment rules blocks any combination that would drop an early-access order below your margin line, so you can be generous with your best customers without hand-checking every cart. **Keep the segments from overlapping badly.** Decide what happens when a customer carries two tags. A wholesale VIP should get one coherent price, not two discounts that stack into a loss. This is a combination decision, and it deserves the same explicit rule as any other. ## Setting this up with Discount Prime Tag-based [B2B and customer-specific pricing](/b2b-pricing) and [wholesale rules](/wholesale-pricing) run as private automatic discounts, so early access is bound to the customer and never to a code. Attach your [volume tiers](/volume-discounts) to the same segments, set the floor, and audit the tags before the window opens. For the broader case that tags are underused, our post on [segment-based pricing](/blog/customer-tags-are-underrated-segment-based-pricing) makes the argument in full, and if you are still deciding how deep to go this season, the [targeted-not-sitewide BFCM piece](/blog/bfcm-2025-the-year-of-targeted-not-sitewide-discounts) is the strategic frame this tactic serves. --- ## BFCM 2025: Why We Think This Is the Year of Targeted, Not Sitewide, Discounts URL: https://www.discountprime.app/blog/bfcm-2025-the-year-of-targeted-not-sitewide-discounts Category: Profit & Strategy | Author: Discount Prime Team | Published: October 21, 2025 | Updated: July 15, 2026 | Read time: 4 min | Tags: bfcm, profit-strategy, targeted-discounts, margin-protection, segmentation > A sitewide BFCM discount pays every buyer the same, including those who would have bought at full price, which is the single largest margin leak of the weekend. For BFCM 2025, target discount depth by segment, product margin, and cart size so the discount lands where it changes behavior. *The most expensive line item of Black Friday is not the discount you give to close a sale. It is the discount you give to a customer who was going to buy anyway.* For BFCM 2025 we think the smart move is targeted, not sitewide. A flat sitewide percentage is the easiest offer to advertise and the most expensive one to run, because it pays the same rate to the customer you had to win and the customer who already had a card out. On a weekend that moved $11.5 billion in merchant sales across Shopify last year, that gap between "discount that changed a decision" and "discount that changed nothing" is where a store's whole margin can quietly go. This is not an argument against discounting hard. It is an argument for spending the discount where it does work. ## The problem with a flat number A sitewide 25% treats every order as identical. But your orders are not identical. Some customers were already going to convert at full price. Some were price sensitive and needed the nudge. Some were buying one thin-margin item, some a basket of healthy ones. The flat rate ignores all of that and pays out the same. Economists have a name for the discount you give a customer who would have bought anyway: deadweight. On a normal Tuesday the deadweight cost of a sale is small because traffic is small. On BFCM, when your highest-intent buyers of the year show up, the deadweight cost is at its structural maximum. The one weekend you most want to protect margin is the one weekend a flat discount hurts it most. ## What "targeted" actually means Targeting is not complexity for its own sake. It is varying discount depth along the three axes that predict whether the discount changed anything. **By who is buying.** Your VIP and returning customers were coming regardless, so a first-time or lapsed-customer offer spends the discount on demand you did not already own. Your wholesale buyers need their own logic entirely, not the retail sitewide rate. Segment pricing through [customer tags and B2B rules](/b2b-pricing) lets the same store show a wholesale buyer, a VIP, and a cold visitor three appropriate prices without three storefronts. **By what they are buying.** A flat rate on a 60% margin candle and a flat rate on a 22% margin electronic accessory are two completely different decisions wearing the same number. Reduce or remove depth on thin-margin products and spend it where you can afford to. **By how much.** A [volume discount](/volume-discounts) that deepens as the cart grows spends the discount only when the order gets bigger. The customer buying one unit at full margin and the customer you talked into three both pay a rate that fits what they did. ## A worked comparison Take a store doing a hypothetical 1,000 BFCM orders at a $60 average order value, with a blended 45% gross margin before discounting. | Approach | Discount logic | Effect on the weekend | |---|---|---| | Sitewide 25% | Every order loses 25% of revenue, thin-margin items included | Simplest to run, deepest margin erosion, subsidizes full-price buyers | | Targeted | 10% floor sitewide, deeper volume tiers on healthy-margin lines, no discount on thin-margin SKUs, segment offer for lapsed customers | Advertised offer stays competitive, discount concentrates where it moves behavior | The targeted store can still headline a strong number. What it stops doing is paying that number to the orders that never needed it. The advertised offer is a door. It does not have to be the rate every single cart receives. ## Targeting without a spreadsheet nightmare The objection to targeting is always operational: it sounds like ten campaigns instead of one. It does not have to be. The three axes above are rules, not individual promotions. One segment rule, one product-margin carve-out, and one volume tier cover most of the weekend. Then set a [profit floor](/profit-analytics) underneath all of it so that no combination of your targeted rules, however unusual the cart, can push an order below your margin line. The floor is what lets you be aggressive on the headline without watching every edge case by hand. Before the weekend, run your targeted rules against last year's orders to see the real blended discount they produce. Targeting can surprise you in both directions, and you want that surprise in October, not on Black Friday. ## The bet for this season Sitewide made sense when discovery was scarce and the discount itself was the marketing. Discovery is not scarce anymore. For BFCM 2025 the edge is not a bigger flat number, it is a smarter distribution of the same discount budget: deep where it changes a decision, shallow where it does not, and floored everywhere so the edges cannot hurt you. For last year's version of this thinking, our [BFCM 2024 playbook](/blog/bfcm-2024-discount-playbook-deep-or-wide) argued deep or wide but not both, and this is the natural next turn of that idea. If you are running any sitewide component at all, pair this with our guide to [protecting margin during sitewide sales](/blog/how-to-protect-margin-during-sitewide-sales) so the flat portion has guardrails too. --- ## Two Years on the App Store: What Changed in How Merchants Buy Apps URL: https://www.discountprime.app/blog/two-years-on-the-app-store-how-merchants-buy-apps Category: Build in Public | Author: Discount Prime Team | Published: October 7, 2025 | Updated: July 15, 2026 | Read time: 4 min | Tags: build-in-public, app-store, shopify, app-discovery, reviews > Over two years selling a Shopify app, merchant buying behavior shifted from browsing category listings toward arriving pre-researched with a shortlist. Reviews now function as verification rather than discovery, evaluation windows shortened, and by late 2025 the first AI-referred installs began appearing from assistants that read comparison content. *Two years ago a merchant found your app by browsing a category. Today they arrive already knowing your name, and they are checking whether you are the one they think you are.* Discount Prime has been live on the Shopify App Store for two years this week. The most interesting change over those two years is not in the app. It is in how merchants decide to install it. Discovery moved upstream, evaluation got faster, and in the last few months a genuinely new install source started showing up. Here is the honest version of what we have watched. ## Merchants arrive pre-researched now Two years ago, a meaningful share of installs came from merchants browsing the discounts category, comparing listings side by side, reading their way to a decision inside the store. That still happens, but it is no longer the main road. Most merchants now show up with a shortlist. They built it somewhere else: a search, a comparison article, a Reddit thread, a recommendation in a community. By the time they reach the listing, they are not asking "which app should I use." They are asking "is this the one I already think it is." The listing stopped being where the decision starts. It became where the decision gets confirmed. That reframed how we think about the store page. A page written to win a cold browse and a page written to confirm a near-decision are different pages. The second one leads with the specific job, shows it working on a realistic catalog, and keeps the pricing legible. It answers the last doubt, not the first curiosity. ## Reviews became verification, not discovery Reviews used to do discovery work. A high star count pulled a merchant in. Now the star count is table stakes, and the job of a review is to verify a choice the merchant has mostly made. That changes which reviews carry weight. A recent, specific review that names a real workflow ("we run wholesale tiers by customer tag and it just worked") does more than ten that say "great app, fast support." The specific one answers the question the merchant actually has: will this handle my case. We stopped chasing volume of reviews and started caring about whether recent ones described concrete use. ## Evaluation windows got shorter The second shift is speed. Merchants decide faster, often inside the first session. They install, they point the app at their real catalog, and they judge within minutes whether the core job works. An app that needs an afternoon to demonstrate value now loses to one that proves itself before the coffee is cold. For us that meant treating the first ten minutes as the product. Setup that assumes a real store with messy data, a default that does something useful immediately, and a clear read on whether it is working. The [analytics view](/profit-analytics) matters here too: a merchant evaluating an app wants to see that it can show its own results, not just perform an action. ## The new one: AI-referred installs The genuinely new development this year is small but real. We have started seeing installs from merchants who found us through an AI assistant. They were researching a problem, an assistant summarized the options, and our app was in that summary. These arrivals behave differently. They tend to come pre-qualified, because the assistant already matched the app to a stated need before the merchant ever clicked. They ask sharper questions. They are further along. It is early, and the volume is modest, but the direction is unmistakable: some of the discovery that used to happen through browsing and search is now happening through a model reading comparison content and handing back a shortlist. The practical response is not a trick. It is to make sure the plain facts about what the app does, who it is for, and how it prices are stated clearly enough that a model can summarize them correctly. The same clarity that helps a rushed merchant helps an assistant reading on their behalf. Our [comparison and category content](/best-shopify-discount-apps) exists partly for exactly this reader. ## What we take from year two Discovery moved upstream, so the listing confirms more than it convinces. Reviews verify instead of attract, so specificity beats volume. Evaluation compressed, so the first ten minutes is the pitch. And a new referrer arrived that reads before the merchant does. For the longer story of what these two years cost to build, the [one-year retrospective](/blog/one-year-on-the-app-store-numbers-mistakes-whats-next) is where this thread started, and our note on the [roadmap debt of a small app](/blog/two-years-in-the-roadmap-debt-of-a-small-shopify-app) covers what we had to cut to get here. To every merchant who shortlisted us, installed, and then told us what was still confusing: that feedback is the product. --- ## Your BFCM Discount Stack: Plan the Combinations Before November URL: https://www.discountprime.app/blog/your-bfcm-discount-stack-plan-the-combinations Category: Discounts & Promotions | Author: Discount Prime Team | Published: September 23, 2025 | Updated: July 15, 2026 | Read time: 5 min | Tags: bfcm, discount-stacking, shopify, margin-protection, combinations > A BFCM discount stack is the full set of offers that can apply to one cart at the same time. Decide combine, exclude, or prioritize for every pair before November, map it in a matrix, and set a profit floor so no combination pushes an order below margin. *Most stores plan their BFCM offers. Far fewer plan what happens when two of those offers land in the same cart.* Your BFCM discount stack is the full set of promotions that can apply to one cart at the same time: a volume tier, a free shipping threshold, a sitewide code, maybe a Buy X Get Y. The offers are the easy part. The margin damage lives in the combinations, and the fix is to decide, for every pair of offers, whether they combine, exclude, or take priority. Do it now, in September, on paper, while nobody is watching the traffic graph. This is the third BFCM we have watched from inside the app, and the pattern holds every year. Stores do not lose margin to the discount they meant to run. They lose it to the second one they forgot was still live. ## What a discount stack actually is On Shopify, discounts fall into classes: product discounts, order discounts, and shipping discounts. A single cart can carry one of each at once when their combination settings allow it. That is by design, and it is useful. A volume discount on a product line, a free shipping threshold on the order, and a percentage code can all coexist. The question is never whether they can stack. It is whether you decided they should. The trap is that combination is a per-discount setting, and defaults are quiet. An order discount you built in July with "combines with shipping discounts" left on will happily meet your BFCM shipping offer in November, and nobody chose that on purpose. ## Build the combination matrix List every offer that will be live over the weekend down one axis and across the other. For each intersection, write one word: combine, exclude, or prioritize. Here is a worked example for a small store running four offers. | Offer | Volume tier (buy 3+) | Free shipping ($75+) | Sitewide 15% code | Buy X Get Y gift | |---|---|---|---|---| | Volume tier (buy 3+) | Hero offer | Combine | Exclude | Exclude | | Free shipping ($75+) | Combine | Baseline | Combine | Combine | | Sitewide 15% code | Exclude | Combine | Fallback | Exclude | | Buy X Get Y gift | Exclude | Combine | Exclude | Gift track | Read it like this. The volume tier is the hero, and it can carry free shipping, but it cannot also take the 15% code or trigger the gift, because a customer buying three units at a tier price and then taking 15% off on top is an order you did not price for. Free shipping combines with almost everything, because it lifts average order value and its cost is bounded. The 15% code is the fallback for customers who do not hit the volume tier, so those two exclude each other by definition. The matrix does one more thing: it forces you to name the hero. Every cell that says "exclude" is a sentence that reads "this offer protects the hero offer." If you cannot say which offer is the hero, you have not planned a stack, you have planned a collision. ## The three moves that protect margin **Exclude your thin-margin products from the hero.** Carve your lowest-margin SKUs out of the deepest offer. A 20% volume tier on a product that already runs at 22% margin is a sale you lose money to complete. **Cap how many classes can meet.** Just because a product, order, and shipping discount can all combine does not mean all three should. Decide the maximum depth for one cart and enforce it in the combination settings, not in your head. **Set a hard floor.** This is the one most stores skip. After every deliberate combination is allowed, there is still a long tail of carts you did not model: unusual quantities, currency edges, a returning customer with a stored code. A profit floor blocks any order that a combination pushes below your margin line, so the tail cannot hurt you even when your matrix misses a case. ## Model one real cart before you commit Pick a representative order from last November. Apply your planned stack to it by hand: start from the line price, apply the volume tier, subtract the shipping subsidy, take out transaction and packaging costs. The number left is your real margin on your busiest weekend. If it survives your hero offer plus free shipping, you have a stack. If it does not, you have found the problem in September instead of at 11pm on Black Friday. Then run it against volume. A [dry-run simulation](/profit-analytics) applies your planned discount logic to recent orders and shows what each combination would have cost across your actual order mix, not one hand-picked cart. That is the difference between believing your matrix is safe and knowing it. ## Setting this up with Discount Prime Combination rules, exclusions, and the profit floor all live in the same place, so your [volume discounts](/volume-discounts) and your [free shipping](/free-shipping) offer carry explicit relationships instead of inherited defaults. Build the matrix, set the floor, simulate against last year's orders, then freeze it before your first email goes out. For the mechanics of how Shopify resolves overlapping offers, our guide to [how combinations actually work](/blog/discount-stacking-on-shopify-how-combinations-work) is the companion to this one, and when you are ready to sequence the rest of the season, the [pre-BFCM checklist](/blog/pre-bfcm-checklist-get-your-discounts-ready) picks up where the matrix leaves off. --- ## New: Profit Floor. A Hard Stop for Unprofitable Orders URL: https://www.discountprime.app/blog/new-profit-floor-a-hard-stop-for-unprofitable-orders Category: Profit & Strategy | Author: Discount Prime Team | Published: September 9, 2025 | Updated: July 15, 2026 | Read time: 5 min | Tags: shopify, profit-floor, profit-strategy, margin-protection, product-update > Profit floor sets a hard minimum margin on every discounted order in Discount Prime. When combined discounts would push an order below the floor you set, the discount is automatically capped so the order never ships at a loss. It turns margin from something you report on after the fact into a guardrail enforced live at checkout, using your cost data. *Reporting tells you an order lost money. A floor stops it from happening.* Today we are shipping profit floor, and it is the feature the last year of Discount Prime has been building toward. Profit floor lets you set a hard minimum margin, and when discounts would push an order below it, the engine caps the discount so the order never ships at a loss. Not a warning, not a line in a report you read next week. A live guardrail enforced at checkout, on every order, using your own cost data. If profit analytics answered "which of my discounts lose money," profit floor answers the harder question: "make sure they cannot." ## What profit floor does You set a floor, expressed as a minimum margin. From that point on, every discounted order is checked against it live in the cart. If the combined discounts on that order would leave margin above the floor, nothing changes and the customer gets the full discount. If they would push margin below the floor, the engine reduces the applied discount to the exact point that holds your minimum, and no further. It caps the discount, it does not block the order. The customer still checks out, still gets a discount, just not one deep enough to breach your floor. You get a completed sale at your minimum acceptable margin instead of a loss. ## The problem it solves Every merchant who runs combinable discounts has the same quiet exposure: the tail. On average a campaign looks healthy, but somewhere in the order data is a cluster that went underwater. Usually it is the cheapest variant hitting the deepest tier, or a volume discount landing on top of a welcome code you forgot could combine, or a thin-margin dropshipped product where a normal-looking discount is enough to erase the spread. You could catch these by setting shallower discounts everywhere, but that is a blunt fix. It protects the edge cases by taxing every healthy order, leaving margin on the table across the whole campaign to defend the few orders that would have breached. Profit floor is the surgical version: full discount on every order that can afford it, a precise cap only on the orders that cannot. ## A worked example Take a product at $40 with a $28 landed cost, so gross margin is $12, or 30%. You run a 15% volume tier, and it can combine with a 10% welcome code. You set your profit floor at 12% margin. A normal order takes the 15% tier: price $34, margin $6, or about 18%. Above the floor, so it applies in full. Now a customer arrives with the welcome code and the volume tier both qualifying. Combined, that is a deeper effective discount: | Scenario | Applied discount | Price | Margin | | --- | --- | --- | --- | | Volume tier only | 15% | $34.00 | 17.6% | | Tier plus welcome code, uncapped | 23.5% | $30.60 | 8.5% | | Tier plus welcome code, with 12% floor | 20% | $32.00 | 12.0% | Uncapped, the stacked order falls to 8.5% margin, below your floor and barely above cost. With profit floor set at 12%, the engine caps the combined discount at 20% instead of letting it run to 23.5%, holding margin at exactly your minimum. The customer still gets a real discount. You just do not fund the last few points that would have crossed the line. ## How it fits the rest of the app Profit floor is the enforcement layer on top of a stack we have been building deliberately. It reads the same cost data that powers your [profit analytics](/profit-analytics), which is why cost of goods is a prerequisite: the floor can only defend a margin it can calculate. If you sell on thin spreads, it pairs directly with [dropshipper margin pricing](/dropshipper-pricing), turning a target margin into a hard limit rather than a hope. It also completes the arc we started with [dry-run simulation](/blog/new-dry-run-simulation-test-a-campaign-before-live) in June. Simulation lets you see the underwater orders before you launch. The floor stops the ones you did not foresee, the combination you did not model, the variant you did not check, at the moment they would occur. Together they cover both halves of the problem: predict what you can, catch what you cannot. ## Setting it up Profit floor needs two things: cost data on your products, and a floor. If you already track cost of goods for [profit analytics](/profit-analytics), you have the first. For the floor itself, start conservative. Set it at the lowest margin you are genuinely willing to accept on a sale, not your target margin, because the floor is a hard stop, not a goal. You want it to catch losses, not to override every promotion you run. Then watch it for a season. The orders it caps are the orders that would otherwise have been the quiet leaks in your margin, and seeing which discounts trigger the cap tells you where your combination rules need tightening upstream. We wrote at our [profit analytics launch](/blog/new-profit-analytics-margin-not-just-revenue) that revenue reporting is table stakes and margin is the story. Profit floor is where that stops being a story you read and becomes a rule your store enforces. It is live for every plan today. Add your cost data, set a floor, and stop shipping orders that lose you money. --- ## Free Gift with Purchase on Shopify: Mechanics, Pitfalls, and Margin Math URL: https://www.discountprime.app/blog/free-gift-with-purchase-on-shopify-mechanics-margin Category: Discounts & Promotions | Author: Discount Prime Team | Published: August 19, 2025 | Updated: July 15, 2026 | Read time: 6 min | Tags: shopify, free-gift-with-purchase, discounts-promotions, margin-math, promotions > Free gift with purchase adds a free item once a cart clears a threshold. It works when the gift's cost is covered by the incremental margin the threshold creates, and fails when it is handed to orders that would have happened anyway. Set the threshold above current average order value, cost the gift at landed cost not retail, and track gift SKUs as real inventory. *A free gift feels generous to the customer and free to the merchant. Only one of those is true.* Free gift with purchase is one of the most effective promotions in ecommerce and one of the easiest to run at a loss without noticing. Done right, it lifts average order value and moves slow inventory while the customer feels rewarded rather than discounted. Done wrong, it hands a costed item to orders that would have happened anyway. The difference is entirely in the mechanics and the margin math, so this guide covers both. The direct answer up front: a gift with purchase pays for itself only when the threshold that triggers it creates more incremental margin than the gift costs you at landed cost. Everything below is how to make that true. ## What a free gift with purchase actually is A free gift with purchase adds a designated item to the cart at no charge once the order meets a condition. The condition is usually a spend threshold ("free gift on orders over $75") or a qualifying product ("free travel size with any full size"). On Shopify, it is built as a [Buy X Get Y](/bxgy) style rule through Shopify Functions, so the gift is added and priced at zero inside the native cart and checkout, no duplicate free product listing or manual code required. Mechanically it is close to a BOGO offer, and the same design principles apply: the reward has to be clearly tied to the purchase, and the customer has to understand it without reading fine print. Our guide to [Buy X Get Y mechanics](/blog/bogo-done-right-buy-x-get-y-mechanics) covers the clarity side in depth. This post is about the money. ## Where to set the threshold The threshold is the entire economic engine of the offer, and most stores set it wrong by setting it too low. If your average order value is $60 and you offer a free gift over $50, you are giving the gift to nearly every order, including the ones already above $50 that needed no encouragement. You just added cost to purchases you were getting at full margin. Set the threshold above your current AOV. If AOV is $60, a $75 threshold asks the customer to add roughly one more item to qualify. Now the gift is buying something: the incremental spend between $60 and $75. That incremental spend carries margin, and that margin is what funds the gift. **The rule: the threshold should stretch the order, not reward the default.** This is the same logic that governs volume tiers and free shipping bars, and it is the single most common place gift offers leak money. ## The margin math, worked Here is the calculation that decides whether the offer is a promotion or a slow loss. Say your AOV is $60 and you set the gift threshold at $75. Your blended contribution margin is 45%, so every extra dollar of sales adds 45 cents of margin. The gift is a house-brand accessory that retails for $20 but costs you $5 landed. | Item | Value | | --- | --- | | Threshold above AOV | $75 minus $60 = $15 incremental spend | | Margin on incremental spend | $15 x 45% = $6.75 | | Cost of the gift | $5.00 | | Net margin gain per lifted order | $6.75 minus $5.00 = $1.75 | On every order the offer successfully lifts, you net $1.75 and the customer feels they got a $20 gift. That is the shape of a healthy gift with purchase: the customer's perceived value ($20) is far above your cost ($5), and the incremental margin covers the cost with room to spare. Now watch it break. Cost the gift at its $20 retail value instead of its $5 landed cost and you would wrongly conclude the offer loses $13.25 per order and kill it. Or set the threshold at $50, below AOV, and the $6.75 of incremental margin never appears, so every gift is a straight $5 cost with nothing funding it. Same offer, two ways to misread it, both fatal. The two numbers that matter: cost the gift at **landed cost**, and place the threshold so it creates **incremental margin** larger than that cost. ## Choosing the gift The ideal gift has a low landed cost and a high perceived value. A sample, a branded accessory, or a house-brand product the customer would not otherwise try all qualify. They feel like a genuine reward and cost you little. Two items to avoid. Do not gift your hero product, the thing people already come to buy at full price. Give it away and you teach customers to wait for the gift promotion instead of paying for it, cannibalizing your best margin. And do not gift anything whose landed cost is high enough that the margin math only works on your largest orders; a gift that only pencils out above $150 on a store with a $60 AOV is not a gift-with-purchase offer, it is a whale reward. ## Treat gift SKUs as real inventory The most common operational failure is treating the gift as an untracked add-on. It is a real unit leaving your warehouse, so it needs a real SKU with real stock. Two rules keep it clean. Cap the campaign to the gift stock you actually have, so a popular offer does not promise a gift you cannot ship. And set the rule to add at most one gift per qualifying order, so a single large cart cannot claim several. Then reconcile gift inventory the same way you reconcile sellable stock. A gift you ran out of mid-campaign is a customer service problem wearing a promotion costume. While you are at it, decide how the gift interacts with other offers. If it can stack with a code or a volume tier, the effective cost of an order changes, and unplanned stacking is one of the [discount abuse patterns](/blog/discount-abuse-is-real-six-patterns-in-order-data) that quietly widens the leak. Set the combination behavior deliberately. ## Measuring whether it worked After the campaign, check three things in your [profit analytics](/profit-analytics): did AOV on qualifying orders actually rise toward the threshold, did margin per order hold after subtracting gift cost, and what share of orders clustered just above the threshold (evidence customers responded to it rather than clearing it by accident). If AOV did not move, the threshold was too low or the gift too weak. If margin fell, the gift cost more than the lift it created. Gift with purchase is not a giveaway. It is a trade: you give a low-cost, high-perceived-value item in exchange for incremental spend that carries more margin than the gift costs. Set up the mechanics with a real threshold, a real SKU, and honest landed-cost math, and it is one of the few promotions that can grow orders and protect margin at the same time. For thresholds specifically, it pairs naturally with a [free shipping](/free-shipping) bar, giving customers two reasons to add one more item. --- ## August 28 Is the Real Checkout Deadline: Thank You and Order Status Pages URL: https://www.discountprime.app/blog/august-28-is-the-real-checkout-deadline Category: Ecosystem & Platform | Author: Discount Prime Team | Published: August 5, 2025 | Updated: July 15, 2026 | Read time: 5 min | Tags: shopify, checkout-extensibility, ecosystem-platform, migration, post-purchase > Shopify's checkout extensibility deadline for the Thank You and Order Status pages is August 28, 2025. After it, customizations built on the legacy checkout.liquid for those pages stop being supported, and stores must move to checkout UI extensions. Discount logic built on Shopify Functions is unaffected, but post-purchase upsells and order-status widgets tied to the old pages need migrating. *Last year's checkout deadline got the headlines. This year's is the one that finishes the job, and it lands on the two pages most merchants forget they customized.* On August 28, 2025, Shopify ends support for legacy `checkout.liquid` customizations on the Thank You and Order Status pages. If your store still relies on the old checkout to render those two pages, this is the date the safety net is removed. The direct answer for most merchants: your products, prices, and discount logic are fine, but any post-purchase upsell, tracking block, or custom content living on the Thank You or Order Status page needs to move to checkout extensibility before the deadline, or it stops working. This is the sequel to the deadline that hit the front of checkout last year, and it is worth understanding precisely, because the parts that break and the parts that do not are easy to confuse. ## What actually changes on August 28 Shopify has spent two years moving merchants off `checkout.liquid`, the old editable checkout, onto checkout extensibility, a system of sandboxed UI extensions and apps. The migration happened in stages by page. The [August 13, 2024 deadline](/blog/checkout-liquid-is-going-away-august-13-deadline) covered the information, shipping, and payment steps, the pages where customers enter details and pay. August 28, 2025 covers the last two pages in the flow: the Thank You page a customer sees immediately after paying, and the Order Status page they return to for tracking and updates. After the deadline, customizations on those two pages that depend on legacy `checkout.liquid` are no longer supported. They can quietly fall back to a default experience, which is the trap: nothing throws an error, the page just stops doing the extra thing you built. ## What breaks, and what does not It helps to separate the layers. | Layer | Affected by Aug 28? | Why | | --- | --- | --- | | Discount and pricing logic on Shopify Functions | No | Functions run in the discount engine, not the checkout page | | Volume, shipping, and Buy X Get Y discounts | No | Applied server-side before the customer reaches these pages | | Post-purchase upsell on the Thank You page | Yes | Rendered in the checkout page layer being deprecated | | Custom content or scripts on Order Status | Yes | Injected through legacy checkout.liquid | | Analytics or tracking pixels in checkout.liquid | Yes | Depend on the old editable checkout | The pattern: anything that computes a price is safe, because that work happens in Shopify Functions long before these pages render. Anything that draws something onto the Thank You or Order Status page through the old checkout is what needs attention. This is exactly why building discount logic on Functions has aged well. If your [volume discounts](/volume-discounts) or [free shipping](/free-shipping) thresholds run through the native engine, they were never touching `checkout.liquid` in the first place, and this deadline passes over them entirely. ## Why the Thank You page is the sneaky one The Order Status page is a known quantity: most merchants know they added a tracking widget or a support link there. The Thank You page is where the surprises live, because it is prime real estate for post-purchase offers and merchants often installed those through apps or snippets they have long forgotten. A post-purchase upsell that appears right after payment is one of the highest-converting placements in ecommerce, precisely because the customer has already committed. If yours is built on the legacy checkout, it is on the list. The customer will still complete their order, they just will not see the offer, and you will not get an error telling you why revenue dipped. ## A migration checklist for discount merchants You do not need to rebuild your checkout. You need to inventory two pages and move what lives on them. 1. **List every customization on the Thank You and Order Status pages.** Post-purchase upsells, order tracking widgets, custom messaging, referral prompts, survey blocks, tracking pixels. Write them down before you touch anything. 2. **Sort each one into "moves" or "already fine."** Anything running through an app that supports checkout extensibility is likely already migrated by the vendor. Anything you added by editing `checkout.liquid` or through a snippet needs to move. 3. **Check your apps' status.** Open each app that touches post-purchase or order status and confirm it supports checkout extensibility. Reputable vendors have shipped their migration already; ask the ones that have not. 4. **Rebuild upsells as checkout UI extensions.** Post-purchase offers move to the extension model. If your current upsell tool is not migrating, this is the moment to switch to one that has. 5. **Confirm your discount logic is untouched.** Verify that your pricing runs on Shopify Functions, not on anything in the checkout page layer. If it does, you can leave it alone with confidence. 6. **Test the full flow after migrating.** Place a real test order and walk through payment, Thank You, and Order Status. Confirm every widget you kept still renders and every discount still applies at the right price. 7. **Do it before the last week of August.** Peak BFCM prep is weeks away. You do not want to be debugging your Thank You page in October. ## The bigger direction this points to Zoom out and the two checkout deadlines tell one story: Shopify is consolidating checkout into a sandboxed, upgrade-safe model where merchants customize through defined extension points rather than by editing a template. The upside is that once you migrate, future checkout upgrades stop breaking your customizations. The cost is this one round of migration work. It also rhymes with the wider platform direction we wrote about in the [Summer '25 Editions recap](/blog/shopify-editions-summer-25-horizon-ai-and-discounts): logic belongs in defined, native surfaces, not in patched templates. Discounting made that move years ago with Functions. Checkout is finishing the same journey now. If your pricing is already Functions-native, August 28 is a small chore about two pages, not a fire. Inventory them, move the upsells, test the flow, and get back to preparing for the season that actually matters. --- ## How We Test Discount Logic: 400 Edge Cases and Counting URL: https://www.discountprime.app/blog/how-we-test-discount-logic-400-edge-cases Category: Build in Public | Author: Discount Prime Team | Published: July 22, 2025 | Updated: July 15, 2026 | Read time: 5 min | Tags: shopify, discount-testing, build-in-public, engineering, reliability > Discount Prime tests its discount logic against more than 400 edge cases covering currencies, rounding, and combination matrices. A wrong price is worse than no discount, so every rule runs through multi-currency rounding checks, line-versus-cart interaction tests, and a combination matrix before release. Each production bug becomes a permanent regression test so the same mistake cannot ship twice. *A discount app has exactly one job that cannot be wrong: the price. Everything else is a feature. The price is the promise.* We have crossed 400 edge cases in our discount test suite, and we thought it was worth explaining what those cases are and why a small pricing app spends this much effort on them. The short version: a discount that is 12 cents off is worse than no discount at all, because it turns a moment of savings into a moment of doubt. A customer who spots a total that does not add up does not think "rounding," they think "is this store real." So here is how we keep the price right. ## Why discount math is deceptively hard Discounting one item by 10% is trivial. The difficulty is that real carts do not contain one item and one discount. They contain several products, sometimes several discounts, in one of many currencies, each of which rounds to a different number of decimal places. Every one of those variables multiplies the others. A single volume tier that can also combine with a free shipping discount, evaluated across three currencies, already has dozens of distinct paths through the math. Each path has to land on the correct cent, and it has to land there the same way every time. That is the surface we test. ## The three families of edge cases Most of the 400 fall into three groups. **Currency and rounding.** Rounding order changes the answer. Apply a percentage and round each line, and you can get a different cart total than if you round once at the end. Add multi-currency conversion, which introduces its own rounding step, and the two can disagree by a cent or two. A cent or two is enough to make line items not sum to the total shown, which is the single most alarming thing a checkout can do. We test zero-decimal currencies, high-denomination currencies, and the conversion boundaries where floating point likes to misbehave. **Combination matrices.** This is the biggest family. We take every discount type in the app, volume, [Buy X Get Y](/bxgy)-style rewards, shipping, and order-level, and pair it against every combination rule: combine, exclude, prioritize. Then we check that when two discounts touch, the engine resolves them deterministically. The same cart must never produce two different totals depending on the order the discounts were evaluated in. **Line versus cart interactions.** A discount can apply to a line item or to the whole cart, and the two interact. A cart-level percentage sitting on top of a line-level volume price has to compose in the right order, and quantity changes have to reprice cleanly. We test carts that cross a tier boundary mid-edit, mixed-eligibility carts where only some products qualify, and the awkward case where a return drops a cart back below a threshold it previously cleared. ## A concrete example Take a cart with two units at $19.99 and a "10% off order" discount, priced in a currency that rounds to two decimals. Round per line: each unit becomes $17.991, rounds to $17.99, cart total $35.98. Round at the end: $39.98 less 10% is $35.982, rounds to $35.98. Those agree here, which is the point. But nudge the price to $19.95 with a three-unit cart and the two methods can split by a cent. The test suite pins which method the engine uses and asserts the line items always sum to the displayed total, in every currency, so the customer never sees arithmetic that does not close. ## How the suite grows We do not sit down and imagine 400 cases. The suite grows two ways. New features arrive with their own matrix. When we shipped a new discount type, we did not just test it in isolation, we added its row and column to the combination matrix against everything already there. That is why each feature costs more to test than the last, and it is the right kind of expensive. The other source is production. Every bug that reaches a real store becomes a permanent regression test before the fix ships. The failing cart gets written into the suite so it fails the build if the behavior ever comes back. This is why the count only goes up. We are not chasing a number, we are refusing to ship the same mistake twice. Our [second BFCM postmortem](/blog/what-our-second-bfcm-broke-and-fixed) has the story of a few of the bugs that earned their place in that suite. ## Why this connects to margin, not just correctness Testing is usually framed as a reliability story, but for a discount app it is also a margin story. A combination that resolves the wrong way does not just show a strange total, it can discount deeper than you intended and quietly erode the margin on every affected order. Correct combination logic is what makes your [volume discounts](/volume-discounts) behave the way you configured them, and it is what makes the numbers in your [profit analytics](/profit-analytics) trustworthy enough to act on. It is also why we built [dry-run simulation](/blog/new-dry-run-simulation-test-a-campaign-before-live): the same determinism that lets us test 400 cases in a build lets you replay a proposed discount against your real orders and trust the result. If the engine were not predictable, the simulation would be a guess. Four hundred is not a finish line. It is where we are this month, and it will be a larger number next month, because every store that trusts us with its checkout is trusting the one thing that cannot be wrong. We would rather over-test the price than ever have to apologize for it. --- ## Discount Abuse Is Real: Six Patterns We See in Order Data URL: https://www.discountprime.app/blog/discount-abuse-is-real-six-patterns-in-order-data Category: Profit & Strategy | Author: Discount Prime Team | Published: July 8, 2025 | Updated: July 15, 2026 | Read time: 5 min | Tags: shopify, discount-abuse, profit-strategy, fraud-prevention, order-data > Discount abuse rarely looks like fraud. It shows up as ordinary orders that quietly cost more than they should: leaked codes on coupon sites, self-referrals, unplanned stacking, gift farming, serial returns, and account cycling. Reading order data for these six patterns, then using automatic discounts and combination rules instead of shareable codes, closes most of the leak. *Most discount abuse does not look like fraud. It looks like a normal order that quietly cost you more than it should have.* Discount abuse prevention starts with a reframe: the problem is rarely a criminal with a stolen card. It is ordinary customers using your promotions in ways you did not intend, at a scale you did not model. Over enough orders, that gap between intended and actual use becomes a real line in your margin. This is a guide to the six patterns we see most often in Shopify order data, and how to shut each one down. None of these require fraud tooling. They require reading your orders with the right questions and configuring discounts so the loophole never opens. ## 1. The leaked code You send a 20% code to your email list. Within days it is on three coupon aggregator sites, and now every price-sensitive shopper who was going to buy anyway pastes it at checkout. Your targeted offer became a sitewide discount you never approved. The tell is concentration: one code showing up on far more orders than the audience you sent it to. The fix is structural. For offers that do not need attribution, use an automatic discount that applies based on cart contents or customer tag rather than a word someone can copy. There is nothing to paste into a coupon site. Reserve typed codes for influencer and campaign tracking, and cap their usage. ## 2. The self-referral Referral programs assume the referrer and the referred are two people. Some customers notice they do not have to be. They refer themselves through a second email, claim both the referrer reward and the new-customer discount, and repeat. In the data this looks like new-customer orders clustering on a shared address, payment method, or device. The fix is to exclude the referrer's own account from redeeming their link, and to treat the new-customer discount as a segment (customers with zero prior orders) rather than an open code anyone can trigger again from a fresh inbox. ## 3. Unplanned stacking This one is not the customer's fault at all. Two discounts you never intended to combine, a volume tier and a welcome code, resolve together in the cart and the effective discount lands far below either headline number. The customer simply accepted the price your store offered. The fix is on your side: set explicit combination rules so promotions stack only when you decided they should. This is exactly the kind of thing a [dry-run simulation](/blog/new-dry-run-simulation-test-a-campaign-before-live) catches before launch, by showing you the effective discount rate rather than the number you typed. If you have never audited which of your live discounts can currently combine, that is the first place to look. ## 4. Gift and threshold farming Free gift and Buy X Get Y offers create a target. Some buyers assemble the cheapest possible qualifying cart, take the gift or the free item, and never touch the products the offer was meant to move. The reward becomes the purchase instead of a bonus on top of one. The pattern shows up as a cluster of orders sitting exactly at the qualifying minimum with an unusual product mix. The fix is to anchor the reward to the products you actually want sold, not to a raw cart total, and to make the gift's value proportional to the qualifying spend rather than a flat item any minimum cart unlocks. Build the mechanics deliberately with [Buy X Get Y](/bxgy) rules rather than a blunt threshold. ## 5. Return-cycle abuse A customer buys enough to unlock a discount or a free item, receives it, then returns the qualifying products and keeps the reward. They net the incentive without the purchase that justified it. On a bundle, they keep the discounted hero product and return the filler that got them to the tier. Read returns against the discount that funded them. If the same discounted item keeps coming back while the reward stays, you have a cycle. The structural fix is to tie the reward to the retained order: if returning the trigger drops the cart below the qualifying threshold, the discount should reverse with it, not survive the refund. ## 6. Account cycling for new-customer offers A generous first-order discount is an incentive to never become a second-order customer. A subset of buyers create a fresh account for every purchase, staying permanently "new" and permanently discounted. The signal is repeat new-customer orders sharing a shipping address or card. The fix is to define the offer against the customer, not the account: gate the first-order discount on customer tags and order history so a returning buyer under a new email does not requalify, and keep the welcome incentive modest enough that cycling is not worth the effort. ## How to find your own leaks You do not need to memorize six patterns. You need to segment margin by discount and look for two things: concentration (one promotion touching far more orders than it should) and repetition (the same behavior recurring across orders that share an identifier). Your [profit analytics](/profit-analytics) will show you which campaigns earn their keep and which ones quietly bleed, which is where every one of these patterns eventually surfaces. Then close the loop the way you would with any margin problem. Prefer automatic discounts and segment rules over shareable codes, set combination rules on purpose, and audit periodically. If you want a broader cleanup pass across your whole store, our guide to [auditing promo debt](/blog/new-year-cleaner-discounts-auditing-promo-debt) walks through the zombie codes and orphaned campaigns that abuse tends to hide behind, and the [last-minute BFCM conflict fixes](/blog/last-minute-bfcm-fixes-discount-conflicts) cover the stacking traps that get worse under peak-season volume. Discount abuse is rarely dramatic. It is a small percentage of orders, repeated, that you never priced for. Reading the data is how you find it, and configuring discounts deliberately is how you keep it from opening back up. --- ## New: Dry-Run Simulation. Test a Campaign Before It Goes Live URL: https://www.discountprime.app/blog/new-dry-run-simulation-test-a-campaign-before-live Category: Profit & Strategy | Author: Discount Prime Team | Published: June 24, 2025 | Updated: July 15, 2026 | Read time: 4 min | Tags: shopify, discount-simulation, profit-strategy, campaign-testing, product-update > Dry-run simulation in Discount Prime replays a proposed discount against recent real orders before it goes live, showing how many orders it would touch, the effective discount rate, and the margin impact. Merchants can catch tiers that break the margin floor and combinations that stack too deep before any customer sees the offer. *The most expensive discount is the one you find out was wrong after it shipped.* Today we are releasing dry-run simulation in Discount Prime. Before you publish a discount, you can now replay it against your recent real orders and see exactly what it would have done: how many orders it touches, how deep it actually discounts once combinations resolve, and what it leaves on the table in margin. Nothing goes live, no customer sees a price change, and you get the answer in seconds. If you have ever launched a campaign, watched it for a day, and quietly realized the tiers were deeper than you meant, this is the feature that ends that pattern. ## What dry-run simulation does A dry-run takes a discount you have configured but not published, runs it through the same engine that would evaluate it in a live cart, and applies it to a window of your recent orders. Instead of guessing what a "buy 3, save 15%" tier will cost you, you see the historical answer: the orders that would have qualified, the average effective discount after any stacking, the revenue affected, and the gross margin remaining. It is read-only. The simulation never touches a live campaign and never changes a price a customer can see. It is a preview, not a soft launch. ## The gap it closes Until now, testing a discount on Shopify meant one of two bad options. You could publish it and watch, which means real customers get real prices while you decide whether the math holds. Or you could model it in a spreadsheet, which never matches reality because spreadsheets do not know how your discount combines with the free shipping threshold or the volume tier already running on that product. Simulation closes that gap. It uses your actual order history and the actual combination rules in force, so the number you see is the number you would have paid. ## A worked example Say you sell a product at $40 with a landed cost of $26, so gross margin is $14 per unit, or 35%. You want to add a "buy 3 or more, 15% off" tier to lift order size. Run the dry-run over the last 30 days of orders and it might report: | Metric | Result | | --- | --- | | Orders that would qualify | 214 | | Average effective discount | 21% | | Gross margin after discount | 19% | The headline discount was 15%, but the effective rate came back at 21%. The simulation caught that many qualifying carts also had a 10% welcome code applied, and the two were set to combine. On those orders, margin fell from 35% to 19%. That is the kind of thing you want to learn from a report, not from a month of thin orders. You then either stop the two discounts from combining, raise the tier threshold, or accept the number with your eyes open. Either way, you decided on purpose. ## How to use it well **Simulate before every non-trivial launch.** Any discount that touches products with real cost variation, or that can combine with something else, is worth a 10-second dry-run. It is cheaper than the alternative. **Watch the effective rate, not the headline.** The number you configured and the number customers actually get diverge whenever discounts stack. The effective discount rate is the one that spends your margin. **Check the thin tail.** A campaign can look healthy on average and still contain a cluster of orders priced below cost, usually the cheapest variant or the deepest tier. The report lets you see where margin bottoms out, not just where it averages. **Pair it with your numbers.** Dry-run tells you what a discount would have done historically. Reading it next to your live [profit analytics](/profit-analytics) tells you whether the campaign, once running, is behaving the way the simulation predicted. ## Where this fits Dry-run simulation is part of a longer arc for us: moving from reporting on margin after the fact to protecting it before a campaign ships. It works with every discount type in the app, including [volume discounts](/volume-discounts) and combination-heavy setups where the stacked outcome is hardest to predict by hand. If you already audit your discounts periodically, this is the tool that lets you audit them before they exist. For a wider cleanup of the promotions you already run, our guide to [auditing promo debt](/blog/new-year-cleaner-discounts-auditing-promo-debt) pairs well with it, and if margin reporting is new to you, start with [the profit analytics launch](/blog/new-profit-analytics-margin-not-just-revenue). Dry-run simulation is live for every store now. Open a draft discount, run it, and see what it would cost before it costs anything. --- ## Scheduled Sales: Why Start and End Times Deserve More Respect URL: https://www.discountprime.app/blog/scheduled-sales-start-and-end-times-deserve-respect Category: Discounts & Promotions | Author: Discount Prime Team | Published: June 10, 2025 | Updated: July 15, 2026 | Read time: 6 min | Tags: discounts-promotions, scheduled-sales, flash-sales, timezones > A scheduled sale is only as reliable as its start and end times. Most sale mishaps trace to timezone confusion, missing end dates, and windows set in the wrong clock. Set schedules in your store timezone, always give a promotion an explicit end, and confirm both times before a flash window opens. *A sale that starts an hour late looks like a glitch. A sale that never ends looks like your real prices. Both are scheduling failures, and both are avoidable.* Merchants obsess over the size of a discount and barely think about its clock. That is backwards. The depth of a sale is a pricing decision you make once. The timing of it is an operational decision you have to get right every single time, and it is where more promotions quietly go wrong than anywhere else. A start time in the wrong timezone, an end date left blank, a flash window that opens ten minutes late during your best traffic hour: none of these show up in your discount settings as errors, but customers feel all of them. Getting scheduling right is unglamorous and worth real money. Here is how the timing actually works, and the traps to avoid. ## The one rule that prevents most problems Set your schedules in your store's timezone, and know what that timezone is. Shopify runs discount schedules against the timezone configured in your admin settings, not your laptop's clock and not the customer's local time. This sounds obvious until your team is spread across three regions and someone sets a "midnight" launch from a city three hours off the store clock. The sale fires when the store says midnight, not when that person's phone did, and now your email said one thing and the store did another. Before you schedule anything, confirm the store timezone in Shopify settings and make it the single reference everyone plans against. If you remember nothing else from this post, remember that the store clock is the only clock that matters. ## Always give a promotion an end The most common scheduling mistake is not a wrong time. It is a missing one. A discount with a start date and no end date does not fail loudly. It just keeps running. Weeks later someone notices that the "spring sale" is still live in summer, and by then it has done its damage: it has taught your customers that your discounted price is your real price, and that patience beats paying full price. We touched on this in our [pre-BFCM checklist](/blog/pre-bfcm-checklist-get-your-discounts-ready), and it is worth repeating because it is so easy to do by accident. The fix is a habit, not a feature. Set the end time when you create the discount, in the same motion as the start. If a promotion genuinely should be permanent, that is a pricing structure, not a sale, and it should be set up as one. ## Flash windows leave no room for drift For a two-week sale, a few minutes of timing slop does not matter. For a four-hour flash sale, it is the whole game. Short windows concentrate demand, which is the point, but they also concentrate the cost of any timing error. If your flash sale opens ten minutes late, the customers who showed up on time saw full price and some of them left. If it closes ten minutes late, you gave the discount to people who missed the window, which annoys the ones who raced to make it. For flash windows, three precautions: **Set both ends before the window opens,** never during. Editing a live flash sale under load is how you introduce the exact error you are trying to avoid. **Confirm the times on the discount itself,** not from memory or from the campaign brief. The discount's own start and end fields are the source of truth. **Test ahead of launch** with a low-stakes version so you know the mechanics fire the way you expect before real money is on the line. ## The daylight saving trap Twice a year, clocks shift, and scheduled sales that span the change can misbehave in ways that are genuinely confusing to debug. A sale set to end at "2 AM" on a spring-forward night has an end time that technically does not exist. Planning a promotion across a daylight saving boundary means checking that your start and end still mean what you think after the shift. You will not hit this often, but when you do it is baffling if you are not looking for it. If a scheduled promotion lands near a clock change, give the times a second look. ## A quick reference for getting it right | Situation | What to check | Common failure | |---|---|---| | Any scheduled sale | Store timezone in admin | Planned in the wrong clock | | Multi-day promo | Explicit end date set | Left blank, runs forever | | Flash window | Both times set pre-launch | Edited live, drifts | | Cross-region team | One agreed reference timezone | Everyone uses local time | | Sale near a clock change | Times valid after DST shift | End time that does not exist | | Recurring promo | Each run re-checked | Copied with stale dates | ## A worked example You want a 24-hour flash sale, free shipping plus a volume break, launching Friday at 9 AM. Wrong way: you set it from a trip, at 9 AM your local time, which is 6 AM store time, with no end date because you plan to "turn it off tomorrow." Result: the sale goes live three hours before your email announces it, early birds get a surprise, and you forget to end it until Sunday afternoon. Right way: you set start to Friday 9:00 AM and end to Saturday 9:00 AM, both in the store timezone, before you leave. You confirm the times on the discount, send the email to match, and the sale opens and closes on its own exactly when it should. Nobody has to remember anything. Same offer, same depth. The only difference is that the clock was respected. ## Setting this up with Discount Prime Scheduling applies to every discount type. Whether it is a [volume discount](/volume-discounts) tier you want live only for a weekend or a [free shipping](/free-shipping) threshold for a flash window, set the start and end in your store timezone and let the discount open and close on its own through Shopify Functions. No manual switching at midnight, no forgotten campaigns running into next month. The best scheduling is invisible: the sale starts when you said, ends when you said, and you never think about it again. If you want a wider audit of timing traps around a big season, our [last-minute BFCM fixes](/blog/last-minute-bfcm-fixes-discount-conflicts) covers the conflict and expiry checks that pair with clean scheduling. --- ## Shopify Editions Summer '25: Horizon, AI Everywhere, and What It Means for Discounts URL: https://www.discountprime.app/blog/shopify-editions-summer-25-horizon-ai-and-discounts Category: Ecosystem & Platform | Author: Discount Prime Team | Published: May 27, 2025 | Updated: July 15, 2026 | Read time: 5 min | Tags: ecosystem, shopify-editions, ai-commerce, pricing-strategy > Shopify Editions Summer '25, themed Horizon, pushes AI across the platform. For discount merchants the signal matters more than any single feature: pricing is becoming something machines read and represent, so clarity and margin discipline stop being optional. The practical response is legible per-unit pricing and defensible discounts, not a rebuild. *Every Shopify Editions is really a memo about where the platform is pointing. This one points, unmistakably, at AI.* Shopify shipped its Summer '25 Editions this week under the theme Horizon, and the headline is not subtle: AI is now woven through the storefront, the admin, and the tools merchants use every day. There is a lot in the release, and most of it is not about discounts. Our job here is the usual one, to filter the announcement down to what a pricing-focused merchant should actually do about it, and to be honest about what is a signal versus what is noise. The short version: nothing in this Edition forces you to change a discount tomorrow. But the direction it confirms is the same one we wrote about two weeks ago, and it is worth taking seriously now rather than later. ## Read the theme, not just the features Editions releases are easy to skim as a feature list and miss as a strategy statement. The feature list changes every six months. The strategy statement is what tells you where to invest. Horizon's statement is that AI is moving from something Shopify experiments with to something that sits underneath the whole platform by default. When a platform makes that shift, the second-order effects reach merchants who never touch an AI feature directly. If more of the storefront, search, and discovery experience is mediated by AI, then more of your pricing gets read and represented by software before a human ever sees it. That is the part discount merchants should care about, regardless of which specific tools shipped. ## What it signals for pricing and discounts Three durable takeaways, none of which depend on the exact features by name. **Legible pricing becomes an advantage.** The more AI sits between shopper and store, the more your prices need to be clear to a machine, not just to a person. A [volume discount](/volume-discounts) expressed as concrete per-unit prices is something software can read and represent. A vague "savings in cart" banner is not. We went deep on this in our first [AI shopping piece](/blog/ai-shopping-assistants-is-your-pricing-ready), and Horizon is the platform confirming the trend line. **Margin discipline stops being optional.** When traffic starts arriving through AI-driven surfaces you do not place or control, every discount you run needs to be defensible on its own economics. A promotion that only worked because few people found it does not survive being surfaced widely. Watching margin in [profit analytics](/profit-analytics) is the same task it always was, but the cost of getting it wrong rises as distribution gets less predictable. **The native foundation matters more, not less.** Pricing logic that runs inside Shopify's own engine through Shopify Functions stays consistent no matter which new surface reads your store. That consistency is exactly what machine-readable pricing depends on. The Functions bet, which underpins how our app has worked from day one, ages well against an AI-heavy platform direction. ## What we are deliberately not saying We are not going to hand you a list of named Horizon features and tell you each one changes your discounting. Editions announcements are directional, and Shopify iterates on them for months after launch. Reacting to a headline feature before it is stable is how merchants waste a quarter. We are also not going to claim AI shopping is fully here. It is early. The measured read is that Horizon accelerates a shift that was already underway, and the right response is preparation, not panic. ## A simple before-and-after Consider what "getting ready" looks like in practice, using a store that runs a buy-more-save-more offer. Before: the product page shows list price and a banner promising bulk savings applied at checkout. A human might dig for the real number. Anything reading the page cold sees only the list price and has no deal to represent. After: the same offer is shown as a small tier table with real unit prices at each quantity, applied automatically through Functions, with margin monitored so the deepest tier still clears profit. A shopper understands it instantly, and so does any software that reads it. The change is not an AI project. It is clearer merchandising that happens to be exactly what an AI-mediated storefront rewards. ## Where this fits in the arc Every Edition we have covered has nudged the same way, from checkout extensibility toward a platform that expects native, structured, machine-readable commerce. Our [Winter '25 breakdown](/blog/shopify-editions-winter-25-where-discounting-is-going) read the early signs, and Horizon makes them explicit. If you already run your [volume discounts](/volume-discounts) transparently and keep an eye on margin, this Edition mostly confirms you are pointed the right way. If you do not, this is a good, low-cost season to start. --- ## AI Shopping Assistants Are Starting to Recommend Products. Is Your Pricing Ready? URL: https://www.discountprime.app/blog/ai-shopping-assistants-is-your-pricing-ready Category: AI & Agentic Commerce | Author: Discount Prime Team | Published: May 13, 2025 | Updated: July 15, 2026 | Read time: 5 min | Tags: ai-commerce, pricing-strategy, structured-data, ecosystem > AI shopping assistants are beginning to recommend products, and they favor listings whose price is clear and machine-readable. Confusing pricing, hidden discounts, and code-gated deals are easy for a human to tolerate and hard for an assistant to represent. Clean per-unit pricing and consistent margin discipline are the practical first step. *The next visitor deciding whether to recommend your product may not be a person at all, and it will judge your pricing by whether it can understand it.* Something worth paying attention to started this spring: AI shopping assistants began recommending real products to real shoppers. The consumer versions, including shopping features inside ChatGPT, are early and imperfect, and we want to be careful not to oversell what they can do today. But the direction is clear enough to think about now, and the practical question for a store owner is simple. If an assistant is reading your listing to decide whether to suggest it, can it understand your pricing? For a lot of stores, the honest answer is not really. And that is the part worth fixing, because the fix is good practice regardless of how big this trend gets. ## What is actually happening An AI shopping assistant sits between the shopper and the store. A person describes what they want in plain language, the assistant researches options, and it points them toward specific products. To do that, it reads whatever it can: the product title, the description, the price, the reviews, the structured data behind the page. That last point is the one merchants underrate. A human shopper will tolerate a messy product page, hunt for the real price, and mentally apply the "buy 3 save 10%" banner. An assistant will not work that hard. It represents what it can read cleanly, and it tends to favor listings it can describe with confidence. Ambiguity is a tax, and the assistant passes that tax on to you by recommending someone clearer instead. ## The pricing patterns that confuse a machine A few common setups are fine for people and hard for assistants. **Deals that only exist at checkout.** If the real price only appears after a code is applied or the cart hits a threshold, the assistant reading your product page sees the higher number. The value you are offering is invisible at exactly the moment a recommendation gets made. **Discounts with no numbers.** A "bulk savings available" badge with no per-unit prices gives an assistant nothing concrete. It cannot cite a value it cannot read. **Inconsistent pricing across variants.** If the same product shows contradictory prices depending on where you look, an assistant has no reliable figure to represent, so it tends to skip the item rather than guess. None of these are new problems. AI just makes them more expensive, because a confused human sometimes buys anyway and a confused assistant simply moves on. ## The measured response We are not going to tell you to rebuild your store around a spring-2025 trend. It is too early for that, and anyone claiming certainty about where agentic commerce lands is guessing. But there is a version of getting ready that costs you nothing if the trend stalls and helps if it grows, because it is just clearer merchandising. **State price per unit.** A [volume discount](/volume-discounts) shown as a concrete unit price at each quantity ("$20 each, $17.60 each at 6") is legible to a shopper and to a machine. Both can reason about it. A vague banner cannot be reasoned about at all. **Prefer automatic, visible discounts over code-gated ones** where it makes sense, so the price a reader sees is the price the customer pays. There are good reasons to use codes, but understand that a code hides value from anything reading the page cold. **Keep margin discipline.** This is the quiet one. If assistants start sending you traffic through channels you do not control, you want every discount you run to be defensible on margin, not a promotion you were relying on nobody noticing at scale. Watching margin in [profit analytics](/profit-analytics) matters more, not less, when the source of a sale is a recommendation you did not place. ## A small example Two stores sell the same $20 product with a buy-6 deal. Store A shows a banner: "Bulk discounts available in cart." The product page price is $20. An assistant reads $20, sees no concrete deal, and has nothing to highlight. Store B shows a small tier table: 1 unit $20, 3 units $19 each, 6 units $17.60 each. An assistant reads real per-unit prices at real quantities and can tell a shopper exactly what buying more saves. Same underlying offer. One is legible and one is not. That is the entire difference, and it is a merchandising decision, not an AI project. ## Where this goes next This is the first time we have written about AI shopping on this blog, and we are keeping it grounded on purpose. What we can say now is narrow: pricing that is clear to a person is becoming clear to a machine too, and the stores that already merchandise their [volume discounts](/volume-discounts) transparently are, almost by accident, the ones best positioned for whatever this becomes. Shopify's summer Edition lands in a couple of weeks and is expected to lean hard into AI, so we will have more to say once we can react to something concrete rather than a trend line. When we do, it will be in our [Summer '25 Editions breakdown](/blog/shopify-editions-summer-25-horizon-ai-and-discounts). For now, the homework is unglamorous and useful: make your pricing something a reader can actually understand, and make sure the discounts behind it still hold their [margin](/blog/cogs-on-shopify-the-missing-piece-of-discount-strategy). --- ## Volume Discounts for B2B vs D2C: Same Feature, Different Math URL: https://www.discountprime.app/blog/volume-discounts-for-b2b-vs-d2c-different-math Category: B2B & Wholesale | Author: Discount Prime Team | Published: April 22, 2025 | Updated: July 15, 2026 | Read time: 6 min | Tags: b2b-wholesale, volume-discounts, pricing-strategy, d2c > B2B and D2C volume discounts use the same mechanic but need opposite tuning. D2C tiers are shallow and start just above one unit to nudge a second purchase. B2B tiers go deep, follow case-pack quantities, and assume the buyer already plans to bulk order. Segmenting by customer tag lets one store run both. *A volume discount is one feature. Whether it grows your business or quietly bleeds it depends entirely on whether the buyer is a shopper or a purchasing department.* Volume discounts work the same way for both audiences: the more a customer buys, the less each unit costs. But B2B and D2C buyers arrive at that quantity decision from opposite directions, so the tiers that work for one are wrong for the other. A consumer store that copies wholesale tier depth gives away margin on carts that would have converted anyway. A wholesaler that uses consumer tiers looks unserious to buyers who compare every price against a distributor. The mechanic is shared. The math is not. This guide breaks down where the two diverge, and how one store can run both without picking a side. ## The core difference: nudging versus expecting D2C volume discounts exist to change behavior. Most consumers intend to buy one. A well-placed tier convinces some of them to buy two or three, which lifts average order value on purchases that would otherwise have been small. The discount is a nudge, and it only needs to be big enough to tip a decision that was genuinely uncertain. B2B volume discounts exist to reward behavior that was already going to happen. A wholesale buyer did not wander onto your product page. They came to place a bulk order, and they are comparing your per-unit price at their quantity against other suppliers. Here the discount is not a nudge, it is a competitive quote. It has to be deep enough to be credible, and it has to line up with how the buyer actually orders, which is by the case, not by the unit. ## Side-by-side: how the math changes | Dimension | D2C volume discount | B2B volume discount | |---|---|---| | Purpose | Nudge a second or third unit | Win and hold a bulk account | | First tier starts at | 2 to 3 units | A case or minimum order quantity | | Typical depth | 5 to 15 percent off | 15 to 40 percent off list | | Tier count | 2 to 3, kept simple | 3 or more, can be granular | | Quantities follow | Round consumer numbers | Case packs, pallets, MOQs | | Payment | Paid upfront at checkout | Often net 30 or net 60 terms | | Margin frame | Per order | Per account over time | | Who sees it | Everyone | Tagged wholesale customers | The table makes the trap obvious. Set B2B-depth tiers on your retail storefront and every casual shopper who buys three units takes a wholesale price. Set D2C tiers on a wholesale catalog and your first break lands at 3 units when the buyer wants 240. ## Where D2C tiers should sit For consumer stores, three rules carry most of the value. **Start the first tier just above typical behavior.** If most shoppers buy one, put the first break at 2 or 3. Check your average line-item quantity before you set anything, because a tier below what people already do just discounts the default. **Stay shallow.** Consumer margins are thinner than wholesale margins, and the goal is incremental units, not a fire sale. A 10 percent break at 3 units usually does more good than a 25 percent break that erodes margin on your best-selling SKU. **Keep it to two or three tiers.** Every tier is a decision you ask the shopper to make. A short ladder converts better than a staircase. ## Where B2B tiers should sit For wholesale, the priorities invert. **Anchor tiers to case-pack logic.** If the product ships 12 to a case, your tiers should be 12, 24, 48, not 10, 25, 50. Buyers order in cases, so breaks that fall between cases never trigger and just annoy the purchasing manager. Our guide to [bulk discounts for B2B buyers](/blog/bulk-discounts-for-b2b-buyers-pricing-big-carts) goes deeper on case and minimum-order math. **Go deep, but never below your floor.** Wholesale buyers expect real volume pricing, and 15 to 40 percent off list is normal. Just price the deepest tier from cost, not from list, so the break at the top of the ladder still clears margin. **Account for net terms.** This is the quiet one. A buyer on net 60 is using your working capital and carries some default risk, so a $10,000 order on terms is worth less than the same order paid today. If you already run deep volume tiers and offer generous terms on top, model the two together before you commit, because stacked they can erase the profit each looked fine holding alone. ## A worked example Same product, list price $20, unit cost $11. For D2C, you set 5 percent off at 3 units ($19 each) and 12 percent off at 6 ($17.60 each). At the deepest tier you still keep $6.60 per unit. The tiers lift AOV without threatening margin. For a tagged wholesale buyer, you set the first tier at one case of 12 at 25 percent off ($15 each), then 32 percent off at 4 cases ($13.60 each). At the top tier you keep $2.60 per unit before terms. That is a real wholesale price, and because it is gated to the wholesale tag, no retail shopper ever sees it. ## Running both from one store You do not need two stores or duplicate products. Tag your wholesale customers, attach the deep case-pack tiers to that segment, and let retail shoppers see the shallow consumer ladder on the same product. Discount Prime applies [volume discounts](/volume-discounts) by [customer tag](/blog/customer-tags-are-underrated-segment-based-pricing) through Shopify Functions, so the same SKU can quote wholesale math to a buyer and consumer math to a shopper in the same checkout. Set the retail tiers on the [volume discounts](/volume-discounts) side and the gated wholesale tiers through [B2B pricing](/b2b-pricing) and [wholesale pricing](/wholesale-pricing). One feature, two audiences, and the right math pointed at each. --- ## Two Years In: The Roadmap Debt of a Small Shopify App URL: https://www.discountprime.app/blog/two-years-in-the-roadmap-debt-of-a-small-shopify-app Category: Build in Public | Author: Discount Prime Team | Published: April 8, 2025 | Updated: July 15, 2026 | Read time: 5 min | Tags: build-in-public, product-strategy, shopify-app, roadmap > Roadmap debt is the pile of features you promised or implied but have not built. After two years building Discount Prime, the lesson is that saying no protects the product more than saying yes. Narrow scope, a clear opinion, and shipping the profit tools last kept the app coherent instead of bloated. *The hardest part of a roadmap is not the list of what to build. It is the quieter list of what you have implied you will build and quietly hope everyone forgets.* Two years ago this week, the first commit for Discount Prime landed. The app has been live on the Shopify App Store for about eighteen of those months, and in that time it has grown from two discount types to a full pricing toolkit. But the more useful anniversary reflection is not about what we shipped. It is about what we did not, and why the pile of unbuilt promises is its own kind of debt. ## What roadmap debt actually is Everyone in software talks about technical debt: the shortcuts in the code that slow you down later. Roadmap debt is the same idea one level up. It is every feature you told a merchant "yes, that is coming", every half-finished idea in the settings, every direction you pointed the product toward without committing to it. It does not show up in the codebase. It shows up as pressure, the slow accumulation of expectations that narrow what you can do next. Two years in, we can say plainly that roadmap debt hurt us more than technical debt did. The code we could refactor. The promises we had to either keep or unwind, and unwinding one always costs a little trust. ## What we cut We killed more than we shipped. A short accounting of the bigger cuts: **A rules builder with unlimited nesting.** Early on we imagined letting merchants compose discounts with deeply nested conditions. We built a prototype. It was powerful and nobody could use it. We cut it and kept rules flat, and the app got better the day we did. **Per-customer manual price overrides.** Requested often, but it pulled the app toward being a spreadsheet with a Shopify skin. We solved the real need with tag-based [B2B pricing](/b2b-pricing) instead, which scales, where per-customer overrides never would. **A dozen display themes.** We almost became a theme app by accident. Merchants wanted the tier table to match their store, which is fair, but every theme we added was a surface we then had to maintain forever. We shipped a few clean defaults and stopped. Each of those was a reasonable idea. That is exactly why they were dangerous. Bad ideas are easy to reject. Good-but-off-mission ideas are the ones that quietly bloat an app. ## What survived The features that lasted all share one trait: they serve the promise the app is actually about, which is protecting margin while you discount. [Volume discounts](/volume-discounts) survived because they are the highest-leverage discount most stores never run properly. The discount combinations controls survived because uncontrolled stacking is where margin leaks. Profit analytics survived, and last month margin-based rules for dropshippers survived, because they are the same promise pointed at cost instead of revenue. The test we use now is simple. A year after a feature ships, is it still earning its place, or is it a toggle nobody touches? The survivors pass that test. The cuts would have failed it. ## The debt we are still paying We are not clean. Two honest examples. We shipped a lot of discount mechanics before we shipped a way to measure them, which meant merchants ran campaigns for months without knowing which ones made money. We wrote about that regret at the [one-year mark](/blog/one-year-on-the-app-store-numbers-mistakes-whats-next), and it is the debt we most wish we had paid earlier. And we still have settings that exist because removing them would break a handful of stores, even though we would never design them that way today. That is the trade every small app lives with. You cannot ship nothing, and everything you ship you then owe maintenance and coherence to. ## What year three has to be about If the [first year](/blog/one-year-of-building-discount-prime) was about breadth and year two was about profit, year three is about restraint with intent. The platform is moving fast underneath every Shopify app right now, and the temptation when the ground shifts is to build in every direction at once. We would rather keep the app narrow and make the few things it does defensible. Roadmap debt does not get paid off by working harder. It gets paid off by saying no earlier, and meaning it. Two years in, that is the discipline we are still learning. --- ## New: Margin-Based Pricing Rules for Dropshippers URL: https://www.discountprime.app/blog/new-margin-based-pricing-rules-for-dropshippers Category: Profit & Strategy | Author: Discount Prime Team | Published: March 25, 2025 | Updated: July 15, 2026 | Read time: 5 min | Tags: dropshipping, margin-pricing, profit-strategy, shopify-functions > Margin-based pricing rules let dropshippers set discounts as a target margin instead of a fixed percent. When supplier cost changes, the price moves with it and never drops below the profit you set. Discount Prime reads each product's cost and holds the margin automatically at checkout. *In dropshipping, the price you charge and the price you pay move independently, and your margin is whatever survives the gap between them.* Today we are shipping margin-based pricing rules in Discount Prime. Instead of setting a discount as a fixed percent off, dropshippers can now set it as a target margin. You tell the app the profit you want to keep, and it works out the price from the product's cost. When a supplier changes what they charge you, the sale price moves with it, so the deal never quietly slips below the margin you decided on. This is the feature dropshippers have been asking us for since we shipped [profit analytics](/profit-analytics) last month. Analytics showed you which discounts made money after the fact. Margin-based rules stop the unprofitable ones from running in the first place. ## What a margin-based pricing rule does A margin-based rule prices from the bottom up. You set a target gross margin, for example 25 percent, and the app computes the sale price for each product from its cost of goods. A percentage discount does the opposite: it starts from your retail price and subtracts, with no knowledge of what the item actually costs you. That difference matters most when costs are not uniform. Dropshipping catalogs almost never have a single markup. One supplier ships at one cost, a second variant costs more, and prices drift over a season. A margin rule reads the live cost per variant and holds your profit across all of it. One rule covers a catalog that a percentage discount would need constant babysitting to keep safe. ## Why fixed percentages are dangerous for thin margins Here is the failure that margin-based rules exist to prevent. Say you run 30 percent off a $40 product that costs you $26. That leaves you $2 per unit. Thin, but positive. Then your supplier raises the item cost to $30 for the next batch and you do not catch it. The same 30 percent rule now sells at $28 against a $30 cost. You are paying customers $2 to take the product, and nothing in Shopify warned you. With a margin-based rule set to a 15 percent floor, that never happens. When the cost moves to $30, the app recomputes the sale price to keep your 15 percent, so the price rises to roughly $35 on its own. You keep the margin you chose, and the customer still sees a real discount off the list price. ## A worked example Two variants of the same product, different supplier costs, one margin rule set to 20 percent. | Variant | Your cost | Fixed 30% off ($50 list) | Margin rule at 20% | |---|---|---|---| | Standard | $28 | $35.00 (20% margin) | $35.00 | | Premium | $36 | $35.00 (loses $1) | $45.00 (20% margin) | The fixed discount treats both variants the same and sells the premium one at a loss. The margin rule prices each variant from its own cost, so both hold 20 percent. You set the intent once, and the math follows the cost. ## Setting it up Margin-based rules live on the [dropshipper pricing](/dropshipper-pricing) page in Discount Prime. Two things need to be true before you switch one on. First, cost per item has to be filled in on your variants in Shopify, since the rule prices from that field. Second, decide the margin you are willing to defend, not the one you hope for on a good day. The rule protects whatever number you give it. Once it is live, the pricing applies through Shopify Functions in cart and checkout on every plan, and you can watch the result in [profit analytics](/profit-analytics) to confirm the margin is holding across your catalog. If you have not thought through why dropshipping margins need this kind of guardrail, our earlier piece on why [dropshipping margins are thin](/blog/dropshipping-margins-are-thin-pricing-rules-should-know) sets up the reasoning, and the [profit analytics launch](/blog/new-profit-analytics-margin-not-just-revenue) explains the reporting side. Margin should not be something you discover at the end of the month. Now it is something you set at the start. --- ## Dropshipping Margins Are Thin. Your Pricing Rules Should Know That. URL: https://www.discountprime.app/blog/dropshipping-margins-are-thin-pricing-rules-should-know Category: Profit & Strategy | Author: Discount Prime Team | Published: March 11, 2025 | Updated: July 15, 2026 | Read time: 5 min | Tags: profit-strategy, dropshipping, margin, pricing-rules, profit-analytics > Dropshipping margins are too thin for flat percentage discounts, which apply the same depth to a 10% product and a 40% product and quietly send the thin ones negative. Cost-aware pricing sizes each discount to the product's own margin, so no promotion crosses break-even. With accurate cost data, a margin floor becomes a rule your discounts respect automatically. *A 20% discount is a rounding error on a 60% margin product and a going-out-of-business decision on a 12% margin one. Flat discounts cannot tell the two apart. That is the whole problem with discounting a dropshipping catalog.* Dropshipping is the hardest place to discount well, because there is almost no room for error. Your margins are thin by design: you buy single units at close to retail, pay shipping and fees on every order, and spend on ads to acquire the customer in the first place. By the time a sale lands, the profit on it can be a few dollars. Take a flat percentage off the top and that profit can vanish, or go negative, without anything on your dashboard looking wrong. This post is about why flat discount rules break on thin margins, and what to do instead. The direct answer: stop applying one discount depth across your whole catalog. On a mixed-margin catalog, the discount each product can afford is different, and it is set by that product's own margin. Cost-aware pricing sizes the cut to the product instead of the promotion, so no order crosses break-even. ## Why dropshipping margins leave no room A traditional retailer buys in bulk, so their unit cost is well below what they charge, and a discount eats into a comfortable spread. A dropshipper does not get that spread. You pay a per-unit supplier price with little or no volume discount, then stack shipping, payment processing, and customer acquisition on top. The result is a gross margin that is often in the single digits to low double digits before ad spend even enters the picture. That thinness is the defining constraint. On a 50% margin product, a 20% discount cuts your profit but leaves you well in the black. On a 12% margin product, a 20% discount is mathematically impossible to survive: you are selling below cost. The exact same promotion is prudent on one product and fatal on another, and the only thing that changed is the margin underneath. ## Why flat percentage discounts are the trap The default way stores discount is a flat number: 20% off sitewide, 15% off this collection. It is simple, and on a healthy-margin catalog it is fine. On a thin, mixed-margin dropshipping catalog it is a quiet disaster, because a flat percentage is blind to the one thing that matters, which is each product's margin. Here is what a flat 25% sitewide sale does across three products: | Product | Price | Loaded cost | Margin | After 25% off | Result | | --- | --- | --- | --- | --- | --- | | A | $40 | $18 | $22 (55%) | $30 price, $12 margin | Healthy | | B | $40 | $28 | $12 (30%) | $30 price, $2 margin | Barely alive | | C | $40 | $34 | $6 (15%) | $30 price, negative $4 | Loss per order | Same price, same discount, three completely different outcomes. Product C now loses four dollars every time it sells, and it may well be your bestseller, because the sale is driving volume to it. The flat rule cannot see any of this. It treats all three as equal and lets your thinnest product bleed. ## The fix: size the discount to the margin The alternative is cost-aware pricing: instead of one depth for everything, the discount is anchored to each product's margin. High-margin products can take a deep, attention-grabbing cut. Thin-margin products get a shallow discount or none. Every discount is bounded by a margin floor, so nothing crosses break-even no matter how the promotion is framed. This requires two things you may not have yet. First, an accurate, fully loaded cost per product, including freight, duties, and per-unit fees, not just the supplier invoice. We wrote the full method in [COGS on Shopify](/blog/cogs-on-shopify-the-missing-piece-of-discount-strategy), and on a thin catalog it is not optional. Second, reporting that shows margin per campaign, so you can catch a loss before you repeat it. That is what [profit analytics](/profit-analytics) is for, and it exists precisely because thin-margin stores cannot afford to discount blind. ## What to run instead of flat sitewide cuts Until every discount can be sized to margin automatically, favor discount types that lift order value rather than just cutting price: **Behavior-based offers.** A volume tier or a free shipping threshold rewards the customer for buying more, so the discount is paid for by a larger order rather than subtracted from a thin one. The margin math changes in your favor because average order value rises. **Deep cuts only on high-margin lines.** Reserve your loud, headline discounts for the products that can actually absorb them, and leave your thin-margin products at or near full price. Your promotion still looks generous; it just points customers at the products where a discount makes sense. **A hard margin floor on everything.** Whatever else you do, set the lowest margin you will accept per order and make it a rule, not a hope. On a thin catalog the floor should be doing real work, catching the tier that would have tipped a product negative. ## Where this is heading Sizing a discount to each product's margin by hand, across a catalog of hundreds of items, is not realistic. It is arithmetic no one has time to redo every time a supplier price moves. That is exactly the gap we are building toward closing next: pricing rules that read a product's margin and set the discount accordingly, so the cost-aware logic in this post becomes automatic rather than manual. We will have more to say on that shortly in [margin-based pricing rules for dropshippers](/blog/new-margin-based-pricing-rules-for-dropshippers). Getting your cost data clean now is the prerequisite for all of it. ## Setting this up with Discount Prime Discount Prime already gives thin-margin stores the two things they need most: accurate margin on every campaign through [profit analytics](/profit-analytics), and behavior-based discounts that lift order value instead of just cutting price. The cost-aware pricing built around this is what [our dropshipper pricing](/dropshipper-pricing) approach is all about, and it runs on Shopify Functions on any plan. Get your costs in, set your floor, and stop letting flat discounts decide which of your products lose money. You can find the app on the Shopify App Store. --- ## COGS on Shopify: Why Cost Data Is the Missing Piece of Your Discount Strategy URL: https://www.discountprime.app/blog/cogs-on-shopify-the-missing-piece-of-discount-strategy Category: Profit & Strategy | Author: Discount Prime Team | Published: February 25, 2025 | Updated: July 15, 2026 | Read time: 5 min | Tags: profit-strategy, cogs, margin, profit-analytics, discount-strategy > Cost of goods sold is the data most Shopify discount strategies quietly skip, which is why so many promotions lose money invisibly. Tracking a fully loaded product cost, including freight, duties, and per-unit fees, turns every discount decision from a guess into arithmetic. With COGS in place you can set a real margin floor and never discount below break-even. *You can run a discount without knowing your cost. You just cannot know whether it worked.* Most Shopify discount strategies have a hole in the middle of them, and the hole is cost data. Merchants agonize over discount depth, tier structure, and timing, then set all of it against a number they are guessing at: what the product actually costs. Cost of goods sold is the missing piece. Get it right and every discount decision becomes arithmetic instead of instinct. Get it wrong, or skip it, and you are running promotions with your eyes closed. The direct answer this post is built around: track a fully loaded cost for every product, including freight and duties, not just the supplier invoice. That single number lets you calculate your break-even discount and set a margin floor, which is the difference between a promotion that earns and one that loses money invisibly. ## What COGS actually is Cost of goods sold is what it costs you to acquire a product and get it ready to sell, per unit. On Shopify you can store a cost against each product, and that field is the foundation everything else sits on. The trap is treating it as just the price on your supplier's invoice. The invoice price is where COGS starts, not where it ends. A fully loaded cost includes every expense that scales with each unit you sell: - **The unit price** you pay your supplier or manufacturer. - **Inbound freight**, the cost of getting the goods to you, divided per unit. - **Duties and import fees** on cross-border inventory. - **Per-unit handling**, pick-and-pack, or fulfillment costs. - Optionally, **payment processing** as a percentage of the sale, since it comes straight off every order. The invoice price alone can understate your true cost by 20% or more once freight and duties land. If you discount against the understated number, you will think you have margin room you do not have. ## Why the missing data quietly loses money Here is the mechanism. When you run a discount and only track revenue, a promotion that sells well always looks good, because revenue always rises when you cut price. The cost of that revenue is invisible. So the deepest discounts, which move the most volume, look like your best campaigns even when they are your worst. Cost data is what makes the loss visible before you repeat it. We built [profit analytics](/blog/new-profit-analytics-margin-not-just-revenue) around exactly this, and it made one thing obvious across store after store: the promotions merchants were proudest of were often not the ones earning the most, because nobody had subtracted cost. The reporting can only be as honest as the cost data behind it. Garbage cost in, confident-looking garbage out. ## A worked example Take a product you sell for $50. Your supplier invoice is $20, so it is tempting to say you have $30 of margin and plenty of discount room. Now load the cost properly. Freight adds $3 per unit, duties add $2, and pick-and-pack adds $2.50. Payment processing on a $50 order runs about $1.50. Your fully loaded cost is not $20, it is $29. Your real margin is $21, not $30. That gap changes every discount decision. A 40% discount takes the price to $30, leaving just $1 of margin on the loaded cost, a promotion you might have thought cleared $10. A 45% discount takes you to $27.50, which is below your cost. You would be paying customers to take the product. Without the loaded number, you would never see the cliff you just walked off. ## Setting a margin floor you can trust Once your COGS is accurate, you can set a margin floor: the lowest gross margin you will accept on any order. Put it above zero so you always clear cost plus a buffer for the overhead COGS does not capture, like ads and salaries. Then the rule is simple. No discount tier, on any product it touches, may push margin below the floor. Suppose your floor is 15% and the loaded cost example above stands. On a $50 product with $29 of cost, a 15% floor means you need at least $8.53 of margin after the discount, which caps your discount at roughly $12.50, or 25% off. That is your maximum safe depth on that product, derived, not guessed. Do this per product line and your promotions stop being able to lose money by accident. We covered the campaign-level version of this discipline in [how to protect margin during sitewide sales](/blog/how-to-protect-margin-during-sitewide-sales); COGS is the data that makes those guardrails real numbers instead of hopeful ones. ## Where thin margins make this non-negotiable If your margins are already thin, COGS is not optional bookkeeping, it is survival. Dropshippers and resellers often work on single-digit or low-double-digit margins, where a 10% discount can be the entire profit on an order. The entire question of whether a dropshipping business works is a COGS question, which is why cost-aware pricing sits at the center of [our dropshipper pricing](/dropshipper-pricing) approach. When the margin is thin, the cost data has to be exact, because there is no cushion to absorb a bad estimate. ## Keeping cost data honest Cost data decays. Supplier prices move, freight rates swing, duties change. Stale COGS is worse than no COGS, because it gives you false confidence. Update a product's cost whenever its inputs move materially, and review your costs at least quarterly. Above all, refresh the cost on a product line before you set a promotion's depth, not after. The five minutes it takes to confirm the number is what stands between a discount that earns and one that quietly does not. ## Setting this up with Discount Prime Discount Prime uses your product costs to put a margin figure on every campaign, so the moment your COGS is accurate, [profit analytics](/profit-analytics) turns it into a profit number on each promotion you run. Enter the fully loaded cost once, set your margin floor, and your discounts can no longer cross it without you seeing it coming. It runs on Shopify Functions on any plan. You can find the app on the Shopify App Store. --- ## New: Profit Analytics. Margin, Not Just Revenue URL: https://www.discountprime.app/blog/new-profit-analytics-margin-not-just-revenue Category: Profit & Strategy | Author: Discount Prime Team | Published: February 11, 2025 | Updated: July 15, 2026 | Read time: 5 min | Tags: profit-strategy, profit-analytics, margin, product-update, analytics > Profit analytics is now live in Discount Prime. Instead of reporting only the revenue a discount drove, it reports the margin left after cost, so you can tell a promotion that earns from one that just moves volume. Revenue reporting is table stakes; margin is the story. Add product costs once and every campaign gets a profit number. *Revenue tells you a discount sold something. It does not tell you the discount earned anything. Those are different questions, and most stores only ever get the first answer.* Today Discount Prime ships profit analytics. Every discount campaign now gets a margin number, not just a revenue number. You can finally tell, at a glance, which of your promotions made money and which ones just moved volume while quietly losing it. This is the feature we have been building toward since the day we launched, and it is the one that changes how you should read every campaign you run. Here is the plain version of what it does: you add a cost for each product once, and Discount Prime subtracts that cost and the discount from each order to show the gross margin a campaign actually left behind. Revenue reporting is table stakes. Margin is the story. ## Why revenue is the wrong headline Revenue is the number every reporting tool leads with, because it is easy to calculate and it always goes up when you discount harder. That is exactly the problem. A promotion can top your revenue chart and still lose money on every single order, once you subtract what the product cost and what you gave away. Consider two campaigns that each generated $10,000 in sales. Campaign A was 10% off a product line with 55% margins. Campaign B was 40% off a clearance line with 30% margins. Same revenue. Judged on revenue, they look identical, and you would happily run both again. Judged on margin, one funded your business and the other drained it. If your dashboard only shows revenue, you cannot see the difference, so you keep repeating the expensive one. ## What "margin, not just revenue" actually means Gross margin is what is left after the cost of the goods and the discount come out of the sale price. It is the money that can actually pay for your ads, your team, and your rent. Revenue cannot do any of that; only margin can. Profit analytics closes the gap in three steps: **1. You enter cost once per product.** Add a cost of goods figure to each product. Every campaign that touches that product inherits the number automatically, so you do it once, not per promotion. **2. Every campaign gets a profit number.** For each discount, Discount Prime subtracts product cost and the applied discount from order revenue and attributes the result to the campaign that drove it. You now see profit per promotion sitting right next to the revenue you were already watching. **3. You compare promotions on margin.** With a profit number on every campaign, ranking your discounts by what they earned instead of what they sold takes seconds. The promotions that survive that ranking are the ones worth repeating. ## A worked example Say a volume tier moved 500 units at $18 each, for $9,000 in revenue. The revenue view stops there and calls it a success. Now add the cost data. Each unit costs you $11, and the tier discount averaged $2 per unit off the $20 list. Your margin per unit is $18 minus $11, or $7, across 500 units, which is $3,500 of gross margin. That is the real result. If instead your cost had been $15 per unit, the same $9,000 campaign would have left just $1,500 of margin, and a slightly deeper tier would have tipped it negative. Same revenue headline, completely different verdict. That is the number you could not see before today. ## This is the second half of a plan When we shipped [discount analytics](/blog/new-discount-analytics-see-which-discounts-make-money) in September, we said it was the first step, not the destination. Discount analytics answered "which discounts drove sales and how were they used." Profit analytics answers the harder question sitting underneath: "which of them actually earned." You need both. A promotion that sold well and earned nothing is not a win, it is a lesson, and now you can see it as one. This matters most for stores with thin margins to begin with. If you dropship or resell, the gap between revenue and profit is where your entire business lives, and running discounts without seeing margin is flying blind over a very short runway. Cost-aware pricing is where this leads next, and it is why we built [our dropshipper pricing](/dropshipper-pricing) page around the same idea. Getting your cost data in now sets you up for everything on that path. ## What to do with it this week Start by entering costs for your top products, then look back at the promotions you ran over the holidays. Rank them by margin instead of revenue. Most merchants find at least one campaign they were proud of that turns out to have earned far less than a quieter one, and at least one they nearly cut that was actually their best. That single reordering is the point of the feature. Then set a break-even discount for each product line, meaning the depth at which margin hits zero, and never let a tier cross it. With cost data in place, that line is now visible instead of theoretical. ## Setting this up with Discount Prime [Profit analytics](/profit-analytics) is live now for every Discount Prime store. Add your product costs, and every campaign you run from here on gets measured by what it earned, not just what it sold. It runs on the same Shopify Functions foundation as the rest of the app, on any plan, so your [volume discounts](/volume-discounts) and your reporting speak the same language. Next up in this series, we go deep on getting cost data right in [COGS on Shopify](/blog/cogs-on-shopify-the-missing-piece-of-discount-strategy). You can find the app on the Shopify App Store. --- ## Shopify Editions Winter '25: What It Signals About Where Discounting Is Going URL: https://www.discountprime.app/blog/shopify-editions-winter-25-where-discounting-is-going Category: Ecosystem & Platform | Author: Discount Prime Team | Published: January 28, 2025 | Updated: July 15, 2026 | Read time: 5 min | Tags: ecosystem, shopify-editions, platform, checkout-extensibility, shopify-functions > Shopify Editions Winter 2025 continues a direction that matters for anyone who discounts: custom logic keeps moving into Functions and checkout extensibility, and away from Scripts and liquid patches. For merchants, the practical read is to keep discount logic native, treat combination control as a core skill, and watch margin, not just headline discount depth. *Twice a year Shopify ships hundreds of updates at once, and twice a year most merchants scroll the whole list looking for the three things that actually change how they run their store.* Shopify Editions Winter '25 is here, and if you sell with discounts and pricing rules, the useful exercise is not reading all of it. It is filtering the release down to what affects your margin, your checkout, and your customer segments, and ignoring the rest. This post is that filter, written from the point of view of a store that lives and dies on how well it discounts. The direct read: nothing in an edition changes the core direction that has held for two years now. Custom discount and checkout logic keeps moving into Shopify Functions and checkout extensibility, and away from Scripts and liquid patches. If your discounts already live in Functions, an edition is mostly confirmation you bet right. If they do not, each edition is another nudge to migrate before you are forced to. ## What Shopify Editions actually is Shopify Editions is the platform's twice-yearly release showcase, published in winter and again in summer. Shopify collects hundreds of shipped and shipping-soon updates across the whole product and presents them in one place. It is part product announcement, part roadmap signal. The winter releases tend to be broad, touching admin, checkout, B2B, and the developer platform all at once. For a discount-focused merchant, the trap is treating the whole thing as a to-do list. It is not. The vast majority of any edition is irrelevant to how you price and promote. The skill is pattern recognition: spotting the few items that touch pricing, checkout, or segmentation, and reading the overall direction of travel. ## The direction that matters for discounts Strip away the specifics and the platform has been telling discount merchants the same thing across several editions in a row. **Native logic wins.** The clearest, most consistent signal is that custom pricing and discount logic belongs inside Shopify Functions, running natively in the checkout, rather than bolted on through legacy Scripts or liquid edits. Functions work on every plan, not just Plus, and they are faster and more stable in checkout. Every edition reinforces this, and Winter '25 is no exception. **Checkout keeps closing.** The multi-year push toward checkout extensibility, and away from the old checkout.liquid customizations, is a direction, not a one-time deadline. The information, shipping, and payment pages already moved off checkout.liquid last August. The platform's message is unambiguous: customizations, including discount-related ones, live in supported extension points now. **B2B keeps maturing.** Editions have steadily built out native B2B capabilities. For merchants who sell to both consumers and trade accounts, the platform increasingly assumes you will price differently for different customer segments rather than running one price for everyone. ## What to actually do about it You do not need to react to most of an edition. You do need to do three small things. **1. Confirm your discount logic is native.** If any of your pricing still relies on Shopify Scripts, that is legacy technology on borrowed time. Custom quantity tiers, volume breaks, and segment pricing should run on Functions today. If they do, you are aligned with where the platform is going. If they do not, migration is a when, not an if. **2. Treat combination control as a core skill.** As more discount logic becomes native and stacking becomes easier, the risk shifts from "can I run this promotion" to "what happens when two promotions touch." The [discount combinations](/volume-discounts) controls are where you decide, deliberately, what stacks with what. That control is more important than any single new feature. **3. Measure margin, not headline depth.** The platform is giving you more powerful ways to discount. The discipline that has to grow alongside that power is measuring what each promotion does to margin per order, not just how big the discount looks. Our analytics exist for exactly that reason. ## A worked read of a release Here is how the filter runs in practice. Suppose an edition announces fifty checkout updates, thirty admin improvements, and twenty developer platform changes. As a discount merchant you can ignore roughly ninety of those hundred items on the first pass. You are looking for anything that changes how discounts apply in checkout, anything that changes how you segment customers, and anything that moves a deadline for legacy technology you still depend on. On most editions that is three to five items. Read those closely; skim everything else. That is the entire job. ## Where this leaves discounting The through-line across recent editions, Winter '25 included, is that Shopify wants pricing and discount logic to be native, combinable, and measurable. That is genuinely good news for merchants, because it means the capabilities that used to require Shopify Plus and custom Scripts are now available to every store through Functions-based apps. The catch is that native and combinable also means it is easier than ever to stack yourself into a margin hole without noticing. Power and discipline have to grow together. For the wider pattern of reading these releases, our earlier breakdowns of [Shopify Editions Winter '24](/blog/shopify-editions-winter-24-for-discount-merchants) and [Shopify Editions Summer '24](/blog/shopify-editions-summer-24-pricing-and-discounts) show the same filtering approach applied to previous releases, and reading them together makes the direction of travel obvious. ## Setting this up with Discount Prime Discount Prime was built on the side of this trend that keeps winning: discount logic native to Shopify Functions, running in checkout on every plan, with explicit combination controls so stacking is a decision and not an accident. If an edition ever makes you wonder whether your discounts are on the right side of the platform's direction, [volume discounts](/volume-discounts) and [our analytics](/profit-analytics) are already there. You can find the app on the Shopify App Store. --- ## New Year, Cleaner Discounts: Auditing the Promo Debt in Your Store URL: https://www.discountprime.app/blog/new-year-cleaner-discounts-auditing-promo-debt Category: Analytics & Comparisons | Author: Discount Prime Team | Published: January 14, 2025 | Updated: July 15, 2026 | Read time: 5 min | Tags: analytics, discount-audit, promo-debt, discount-conflicts, profit-strategy > Promo debt is the pile of forgotten discounts left running in a Shopify store: expired campaigns still live, codes leaking in bulk, and automatics quietly stacking. A January audit finds and closes them in seven numbered steps, starting with a full inventory of every active discount and ending with a repeatable review so debt never accumulates again. *Every store carries promo debt. It is the pile of discounts you started, meant to end, and never actually turned off.* If you run promotions on Shopify for a year, some of them do not get cleaned up. A BFCM code that never got deactivated. An automatic discount you set up for one weekend and forgot. A free shipping threshold from a campaign that ended in March. None of it is visible on your storefront, so none of it feels urgent, and all of it quietly discounts orders that would have converted at full price. That accumulated mess is promo debt, and January is the right time to pay it down. A discount audit is a full review of every active discount in your store, checking each one for whether it should still be running, whether it is leaking, and whether it is stacking with others in ways you never approved. Below is the audit we run, in seven numbered steps. Set aside an afternoon. Most stores find at least one thing costing them money. ## Why promo debt is invisible until you look The reason promo debt survives is that a live-but-forgotten discount produces no error. The order goes through. The customer is happy. Your revenue number even looks fine. The only thing that suffers is margin per order, and margin per order is the number most stores watch least closely. A discount you meant to run for three days and left on for three months does not announce itself. You have to go looking. The other reason is that Shopify spreads discounts across two systems, codes and automatic discounts, and the interactions between them are governed by combination settings that are easy to set once and never revisit. An audit forces you to look at all of it in one sitting. ## The seven-step discount audit **1. Inventory every active discount.** Open your Shopify admin discounts list and export or write down every code and automatic discount currently active or scheduled. Do the same inside any app that creates discounts, including Discount Prime. You cannot audit what you have not listed. Most merchants are surprised by the length of this list. **2. Kill the zombie codes.** A zombie code is a past-campaign code that was never deactivated and is still being redeemed. Sort your recent orders by discount code. Any code still getting used after its campaign ended, or used far more than the audience you gave it to, is leaking. These circulate on coupon sites and browser extensions for months. Disable every code you cannot tie to a live, approved promotion. **3. Check every end date.** For each remaining active discount, confirm it has an end date and that the date is correct. Campaigns without an end date are the single biggest source of promo debt. If a discount is meant to be permanent, that should be a deliberate decision, not the default that happened because no one set a date. **4. Map the overlaps.** List which discounts can apply to the same cart at the same time. A volume tier on a product, an order-level code, and a free shipping threshold can all hit one cart. If they are all set to combine, the customer gets all three. Write down every combination that is currently allowed and ask, for each, whether you meant to allow it. **5. Calculate the effective discount on your worst case.** For the deepest allowed stack, do the arithmetic. Suppose a customer hits a 15% volume tier, applies a 10% welcome code, and clears the free shipping threshold. Those do not simply add, but on a $100 order the combined giveaway plus shipping cost can easily reach 30% or more of your take. If that number is below your margin floor, you have found real money. **6. Retire the orphaned campaigns.** An orphaned campaign is a discount tied to a landing page, collection, or promotion that no longer exists. The offer is live but the context around it is gone. These confuse customers who stumble into them and they never get measured because no one remembers they exist. Turn them off. **7. Set a standing review.** Promo debt is not a one-time cleanup, it is a recurring maintenance task. Put a quarterly audit on the calendar, plus a quick pass after every major sale season. BFCM and the winter holidays generate the most orphaned campaigns and leaked codes, which is exactly why January is the natural time to do the big one. ## A quick worth-it check Say your store did 2,000 orders last quarter and a zombie code leaked onto a coupon site, quietly attaching 10% off to 8% of those orders. That is 160 orders discounted by 10%. On a $70 average order, that code alone gave away roughly $1,100 of revenue you never approved, most of it straight off margin. One code. The audit that would have caught it takes an afternoon. ## Measuring the cleanup Once you have closed the leaks, watch what happens to your effective discount rate, meaning total discount dollars divided by gross revenue. It should drop, and margin per order should rise, without any fall in conversion, because the discounts you removed were not driving the sales in the first place. Our analytics can show you which discounts are actually tied to incremental orders and which are just leaking, which is the difference between a promotion and a liability. We wrote about that shift when the feature first shipped in [see which discounts actually make you money](/blog/new-discount-analytics-see-which-discounts-make-money). ## Keeping the store clean going forward The best defense against promo debt is deliberate combination settings and a scheduled end date on everything. Decide up front what each discount is allowed to stack with, and never create a promotion without an end. For the margin side of the same problem, our guide to [protecting margin during sitewide sales](/blog/how-to-protect-margin-during-sitewide-sales) covers the exclusions and caps that keep a big sale from becoming a leak. ## Setting this up with Discount Prime Discount Prime gives every campaign explicit combination controls and a scheduled end date, so the discounts you create do not become next year's promo debt. It runs on Shopify Functions, applies natively in checkout, and works on any plan, so you can see and manage all of your volume, shipping, and tiered offers in one place instead of hunting through the admin. Pair it with [our analytics](/profit-analytics) and your [volume discounts](/volume-discounts) stay clean by design. You can find the app on the Shopify App Store. --- ## Post-Holiday Pricing: How to Exit a Sale Without Killing Momentum URL: https://www.discountprime.app/blog/post-holiday-pricing-how-to-exit-a-sale Category: Profit & Strategy | Author: Discount Prime Team | Published: December 17, 2024 | Updated: July 15, 2026 | Read time: 6 min | Tags: profit-strategy, post-holiday-pricing, discount-strategy, tiered-pricing, b2b-pricing > Exit a holiday sale by ramping the discount down in stages instead of flipping to full price overnight. Replace the sitewide banner with narrower, reason-based offers, protect margin as depth shrinks, and pivot to January wholesale buyers who restock. A staged exit keeps traffic warm without training shoppers to only buy on sale. *The hardest part of a holiday sale is not starting it. It is ending it without watching your traffic go cold the moment the banner comes down.* Most Shopify stores plan the entrance to a holiday sale in detail and give no thought to the exit. Then December 26 arrives, the sitewide code switches off, full price returns overnight, and the same traffic that was converting all month suddenly bounces. If you sell to consumers, the days after Christmas are some of the highest-intent, highest-refund, lowest-loyalty days of your year. How you leave the sale decides whether that intent carries into January or evaporates. The short answer: ramp the discount down in stages instead of flipping a switch, replace "everything is on sale" with a narrower reason to buy, and pivot toward the buyers who actually restock in January. A cold-turkey return to list price on the 26th is the most reliable way to train customers that your store is only worth visiting when it is bleeding margin. ## Why the day after a sale is so dangerous During a sale, your conversion rate is propped up by a discount that touches every order, including the ones that would have happened anyway. When you remove it in one step, you do not return to your baseline conversion rate. You often dip below it, because the shoppers who arrived expecting a deal now feel they missed it. This is the anchoring problem in reverse. For three or four weeks you taught the market that your prices carry a discount. Undo that in a single day and full price reads as a price increase, even though it is just your normal price. The fix is not to keep discounting forever. It is to let the anchor fade instead of snapping. ## Ramp down in stages, do not flip a switch A staged exit shrinks two things at once: how deep the discount is, and how many products or customers it applies to. Each step gives returning visitors a smaller but still real reason to act, and each step lets your average margin recover before the next one. Here is a sample three-week ramp for a store that ran 25% off sitewide through Christmas: | Window | Offer | Scope | Depth | | --- | --- | --- | --- | | Dec 26 to Dec 31 | Year-end clearance | End-of-season collections only | Up to 30% | | Jan 1 to Jan 7 | New Year refresh | Selected collections | 15% | | Jan 8 to Jan 14 | Bundle and volume offers | Bestsellers | Effective 10% via tiers | | Jan 15 onward | Full price plus segment deals | Wholesale and VIP only | Varies by segment | Notice the depth does not fall in a straight line. Clearance can go deeper than the sitewide sale did, because it is aimed only at inventory you want gone. The general shopper sees the headline discount shrink week over week, which nudges the undecided to buy sooner rather than wait for a better deal that is visibly disappearing. ## Replace "everything is on sale" with a reason A sitewide percentage is a blunt instrument that says nothing. A reason-based offer says something specific and holds its value: "end-of-season clearance," "New Year bundle," "restock pricing for trade accounts." Reasons let you keep an offer live without eroding your list price, because the customer understands the discount is tied to a condition, not to your product being worth less. The mechanical version of this is tiered pricing. Instead of 15% off one shirt, a customer who buys three gets a per-unit break. The discount now rewards a behavior you want rather than subsidizing a purchase that was already going to happen. Structuring these tiers well is its own craft, and getting the anchor right matters more than the depth. You can go deeper on that in our guide to [tiered pricing on Shopify](/tiered-pricing), and on protecting the numbers underneath in [how to protect margin during sitewide sales](/blog/how-to-protect-margin-during-sitewide-sales). ## The January B2B pivot most stores miss Consumer demand cools in the first weeks of January. Wholesale demand does the opposite. Trade buyers, resellers, and repeat business accounts spend late December selling through their own holiday stock, and early January restocking it. If your store serves any B2B or wholesale buyers, January is when they come back to the well. This is the cleanest place to keep revenue warm without discounting to the public. A tag-based [B2B pricing](/b2b-pricing) rule lets you show restock terms only to accounts you have marked as wholesale, while every other visitor sees your recovered full price. The consumer side of your store exits the sale; the trade side gets a reason to reorder. We go deeper on that seasonal pattern in [January is for B2B: why wholesale buyers restock](/blog/january-is-for-b2b-why-wholesale-buyers-restock). ## A worked example Say your average order is $60 at a 40% gross margin, or $24 of margin per order. A 25% sitewide discount during the holidays cuts that to roughly $9 of margin per order, and you accept it for volume. If you hold that 25% into January out of fear of losing traffic, you are giving away $15 of margin on every order at exactly the point where order volume is falling anyway. That is the worst possible trade. Now run the staged ramp instead. By the second week you are at an effective 10% through bundle tiers, which restores you to roughly $18 of margin per order, and the discount only pays out when a customer buys more. By week three the general shopper is at full price and your remaining discount is a targeted wholesale offer that you priced deliberately. Same calendar, very different January. ## What to watch as you exit Track three things through the ramp. Watch margin per order recover week over week; if it is not climbing, your stages are too shallow. Watch conversion rate on returning visitors; a small dip is normal, a cliff means you removed the reason to buy too fast. And watch repeat and wholesale order share rise as consumer orders fall, which tells you the January pivot is working. Our analytics can show you which of these offers is actually carrying revenue rather than just moving volume. ## Setting this up with Discount Prime Discount Prime lets you schedule each stage of the ramp in advance, so the clearance, the bundle tiers, and the January wholesale offer all switch over on their own dates without a scramble. You can run [tiered pricing](/tiered-pricing) for the consumer ramp and tag-based [B2B pricing](/b2b-pricing) for the restock buyers at the same time, on any Shopify plan. Plan the exit now, before the 26th, and January takes care of itself. You can find the app on the Shopify App Store. --- ## What Our Second BFCM Broke (and Fixed) in Discount Prime URL: https://www.discountprime.app/blog/what-our-second-bfcm-broke-and-fixed Category: Build in Public | Author: Discount Prime Team | Published: December 10, 2024 | Updated: July 15, 2026 | Read time: 5 min | Tags: build-in-public, shopify, engineering, performance, bfcm > Discount Prime's second BFCM ran heavier than its first. This engineering postmortem covers what strained under peak load: analytics ingestion lag, a combination-resolution edge case at high concurrency, and a scheduling boundary bug. Because discount logic runs inside Shopify Functions at checkout, the fixes prioritized correctness and predictable latency over features. *Your first BFCM tests whether the app works. Your second one tests whether it works when a lot of people use it at once.* Our second BFCM ran heavier than our first, and that was the point of the exercise. Last year we launched six weeks before Black Friday and mostly hoped. This year we had a full year of merchants, more stores running campaigns, and meaningfully more orders flowing through the app at peak. Nothing fell over. But a few things strained, and a postmortem is only useful if it is honest about the strain and not just the survival. Here is what our second BFCM broke, and what we fixed. A note on numbers: we are not going to quote a headline figure for the weekend. What matters for an engineering writeup is not a dollar total, it is the shape of the load. Our peak was concentrated in a few hours, orders per minute ran well above anything we had seen outside a sale, and the concurrency, many stores hitting checkout at the same moment, was the real test. That concentration is what surfaces the bugs a calmer week never would. ## Why checkout-time code is unforgiving Discount Prime runs its discount logic inside [Shopify Functions](/volume-discounts), which means the calculation happens natively in Shopify's own checkout engine, in-line, at the moment a customer is deciding to pay. That is the right architecture and we would choose it again. It avoids the price-manipulation hacks that genuinely fall apart under load. But it also sets a hard bar: the function has to be fast and deterministic every single time, because there is no slow path that is acceptable when someone is mid-checkout on Black Friday. A feature can be late. A checkout cannot be slow. That framing decided every fix below. When we had to choose between adding something and making the existing path more predictable, predictability won. ## What strained, and what we did about it **Analytics ingestion lagged at peak.** Our [discount analytics](/profit-analytics), which shipped in September, records what each discount does so merchants can see which offers make money. During the busiest hours, the ingestion side, the processing that turns raw events into reporting, fell behind. Crucially, this never touched checkout: the discount calculation and the recording of it are decoupled by design, so a customer's cart was never waiting on a report. But dashboards lagged, and a merchant refreshing their numbers mid-sale saw stale figures for a while. We widened the buffer between recording and processing so ingestion can fall behind and catch up without any pressure reaching the checkout path, and without the merchant seeing gaps once it caught up. **A combination-resolution edge case appeared at high concurrency.** When several discounts qualify for one cart, the order in which they resolve matters, and we found a narrow case where an unusual combination could resolve inconsistently under heavy concurrent load. It was rare and it was caught, but "rare during BFCM" still means real orders. We made combination resolution fully deterministic for that case, so the same cart produces the same, correct result regardless of how much traffic is hitting the app at that instant. This is the kind of bug that is nearly impossible to see in a quiet week and obvious in a busy hour. **A scheduling boundary behaved unexpectedly.** A store scheduled a sale to end at a specific local time, and the behavior at the exact boundary, for carts already open when the clock flipped, was not what the merchant expected. Nobody was overcharged, but the transition was less clean than it should be. We tightened the timezone-aware scheduling so the start and end boundaries are unambiguous, including for carts that straddle the moment the sale changes state. ## What held up Plenty worked, and it is worth naming so this reads as a postmortem and not a confession. The core [volume discount](/volume-discounts) path, the one most of our stores lean on, stayed fast and correct through the peak. The Functions architecture kept latency predictable exactly when it mattered. And the observability we added earlier in the year, the ability to actually watch latency and errors in real time, is the only reason this postmortem has specifics instead of vague suspicions. You cannot fix what you could not see, and last year we could not see nearly this much. ## What we are changing before next year Three things go on the list for our third BFCM: 1. **Load-test against realistic peak concurrency, not average throughput.** The bugs live at the concentration peaks, so that is what the test has to reproduce. 2. **Make ingestion backpressure a first-class design goal**, so reporting can always lag safely without any path to the checkout. 3. **Expand the deterministic-combination test matrix**, because the resolution edge cases are where correctness quietly slips under load. ## Setting this up with Discount Prime For merchants, the takeaway is simpler than the engineering: the app you run your sale on should treat checkout-time correctness as non-negotiable, because that is the moment you cannot afford to be slow or wrong. That is the standard we hold [volume discounts](/volume-discounts) and [our analytics](/profit-analytics) to, especially at peak. If you want the merchant-side version of a smooth sale, the two posts next to this one cover it: [deep or wide but not both](/blog/bfcm-2024-discount-playbook-deep-or-wide) for the strategy, and [last-minute BFCM fixes](/blog/last-minute-bfcm-fixes-discount-conflicts) for the conflicts you can still catch before the next one. --- ## Last-Minute BFCM Fixes: Discount Conflicts You Can Still Catch URL: https://www.discountprime.app/blog/last-minute-bfcm-fixes-discount-conflicts Category: Discounts & Promotions | Author: Discount Prime Team | Published: November 26, 2024 | Updated: July 15, 2026 | Read time: 4 min | Tags: bfcm, shopify, discount-conflicts, checklist, holiday-sales > Three days before BFCM, the highest-value fixes are conflict fixes: accidental stacking between your sale and old codes, zombie codes still live from past promos, and timezone traps that start or end the sale at the wrong hour. Audit combinations in an incognito cart, expire dead codes, and confirm every schedule in your store timezone. *The dangerous discount problems this week are not the offers you forgot to build. They are the offers you forgot to turn off.* Three days out from BFCM, the highest-return work is not adding anything. It is finding conflicts in what you already set up. Every new offer you create now ships with whatever bugs it has and no time to catch them. But an audit of your existing discounts, specifically how they collide with each other, can save real margin in the next fifteen minutes. That is where your attention should go this week. We watched this play out last year. The stores that had trouble over the weekend mostly did not have bad offers. They had good offers that quietly stacked with something old, or fired an hour off schedule, or kept a code alive that should have died in September. None of it showed up until the orders did. All of it was catchable in advance. Here is the fast version of that audit. ## Fix one: accidental stacking The most expensive conflict is two discounts applying to the same cart when you meant only one. Shopify controls how product, order, and shipping discounts combine, and if you have not set those rules explicitly, the behavior may not be what you assume. Open an incognito window and build a cart that qualifies for more than one of your active offers at once. Watch what actually applies at checkout, not what you expect to apply. If your BFCM sale combines with a loyalty reward and a free shipping deal, the customer gets all three, and a planned 25 percent becomes something closer to 40 percent plus subsidized shipping. Set the combination rules so your main offer stacks only with what you have deliberately allowed, then retest the same cart. ## Fix two: hunt down zombie codes A zombie code is an old discount code, a welcome offer, a past-sale code, an influencer code from spring, that is still live and still applicable on top of your BFCM offer. Customers share these. Deal sites index them. During the highest-traffic weekend of the year, a forgotten 15 percent code stacking on your sale is a leak that scales with your success. Go through your active codes and ask one question of each: should this be applicable this weekend? Expire anything that should not. Pay special attention to codes with no end date, because those are the ones that outlive the campaign that created them. ## Fix three: close the timezone traps Confirm that every scheduled start and end time is set in your store's timezone, and that you know what happens to carts open at the boundary. A sale scheduled in the wrong timezone either starts late, losing your earliest and highest-intent traffic, or ends late, teaching your list that your deadlines do not mean anything. Check the free shipping schedule too. If [free shipping](/free-shipping) is part of your BFCM plan, confirm its threshold sits above your average order value so it lifts baskets instead of subsidizing orders that already cleared it, and that it turns on and off with the rest of the sale rather than lingering. ## Fix four: verify the boundaries Most conflicts hide at the edges, so test the edge carts specifically: 1. **The multi-discount cart.** Qualifies for two or more offers at once. Confirm only the intended ones apply. 2. **The threshold cart.** Sits exactly at your free shipping or volume break boundary. Confirm the discount triggers where you expect. 3. **The mixed cart.** Contains one included product and one excluded product. Confirm the excluded item stays full price. 4. **The mobile cart.** Same tests on a phone. Display and combination behavior can differ from desktop. 5. **The just-expired-code cart.** Try applying a code you just expired. Confirm it is actually rejected. ## What to leave alone Resist the urge to make the offer deeper this week. The margin floor you set calmly weeks ago is more trustworthy than the number a competitor's email tempts you toward on Wednesday night. If a [volume discount](/volume-discounts) is your hero offer, it is already rewarding larger baskets, which is the shape you want going into a high-traffic weekend. Do not rebuild it three days out. Audit it, confirm it, and move on. ## After the weekend, look at the data Once the orders land, the question is not how much revenue came in. It is which discounts made money and which quietly did not. [Our analytics](/profit-analytics) will show you the blended margin each offer actually earned, including whether any stacking slipped through your audit. That is how this weekend becomes next year's plan instead of next year's guess. ## Setting this up with Discount Prime Discount Prime keeps combination rules, exclusions, and timezone-aware scheduling in one place, which is most of this audit, and the same [analytics view](/profit-analytics) that reports the weekend also helps you sanity-check the setup before it starts. If you built your offers weeks ago, run back through the [pre-BFCM checklist](/blog/pre-bfcm-checklist-get-your-discounts-ready) one more time, and if you are still deciding how deep to go, [deep or wide but not both](/blog/bfcm-2024-discount-playbook-deep-or-wide) is the short version of the strategy. --- ## How to Protect Margin During Sitewide Sales URL: https://www.discountprime.app/blog/how-to-protect-margin-during-sitewide-sales Category: Profit & Strategy | Author: Discount Prime Team | Published: November 12, 2024 | Updated: July 15, 2026 | Read time: 5 min | Tags: sitewide-sale, profit-strategy, shopify, margin, discount-strategy > A sitewide sale protects margin when it is not truly sitewide. Exclude thin-margin and MAP-restricted products, carve out collections that cannot absorb the depth, cap combinations so nothing stacks past your floor, and set the depth to survive your worst included product. Then use analytics to see the blended margin the sale actually earned. *A sitewide sale is the bluntest instrument in retail, and the stores that survive it are the ones that quietly made it less sitewide than it looks.* A sitewide sale can protect your margin, but only if it is not actually applied to your entire site. The word "sitewide" is a marketing promise to the customer, not a technical instruction to your discount engine. The stores that come out of a big sale with their margin intact all do the same thing: they present one clean offer to shoppers while, underneath, a handful of products and collections quietly sit it out, and combinations are capped so the depth never compounds. This post is how to build that gap between what the customer sees and what your margin actually experiences. The core problem with a true sitewide discount is that it applies one depth to products that have wildly different margins. A flat 25 percent off treats your 65 percent margin bestseller and your 28 percent margin accessory identically. The bestseller barely notices. The accessory is now selling at a small loss, on every order, for the length of the sale. Multiply that across your thin-margin tail and the sale can be a net winner on revenue and a net loser on profit at the same time. ## Set the depth against your worst included product Most stores set sale depth against a feeling, or against their blended average margin. Both are wrong. Set it against the thinnest-margin product you are willing to include. Work it as a floor. Take your lowest-margin included item, subtract product cost, shipping subsidy, transaction fees, and packaging from its price, and express the remainder as a percentage. That is the deepest the sitewide discount can go before that product sells at a loss. If your worst included product has 30 percent contribution margin, a 30 percent sale is its break-even and anything deeper is red. If you want to go deeper than your tail can survive, the answer is not a shallower sale for everyone. It is to exclude the tail. ## Exclude the products that cannot absorb it Exclusions are the single highest-leverage margin protection in a sitewide sale, and they cost you almost nothing in customer goodwill because shoppers judge a sale by its headline and its bestsellers, not by whether one accessory is discounted. Exclude, at minimum: - **Your lowest-margin tier.** The products where the sale depth exceeds contribution margin. These are the ones bleeding on every order. - **MAP-restricted products.** Anything under a manufacturer's minimum advertised price policy, where discounting risks the relationship or violates terms. - **Brand-new arrivals.** Products selling fine at full price do not need the discount, and including them just donates margin. - **Gift cards.** Never discount stored value. A discounted gift card is a discount you pay for twice. ## Carve out collections instead of tagging one by one If a whole category cannot take the depth, exclude the collection, not the products inside it individually. A collection carve-out is one rule instead of fifty tags, and it stays correct as you add products to that collection during the sale. Premium lines, MAP-restricted brands, and a new-season collection are all natural carve-outs. The customer still sees a storewide sale. Your margin sees a fenced one. ## Cap the combinations so depth cannot compound The quietest margin leak in any sale is stacking. A 25 percent sitewide sale that combines with a leftover 15 percent welcome code and a free shipping threshold is not a 25 percent sale on that order. It is 40 percent plus subsidized shipping, and it lands on whichever customer happens to hold the code. Set explicit combination rules: decide whether the sitewide discount can stack with product, order, or shipping discounts, and default to not. If you do allow one additional offer, cap it at a single shallow one you have margin-tested together. Then prove it in an incognito cart by building an order that qualifies for everything at once and watching what actually applies. ## A worked example Say a sitewide 25 percent sale runs across 400 products. Your margins range from 28 to 65 percent. Here is the difference exclusions make on the tail. | Approach | Products included | Depth | Result on the thin tail | |---|---|---|---| | True sitewide | All 400 | 25 percent flat | ~40 products sell at a loss the whole sale | | Protected sitewide | 360, thin tail excluded | 25 percent flat | Every included product stays profitable | | Over-corrected | All 400 | 12 percent flat | Nobody loses money, but the sale is too weak to convert | The protected version keeps the depth customers respond to and removes only the products that could not survive it. That is almost always better than shallowing the whole sale to protect a few items. ## Measure the blended margin, not the revenue After the sale, revenue will look great. It always does. The number that tells you whether the sale worked is blended margin: total profit after all discounts, across every order the sale touched. A sale can lift revenue and lower blended margin at the same time, and you cannot see that without looking. This is exactly what post-sale reporting is for, and it is how you decide whether next quarter's sale should be deeper, shallower, or narrower. ## Setting this up with Discount Prime Discount Prime lets you build a sitewide offer with product and collection exclusions, then set combination rules so it does not stack past your floor. If your offer rewards larger orders, [volume discounts](/volume-discounts) can do some of the work a flat markdown does, at better margin, by tying the discount to basket size. Afterward, [our analytics](/profit-analytics) show the blended margin the sale actually earned so you are not flying on revenue alone. For the strategy layer, see [deep or wide but not both](/blog/bfcm-2024-discount-playbook-deep-or-wide), and for keeping sales from training your customers to wait, read [how to run a sale without training customers to wait](/blog/how-to-run-a-sale-without-training-customers-to-wait). --- ## BFCM 2024 Discount Playbook: Deep or Wide, but Not Both URL: https://www.discountprime.app/blog/bfcm-2024-discount-playbook-deep-or-wide Category: Discounts & Promotions | Author: Discount Prime Team | Published: October 22, 2024 | Updated: July 15, 2026 | Read time: 5 min | Tags: bfcm, shopify, discount-strategy, profit-strategy, holiday-sales > The BFCM 2024 rule: go deep on a few products or wide across the catalog, but not both at once. Deep discounts drive traffic and basket-building loss leaders; wide discounts lift blended volume at shallow depth. Stacking a deep doorbuster on top of a sitewide sale is how planned promotions quietly erase your holiday margin. *Most stores do not lose money on BFCM because their discounts were too deep. They lose it because their deep discount and their wide discount were running on the same cart.* Here is the whole playbook in one sentence: for BFCM 2024, go deep on a few products or go wide across the store, but do not do both at the same time. Deep and wide are two different tools that solve two different problems, and each one is margin-tested on the assumption that the other is not also running. Stack them and you get a third thing nobody planned for: a store where your loss leaders are also carrying a sitewide markdown, and every cross-sell happens at compounded depth. Last year Shopify merchants sold $9.3 billion over BFCM weekend, up from $7.5 billion the year before. The demand is real and it is growing. But the weekend rewards stores that discount with intent and quietly punishes stores that discount out of fear. The fear move is the one where you set a deep hero deal to pull traffic, then panic that the rest of the store looks full price next to it, and layer a sitewide discount on top. That is the specific mistake this playbook exists to prevent. ## Deep discounts: a scalpel for traffic A deep discount is a large markdown, 40 percent or more, on a small, deliberate set of products. Its job is not margin on those products. Its job is attention and basket-building. You accept a thin or negative margin on the hero item because it pulls a customer in who then adds full-margin products around it. Deep only works under conditions. You need enough traffic for the loss to convert into basket size, and you need the deep product to be something people buy alongside other things, not by itself. A deep discount on a one-off product that customers buy singly and leave is just you paying to sell that product for less. Pick deep-discount items that are recognizable enough to draw the click and connected enough to build the cart. ## Wide discounts: a shallow layer across everything A wide discount is a shallow markdown, 10 to 20 percent, applied across most of the catalog. Its job is blended volume: a small nudge on a large number of orders. It works because the depth is survivable on nearly every product, including your thinner-margin ones. The failure mode of wide is setting it deep to look competitive. A single depth applied to every product discounts your 60 percent margin item and your 25 percent margin item by the same number of points. Go too deep on a wide sale and you are financing the discount on your worst products out of the profit on your best ones. Keep wide shallow, and exclude anything that cannot absorb even the shallow number. ## Why both at once breaks the math When you run deep and wide together, three things happen. Your deep loss leaders now also carry the wide discount, deepening a loss you already planned. Any customer who cross-shops from the deep item into the rest of the store buys at the wide depth, so the basket you were building to fund the loss leader is itself discounted. And your blended margin, the number you actually take home, drops below the floor you set for either strategy alone. Consider a $50 product with $33 of cost, subsidy, fees, and packaging, so $17 of contribution. A deep 45 percent deal takes $22.50 off, a planned $5.50 loss you expect the basket to cover. Now add a 15 percent wide sale that also touches it: the customer stacks to 60 percent, $30 off, a $13 loss on that unit, and the "basket" they add is itself 15 percent off. The loss you sized got more than twice as large, and its funding source got smaller. Nothing about that was on the plan. ## Deep vs wide: choosing your BFCM shape | | Deep | Wide | |---|---|---| | **Discount depth** | 40 percent and up | 10 to 20 percent | | **Product coverage** | A few hero or clearance items | Most of the catalog | | **Primary job** | Drive traffic, build baskets | Lift blended volume | | **Margin on the discounted item** | Thin or negative, funded by the basket | Positive, survivable everywhere | | **Biggest risk** | Discounting products bought singly | Setting depth too deep to look competitive | | **Requires** | Enough traffic to convert the loss | Exclusions for thin-margin products | | **Do not** | Layer a wide sale on top | Set a single deep rate across everything | Pick the row that fits your store this year and commit to it. A store with a few recognizable heroes and real traffic can run deep. A store with a broad catalog of similar-margin products is usually better off wide. Very few stores are served by running both, and the ones that try mostly discover it in December. ## The one exception, done carefully There is a disciplined version of "both" that works: a deep offer on a tightly walled set of products, explicitly excluded from a shallow wide sale on everything else, with combination rules set so nothing stacks. That is not deep-and-wide on the same cart. That is deep here, wide there, with a fence between them. It takes exclusions and tested combination rules to hold, and it is worth doing only if you can prove in an incognito cart that the two never touch. ## Setting this up with Discount Prime Whichever shape you choose, [volume discounts](/volume-discounts) let you reward the basket instead of just marking down demand you already had, and the combination controls keep a deep offer and a wide one from stacking when you intend them separate. After the weekend, [our analytics](/profit-analytics) show you which discounts actually grew the order versus which just gave margin away, so next year's depth is a decision instead of a guess. If you have not locked your setup yet, start with the [pre-BFCM checklist](/blog/pre-bfcm-checklist-get-your-discounts-ready), and if you are leaning toward a wide sale, read [how to protect margin during sitewide sales](/blog/how-to-protect-margin-during-sitewide-sales) before you set the depth. --- ## One Year on the App Store: Numbers, Mistakes, and What Is Next URL: https://www.discountprime.app/blog/one-year-on-the-app-store-numbers-mistakes-whats-next Category: Build in Public | Author: Discount Prime Team | Published: October 8, 2024 | Updated: July 18, 2026 | Read time: 4 min | Tags: build-in-public, shopify, milestone, product-strategy, roadmap > Discount Prime turned one on the Shopify App Store. This build-in-public review covers what shipped across the year, the three mistakes worth admitting (underrating support, shipping settings instead of decisions, waiting too long on analytics), the platform shifts that validated the Functions bet, and a year two focused on protecting profit.One year ago this week, Discount Prime went live on the Shopify App Store. The app that launched in October 2023 did two things: volume discounts and quantity breaks. The app you can install today does considerably more. This post is the honest version of the year in between.
We launched six weeks before our first BFCM, which in hindsight was either brave or careless, and survived it. Since then the app has shipped, in order: free shipping discounts with a progress bar, buy X get Y offers, tiered pricing, B2B and customer-specific pricing, and, last month, discount analytics.
Some numbers we are comfortable sharing: +900 installs / active stores/orders processed, whichever you want public. The number we watch most closely is not installs; it is how many stores are still actively running campaigns 90 days after installing. Retention is the only review that cannot be charmed.
We underestimated support as a product channel. For the first months, we treated support as an interruption. Somewhere around conversation one hundred, we realized it was the roadmap talking to us. The B2B pricing feature exists because wholesale merchants kept describing the same workaround in support tickets. We wrote about this in March, and it remains the most important lesson of the year.
We shipped settings instead of decisions. Early versions of the app exposed every option we could imagine. Merchants do not want fifteen toggles; they want the app to have an opinion and a good default. We have spent much of the year removing choices, and every removal made the app better.
We waited too long on analytics. For most of the year, merchants could run sophisticated campaigns but could not see which ones made money. Discount analytics shipped in September. It should have shipped in March. The uncomfortable truth is that we prioritized visible features over the one that tells you whether the others are working.
It was a consequential year to be building on Shopify. The Winter and Summer Editions both pushed further into checkout extensibility, and August's checkout. liquid deadline for information and payment pages made the direction unambiguous: custom logic belongs in Functions and extensions now, not in scripts and liquid patches.
We made the Functions bet on day one, which meant this year's platform shifts mostly happened to other apps. That bet keeps paying for itself, and we would make it again. (If you want the fuller version of the build story, we told it in one year of building Discount Prime.)
Year two has one theme: profit. Analytics was the first step. The next steps take the same idea further, from reporting on margin to actively protecting it while campaigns run. If year one was about giving merchants more ways to discount, year two is about making sure every one of those discounts can defend itself.
BFCM number two is seven weeks away. We will publish our playbook for it later this month, informed by what we watched happen across stores last November.
To every merchant who installed the app in year one, reported a bug, or told us bluntly that a feature was confusing: thank you. The app is what it is because you did.
--- ## Pre-BFCM Checklist: Get Your Discounts Ready Before November URL: https://www.discountprime.app/blog/pre-bfcm-checklist-get-your-discounts-ready Category: Discounts & Promotions | Author: Discount Prime Team | Published: September 24, 2024 | Updated: July 15, 2026 | Read time: 5 min | Tags: bfcm, shopify, discount-strategy, holiday-sales, checklist > Prepare your Shopify store for BFCM by deciding four things before November: your margin floor, one hero offer, how your discounts combine, and your exact start and end times. Test every offer in an incognito cart, confirm timezone scheduling, and pull last year's data to see which discounts actually earned their depth. *The stores that have a calm BFCM are not the ones with the deepest discounts. They are the ones that decided everything in September.* If you run a Shopify store, the single highest-leverage BFCM decision is when you make your decisions. A discount plan built in late September has time to be tested, corrected, and slept on. A plan built the week of Black Friday gets shipped with whatever bugs it has. This checklist is the September version: what to decide and set up now, so November is execution instead of panic. We watched a lot of stores run discounts through Black Friday last year. The pattern was consistent. The margin damage almost never came from the headline offer being too generous. It came from small things that compounded: an offer that quietly stacked with a forgotten code, a free shipping threshold set below the average order, a sale that started an hour late because the schedule was in the wrong timezone. Every one of those is preventable in September and expensive in November. ## Decision one: find your margin floor first Before you choose a discount percentage, find the point where your average order stops making money. Take a typical order, subtract product cost, the shipping you subsidize, transaction fees, and packaging. What remains is the room you have to discount. Here is the worked version. Say your average order is $80, product cost is $40, shipping subsidy is $8, fees are $3, and packaging is $2. Your contribution before any discount is $27. A 25 percent sitewide discount takes $20 off that order, leaving $7. A 35 percent discount, which is what "25 percent, but it accidentally stacked" looks like, leaves you underwater. The floor is not a feeling. It is a number, and you should write it down now so nobody has to guess at 11pm on Black Friday. ## Decision two: build one hero offer Pick one offer that headlines the weekend. Not five. The strongest small-store offers reward larger orders instead of just discounting demand you already had. A sitewide code discounts every order, including the customer who was going to buy anyway. A [volume discount](/volume-discounts) like "save 20 percent when you buy 3 or more" only pays out when the basket grows, which means the discount funds itself out of the extra units. During the highest-traffic weekend of the year, that difference compounds. If your catalog suits it, a [Buy X Get Y offer](/bxgy) does similar work by moving slow inventory as the free item instead of discounting the hero product. ## Decision three: set combination rules, then test them This is the one that bites quietly. Shopify lets you control how product, order, and shipping discounts combine, but the defaults will not read your mind. Decide for each active offer whether it can stack, then prove it. Open an incognito window, build a cart that qualifies for more than one discount at once, and watch what actually applies. If your hero offer combines with a leftover welcome code and a free shipping deal, the customer gets all three and you find out from your margin report, not before. Test the boundary cases: the cart that just clears the free shipping threshold, the cart with one qualifying product and one excluded one. ## Decision four: schedule in the right timezone Set your start and end times explicitly, in your store's timezone, and confirm what happens to carts that are open when the sale flips on or off. A sale that starts an hour late loses your earliest, highest-intent traffic. A sale that ends late trains your list that your deadlines are negotiable. If you offer [free shipping](/free-shipping) as part of the plan, set the threshold above your current average order value so it lifts basket size rather than subsidizing orders that already cleared it. A threshold below your AOV is margin given away for nothing. ## The eight-week checklist Work through these in order. Everything here can be done in September. 1. **Calculate your margin floor** from a real average order, and write the number where your team can see it. 2. **Choose one hero offer** and confirm it rewards larger orders, not just existing demand. 3. **Exclude your lowest-margin products** from the hero offer so the deepest discount never lands on the thinnest margin. 4. **Set combination rules** for every active discount, product, order, and shipping. 5. **Test in an incognito cart**, desktop and mobile, including the carts that qualify for multiple offers. 6. **Confirm the offer displays before the cart**, on the product page, so customers see it while they are still adding units. 7. **Schedule start and end times** in your store's timezone and check the boundary behavior. 8. **Pull last year's data** and note which discounts drove real volume at real margin, so this year's depth is a decision, not a guess. That last step is new this season. With [discount analytics](/profit-analytics) you can look back at what actually happened last year instead of running on memory. The stores that review last year before planning this one tend to discount less and earn more, because they can see which offers were pulling weight and which were just habit. ## Setting this up with Discount Prime Discount Prime handles the tier setup, the product-page display, the combination controls, and the timezone scheduling in one place, which is most of this checklist. If you are building your BFCM offers this month, our [pre-BFCM analytics view](/profit-analytics) also lets you sanity-check them against last year before you commit. For the framework behind a first BFCM plan, see [your first BFCM discount plan](/blog/your-first-bfcm-discount-plan-simple-framework), and for how last year's numbers should shape this year's, read [what discount analytics shows you](/blog/new-discount-analytics-see-which-discounts-make-money). --- ## New: Discount Analytics. See Which Discounts Actually Make You Money URL: https://www.discountprime.app/blog/new-discount-analytics-see-which-discounts-make-money Category: Analytics & Comparisons | Author: Discount Prime Team | Published: September 10, 2024 | Updated: July 15, 2026 | Read time: 4 min | Tags: analytics, discounts, product-update, measurement > Discount analytics, new in Discount Prime as of September 2024, shows how each discount performs: orders, revenue, average order value, and redemption. It answers which discounts drive real behavior, which sit unused, and which merely mark down sales that would have happened anyway, so decisions rest on evidence rather than instinct before BFCM. *You cannot manage what you cannot see, and until now most Shopify stores have run their discounts with the lights off.* Today we are shipping discount analytics in Discount Prime. It answers the question every merchant should be able to answer and almost none can: which of your discounts are actually working? Not which ones got used, which ones changed behavior enough to be worth their cost. Orders driven, revenue, average order value, and redemption, broken out per discount, in one place. This is our first analytics feature, and it is deliberately the foundation. Before you can optimize what a discount earns, you have to be able to see what each one does. That is what launches today. ## The problem: discounting by instinct Most stores decide which promotions to run based on a feeling. This one seemed popular. That one we always do. The BFCM code did fine last year, probably. None of that is measurement, and instinct hides two expensive failures. The first is the **idle discount**: a code or automatic offer that barely gets used, cluttering your store and occasionally firing on an order in ways nobody planned. The second, more costly, is the **demand discount**: a promotion that gets used constantly but mostly applies to orders that would have happened anyway. It looks successful because redemption is high. It is actually just marking down sales you already had. Without per-discount data, those two look identical to a busy operator, and you keep paying for both. ## What discount analytics shows you The release gives every discount its own performance view. The metrics that matter first: - **Orders driven.** How many orders included this discount. The raw usage signal. - **Revenue.** Total revenue on orders where the discount applied. - **Average order value.** The AOV of discounted orders, which tells you whether an offer is growing baskets or just shaving existing ones. - **Redemption.** How often the discount is being used relative to its exposure, the difference between an offer nobody finds and one that resonates. Read together, these separate the discounts pulling their weight from the ones just occupying space. A volume tier that lifts AOV is doing its job. A code with heavy redemption but flat AOV is a candidate for a hard look. ## A worked example: two offers that look the same Suppose two active discounts each show 300 orders last month. On a usage dashboard they look equally successful. Discount analytics tells a different story. | | Offer A: 10% sitewide code | Offer B: buy 3, save 15% | | --- | --- | --- | | Orders driven | 300 | 300 | | Average order value | $52 | $86 | | AOV vs store baseline ($55) | Below baseline | Well above baseline | | What it is doing | Marking down normal orders | Growing basket size | Same order count, opposite economics. Offer A is discounting demand you already had, its discounted orders are smaller than a normal order. Offer B is changing behavior, pulling average order value well above your baseline. Before this data, both were "our popular discounts". After it, one is a keeper and one needs rethinking. That is the entire point of measuring. ## Why we are shipping this now, six weeks before BFCM The timing is not an accident. BFCM concentrates a full year of discounting into a single weekend, which means a promotion that quietly loses money does its maximum damage in November. Walking into that weekend with evidence about which offers actually drive orders, and which merely discount existing demand, is worth more than any last-minute tactic. So use the next six weeks to look. Find the idle discounts and retire them. Find the demand discounts and either fix their structure or cut them. Keep the offers that provably grow orders and average order value, and make those your BFCM headliners. When you are ready to build the plan itself, our [pre-BFCM checklist](/blog/pre-bfcm-checklist-get-your-discounts-ready) walks through the rest. ## Where this is going We want to be direct about what this release is and is not. Today it measures discount performance, orders, revenue, AOV, and redemption. That is the measurement foundation, and it is genuinely useful on its own. It is also the first step toward a longer ambition: reporting that puts profit, not just revenue, at the center of every discount decision. We are planting that flag now. This is the base we intend to build the profit-first story on top of. For today, the win is concrete. You can finally see which discounts make you money and which just make noise. ## Setting this up with Discount Prime Discount analytics is live in [our analytics](/profit-analytics) for every Discount Prime store, no setup required beyond running discounts through the app. Pair it with [volume discounts](/volume-discounts) to see, in the data, which tiers actually lift average order value. If you are still deciding between automatic offers and codes, our guide on [automatic discounts versus discount codes](/blog/automatic-discounts-vs-discount-codes-which-converts-better) pairs well with the new numbers, and the [BFCM 2024 discount playbook](/blog/bfcm-2024-discount-playbook-deep-or-wide) shows how to put them to work for the weekend. --- ## Bulk Discounts for B2B Buyers: Pricing Big Carts Without Guesswork URL: https://www.discountprime.app/blog/bulk-discounts-for-b2b-buyers-pricing-big-carts Category: B2B & Wholesale | Author: Discount Prime Team | Published: August 20, 2024 | Updated: July 15, 2026 | Read time: 6 min | Tags: bulk-discounts, b2b, wholesale, quantity-breaks, pricing > Bulk discounts for B2B buyers reward large orders with lower per-unit pricing. The two decisions that matter are case quantity logic, pricing by the pack rather than the single, and whether breaks apply at the line level or across the whole cart. Set order minimums and a margin floor per tier to price big carts without guesswork. *A B2B buyer filling a large cart is not looking for a coupon. They are looking for a price that makes sense at the quantity they actually buy, and a store that clearly cannot do that math loses the order to one that can.* Bulk discounts reward large orders with lower per-unit pricing. For B2B buyers, that is not a promotion, it is the expected shape of the relationship. The trouble is that most Shopify stores price for a retail shopper buying one and then improvise when a wholesale buyer wants fifty. This post is about removing the improvisation: how to structure case quantities, order minimums, and the choice between line-level and cart-level breaks so a big cart prices itself. The direct answer up front: decide two things and the rest follows. First, do you price by the single unit or by the case? Second, does the discount count quantity per product line or across the whole cart? Get those two right and your bulk pricing stops being guesswork. ## Bulk discounts versus retail volume discounts A retail volume discount and a B2B bulk discount use the same mechanic, per-unit price falling with quantity, but the numbers live in different worlds. A retail tier might reward buying 3 instead of 1. A B2B bulk tier rewards buying 50, 200, or 500. The depth is greater, the margin per unit is thinner, and the buyer is doing deliberate math, not responding to a nudge. That difference changes how you design tiers. Retail volume tiers are a persuasion tool; you want the middle tier to look like the obvious choice. B2B bulk tiers are a negotiation encoded in software; you want each tier to reflect a real cost-to-serve reality at that volume. A buyer taking 500 units genuinely costs you less per unit to sell and ship than one taking 50, and the price should say so honestly. ## Decision one: singles or cases Case-quantity pricing sells in fixed pack sizes rather than singles. Instead of "buy 48 units", the buyer orders "4 cases of 12". This matches how B2B purchasing actually works and it removes a whole class of problems. **Why case quantities help:** - **They mirror real buying.** Wholesale buyers think in cases, pallets, and packs, not loose units. - **They stabilize fulfillment.** Whole cases pick and pack cleanly; odd lots create labor and error. - **They keep margin predictable.** When every order is a case multiple, your per-order economics do not swing on a stray single unit. If your product genuinely ships as a case, price it as a case and set your tiers on case multiples. If singles are legitimate, keep them, but consider a minimum order quantity so a bulk price never unlocks on a two-unit order. ## Decision two: line-level or cart-level breaks This is the decision merchants get wrong most often, because the right answer depends entirely on how your buyers order. | | Line-level break | Cart-level break | | --- | --- | --- | | Counts quantity | Per product line | Across the whole cart | | Unlocks tier when | One product hits the threshold | Total units or spend hits it | | Best for | Deep buying of single SKUs | Broad orders across many SKUs | | Example buyer | Restocks 200 of one item | Orders 20 each of 15 items | | Margin risk | Low, tier matches real volume of that item | Mixed cart can hit a tier without real per-item volume | **Line-level** suits a buyer who goes deep on individual products: a shop restocking 200 units of one bestseller. The tier attaches to that line, and the discount reflects genuine volume of that specific item. **Cart-level** suits a buyer who spreads a large order across many products: a business ordering 20 units each of fifteen items. No single line is deep, but the total order is large, and a cart-level break rewards the whole basket. Many B2B stores need both, applied to different products, and the guesswork disappears once you have consciously matched each product to the pattern its buyers actually use. ## Decision three: order minimums that protect margin An order minimum is the guardrail that keeps bulk pricing from leaking to small orders. Set it by quantity, by cart value, or both. The rule of thumb: the minimum should sit just above the point where the lower per-unit price is still profitable after fulfillment and payment costs. Without a minimum, a buyer can sometimes claim a bulk unit price on a near-retail order, which is exactly the margin leak bulk pricing is supposed to prevent. ## A worked example You sell a product at $20 retail with a fully loaded cost of $12, so retail margin is $8 per unit, 40 percent. You want a three-tier B2B bulk structure, priced by the case of 12, with a 2-case minimum to unlock trade pricing. | Tier | Cases | Units | Per-unit price | Margin per unit | Margin % | | --- | --- | --- | --- | --- | --- | | Trade entry | 2 to 4 | 24 to 48 | $17 | $5 | 29% | | Volume | 5 to 9 | 60 to 108 | $15.50 | $3.50 | 23% | | Wholesale | 10+ | 120+ | $14 | $2 | 14% | Two things to read from this table. First, every tier stays above zero margin, which is the non-negotiable, know your fully loaded cost before you set the deepest tier. Second, the minimum (2 cases) means a buyer taking a single case still pays a price that protects you. The wholesale tier at 14 percent margin is deliberately thin, but it only applies at 120-plus units, where near-zero acquisition cost and clean case fulfillment make thin margin at volume a good trade. ## The mistakes that cost margin on big carts **No margin floor on the deepest tier.** The most common and most expensive error. If you do not know your loaded cost, your best customers become your least profitable orders. **Bulk pricing that stacks with codes.** A buyer who unlocks a bulk tier and then applies a general discount code can push the effective price below your floor. Decide explicitly whether bulk pricing combines with anything else. **Cart-level breaks on mixed carts you did not model.** A cart-level tier can trigger on a basket that has no real per-item volume. Model the worst-case cheap-heavy cart before you ship a cart-level break. **Ignoring per-variant cost.** If variants have different costs, check the deepest tier against the cheapest variant, not the average, or that variant quietly runs underwater. ## Setting this up with Discount Prime Discount Prime runs [bulk discounts](/bulk-discounts) natively through Shopify Functions, with case-quantity logic, order minimums, and a choice of line-level or cart-level breaks, so a large B2B cart prices itself at checkout. Pair it with [B2B and customer-specific pricing](/b2b-pricing) to scope those bulk tiers to your trade accounts, and use [volume discounts](/volume-discounts) for the retail side of the same catalog. For the segmentation layer underneath it, see [customer tags and segment-based pricing](/blog/customer-tags-are-underrated-segment-based-pricing) and [wholesale pricing on Shopify without Shopify Plus](/blog/wholesale-pricing-on-shopify-without-shopify-plus). --- ## checkout.liquid Is Going Away: What the August 13 Deadline Means for Your Discounts URL: https://www.discountprime.app/blog/checkout-liquid-is-going-away-august-13-deadline Category: Ecosystem & Platform | Author: Discount Prime Team | Published: August 6, 2024 | Updated: July 15, 2026 | Read time: 5 min | Tags: checkout, ecosystem, migration, shopify-platform, discounts > Shopify deprecates checkout.liquid for the information, shipping, and payment pages on August 13, 2024. Stores must move customizations to checkout extensibility. Discounts calculated through Shopify Functions are unaffected, but any custom checkout messaging, including free shipping bars and cart notices, must migrate to checkout UI extensions or it stops rendering. *A discount that calculates perfectly but renders on a page Shopify is about to turn off is still a discount your customer will not see.* Shopify is deprecating checkout.liquid for the information, shipping, and payment pages on August 13, 2024. If your store customized checkout through the old Liquid template, those customizations stop applying after that date, and anything you built to communicate discounts at checkout, free shipping progress bars, cart notices, threshold messaging, goes with it unless you have migrated. Here is the reassuring part first, then the checklist. The math of your discounts is safe. What is at risk is the presentation. This post separates the two so you know exactly what to move and what to leave alone. ## What is actually changing on August 13 checkout.liquid was the customizable checkout template available to Shopify Plus merchants. It let developers edit the checkout pages directly in Liquid. Shopify is retiring that model in favor of checkout extensibility, a system of checkout UI extensions that render in defined, upgrade-safe slots instead of a freely edited template. The August 13, 2024 deadline covers three pages: information, shipping, and payment. The Thank You and Order Status pages are on a separate, later timeline with an August 28, 2025 deadline. So this is a two-phase migration, and only the first phase is due now. If your store never used customizable checkout.liquid, which is most stores, since it was a Plus feature, there is nothing here for you to migrate. You are already on the modern checkout. Skip to the closing section. ## What breaks and what does not The single most important distinction: calculation versus presentation. **Calculation is safe.** Discounts that run through Shopify Functions apply server-side, inside Shopify's discount engine. A volume tier, a customer-specific price, or a free shipping threshold calculated by Functions does not touch checkout.liquid at all. Those keep working through the deadline and past it. This is one of the quiet advantages of Functions-native discounting over the old Scripts-and-template approach. **Presentation is at risk.** Anything hand-built into the checkout.liquid template to display or reinforce a discount is what breaks. The usual casualties: - Custom free shipping progress bars coded into the checkout template - Cart or checkout notices ("Add $15 more for free shipping") - Trust badges, upsell blocks, and custom field logic on the information or payment pages - Any bespoke messaging that told the customer why a discount did or did not apply None of that math is wrong. It just has nowhere to render after August 13 unless it moves to a checkout UI extension. ## The migration checklist Work top to bottom. Do not skip the audit step; you cannot migrate what you have not inventoried. | Step | Action | Done when | | --- | --- | --- | | 1. Confirm exposure | Check whether your store uses customizable checkout.liquid at all (Plus only) | You know if this applies to you | | 2. Inventory customizations | List every custom element on the information, shipping, and payment pages | You have a written list, not a memory | | 3. Flag discount-facing items | Mark which items communicate a discount (free shipping bar, threshold notice) | Discount messaging is separated out | | 4. Map to extensions | For each item, find the checkout UI extension or app block that replaces it | Every item has a target, or a decision to drop it | | 5. Rebuild in extensibility | Recreate the discount messaging as checkout UI extensions | The bar and notices render in preview | | 6. Test discount display | Run a test cart at, just below, and above each threshold | Messaging shows correctly at every tier | | 7. Test on mobile and Shop Pay | Verify rendering on mobile and through Shop Pay | Nothing is missing or misplaced | | 8. Publish before the deadline | Ship the new checkout before August 13, 2024 | Old checkout.liquid is no longer relied on | The step merchants skip is number 6. Discount messaging has to be tested at the boundaries, exactly at the free shipping threshold and one dollar below it, because that is where a broken bar does the most damage. A customer who is told they need $15 more when they actually qualify will abandon. ## A worked scenario Say your old checkout ran a free shipping bar coded into checkout.liquid, tied to a $75 threshold. On August 13, the bar disappears, but the free shipping discount itself, if it runs through Functions, still applies at $75. So customers still get free shipping. They just lose the nudge that grew carts toward it. The revenue at risk is not the discount, it is the incremental order size the bar was producing. If that bar reliably pushed a slice of $60 carts up to $75, its silent disappearance is a quiet drag on average order value that will not show up as an error anywhere. That is why presentation deserves the same migration urgency as anything that throws a visible failure. ## What to do if you are not on Plus If you were never on Shopify Plus, you never had checkout.liquid to customize, and this deadline does not create work for you. But it does carry a lesson worth internalizing: the durable way to run checkout discounting is to keep the calculation in Shopify Functions and the display in supported checkout extensions. Both survive platform migrations by design. Hand-coded template hacks do not. ## Setting this up with Discount Prime Discount Prime runs entirely through Shopify Functions and checkout extensibility, so [volume discounts](/volume-discounts) and [free shipping thresholds](/free-shipping) calculate server-side and their messaging renders in supported checkout slots. The August 13 migration does not touch how our discounts apply, and the free shipping progress display moves with the modern checkout, not against it. For the wider platform context, see our read on [Shopify Editions Summer '24](/blog/shopify-editions-summer-24-pricing-and-discounts) and the earlier [Shopify Editions Winter '24](/blog/shopify-editions-winter-24-for-discount-merchants) roundup. --- ## Customer Tags Are Underrated: Segment-Based Pricing on Shopify URL: https://www.discountprime.app/blog/customer-tags-are-underrated-segment-based-pricing Category: B2B & Wholesale | Author: Discount Prime Team | Published: July 23, 2024 | Updated: July 15, 2026 | Read time: 5 min | Tags: customer-tags, b2b, segment-pricing, wholesale, vip-pricing > Customer tags are a free, native Shopify field that turns a flat store into a segmented one. Tag a customer as VIP, wholesale, or staff, then attach a price rule to that tag so each segment sees its own pricing automatically at checkout, with no separate storefront, no shared codes, and no leaked discounts. *Every Shopify store already has a segmentation engine built in. It is called the customer tag, it costs nothing, and most stores use it to file people rather than to price them.* If you want to charge a wholesale buyer one price, a VIP customer another, and a staff member a third, without spinning up a separate storefront or upgrading your plan, the answer is almost always customer tags. Tag the customer, attach a price rule to the tag, and each segment sees its own pricing automatically when they are logged in. That is the whole idea, and it is more powerful than most merchants realize. This post covers what customer tags can and cannot do on their own, the segments worth building first, and how to keep segment pricing from leaking to people who should not have it. ## What a customer tag actually is A customer tag is a plain-text label on a customer record in your Shopify admin: `vip`, `wholesale`, `staff`, `net30`, whatever you decide. You can add tags manually, in bulk through import, or automatically with flows and rules. Shopify uses the same tags to build customer segments for marketing. On their own, tags do nothing to price. They are just labels. The pricing happens when you pair a tag with a discount engine that can read it as a condition. With an app built on Shopify Functions, a tag becomes a trigger: if the logged-in customer carries this tag, apply this price. The tag is the who; the price rule is the what. ## Why tags beat codes for ongoing segments Merchants often reach for a discount code to handle VIP or wholesale pricing. For a one-time promotion, fine. For a standing relationship, codes are the wrong tool, and it comes down to control. | | Discount code | Customer tag | | --- | --- | --- | | Who can use it | Anyone who has the code | Only the tagged, logged-in customer | | Leak risk | High, codes get shared and posted | Low, tied to a verified account | | Applies automatically | No, customer must enter it | Yes, at checkout for that customer | | Good for | Time-boxed promos, attribution | Ongoing VIP, wholesale, staff pricing | | Removes access | Reissue or expire the code | Remove the tag | The leak point is the whole story. A wholesale code that ends up on a coupon aggregator becomes a public wholesale storefront overnight. A wholesale tag cannot leak, because it lives on the account, not in a string a customer can paste to a friend. ## The three segments worth building first You do not need a taxonomy of twenty tags. Start with the three that pay for themselves. **VIP customers.** Your repeat buyers and highest-lifetime-value accounts. A modest standing discount, or early access to sales, tagged as `vip`, rewards loyalty without a public markdown. The margin math is favorable because these customers already convert; you are protecting a relationship, not buying a new one. **Wholesale and B2B accounts.** The classic case. Tag verified resellers as `wholesale` and give them their trade pricing automatically. This is how you run wholesale on a standard plan without a separate B2B storefront. Pair it with minimum quantities if your trade terms require case packs. **Staff and friends-and-family.** A `staff` tag with a defined discount keeps employee purchases clean, attributable, and off the public code system, where a staff code would inevitably escape. ## A worked example Say you sell a product at $40 retail with a fully loaded cost of $22, so retail margin is $18 per unit, or 45 percent. You want three segments: - **Retail:** $40, no tag, 45 percent margin. - **VIP (`vip`):** 10 percent off, $36, margin $14, or 39 percent. Still healthy, and it rewards your best repeat buyers. - **Wholesale (`wholesale`):** 30 percent off at a 6-unit minimum, $28 per unit, margin $6, or 21 percent, but at volume and with near-zero acquisition cost. The point of writing it out is that each segment has a different margin floor, and tags let you honor all three at once on the same catalog. A retail shopper never sees the wholesale price, and a wholesale buyer never has to hunt for a code. ## The mistakes that undo segment pricing **Tagging without a logged-in requirement.** Segment pricing should apply to authenticated customers. If a price can show to anyone, it is not a segment, it is a public discount. Gate the pricing behind the account. **Overlapping tags with conflicting prices.** If a customer is both `vip` and `wholesale`, decide in advance which wins. Ambiguity here is how a buyer accidentally gets the deepest of two discounts stacked. Set an explicit priority. **Stale tags.** A customer who leaves your wholesale program should lose the `wholesale` tag. Segment pricing is only as clean as your tag hygiene. Review tags on a schedule, especially after staff changes. **Forgetting the margin floor per segment.** As the worked example shows, each tier has its own floor. A discount that is safe for VIP may be underwater for wholesale once you add case-pack economics. Price each segment against its own cost, not a single blended number. ## Setting this up with Discount Prime Discount Prime reads Shopify customer tags natively and applies the right price automatically at checkout, on any plan, no separate storefront required. You define a price rule per tag for [B2B and customer-specific pricing](/b2b-pricing) or standing [wholesale pricing](/wholesale-pricing), and each segment sees only its own price. For the broader wholesale approach, see [wholesale pricing on Shopify without Shopify Plus](/blog/wholesale-pricing-on-shopify-without-shopify-plus), and for the feature launch itself, [new B2B and customer-specific pricing](/blog/new-b2b-and-customer-specific-pricing). --- ## Why We Said No: Three Feature Requests We Did Not Build (and One We Did) URL: https://www.discountprime.app/blog/why-we-said-no-three-feature-requests-we-did-not-build Category: Build in Public | Author: Discount Prime Team | Published: July 9, 2024 | Updated: July 15, 2026 | Read time: 4 min | Tags: build-in-public, roadmap, product, shopify-app > Saying no is how a small Shopify app stays focused. We turned down three common feature requests, a countdown-timer widget, unlimited stacking, and a full email tool, because each pulled us away from reliable native discounting. The one request we built was customer-specific pricing, because it fit the core job. *The hardest part of a roadmap is not the list of things you will build. It is the longer list of reasonable requests you decide, on purpose, to disappoint.* We get feature requests every week. Most are thoughtful, and many describe a real problem. But a small app cannot build everything and stay good at anything. So the roadmap is really a set of decisions about what not to do, and the discipline is being able to explain each no in one clear sentence. Here are three requests we turned down this year, the reasoning behind each, and the one request we said yes to, so you can see the filter we actually use. ## The filter: does it make the core job more reliable? Our core job is narrow on purpose: run native discount and pricing logic through Shopify Functions so it applies correctly in cart and checkout, on any plan, without hurting margin. Every request gets held up against that sentence. If a feature makes that job more complete or more reliable, it is a candidate. If it adds a new, loosely related surface, the answer trends toward no, even when the request is popular. This is not about being minimalist for its own sake. It is that every feature you ship is a feature you maintain, support, and reason about forever, including during BFCM at 2am. Scope is a liability with a long tail. ## No 1: the countdown timer widget The request: add an urgency countdown timer to product and cart pages to pressure customers toward the sale. Why we said no: it is a storefront theme and conversion-optimization job, not a discount-engine job. Timers live in the theme, need design control to match a brand, and are handled well by a whole category of dedicated apps. If we built a mediocre timer, we would own a support burden for pixels and CSS that has nothing to do with whether a discount calculates correctly. The two problems do not share a spine. The honest version of the no: a timer would help us look fuller in the App Store screenshots, and that is exactly the wrong reason to build something. ## No 2: unlimited discount stacking The request: let every discount stack on top of every other one automatically, with no limits. Why we said no: this one is not just off-scope, it is actively harmful. Uncontrolled stacking is how a planned 20 percent quietly becomes an actual 40 percent when a volume tier, a code, and a shipping offer all land on the same cart. The value we provide is the opposite of unlimited: deliberate combination control, so you decide exactly what stacks with what. Building a switch that removes that control would undercut the reason the product exists. We covered the mechanics of this in [our guide to how discount combinations work](/blog/discount-stacking-on-shopify-how-combinations-work) if you want the full picture. ## No 3: a built-in email marketing tool The request: send discount announcement emails directly from the app. Why we said no: email marketing is a deep discipline with mature, dedicated tools, deliverability, segmentation, templates, compliance, and a decade of refinement behind them. A discount app that bolts on a thin email feature does two jobs worse instead of one job well. The better service to a merchant is to make our discounts easy to reference from the email tool they already trust, not to compete with it badly. ## The one we said yes to: customer-specific pricing Now the yes. Enough merchants kept describing the same wall: they wanted different prices for wholesale accounts, VIP customers, and staff, without standing up a separate wholesale storefront or upgrading a plan for it. That request passed all three tests. - **Many merchants hit the same wall.** Wholesale and VIP pricing came up constantly, across very different store types. - **It sits inside the core job.** Customer-specific pricing is still discount and pricing logic running through Functions. Same spine, wider reach. - **It makes existing features more useful.** Volume tiers and pricing rules become far more powerful once you can scope them to a customer segment. So we built it, and it shipped in May. You can read the launch note for [B2B and customer-specific pricing](/blog/new-b2b-and-customer-specific-pricing), or see how it works on the [B2B pricing](/b2b-pricing) page. ## How to read a no from any tool you use If a tool you rely on turns down a feature you asked for, the useful question is not whether they were nice about it. It is whether their no is consistent with a clear core job. A vendor that says yes to everything is a vendor whose product will eventually be a confused pile of half-features, none of them dependable. The ones worth trusting can tell you what they will never build, and why. ## Setting this up with Discount Prime If you want to see what we did choose to build, the [volume discounts](/volume-discounts) engine and customer-specific pricing are the core of it, and the current thinking lives on our [public roadmap](/roadmap). For more on how merchant conversations shape those calls, see [what 100 support conversations taught us](/blog/what-100-support-conversations-taught-us) and our [one year of building Discount Prime](/blog/one-year-of-building-discount-prime) retrospective. --- ## Shopify Editions Summer '24: The Quiet Wins for Pricing and Discounts URL: https://www.discountprime.app/blog/shopify-editions-summer-24-pricing-and-discounts Category: Ecosystem & Platform | Author: Discount Prime Team | Published: June 25, 2024 | Updated: July 15, 2026 | Read time: 5 min | Tags: shopify-editions, ecosystem, pricing, discounts, checkout > Shopify Editions Summer '24 landed on June 24, 2024. For pricing and discount merchants, the durable signals are continued investment in Shopify Functions, the push toward checkout extensibility ahead of the August 13 checkout.liquid deadline, and deeper native B2B tooling. Read releases for what they enable, not the demo reel. *The useful way to read a Shopify Editions release is to ignore the sizzle reel and ask one question: what can I now build that I could not build last week?* Shopify Editions Summer '24 arrived on June 24, 2024. If you run pricing and discounts for a store, most of the launch coverage is not written for you. It is written for the keynote. This post filters the release down to the parts that change how you set prices, structure offers, and survive checkout, and skips the rest. The short version: there is no single headline feature that rewrites discounting overnight. The signal is in the direction of travel. Shopify keeps pushing capability out of the Plus tier and into Functions and checkout extensibility, and that is quietly the best news a discount-focused merchant can get. ## What Shopify Editions actually is Shopify Editions is a twice-yearly release event, one in summer and one in winter, where Shopify bundles a season of platform work into a single searchable site. Some items are live on release day, some are in developer preview, and some are directional. Treating every card as shippable today is the most common mistake merchants make reading it. For our purposes, the categories worth scanning are checkout, discounts and pricing primitives, B2B, and anything touching Shopify Functions. Everything else, from storefront design to shipping label workflows, matters to someone, just not to the person deciding whether to run a buy-more-save-more offer this quarter. ## The three threads that matter for pricing ### 1. Functions keeps getting deeper Shopify Functions, introduced in 2022, is the native extension point that lets apps insert custom logic into Shopify's own discount engine. It is the reason a volume discount can now apply in cart and checkout without duplicate variants or Shopify Scripts. Every Editions release since has widened what Functions can touch, and Summer '24 continues that pattern. Why you should care: the deeper Functions goes, the more your discount logic behaves like a first-class part of Shopify instead of a bolt-on. Discounts calculate server-side, respect the combinations rules, and show up correctly in checkout. That reliability is worth more during a high-traffic weekend than any single flashy offer type. ### 2. Checkout extensibility is now the main road The clearest time-sensitive item around this release is not in the highlight reel. It is the deadline. Shopify's checkout.liquid, the old customizable checkout for the information, shipping, and payment pages, is deprecated as of August 13, 2024. After that, those customizations need to live in checkout extensibility instead. If your store still runs a legacy checkout.liquid customization, that migration outranks anything else in Summer '24 on your to-do list. It affects how free shipping messaging, cart notices, and upsell blocks render at the exact moment a customer is deciding to pay. We wrote a full checklist for this in [our checkout.liquid migration guide](/blog/checkout-liquid-is-going-away-august-13-deadline). ### 3. Native B2B keeps expanding Shopify continues to invest in native B2B and wholesale tooling, and Summer '24 is part of that arc. Customer-specific pricing, company accounts, and catalog-level pricing are steadily becoming standard platform capabilities rather than Plus-only add-ons. This matters even if you are purely direct-to-consumer today, because the same primitives, customer tags, catalogs, and price lists, are what let you run VIP pricing, employee pricing, and early-access tiers without a separate storefront. ## A worked read: turning a release card into a decision Suppose an Editions card announces improved checkout customization. The low-value response is to bookmark it. The high-value response looks like this: | Question | Answer for your store | | --- | --- | | Does it touch a page my discounts appear on? | Yes, free shipping progress shows at checkout | | Is there a deadline attached? | Yes, checkout.liquid ends August 13, 2024 | | Does it need Plus? | No, extensibility works across plans | | What would I ship because of it? | Migrate the free shipping bar to an extension | | What is the cost of ignoring it? | Broken checkout messaging after the deadline | Run that table against every card that looks relevant. Two or three will produce real action items. The rest are context, and context is fine, but do not confuse it with work. ## What did not change (and that is good) Your fundamentals are untouched by any Editions release. Volume discounts still reward larger orders. Free shipping thresholds still need to sit above your average order value to protect margin. Tiered and customer-specific pricing still work through tags and price rules. Editions gives you better rails; it does not change the physics of a discount. The stores that get the most out of a release are not the ones that adopt the most features. They are the ones that already had a clear pricing strategy and used the release to execute it more reliably. ## Setting this up with Discount Prime Discount Prime is built on Shopify Functions and runs inside checkout extensibility, so the platform direction in Summer '24 is the direction we already ship on. You can run native [free shipping thresholds](/free-shipping) and [B2B and customer-specific pricing](/b2b-pricing) on any plan, and they stay correct through the checkout migration. If you are auditing what Summer '24 means for your offers, that is a good place to start. For the previous release, see our read on [Shopify Editions Winter '24](/blog/shopify-editions-winter-24-for-discount-merchants), and for the B2B pricing launch itself, see [B2B and customer-specific pricing in Discount Prime](/blog/new-b2b-and-customer-specific-pricing). --- ## How to Run a Sale Without Training Customers to Wait for Sales URL: https://www.discountprime.app/blog/how-to-run-a-sale-without-training-customers-to-wait Category: Profit & Strategy | Author: Discount Prime Team | Published: June 11, 2024 | Updated: July 15, 2026 | Read time: 6 min | Tags: discount-strategy, profit, sale-cadence, segmentation, pricing-strategy > Frequent, predictable sitewide sales train customers to wait, eroding full-price sell-through and resetting the reference price they expect to pay. A durable discount strategy controls cadence, favors segmented and behavior-based offers over storewide markdowns, and reserves deep discounts for goals like clearance. The J.C. Penney reversal shows the danger of changing the pattern carelessly. *A discount teaches. The question is only what it teaches: buy now, or wait for the next one.* Every promotion sends a lesson to your customers, whether you intend it or not. Run sales rarely and for a reason, and you teach people that buying now is smart. Run them constantly and predictably, and you teach the opposite: that full price is for suckers and a better deal is always a week away. This post is about staying on the right side of that line, running effective sales without conditioning your customers to stop paying full price. The core move is simple to state and hard to hold to. Control your cadence so sales stay unpredictable, and favor segmented, behavior-based offers over constant sitewide markdowns. Do that and discounts pull orders forward. Skip it and discounts just relocate orders you would have gotten anyway to a lower price. ## What "training customers to wait" actually means Two things happen when you discount on a predictable rhythm. First, you erode your **reference price**, the amount a customer believes the product is worth, formed mostly from what they have seen it sell for. Show a product at 25 percent off often enough and the discounted price becomes the price in the customer's mind. Full price starts to feel like a markup, not a baseline. You have not run a sale, you have quietly relabeled your list price as aspirational. Second, you activate **loss aversion** against yourself. Once customers learn your rhythm, buying at full price feels like losing the deal they know is coming. A rational shopper who has seen your monthly sale will simply wait for it. You have converted patient customers into discount-only customers, and impatient ones into people who feel cheated when they miss the window. The combined result is falling full-price sell-through. More of your revenue arrives at a discount, your average margin sags, and the sale stops being a lever and becomes a tax. ## The J.C. Penney cautionary tale The most expensive lesson in modern retail pricing is J.C. Penney's, and it cuts both ways. For years, J.C. Penney ran on constant coupons and near-permanent sales. Shoppers were trained, thoroughly, to never pay the marked price. In 2012, a new CEO, Ron Johnson, tried to fix this in one move: he scrapped the coupons and the endless sales and replaced them with straightforward everyday low prices. On paper, customers were often paying the same or less. In practice, sales collapsed. The shoppers who had been conditioned to hunt for markdowns did not feel they were getting fair prices, they felt they had lost the game they came to play. The company reversed course, but the damage was severe. The lesson has two edges. Over-discounting trains customers into a habit that is genuinely hard to break. And once they are trained, yanking the discounts away abruptly is its own disaster. The time to manage your cadence is before you have taught the wrong rhythm, not after. ## Cadence: make the sale unpredictable and earned You do not need to stop discounting. You need to stop being predictable about it. **Tie every sale to a reason.** A season, a clearance, a product launch, a genuine occasion. A reason makes the sale feel like an event rather than a schedule. "End of summer" teaches nothing about next month. "The 15th of every month" teaches everything. **Vary the pattern.** If a customer can predict your next storewide sale from memory, it is too regular. Move the timing, the depth, and the mechanic so there is no rhythm to learn. **Reserve depth for a job.** Deep discounts should do specific work, clearing dead stock, hitting a seasonal reset, moving a discontinued line. A deep markdown with no job behind it is just margin you gave away and a lower reference price you now have to live with. ## Segment instead of going sitewide The single most useful habit for avoiding the training problem: stop making your discounts public and constant. Segment them. A sitewide sale teaches your entire customer base at once. A segmented offer teaches only the segment, and only for the behavior you want to reward. Some patterns that pull orders forward without conditioning everyone: - **Behavior-based**: reward buying more, not just buying. [Volume discounts](/volume-discounts) and [tiered pricing](/tiered-pricing) lower the price only when a customer concentrates spending in one order, so you are buying incremental units, not subsidizing existing ones. Automatic tiers can run always-on without teaching anyone to wait, because the deal is the structure, not an event. - **Group-based**: give trade accounts, VIPs, or subscribers their own pricing through [customer-specific pricing](/b2b-pricing). Because the offer is gated to a tag and never public, it rewards a defined relationship without lowering the reference price for your whole audience. - **Trigger-based**: first-order or win-back offers reach a specific customer at a specific moment, not the whole store on a calendar. Segmentation is the structural answer to the cadence problem. It lets you discount continuously in some corners while your default catalog holds full price for everyone else. ## A worked comparison Say you sell a $50 product with 50 percent gross margin, and you move 1,000 units a month. Compare two twelve-month strategies. | Strategy | Pattern | Effect on reference price | Effect on full-price sell-through | | --- | --- | --- | --- | | Predictable sitewide | 20% off, first week of every month | Falls toward the sale price | Drops, buyers wait for the window | | Segmented and varied | Always-on volume tiers, occasional reason-based events | Holds near list | Holds, with incremental volume on top | The first strategy looks busy and generous. Within a few months, a growing share of the 1,000 units sells only in the discount week, and the other three weeks soften as customers learn to wait. The second keeps list price intact for the default buyer while volume tiers and segment offers lift orders at the edges. Same discount budget, opposite lesson taught. ## Choosing offers instead of markdowns If you are deciding between an automatic structural offer and a coded event, our guide to [automatic discounts versus discount codes](/blog/automatic-discounts-vs-discount-codes-which-converts-better) covers the tradeoffs. And if you are designing the price ladder itself, [how to structure pricing tiers customers understand](/blog/tiered-pricing-on-shopify-structure-tiers-customers-understand) walks through depth and anchoring. The through-line is the same: prefer offers that reward a behavior over sales that reward waiting. ## Setting this up with Discount Prime Discount Prime is built for the structural side of this. [Volume and tiered pricing](/tiered-pricing) let you run always-on, behavior-based offers that lift order size without teaching anyone to wait, and [B2B and customer-specific pricing](/b2b-pricing) keeps deeper deals gated to the segments that earn them. Use scheduled, reason-based events sparingly on top. The result is a store that can discount all year and still protect the price customers believe your products are worth. --- ## New: B2B and Customer-Specific Pricing in Discount Prime URL: https://www.discountprime.app/blog/new-b2b-and-customer-specific-pricing Category: B2B & Wholesale | Author: Discount Prime Team | Published: May 21, 2024 | Updated: July 15, 2026 | Read time: 4 min | Tags: b2b-pricing, wholesale, shopify, customer-tags, product-update > Discount Prime now offers B2B and customer-specific pricing on Shopify. Tag a customer group, set a price rule that applies only to those accounts, and layer volume tiers on top, all through Shopify Functions on any plan. Approved buyers see their own pricing when logged in, retail shoppers see standard prices, with no Shopify Plus required. *The most requested feature in our support inbox for six months was the ability to say: this customer pays a different price.* Today Discount Prime adds B2B and customer-specific pricing. You can now set prices that apply only to specific customer groups, tagged wholesale accounts, VIPs, employees, or any segment you define, and layer your existing volume tiers on top. It runs through Shopify Functions, which means it works on every plan. No Shopify Plus, no separate wholesale store, no public code. This is the feature we spent the first year hearing about and the last stretch building. Here is what it does and how to set it up. ## What shipped Customer-specific pricing in Discount Prime is tag-driven. The building block is simple: a price rule that only fires when the logged-in customer carries a tag you choose. - **Tag-gated pricing.** Point a rule at a customer tag like `wholesale` or `vip`. Only tagged, logged-in accounts get that price. Everyone else sees standard pricing. - **Account-level wholesale rates.** Give your trade accounts a base discount off retail, set from cost up, not from retail down. - **Volume tiers on top.** Combine the tag gate with a quantity ladder so wholesale buyers get deeper pricing at case quantities. - **No leakage.** Because pricing is tied to the account, not to a code, there is nothing to post on a coupon site. The wholesale price does not exist for anyone who is not approved and tagged. - **Any plan.** It is built on Functions, so it applies natively in cart and checkout without the Plus-only B2B tooling. Two weeks ago we published a guide on doing [wholesale pricing without Shopify Plus](/blog/wholesale-pricing-on-shopify-without-shopify-plus) using customer tags. This feature is that approach, built into the app so you do not have to assemble it yourself. ## How to set it up Setup takes a few minutes if your accounts are already tagged. 1. **Tag your accounts.** Approve wholesale applicants and add a tag such as `wholesale`. Tag VIPs or employees the same way if you run those segments. 2. **Create a customer-specific rule.** In Discount Prime, create a price rule and target it to that tag. 3. **Set the rate from cost.** Decide the base discount against your fully loaded cost, so trade pricing stays profitable. 4. **Add volume tiers (optional).** Layer a quantity ladder for case-quantity breaks. B2B buyers expect depth, so more tiers are fine here than in a retail offer. 5. **Set what combines.** Decide whether the rule can stack with any public promotions, and configure it, so a tagged account cannot accidentally take a wholesale rate plus a sitewide code. The rule applies automatically for tagged, logged-in customers. Retail shoppers see standard pricing without any change to their experience. ## A quick example Say a product retails at $40 against a $22 cost. You want wholesale accounts to pay 30 percent less as a base, with a further break at a case of 12. | Buyer | Condition | Price per unit | Margin per unit | | --- | --- | --- | --- | | Retail | Standard price | $40.00 | $18.00 (45%) | | Wholesale, under 12 | Tagged `wholesale` | $28.00 | $6.00 (21%) | | Wholesale, 12 or more | Tagged, case quantity | $26.00 | $4.00 (15%) | The retail shopper never sees the $28 price. The wholesale account gets its base rate the moment it logs in, and the case break stacks on top, exactly the layered structure the manual tag approach produced, now handled by the app. ## Why we built it this way We could have waited for a heavier B2B system with company hierarchies and net terms. We chose the tag-based version first because it solves the actual problem most non-Plus merchants brought to us: show my approved buyers their own prices, on the plan I am already paying for. Tags are something merchants already understand, Functions makes them apply natively, and the result is account pricing without a platform upgrade or a second store. It also composes cleanly with what you already run. Your [tiered pricing](/tiered-pricing) ladders and volume tiers do not go away. Customer-specific pricing adds a *who* on top of the existing *how much*, and the two work together. If you have not built your quantity ladder yet, our guide to [structuring tiers customers understand](/blog/tiered-pricing-on-shopify-structure-tiers-customers-understand) covers depth and anchoring. ## Setting this up with Discount Prime If you sell to trade buyers, VIPs, or any segment that should see its own prices, [B2B and customer-specific pricing](/b2b-pricing) is live now. Start by tagging your approved accounts, set your rates from cost up, and layer volume tiers where quantity matters. For the full tag-based method and the thinking behind it, our [wholesale pricing without Plus](/wholesale-pricing) guide walks through every step. Install Discount Prime from the Shopify App Store and give your best customers the pricing they have been asking you for. --- ## Wholesale Pricing on Shopify Without Shopify Plus URL: https://www.discountprime.app/blog/wholesale-pricing-on-shopify-without-shopify-plus Category: B2B & Wholesale | Author: Discount Prime Team | Published: May 7, 2024 | Updated: July 15, 2026 | Read time: 5 min | Tags: wholesale, b2b-pricing, shopify, customer-tags, pricing-strategy > You can run wholesale pricing on Shopify without Shopify Plus by using customer tags to identify trade accounts and applying tag-based price rules through Shopify Functions. Tag approved buyers, gate a wholesale offer to that tag, and layer volume tiers on top. This gives account-specific pricing on any plan, without the native B2B tools that Plus reserves. *Wholesale on Shopify has a reputation for meaning "upgrade to Plus." It does not have to.* If you sell to both retail shoppers and trade buyers, you need two prices for the same product shown to two different people. Shopify Plus offers a native B2B system for exactly this, but Plus is a significant jump in cost, and most growing wholesalers are not ready for it. The good news: you can give approved buyers their own pricing on any Shopify plan using customer tags and Functions-based discount rules. This guide walks through how. The short answer is this. Tag your wholesale customers, apply a pricing rule that only fires for accounts carrying that tag, and layer volume tiers on top. Approved buyers see wholesale prices when logged in. Retail shoppers see standard prices. No Plus, no second store, no public code that leaks. ## Why wholesale feels locked behind Plus Shopify's native B2B features, company accounts, published price lists, and net terms, are reserved for Plus. That is real, and it is why the search "wholesale pricing Shopify without Plus" exists at all. But those features are a convenience layer over a simpler idea: show different prices to different customers based on who they are. You can reproduce the essential outcome without the native tooling. The mechanism is the customer tag. ## How tag-based wholesale pricing works A **customer tag** is just a label on a customer account, like `wholesale` or `trade`. Shopify lets you tag accounts manually or through an approval flow. Once an account is tagged, you can apply a pricing rule that only fires when the logged-in customer carries that tag. Here is the flow end to end: 1. **Collect wholesale applications.** Use a simple form or a dedicated account request so you approve buyers rather than letting anyone self-select into trade pricing. 2. **Tag approved accounts.** Add a `wholesale` tag to each approved customer. This is the gate. 3. **Build a tag-gated pricing rule.** Create a discount that only applies to customers with the `wholesale` tag. On modern Shopify this runs through Shopify Functions, so it works on any plan, not just Plus, and it replaces the old Plus-only Scripts approach. 4. **Layer volume tiers on top.** Wholesale buyers purchase in quantity, so combine the tag gate with a volume schedule. A trade account gets both its base wholesale rate and deeper pricing at case quantities. Because the offer is tied to the account, not to a code, there is nothing to post on a coupon site. The wholesale price simply does not exist for anyone who is not logged in and tagged. ## A worked example Say a product retails at $40 with a cost of $22, so retail margin is 45 percent. You want trade buyers to get 30 percent off as a base, with an extra break at a case of 12. | Buyer | Condition | Price per unit | Margin per unit | | --- | --- | --- | --- | | Retail | Public price | $40.00 | $18.00 (45%) | | Wholesale, 1 to 11 | Tagged `wholesale` | $28.00 | $6.00 (21%) | | Wholesale, 12 or more | Tagged, case quantity | $26.00 | $4.00 (15%) | Two things to notice. First, the retail shopper never sees the $28 price, because the rule only fires for tagged accounts. Second, the wholesale margin still clears cost at every tier. That second point is the whole discipline of wholesale: your trade prices are lower, but they are set from cost up, not from retail down. A wholesale rate that dips below your fully loaded cost turns your best-volume accounts into losses. ## Tag-based wholesale versus a separate store The other common answer to wholesale on Shopify is a second, password-gated store or an "expansion store." That works, but it is heavier: two catalogs to keep in sync, two sets of inventory, two checkouts, two things to break. Tag-based pricing keeps everything in one store. Retail and wholesale buyers shop the same catalog, and the price each one sees is decided by their tag. For most wholesalers under Plus, the single-store, tag-gated approach is simpler to run and easier to keep consistent. Reserve the separate-store pattern for cases where the wholesale catalog is genuinely different from retail. ## Where volume tiers fit Wholesale and volume pricing are close cousins, and the strongest setups use both. The tag decides *who* gets trade pricing. The [volume tiers](/volume-discounts) decide *how much* they save as the order grows. If you have not designed your quantity ladder yet, our guide to [tiered pricing on Shopify](/blog/tiered-pricing-on-shopify-structure-tiers-customers-understand) covers depth and breakpoints, and B2B buyers can carry more tiers than retail because they expect a volume schedule. ## What to get right before you launch **Approve before you tag.** The tag is the gate, so guard it. Do not let visitors self-assign wholesale pricing. **Set prices from cost, not from retail.** Decide each wholesale tier against fully loaded cost. Discounting down from your retail price is how trade accounts quietly become unprofitable. **Decide what combines.** A tag-gated wholesale rule that also stacks with a public sitewide code can discount far past your floor. Set your combination rules deliberately. **Handle net terms separately.** Tag-based pricing sets the price. It does not by itself grant net-30 payment. If you offer terms, handle that through your order and invoicing process. ## Setting this up with Discount Prime Discount Prime runs [volume and tiered pricing](/wholesale-pricing) natively through Shopify Functions on any plan, so the quantity side of your wholesale ladder is ready today without Plus. Account-specific, tag-gated [customer pricing](/b2b-pricing) is the natural next layer, and it is exactly where we are heading next. Our follow-up post on [B2B and customer-specific pricing](/blog/new-b2b-and-customer-specific-pricing) covers that approach in full. If you are selling wholesale on a non-Plus plan, start by mapping your tags and your cost-up tiers, and the tooling will meet you there. --- ## Automatic Discounts vs Discount Codes: Which Converts Better? URL: https://www.discountprime.app/blog/automatic-discounts-vs-discount-codes-which-converts-better Category: Discounts & Promotions | Author: Discount Prime Team | Published: April 23, 2024 | Updated: July 15, 2026 | Read time: 6 min | Tags: discount-codes, automatic-discounts, shopify, conversion, discount-strategy > Automatic discounts apply themselves in cart with no code to enter, which lowers friction and abandonment but sacrifices attribution and channel control. Discount codes track campaigns and gate offers to segments but add a friction step and risk leaking to coupon sites. Use automatic for storewide and volume offers, codes for measurable, targeted, or gated campaigns. *The empty coupon field at checkout is one of the most expensive boxes in ecommerce. Half the customers who see it leave to go find a code.* Automatic discounts and discount codes do the same job, they lower a price, but they behave differently at the two moments that matter: when the customer decides to buy, and when you try to figure out whether the promotion worked. Neither is universally better. The right answer depends on whether you value friction reduction or campaign control more for a given offer. Here is the short version. Automatic discounts apply themselves the instant the cart qualifies, so they remove the friction step and the "search for a coupon" detour, which usually helps conversion. Discount codes give you a token you can track, gate, and hand out per channel, which usually helps everything downstream of the sale. Choose based on what the specific promotion needs to do. ## What each one is An **automatic discount** applies without any action from the customer. You set a condition, such as "10 percent off orders over $75" or a quantity tier, and Shopify applies it in the cart for anyone who qualifies. There is no field to fill, no code to remember, nothing to leak. A **discount code** is a token the customer enters at checkout, or arrives with pre-applied from a link. The code is the point. It lets you tie the discount to a campaign, restrict it to a segment, cap its uses, and run different offers on different channels at the same time. Both run through the same underlying discount engine on Shopify. On modern stores, custom logic for either one is powered by Shopify Functions, which is why quantity tiers and storewide offers can apply automatically on any plan without Scripts. ## The friction difference The strongest argument for automatic discounts is the coupon field itself. When a customer sees an empty "discount code" box at checkout and does not have a code, a meaningful share of them pause, open a new tab, and go looking. Some come back. Some find a better code on a deal site. Some get distracted and never return. The box advertises that a discount exists and then makes the customer feel like they are missing it. An automatic discount removes that entire loop. The price is already lower when they reach checkout, and there is nothing to hunt for. Codes have the opposite dynamic, and it can work in your favor. A customer who arrives from your email with a code already in hand feels like they earned something specific. The code makes the offer feel personal and deliberate rather than available to everyone. The friction is real, but so is the sense of a deal claimed rather than a discount stumbled into. ## The attribution difference This is where codes pull ahead. A code is a label. When an order used `SPRING20`, you know which campaign, email, or influencer drove it. You can run `PODCAST15` and `NEWSLETTER15` at the same time and tell them apart. Automatic discounts have no such tag. Anyone who qualifies gets the offer, so you cannot separate the customer who came for the promotion from the one who would have bought anyway. For a storewide "spend more, save more" mechanic, that ambiguity does not matter much, because the offer is the store policy, not a campaign. For a targeted push you want to measure and repeat, the code's trackability is the whole point. ## The leak-risk difference A public code can travel. Post it once and it can end up on a coupon aggregator, in a Reddit thread, or in a browser extension that auto-tries codes at checkout. Now the discount you built for newsletter subscribers is discounting orders from people who never subscribed. Automatic discounts cannot leak this way, because there is no code to share. If you need an offer to stay inside a segment, that is an argument for either a gated code or a targeted automatic discount, not a public code. ## Side by side | Dimension | Automatic discount | Discount code | | --- | --- | --- | | Customer effort | None, applies in cart | Must enter or click a code | | Checkout friction | Low, no empty coupon field | Higher, prompts code-hunting | | Attribution | Weak, no per-campaign token | Strong, one token per campaign | | Gating to a segment | Only by cart conditions | Easy, restrict code to a group | | Leak risk | None, nothing to share | Real, public codes travel | | Best for | Storewide, volume, and tiered offers | Targeted, measurable, gated campaigns | | Feels like | Store policy | A deal you claimed | ## When to use each **Use automatic discounts** for offers that are really store policy: volume tiers, storewide thresholds, free shipping over a cart value, and [tiered pricing](/tiered-pricing) ladders. These reward behavior you want from everyone, so there is no reason to make the customer work for them, and no campaign to attribute. Our guides to [volume discounts](/volume-discounts) and [structuring tiers customers understand](/blog/tiered-pricing-on-shopify-structure-tiers-customers-understand) cover how these apply on the product page and in cart. **Use discount codes** when the token is doing real work: attributing a channel, gating an offer to subscribers or wholesale accounts, capping redemptions, or running several offers at once you need to tell apart. If you cannot answer "which campaign did this sale come from," you probably wanted a code. **Use both, deliberately.** Many stores run an automatic baseline (volume tiers, always on) and layer coded campaigns on top for specific pushes. The moment you do that, the combination settings matter. Shopify's [discount combinations](/blog/discount-stacking-on-shopify-how-combinations-work) let you decide whether a code can stack on top of an automatic offer. Set it on purpose, because an automatic tier that quietly combines with a forgotten code can discount far deeper than you intended. ## A quick worked example Say you run an always-on volume tier: buy 3, save 10 percent, applied automatically. Then you send a newsletter with `WELCOME15`. If those two combine, a subscriber buying 3 units gets 10 percent plus 15 percent, roughly 23.5 percent off, not 15. On a product with 40 percent gross margin, that is the difference between a healthy order and a thin one. The fix is not to avoid running both. It is to decide up front whether the code combines with the tier, and to configure that rather than discover it later. ## Setting this up with Discount Prime Discount Prime runs both models through Shopify's native engine. Volume and [tiered pricing](/tiered-pricing) offers apply automatically on the product page and in cart with no code to leak, and you control exactly what combines with what. Start with your always-on automatic tiers, then layer coded campaigns on top only where you need attribution or gating, and set the combination rules on purpose. --- ## One Year of Building Discount Prime URL: https://www.discountprime.app/blog/one-year-of-building-discount-prime Category: Build in Public | Author: Discount Prime Team | Published: April 9, 2024 | Updated: July 15, 2026 | Read time: 4 min | Tags: build-in-public, shopify, shopify-functions, product-development > Discount Prime is one year old, measured from its first commit in April 2023. The build ran roughly six months in development and six months live on the Shopify App Store. It shipped volume discounts, quantity breaks, free shipping, Buy X Get Y, and tiered pricing, with each release traced to a real merchant need. *A year ago this codebase was one commit and a strong opinion about how Shopify discounts should work.* Discount Prime is one year old this week, counting from the first commit in April 2023, not from the public launch. Those are two different anniversaries, and the gap between them is most of the story. Roughly six months went into building before anyone could install the app, and roughly six months have passed since it went live on the Shopify App Store. This is a short, honest look at both halves. ## The first six months: building toward one bet The whole app rests on a single early decision: build on Shopify Functions, not Shopify Scripts. Scripts was the established way to write custom discount logic, but it was limited to Shopify Plus and it was clearly on borrowed time. Functions was newer, thinner on documentation, and worked on every plan. We bet that a discount app most merchants could actually install was worth more than one that only Plus stores could run. Six months of building went into making [volume discounts](/volume-discounts) and [quantity breaks](/quantity-breaks) apply natively in cart and checkout through that engine, without duplicate variants and without a Plus requirement. That first version did two things and did them properly. It was tempting to launch with more. Shipping less turned out to be the right call, because it meant the surface we had to support at launch was small. ## The launch: six weeks before BFCM We went live on the App Store about six weeks before our first BFCM, which was either brave or careless depending on the week you asked. We wrote the honest version of that decision in [we launched a discount app six weeks before BFCM](/blog/we-launched-a-discount-app-six-weeks-before-bfcm), and the short summary is that it worked, but we would not casually recommend the timing. Peak traffic is a bad time to discover your edges. The launch itself is documented in [Discount Prime is live on the Shopify App Store](/blog/discount-prime-is-live-on-the-shopify-app-store). The more interesting part is what happened after. ## The live six months: the roadmap wrote itself We did not launch with a fixed feature roadmap, and that turned out to be a feature, not a bug. Every release since came from the same source: merchants describing the same workaround enough times that it stopped being a request and started being obvious. - **Free shipping discounts with a progress bar** shipped in December, because merchants running volume deals kept asking how to pair them with a shipping threshold. - **Buy X Get Y** shipped in February, because BOGO requests were the most common thing in our inbox that the app could not yet do. - **Tiered pricing** shipped in March, because merchants who had outgrown a single quantity break wanted a real price ladder, and wholesale sellers wanted depth. None of these was on a whiteboard a year ago. They came from support conversations, which we now treat as the most reliable product signal we have. ## What a year taught us Three things stand out. **Narrow scope is a moat, not a limitation.** The app does discounts and pricing. It does not try to be an email tool or an analytics suite or a page builder. Every time we were tempted to widen, staying narrow kept the app understandable, and understandable is what gets kept after install. **Support is the roadmap.** The features that landed best were the ones we did not think of first. Merchants did. Our job was mostly to notice the pattern and resist the urge to build the clever version of a problem nobody actually had. **The platform bet compounds.** Building on Functions meant the year's platform shifts toward checkout extensibility mostly happened to other apps, not to us. A good foundational decision keeps paying quietly, long after you have stopped congratulating yourself for it. ## What year two looks like The theme for the coming year is measurement and margin. Merchants can now run sophisticated campaigns, but knowing which ones actually made money is a different problem, and it is the one we want to solve next. If year one was about giving stores more ways to discount, year two is about making sure each discount can prove it earned its place. To everyone who installed the app, filed a bug, or told us plainly that something was confusing: thank you. A year in, the app is shaped more by your messages than by our original plan, and that is exactly how it should be. --- ## Tiered Pricing on Shopify: How to Structure Tiers Customers Understand URL: https://www.discountprime.app/blog/tiered-pricing-on-shopify-structure-tiers-customers-understand Category: Discounts & Promotions | Author: Discount Prime Team | Published: March 26, 2024 | Updated: July 15, 2026 | Read time: 6 min | Tags: tiered-pricing, shopify, pricing-strategy, volume-discounts, price-anchoring > Tiered pricing on Shopify lowers the price as quantity or spend rises across defined breaks. Three tiers convert better than five because each tier adds a decision. Anchor the middle tier to your target order, keep the deepest tier above your margin floor, and give B2B more depth than B2C. *The problem with most pricing tables is not the prices. It is that the customer has to do arithmetic to understand them.* Tiered pricing is a schedule of prices that get better as the customer buys more, either more units or more dollars. Done well, it lifts average order value and rewards your best customers without a code. Done badly, it turns your product page into a spreadsheet nobody reads. This guide is about the difference. If you sell anything a customer might buy more than one of, you have already thought about tiers. The question is how to structure them so a buyer understands the offer in about two seconds and acts on it. That comes down to three things: how many tiers, where you place them, and how much you vary depth for consumer versus wholesale buyers. ## What tiered pricing actually is Tiered pricing sets a different price at each of several breakpoints. Buy 1 to 2 units at $20 each, 3 to 5 at $18, 6 or more at $16. The breakpoint can be a quantity, as above, or a cart total ("spend $200, save 10 percent"). Either way, the customer moves down a price ladder as their order grows. This is closely related to [volume discounts](/volume-discounts) and quantity breaks, and the terms overlap in everyday use. The useful distinction is intent. A quantity break is a single "buy more, save more" rule on one product. Tiered pricing is the broader structure, the whole ladder, and it often spans a collection or a customer group, not just one SKU. On Shopify, tiers used to mean either duplicate "3-pack" variants that fragment your inventory or Shopify Scripts, which only Plus stores could use. Shopify Functions changed that. Price tiers now apply natively in cart and checkout, on any plan, without cloning products. ## The three-tier rule Here is the single most useful constraint: for a consumer store, three tiers is the ceiling, and two is often plenty. Every tier you add is a decision you hand to the buyer. A person deciding between "1" and "buy 3, save" makes that call quickly. A person staring at 1, 3, 6, 12, and 24 options has to model their own consumption, compare five per-unit prices, and predict future need. Most people resolve that friction by picking the smallest option or leaving. More tiers feel generous to the merchant and read as work to the customer. Two or three tiers also make the offer legible at a glance, which matters because the offer has to be understood on the product page, before the cart. If a buyer cannot see the shape of the deal without scrolling or calculating, the deal is not doing its job. ## Where to place the tiers The tiers only work if they are anchored to real behavior. Setting them by instinct is how you end up rewarding orders that would have happened anyway. **Anchor the first tier just above typical behavior.** Look at your average line-item quantity. If most customers buy 2, set the first break at 3, not at 2. The first tier should stretch the order, not discount the default. **Make the middle tier the one you want people to choose.** In a three-tier layout, design the middle tier to be the target order and price it so it reads as the sensible pick. This is price anchoring: the top tier is there partly to make the middle look reasonable, a mild version of the decoy effect. Not everyone reaches the top tier, and that is fine. Its job is to frame. **Keep the deepest tier above your margin floor.** Know the fully loaded cost before you set the biggest break. A 25 percent discount on a product carrying 30 percent gross margin means your highest-volume customers are your least profitable orders, which is exactly backwards. ## A worked example Say you sell a $20 consumable. Cost of goods is $11, so gross margin at full price is 45 percent. Your average line-item quantity is 2. Here is a clean three-tier ladder. | Tier | Quantity | Price per unit | Discount | Margin per unit | | --- | --- | --- | --- | --- | | Base | 1 to 2 | $20.00 | 0% | $9.00 (45%) | | Middle | 3 to 5 | $18.00 | 10% | $7.00 (39%) | | Top | 6 or more | $16.00 | 20% | $5.00 (31%) | The first break sits at 3, just above the average of 2, so it pulls orders up rather than rewarding the default. The middle tier is the one you are steering toward, and even at the top tier you still clear 31 percent margin per unit, comfortably above zero. Contrast that with a lazy "buy 6, save 40 percent" break that would price the unit at $12, one dollar over cost, and turn your best customers into break-even orders. ## B2C versus B2B tier depth The three-tier rule is a consumer rule. B2B is a different animal. Wholesale and trade buyers expect a volume schedule. They buy in case quantities, they compare your breaks against other suppliers, and a deeper ladder reads as normal rather than confusing. Where a D2C store might stop at "6 or more," a B2B catalog might run breaks at 12, 48, and 144 with meaningfully larger per-unit savings, because the buyer is planning a purchase order, not an impulse add-on. The other difference is who sees which price. Consumer tiers are public and quantity-based. B2B pricing is often account-based, where a logged-in wholesale customer sees a different price ladder than a retail shopper. That is where tag-based [customer-specific pricing](/tiered-pricing) comes in, and it is the natural next step once you have your quantity tiers working. If you are selling wholesale on a non-Plus plan, our guide to [wholesale pricing without Shopify Plus](/blog/wholesale-pricing-on-shopify-without-shopify-plus) walks through the tag-based approach. ## The mistakes that quietly cost margin **Tiers set below cost awareness.** If you cannot state the margin at your deepest tier from memory, you are guessing. **Tiers that stack with codes you forgot about.** A tier that can combine with a sitewide code can discount far deeper than either number suggests. Decide deliberately what combines. Our guide to [volume discounts](/blog/volume-discounts-on-shopify-the-complete-guide) covers the display and stacking details. **Variant cost blindness.** A tier usually spans a product's variants. If a large size costs more to make than a small, check the margin at each tier for the most expensive variant, not just the default. **Invisible tiers.** A price ladder only in the cart is a ladder most buyers never see. Show it near the quantity selector on the product page. ## Setting this up with Discount Prime [Tiered pricing in Discount Prime](/tiered-pricing) lets you define quantity or spend breaks on products and collections, with the discount applying automatically through Shopify's native engine and the tier table displaying on the product page. No duplicate variants, no Scripts, no Plus requirement. Start with two or three tiers, anchor the middle one to the order you actually want, and let the app handle the rest. --- ## What 100 Support Conversations Taught Us About How Merchants Discount URL: https://www.discountprime.app/blog/what-100-support-conversations-taught-us Category: Build in Public | Author: Discount Prime Team | Published: March 12, 2024 | Updated: July 15, 2026 | Read time: 7 min | Tags: build-in-public, discounts-promotions, shopify, product-strategy > Across 100 support conversations, three patterns explain how merchants actually discount on Shopify: tiers built too complex to convert, promotions with no scheduled end date that quietly become permanent, and discounts that stack by accident and erode margin. The lesson is that most discount pain is structural, not a lack of features. *The features merchants ask for are rarely the features they need. What they need, almost always, is to be saved from the offer they already built.* We have now had somewhere around a hundred real support conversations with merchants running discounts through Discount Prime. Not survey responses, not roadmap votes, actual back-and-forth about a promotion that was not doing what someone expected. When you read a hundred of those in a row, the individual questions blur and the patterns get loud. Three of them explain most of what we saw, and none of them is really about a missing feature. Here is the short version before the detail: most discount pain is structural. Merchants are not failing because a tool lacks a button. They are failing because the offer was shaped wrong at the start, and nothing caught it until the margin did. That reframed how we think about what to build next. ## Pattern one: tiers built too complex to work The most common setup we untangled was a merchant who had built too many tiers. Five, six, sometimes more quantity breaks on a single product, each a slightly better per-unit price than the last. It feels generous. It reads, to the shopper, as work. Every tier is a decision. A staircase of six options does not make the deal more attractive; it makes the buying decision slower and dilutes the anchor that would have made one tier the obvious pick. The conversations that started with "why isn't my volume discount converting" almost always ended with us suggesting the merchant delete half their tiers. Two or three well-placed breaks convert better than a wall of them. We wrote the full argument for this in our [volume discounts guide](/volume-discounts), but seeing it play out across dozens of stores made it concrete in a way the theory never did. The deeper lesson: the tool made it easy to add tiers and gave no friction, and no guidance, about when to stop. Ease of creation is not the same as ease of success. ## Pattern two: the promotion nobody ended The second pattern is quieter and more expensive. A merchant creates a discount for a specific moment, a weekend sale, a holiday, a one-week push, and never sets an end date. The tool starts the promotion instantly and asks nothing about when it should stop. So it does not stop. It runs until someone notices, which is often weeks later, sometimes only when a margin report looks wrong. By then the damage is not just the extra weeks of discount. It is that the promotion has quietly become the price. Customers who bought during the "sale" that never ended now treat the lower number as normal, and returning to list feels, to them, like a price increase. A temporary tier that becomes permanent trains customers to wait, which is the exact outcome discounting is supposed to avoid. The fix a merchant can apply today is simple: schedule the end date the moment you create the offer, every time, even if you think you will remember. You will not. We say this in every relevant guide now because the support log made it undeniable. ## Pattern three: stacking that happened by accident The third pattern is the one with the sharpest margin edge. Two discounts combine, a volume discount and a sitewide code, or a promotion and an automatic discount, and the merchant never intended them to. Shopify's discount combination rules exist precisely to govern this, but they only work if someone sets them deliberately. Left at default, offers can stack in ways nobody chose. The effect is that the deepest discounts land on exactly the orders a merchant most wanted to protect: the big carts, the loyal repeat buyers, the customers already getting a volume break who then also applied a code. The conversation usually opened with surprise, "I didn't know those could combine," and that surprise is the whole problem. A combination should be a decision, not a discovery. We laid out how the rules actually resolve in [discount stacking on Shopify](/blog/discount-stacking-on-shopify-how-combinations-work), but the pattern taught us that explaining the rules is not enough. The default should push merchants toward an explicit choice. ## What the three patterns have in common Read together, these are not three unrelated complaints. They are one shape. In every case the tool made the risky action easy and silent: easy to over-build tiers, easy to start a promotion with no end, easy to let offers combine by default. The mistake surfaced later, in the margin, long after the moment it could have been caught. That is a design lesson as much as a merchant lesson. The most useful thing a discount tool can do is not add another offer type. It is to make the shape of an offer, its depth, its lifespan, and what it combines with, visible and deliberate at the moment of creation, when a change costs nothing. We are thinking hard about how to build that kind of guardrail into the product. We are not going to pretend it already exists, but the direction is set by what these hundred conversations showed us. ## What a merchant can do right now You do not need to wait for us to build anything to avoid all three: 1. **Cap your tiers.** Two or three breaks, not six. Design one to be the obvious choice. 2. **Schedule the end when you schedule the start.** Every promotion gets a death date at birth. 3. **Set combination rules on purpose.** Decide what stacks with what before launch, and check the margin at every overlap. ## Where we are pointing next The pattern around tiers is also why our next major feature is [tiered pricing](/tiered-pricing): merchants clearly want structured, multi-level pricing, and they deserve a tool that makes the good structure easy and the bad structure hard. We go deep on how to design tiers customers actually understand in our [tiered pricing guide](/blog/tiered-pricing-on-shopify-structure-tiers-customers-understand). If you want to see where this build-in-public thread started, our [first-BFCM retrospective](/blog/we-launched-a-discount-app-six-weeks-before-bfcm) covers the earliest version of these same lessons. Discount Prime is on the Shopify App Store, and the merchants who tell us what breaks continue to shape what we build. --- ## New: Buy X Get Y Deals in Discount Prime URL: https://www.discountprime.app/blog/new-buy-x-get-y-deals-in-discount-prime Category: Discounts & Promotions | Author: Discount Prime Team | Published: February 27, 2024 | Updated: July 15, 2026 | Read time: 6 min | Tags: buy-x-get-y, bogo, product-update, shopify > Buy X Get Y deals are now live in Discount Prime. Build BOGO, buy 2 get 1, buy X get Y at a percentage off, and gift-with-purchase offers that apply automatically through Shopify Functions, with per-order reward caps and combination controls. No coupon code, no duplicate variants, configured from the same dashboard as volume and free shipping. *The offer that turns one unit into three, or attaches a companion item at checkout, is finally native in Discount Prime, capped and code-free.* Buy X Get Y deals are live in Discount Prime. You can now build BOGO, buy 2 get 1 free, buy X get Y at a percentage off, and gift-with-purchase offers that apply automatically through Shopify Functions, with per-order reward caps and full combination control. Two weeks ago we published a guide on [running Buy X Get Y without confusing customers](/blog/bogo-done-right-buy-x-get-y-mechanics). This is the feature that guide was pointing at. This is the third capability we promised at launch, after volume discounts and free shipping, and it rounds out the core set of offers most stores actually run. ## What shipped Buy X Get Y in Discount Prime is built from a single, clear structure: a trigger and a reward. You define what a shopper must buy, and what they receive when they do. From that one mechanic you can build: - **Buy one get one free.** The classic BOGO, a second identical unit free. - **Buy 2 get 1 free.** The consumables workhorse, a third unit on the house. - **Buy X get Y at a percentage off.** Buy a full-price item, get a related item discounted, useful for driving attach rate. - **Gift with purchase.** A qualifying purchase adds a specific free gift SKU. Every one of these applies automatically in the cart. There is no coupon code for shoppers to remember, and no duplicate "3-pack" variants fragmenting your inventory. It is the offer, applied natively, at the moment the cart qualifies. ## The two controls that matter We built two controls into Buy X Get Y specifically because they are what separate a promotion you can forecast from one that surprises you. **Per-order reward caps.** You set how many rewards a single order can earn. An uncapped "buy 1 get 1 free" is how merchants accidentally give away twenty free units to one shopper. Discount Prime lets you cap the reward at one, or any small number, per order, so the giveaway stays inside the budget you planned. **Combination control.** Buy X Get Y runs on Shopify's discount engine, so it respects the discount combination settings. You decide whether a BOGO can stack with a percentage code, a [volume discount](/volume-discounts), or a free shipping offer. Left uncontrolled, a Buy X Get Y that combines with other active discounts can push the effective giveaway well past what you intended. In Discount Prime that stacking is a choice you make, not an accident you discover later. ## A quick worked example Run "buy 2 get 1 free" on a $20 product that costs you $10. - A shopper buys 3, pays for 2 ($40), gets 1 free. - Revenue: $40. Cost for 3 units: $30. Gross profit: $10. - Your margin on the order is 25 percent instead of 50, but the shopper bought 3 units instead of 1. That is a good trade when the offer genuinely moves shoppers from one unit to three. Cap the reward at one per order, and a single cart cannot turn that controlled trade into an uncontrolled loss. The offer pays when it changes behavior, and the cap keeps it from paying out on behavior you did not intend to reward. ## Where it fits with what you already run If you run [volume discounts](/volume-discounts) in Discount Prime, Buy X Get Y complements them rather than duplicating them. Volume pricing rewards bigger orders across the board by lowering the per-unit price. Buy X Get Y is directional: it triggers a precise reward when a shopper takes a defined action. On consumables you might run both, a quantity tier for the shopper stocking up and a BOGO for the shopper who needs one more nudge, and let the combination rules decide how they interact. The same is true for the [free shipping](/free-shipping) progress bar we shipped in December. A cart working toward a free-shipping threshold and a Buy X Get Y trigger can point the shopper in the same direction, toward one more item. Just decide, deliberately, whether the two discounts combine before you turn both on. ## Setting this up with Discount Prime Buy X Get Y is configured from the same dashboard as your other offers, and a first BOGO takes a couple of minutes: pick the trigger, pick the reward, set the cap, choose whether it combines. Full details are on the [Buy X Get Y](/bxgy) feature page. If you are new to structuring these offers cleanly, start with our guide to [Buy X Get Y mechanics that do not confuse customers](/blog/bogo-done-right-buy-x-get-y-mechanics), then build the offer in the app. You can install Discount Prime from the Shopify App Store. --- ## BOGO Done Right: Buy X Get Y Mechanics That Do Not Confuse Customers URL: https://www.discountprime.app/blog/bogo-done-right-buy-x-get-y-mechanics Category: Discounts & Promotions | Author: Discount Prime Team | Published: February 13, 2024 | Updated: July 15, 2026 | Read time: 7 min | Tags: buy-x-get-y, bogo, discounts-promotions, shopify > Buy X Get Y offers work when the trigger and the reward are unmistakable and the quantity limits are capped. Confusion, not generosity, is what breaks BOGO promotions: unclear eligibility, uncapped free items, and reward products that erode margin. Define the trigger, the reward, the limit, and the combination rules before launch. *BOGO does not fail because it is too generous. It fails because the customer cannot tell what they have to buy, or what they actually get.* A Buy X Get Y offer works when three things are unmistakable: what the customer must buy, what they receive in return, and how many times the deal applies. Get those three right and BOGO is one of the most effective promotions in ecommerce. Get any of them fuzzy and you produce two problems at once: shoppers who abandon because they cannot tell if they qualify, and a giveaway that multiplies past what you planned. This guide covers the mechanics of Buy X Get Y on Shopify, the structures worth running, and the specific ways these offers confuse customers or quietly bleed margin. ## What Buy X Get Y actually is Buy X Get Y is any promotion where buying a qualifying item or quantity, the **trigger**, unlocks a discount or free item, the **reward**. BOGO (buy one get one) is the famous case, but the family is broader: - **Buy one get one free.** Buy 1, get a second identical unit free. - **Buy 2 get 1 free.** Buy 2, get a third free. Common for consumables. - **Buy X get Y at a percentage off.** Buy 1 full-price item, get a related item at 50 percent off. - **Gift with purchase.** Buy a qualifying item, get a specific free gift SKU added. Every one of these is the same underlying logic: a trigger the shopper must satisfy, and a reward they receive when they do. Keeping those two ideas cleanly separated in your head, in your setup, and in your storefront copy is most of what "done right" means. ## The trigger and the reward, kept separate The single most common source of BOGO confusion is blurring the trigger and the reward. The shopper needs to answer two questions instantly: "What do I have to put in my cart?" and "What do I get for it?" **Define the trigger precisely.** Is it any product, a specific product, a collection, or a quantity? "Buy 2 of anything in this collection" is a clear trigger. "Buy stuff to get a deal" is not. The trigger should be something a shopper can look at their cart and verify. **Define the reward precisely.** Is the reward a free identical unit, a specific gift SKU, or a discount on a different item? "Get a third of the same free" is clear. "Get something free" invites a support ticket. If the reward is a different product, make sure it is one the shopper would actually want, or the offer does not motivate anyone. When these two are crisp, the storefront copy writes itself: "Buy 2, get the 3rd free." When they are not, no amount of banner design rescues it. ## Cap the reward, always The margin failure mode is the uncapped reward. "Buy 1 get 1 free" with no per-order limit sounds fine until a shopper puts twenty triggers in the cart and walks away with twenty free units. On a thin-margin product, one uncapped order can erase the profit from many normal ones. Set a per-order limit on how many rewards a single order can earn. Most well-run BOGO offers cap the reward at one, or at a small number, per order. The cap is not stinginess; it is the difference between a promotion you can forecast and one that surprises you at reconciliation. ## Margin math on a worked example Say you run "buy 2 get 1 free" on a $20 product with 50 percent margin (cost $10). - A shopper buys 3, pays for 2 ($40), gets 1 free. - Revenue: $40. Cost of goods for 3 units: $30. Gross profit: $10. - Your margin on the order dropped from 50 percent to 25 percent, but the shopper bought 3 units instead of 1. That trade is good if the promotion genuinely moves shoppers from one unit to three. It is bad if most of these shoppers were going to buy 2 anyway, because then you gave a free third unit to demand you already had. As with free shipping, the offer pays when it changes behavior, not when it subsidizes it. The comparison to keep in mind: | Structure | Trigger | Reward | Best for | Margin risk | | --- | --- | --- | --- | --- | | Buy 1 get 1 free | 1 unit | 1 free unit | New customer trial, clearance | High if uncapped | | Buy 2 get 1 free | 2 units | 1 free unit | Consumables, stocking up | Moderate, cap it | | Buy X get Y % off | 1 full-price item | Related item discounted | Attach rate, bundling | Lower, controllable | | Gift with purchase | Qualifying item | Fixed free SKU | AOV lift, moving a gift SKU | Predictable if SKU is cheap | ## Where Buy X Get Y beats a plain discount A percentage-off code discounts whatever is in the cart. Buy X Get Y is directional: it pushes the shopper toward a specific action, buying more of a product or attaching a related one. That makes it a better tool than a flat code when your goal is to raise units per order or lift the attach rate on a companion product, rather than just lowering the price on what someone already wanted. It also pairs naturally with [volume discounts](/volume-discounts). A "buy 2 get 1 free" offer and a quantity tier at 3 units are two ways of rewarding the same behavior, and on consumables they reinforce each other. ## Combination rules: decide before launch Buy X Get Y runs on Shopify's discount engine, which means it obeys the discount combination settings. A BOGO that stacks with a percentage code or a volume discount can push the effective giveaway well past what you intended. Decide deliberately what a Buy X Get Y offer is allowed to combine with, and check the margin at the overlap. We covered how the combination rules resolve in [discount stacking on Shopify](/blog/discount-stacking-on-shopify-how-combinations-work); read it before you let a BOGO run alongside other active discounts. ## Setting this up with Discount Prime Buy X Get Y is exactly the kind of offer that belongs on Shopify's native discount engine, applied automatically, capped cleanly, with combination rules you control. It is next on our roadmap, and we go into the [Buy X Get Y](/bxgy) mechanics we are building on the feature page. Keep an eye on the blog: we announce it in [new Buy X Get Y deals in Discount Prime](/blog/new-buy-x-get-y-deals-in-discount-prime). In the meantime, if you sell products people buy in multiples, [volume discounts](/volume-discounts) are live today and cover much of the same stocking-up behavior. You can find Discount Prime on the Shopify App Store. --- ## Shopify Editions Winter '24: What Discount-Focused Merchants Should Actually Care About URL: https://www.discountprime.app/blog/shopify-editions-winter-24-for-discount-merchants Category: Ecosystem & Platform | Author: Discount Prime Team | Published: January 31, 2024 | Updated: July 15, 2026 | Read time: 6 min | Tags: shopify-editions, ecosystem, shopify-functions, checkout > Shopify Editions Winter '24 shipped a broad release, but for discount-focused merchants the signal is narrow: Shopify keeps investing in Functions and checkout extensibility as the native home for custom pricing, while Scripts and checkout.liquid move toward retirement. Build discounts on Functions now, and treat the direction as settled rather than speculative. *Editions is a firehose. The useful skill is not watching all of it, but filtering it down to the two or three things that change what you should do this quarter.* Shopify Editions Winter '24 landed in late January, and like every Editions it covered a lot of ground: merchant tools, developer platform, retail, international, the full sweep. If you run discounts and pricing, almost none of that is a to-do list for you. The honest summary for our corner of the ecosystem is that Editions Winter '24 mostly confirmed a direction that was already clear, and the value is in reading that direction correctly rather than chasing every headline. Here is the filtered version: Shopify keeps investing in Functions and checkout extensibility as the native home for custom pricing and checkout, while the older tools sit on borrowed time. If your discounts already run on the modern primitives, this Editions is a green light, not a fire drill. ## What Editions actually is Shopify Editions is a twice-yearly showcase. Shopify batches up product announcements across the whole platform and presents them together, twice a year, roughly winter and summer. It is a signal of direction as much as a changelog. Some items are live features, some are developer capabilities, and some are directional statements about where the platform is heading. That framing matters because it is easy to read an Editions as a list of switches you need to flip. For most merchants, most of it is not. The skill is separating "this is a thing I now have to configure" from "this is Shopify telling me where to build." ## The one theme that matters for discounts Strip Winter '24 down to what touches pricing and the through-line is continuity. Shopify continues to position two things as the native way to customize how money moves through a store: **Functions** for custom discount and pricing logic. This is the primitive that lets apps inject discount behavior directly into Shopify's own engine, on every plan, without variant hacks or draft orders. Shopify introduced Functions in 2022 as the modern replacement for Scripts, and every Editions since has reinforced that Functions are where the investment goes. **Checkout extensibility** for customizing the checkout experience itself. This is the upgrade-safe replacement for the old checkout.liquid customization path. For discount merchants it is where free shipping bars, cart messaging, and discount displays are meant to live going forward. Neither of these is a Winter '24 surprise. That is the point. The platform is not zigzagging. It set a direction, and Editions after Editions it keeps pointing the same way. ## What that means you should do If you are a merchant thinking about discounts, the practical reading is short: 1. **Build new discount logic on Functions, not Scripts.** Scripts are Plus-only, legacy, and clearly on a retirement path. Any new pricing you set up on Scripts is built on a foundation Shopify is walking away from. Functions run natively, work on every plan, and inherit platform improvements like the discount combinations system as they land. 2. **Assume checkout is moving to extensibility.** If any of your discount displays or cart messaging depend on legacy checkout.liquid customizations, start treating that as technical debt. Shopify has been consistent about the deadlines, and Editions keeps reinforcing them. 3. **Do not chase headline features you do not need.** Editions rewards restraint. The stores that stay calm and confirm their foundations age better than the ones that rebuild around every announcement. ## A simple way to filter any Editions Because there is another one every six months, it helps to have a filter you reuse. For a discount-focused store, three questions handle almost everything: - **Does it change how discounts calculate or combine?** If yes, read closely. If no, skim. - **Does it change checkout in a way that affects how offers are shown?** If yes, note the timeline. If no, move on. - **Is it a capability for developers, or a switch for merchants?** Developer capabilities shape the apps you use over time; they rarely need action from you today. Run Winter '24 through that filter and you get a short list: the ongoing Functions and checkout-extensibility direction, and the reminder that the legacy paths have deadlines. Everything else is context, not homework. ## How this connects to what we build We built Discount Prime on Functions from the first commit precisely because of this direction, so an Editions like Winter '24 tends to validate the bet rather than complicate it. When Shopify shipped [discount combinations](/blog/discount-stacking-on-shopify-how-combinations-work) last year, our discounts inherited the control automatically because they run inside Shopify's native engine. The same is true for the [free shipping](/free-shipping) discounts and progress bar we shipped in December: they sit on the supported surfaces, so platform direction is a tailwind, not a migration. ## The takeaway for your store Editions Winter '24 is not a reason to change your discount strategy. It is a reason to confirm your foundations are modern. Run your pricing on [volume discounts](/volume-discounts) and other offers that live on Functions, keep your checkout customizations on supported surfaces, and you can treat each new Editions as interesting reading rather than an emergency. If you want your discounts on the primitives Shopify is actually investing in, Discount Prime is built there, and you can find it on the Shopify App Store. For a closer look at the shipping math that made our December launch worth it, see [the math behind free shipping](/blog/the-math-behind-free-shipping-when-it-pays-off). --- ## The Math Behind Free Shipping: When It Pays for Itself URL: https://www.discountprime.app/blog/the-math-behind-free-shipping-when-it-pays-off Category: Shipping | Author: Discount Prime Team | Published: January 9, 2024 | Updated: July 15, 2026 | Read time: 7 min | Tags: free-shipping, profit-strategy, average-order-value, shopify > Free shipping pays for itself only when the threshold sits above your average order value, so the offer buys incremental spending instead of subsidizing orders that would happen anyway. Calculate the added margin from a larger cart against the shipping you absorb. If the threshold is too low, free shipping quietly becomes a discount on every order. *Free shipping is not a discount you give. It is a bet that a shopper will spend more to avoid paying for shipping, and the bet only pays if you place the line correctly.* Free shipping pays for itself when the extra margin from a larger cart is greater than the shipping cost you absorb. That is the entire test. Everything else in this article is about the two ways stores get that test wrong: setting the threshold too low, so free shipping becomes a silent discount on orders that would have happened anyway, and forgetting to check whether the item that clears the threshold actually earns enough margin to cover the shipping. If you are running or considering a free shipping threshold on Shopify, this is the math you need before you turn it on. ## The core idea: buy incremental spending, not existing orders A percentage-off code discounts every order it touches. A free shipping threshold is more surgical. It only pays out on carts that reach the threshold, and the useful ones are the carts that grew to reach it. When a shopper adds a second item specifically to clear "add $12 for free shipping," you bought that extra item at the cost of the shipping you waived. That is a good trade if the item's margin beats the shipping cost. The trap is the cart that was already above your threshold. That shopper gets free shipping for a behavior they had already committed to. You paid, and nothing changed. The more of your normal orders sit above the threshold, the more of your free shipping budget goes to orders you already had. This is why the single most important decision is where the threshold sits relative to your average order value. ## Setting the threshold above AOV Find your average order value first. Then set the free shipping threshold above it, usually 15 to 30 percent higher. The gap between AOV and threshold is the distance you are asking the average shopper to travel, and it should be small enough to close with one reasonable addition. - If your AOV is $40, a threshold near $50 asks for one modest item. - If your AOV is $40 and you set the threshold at $35, almost every order qualifies automatically, and you have simply started paying for shipping on your entire order volume. - If your AOV is $40 and you set the threshold at $90, most shoppers cannot plausibly get there, so the bar stops motivating and the offer does little. The sweet spot is a target most shoppers can see themselves reaching. Too low and it is a giveaway. Too high and it is wallpaper. ## A worked example Say the numbers are: - Average order value: $40 - Your shipping cost to fulfill a typical order: $6 - Your gross margin: 50 percent - Threshold you set: $52 A shopper arrives with a $40 cart. The bar reads "add $12 for free shipping." They add a $16 item to clear it. Now: - New order value: $56 - Added revenue: $16 - Added margin at 50 percent: $8 - Shipping you absorb: $6 - Net gain on this order: $8 minus $6, which is $2 You came out ahead, but not by much, and only because the added item earned $8 of margin against $6 of shipping. Change one input and the picture flips. If your margin were 30 percent, the added item earns just $4.80, and absorbing $6 of shipping turns the incremental order into a $1.20 loss. The threshold that "works" at 50 percent margin loses money at 30 percent. This is the calculation to run before launch: for a typical item that would clear your threshold, does its margin cover your shipping cost with room to spare? If not, either raise the threshold so the clearing item is bigger, or accept that you are using free shipping as a conversion tool rather than a profit-neutral one, and price that decision honestly. ## Free shipping vs a percentage discount | | Free shipping threshold | Percentage-off code | | --- | --- | --- | | Who it rewards | Carts that grow to reach the line | Every qualifying order | | Targets incremental spending | Yes, when set above AOV | No, discounts existing orders too | | Effect on AOV | Pushes carts up toward the target | Neutral or can lower it | | Margin predictability | Fixed shipping cost per qualifying order | Scales with order size | | Best use | Nudging order value on margin-healthy items | Broad promotions, clearing inventory | Neither is strictly better. A percentage code is the right tool for a sitewide promotion or a clearance push. A free shipping threshold is the more efficient tool when your goal is to lift order value without discounting the orders you already had. ## When free shipping loses money Three failure modes, in order of how often we see them: 1. **Threshold at or below AOV.** You pay shipping on orders that were already happening. This is the most common and the most expensive mistake. 2. **Thin-margin clearing item.** The item shoppers add to reach the threshold earns less margin than the shipping you waive. The incremental order is a loss even though it looks like a win. 3. **Uncontrolled stacking.** Free shipping combined with another discount can push a qualifying order below cost. Decide combination rules deliberately; the [free shipping progress bar we shipped in December](/blog/new-free-shipping-discounts-with-a-progress-bar) uses Shopify's discount combination controls so you can choose whether it stacks. ## Setting this up with Discount Prime Discount Prime applies [free shipping](/free-shipping) as a native automatic discount, so you set a threshold once and a live progress bar shows each shopper their distance to it. Point the threshold just above your average order value, pair it with [volume discounts](/volume-discounts) on the products people buy in multiples, and the two offers push order value from the same direction. You can install the app from the Shopify App Store and have a first threshold live in a few minutes. --- ## New in Discount Prime: Free Shipping Discounts with a Progress Bar URL: https://www.discountprime.app/blog/new-free-shipping-discounts-with-a-progress-bar Category: Shipping | Author: Discount Prime Team | Published: December 19, 2023 | Updated: July 15, 2026 | Read time: 6 min | Tags: free-shipping, shopify, product-update, average-order-value > Discount Prime now offers free shipping discounts with a live progress bar that tells shoppers how much more they need to spend to unlock free shipping. Set a threshold above your average order value, and the bar nudges carts upward without a coupon code. Three setup recipes cover flat, tiered, and segment thresholds. *A shipping threshold that no one can see is just a number in your settings. A progress bar turns it into a target shoppers actually chase.* Free shipping discounts are now live in Discount Prime, and they ship with a progress bar that tells each shopper exactly how much more they need to add to unlock free shipping. This is the second feature we promised at launch, and it closes one of the most common gaps we heard about in our first months: merchants wanted to reward larger carts with free shipping, automatically, without a coupon code and without hand-building a threshold banner in their theme. Here is the short version. You pick a cart value, say $50. Any cart that reaches it gets free shipping applied automatically through Shopify Functions. Any cart below it sees a live bar: "You are $12 away from free shipping." As items go in, the bar fills. That is the whole mechanic, and it is one of the most reliable ways to lift average order value on Shopify. ## Why a progress bar beats a plain threshold A free shipping threshold on its own is invisible. A shopper with $38 in their cart has no idea that $50 unlocks free shipping, so they never reach for the extra item. The threshold only works when the shopper can see the finish line and their distance from it. The progress bar makes three things visible at once: the target, the current cart value, and the gap between them. That gap is the entire nudge. "Add $12 more for free shipping" is a concrete, solvable problem, and shoppers solve it surprisingly often with one more unit. You are not discounting the order that would have happened anyway; you are buying the incremental item that pushes the cart over the line. ## How the discount actually applies The free shipping discount is a Shopify automatic discount, injected natively through Functions. There is no duplicate variant, no draft order, and no code for the customer to type. When the cart crosses your threshold, shipping goes to free in the cart and at checkout. When it drops back below, the discount and the bar update instantly. Because it runs on Shopify's own discount engine, it also respects the discount combinations system. You decide whether free shipping can stack with a product or order discount. If you want free shipping to be the reward for a big cart and nothing else, set it to not combine. If you are running a promotion where both should apply, allow it, but check your margin at the overlap first. ## Three setup recipes **Recipe one: the flat threshold.** The simplest and the one most stores should start with. Set a single cart value just above your average order value and leave it. If your AOV is around $42, a $50 threshold asks most shoppers for one small addition, not a second full purchase. This is the recipe we recommend for a first campaign, because it is easy to reason about and easy to measure. **Recipe two: the round-up threshold for consumables.** If you sell products people buy in multiples, set the threshold at the price of a clean extra unit. Say each unit is $16 and typical carts hold two ($32). A $48 threshold is exactly three units, so the bar reads "add one more to ship free." Here free shipping and a volume discount reinforce each other: the shopper adds the third unit, hits your quantity tier, and clears the shipping bar in one move. Pair this with [volume discounts](/volume-discounts) and the two offers do the same job from two directions. **Recipe three: the segment threshold.** Not every customer needs the same target. A returning customer with a larger typical basket can carry a higher threshold than a first-time visitor. You can run different free shipping thresholds for different situations and let the bar meet each shopper where their spending already is. Start with one flat threshold, prove it works, then layer segmentation once you have a baseline to compare against. ## A worked example Say your average order value is $40 and shipping costs you $6 to fulfill on a typical order. You set the threshold at $50. - A shopper arrives with $40 in the cart. The bar reads "add $10 for free shipping." - They add a $14 item to clear it. Cart is now $54. - You absorb $6 of shipping. You gained $14 of revenue on an item that, at your margin, more than covers the $6 you gave up. The math only works because the threshold sits above the cart that already existed. If you had set free shipping at $35, that same shopper would have gotten free shipping on their original $40 order, and you would have paid $6 for a behavior change that never happened. Threshold placement is the whole game, and we go deep on it in [the math behind free shipping](/blog/the-math-behind-free-shipping-when-it-pays-off). ## One thing to decide before you turn it on Decide how free shipping interacts with your other discounts. If you already run automatic discounts, a new shipping discount that combines with them changes your effective margin on every qualifying cart. We wrote a full explainer on how the combination rules resolve in [discount stacking on Shopify](/blog/discount-stacking-on-shopify-how-combinations-work). Read it before you allow free shipping to stack, so the overlap is a choice and not a surprise. ## Setting this up in Discount Prime Free shipping discounts are available now on the [free shipping](/free-shipping) feature page, and setup for a flat threshold takes a couple of minutes: pick a cart value, choose whether it combines, and the progress bar handles the rest on your storefront. If you already run volume pricing in Discount Prime, the two features share the same dashboard, so you can point both at the same products and let them work together. Install the app from the Shopify App Store to try it on your own store. --- ## Discount Stacking on Shopify: How Combinations Actually Work URL: https://www.discountprime.app/blog/discount-stacking-on-shopify-how-combinations-work Category: Discounts & Promotions | Author: Discount Prime Team | Published: December 12, 2023 | Updated: July 15, 2026 | Read time: 5 min | Tags: shopify, discount-combinations, discount-stacking, margin, discount-guide > Shopify's discount combinations system sorts every discount into three classes, product, order, and shipping, and lets you decide which classes can stack. Discounts in different classes can combine when both are set to allow it; two discounts in the same class do not stack. Set combination rules deliberately so overlaps never quietly erode margin. *Most Shopify stores do not have a discount problem. They have a discount collision problem.* You can run each of your promotions perfectly and still lose margin at the exact moment two of them touch. A customer applies a code on top of an automatic offer, both fire, and the order goes out at a depth you never approved. For years, controlling that on Shopify meant workarounds. In 2023, Shopify shipped a native system for it, and this post explains how that system actually works. Here is the direct answer. Shopify now sorts every discount into one of three classes, product, order, and shipping, and lets you decide which classes are allowed to stack. Discounts in different classes can combine when both are set to allow it. Two discounts in the same class do not stack; Shopify applies the better one. Once you understand those two rules, most stacking mysteries resolve themselves. ## What discount combinations are Discount combinations are Shopify's built-in rules for whether two discounts can apply to the same order. Every discount is assigned a class and a set of permissions for which other classes it may combine with. At checkout, Shopify honors those permissions, so stacking becomes something you configure on purpose rather than something that happens to you. Before this system existed, merchants prevented unwanted stacking with blunt instruments: disabling codes during automatic sales, or accepting that certain overlaps would just happen. The combinations system replaces the guesswork with explicit, deterministic rules. ## The three classes Shopify combines Every discount belongs to exactly one of these: - **Product discounts** apply to specific items or collections. A [volume discount](/volume-discounts) that lowers per-unit price as quantity rises is a product discount. So is a percentage off a collection. - **Order discounts** apply to the cart subtotal, for example "15% off your order" or "$10 off orders over $75." - **Shipping discounts** apply to shipping cost. A [free shipping](/free-shipping) offer or a reduced-rate shipping deal lives here. The class is what determines stacking. This is the single most useful thing to internalize: Shopify combines across classes, never within one. ## How combinations actually work Two rules govern everything. **Rule one: same class does not stack.** Two product discounts will not both apply to the same item. If a product qualifies for two, Shopify applies the one that benefits the customer more and ignores the other. The same is true for two order discounts or two shipping discounts. **Rule two: different classes stack only with mutual permission.** A product discount and a shipping discount can apply to the same order, but only if each one's combination settings allow the other's class. If either side says no, they do not combine. Both toggles have to agree. That second rule is where most accidental stacking hides. A volume discount and a free shipping offer sit in different classes, so they are eligible to combine. Whether they actually do is your decision, expressed through each discount's combination settings. Leave the settings on their defaults and you may be permitting a stack you never priced for. ## A worked example of a collision Say you run a volume discount, buy 6 units at $16 each instead of $20, a product-class offer. Separately, you run a "15% off your order" code, an order-class offer. During a busy week, both are active. A customer buys 6 units and applies the code. If both discounts are set to allow cross-class combinations, here is the stack: 6 units drop from $120 to $96 at the volume tier, then the 15% order code takes another $14.40 off, landing at $81.60. Your intended volume price was $96. The actual price is 15% below that. Neither discount is wrong. The collision is. If your product costs $12 per unit, your 6-unit cost is $72, so at $96 you held a healthy margin and at $81.60 you gave most of it away. The fix is not to delete either offer; it is to set the volume discount to disallow combining with order discounts, so the two never stack unless you decide they should. ## How to set combination rules that protect margin **Decide combinations per discount, not by default.** For each active discount, open its combination settings and choose deliberately which classes it may join. Defaults are a guess; your margin is not. **Protect your deepest offers.** Your steepest product discount is usually the one you least want an order code stacked on. Turn combining off for those first. **Exclude low-margin products from stackable offers.** If a product barely clears cost at one discount, it cannot survive two. Keep those items out of any offer set to combine. **Test the worst case.** Build a cart that qualifies for every active discount at once and check the final price. The collision you find in a test cart is the one you did not find on Black Friday. ## Setting this up with Discount Prime Because Discount Prime is built on Shopify Functions, its discounts participate in the native combinations system rather than fighting it. A [volume discount](/volume-discounts) you create is a well-behaved product-class discount that respects the combination settings you choose, and it coexists cleanly with order and [shipping](/free-shipping) discounts you run alongside it. If you are still deciding how to structure the underlying offers, our [complete guide to volume discounts](/blog/volume-discounts-on-shopify-the-complete-guide) and our breakdown of [quantity breaks versus volume discounts](/blog/quantity-breaks-vs-volume-discounts-shopify) cover the mechanics. You can find the app on the Shopify App Store. --- ## We Launched a Discount App Six Weeks Before BFCM. Here Is How That Went. URL: https://www.discountprime.app/blog/we-launched-a-discount-app-six-weeks-before-bfcm Category: Build in Public | Author: Discount Prime Team | Published: November 28, 2023 | Updated: July 15, 2026 | Read time: 4 min | Tags: build-in-public, bfcm, shopify-functions, product-launch, retrospective > Discount Prime launched on the Shopify App Store six weeks before its first BFCM. The retrospective: building on Shopify Functions meant Shopify absorbed the checkout load, the first real bug reports were about display and timezones rather than the discount engine, and support tickets, not the roadmap, revealed what to build next. *Launching a discount app six weeks before the busiest sales weekend of the year is not a plan. It is a deadline that plans for you.* Discount Prime went live on the Shopify App Store on October 10, 2023. Black Friday was November 24. We knew going in that our first BFCM would arrive before we were ready for it, and it did. This is the honest retrospective: what the load actually looked like, what broke first, and what merchants told us that we could not have learned any other way. The short version: the discount engine held, the surprises were smaller and more human than we feared, and the most valuable output of the weekend was not revenue. It was a queue of support conversations that rewrote our sense of what to build next. ## The timeline we walked into Six weeks is not enough time to feel ready, and that turned out to be fine. The app that faced BFCM did exactly two things: [volume discounts](/volume-discounts) and [quantity breaks](/quantity-breaks). We had shipped nothing else, on purpose. Going into the highest-pressure weekend of the year with a narrow, well-understood feature set is far easier to support than going in with ten features you half understand. Over the same weekend, merchants across Shopify sold $9.3 billion. We were a very small part of a very large wave, watching our corner of it closely. ## What the load actually looked like Here is the thing about building on Shopify Functions: the checkout traffic is not really your traffic. Discounts apply inside Shopify's own engine, so when order volume spiked, Shopify absorbed it. There was no intermediate layer of duplicate variants or draft orders to buckle under the weekend, because we had never built one. That does not mean the weekend was quiet. The pressure just showed up somewhere other than checkout throughput: in dashboard sessions as merchants adjusted live campaigns, in support volume, and in the long tail of edge cases that only appear when enough orders flow through enough different store configurations at once. ## What actually broke first The first real bug reports were not about the discount math. The engine did the arithmetic correctly. The problems lived in the surrounding presentation and configuration, which is a useful lesson on its own. - **Display, not calculation.** A tier table that looked perfect on our test themes rendered awkwardly on a couple of merchant themes we had never seen. The price was right; the layout was not. - **Timezones.** More than one scheduling question came down to a sale starting or ending in a different timezone than the merchant expected. The math was correct; the clock was the argument. - **Currency edges.** Multi-currency carts occasionally rounded a per-unit price to a cent a merchant did not anticipate. Small, but the kind of thing a careful merchant notices immediately. None of these were dramatic. All of them were exactly the sort of rough edge you can only find by putting the app in front of real stores, which is the entire case for launching before you feel finished. ## What merchants told us The support queue was the real product of the weekend. Read enough tickets in a row and patterns emerge that no roadmap meeting would have produced. Merchants kept describing the same workarounds, and the workarounds pointed straight at missing features. Wholesale-leaning stores wanted pricing tied to customer groups. Several asked, in effect, for a free shipping incentive to sit alongside their volume tiers. We were not going to build any of that during BFCM week, but we wrote every request down, and that list is now shaping the roadmap far more than our original plan did. ## What we would tell our six-weeks-ago selves Three things. First, a narrow launch is a feature, not a compromise; the smaller the surface, the calmer the support. Second, the bugs that matter early are almost never in the core logic you obsessed over, so budget attention for display, scheduling, and currency. Third, treat the first BFCM as a research instrument. The revenue is a rounding error against the clarity you get about what to build. If you are a merchant weighing your own first BFCM, we wrote a separate framework for that in [your first BFCM discount plan](/blog/your-first-bfcm-discount-plan-simple-framework). And if you want the story of why we built on Functions in the first place, it is in our [launch note](/blog/discount-prime-is-live-on-the-shopify-app-store). To everyone who installed the app in those six weeks and told us what was rough: thank you. You were the retrospective. --- ## Your First BFCM Discount Plan: A Simple Framework for Small Shopify Stores URL: https://www.discountprime.app/blog/your-first-bfcm-discount-plan-simple-framework Category: Discounts & Promotions | Author: Discount Prime Team | Published: November 14, 2023 | Updated: July 15, 2026 | Read time: 4 min | Tags: bfcm, black-friday, discount-strategy, small-business, margin > A first BFCM discount strategy for a small Shopify store comes down to three decisions made in advance: one simple hero offer that rewards larger orders, a written margin floor below which you will not discount, and a short list of big-brand tactics you deliberately skip. Decide calmly, before the weekend pressure hits. Black Friday is ten days away. If this is your store's first BFCM, you have probably read advice written for brands with a marketing team, an agency, and a promo calendar that started in August. This post is not that. It is a framework for a small store, run by one or two people, deciding this week what to offer. Last year merchants on Shopify sold $7.5 billion over BFCM weekend. The volume is real, but so is the margin damage for stores that discount in a panic. The difference is usually not effort. It is having decided three things in advance. ## Decision one: your hero offer Pick one offer that headlines everything. Not five offers. One. The strongest BFCM offers for small stores share a shape: they are simple to say in a single line ("Buy 2, get 20% off everything in your cart"), they reward larger orders rather than just discounting existing demand, and they do not require the customer to do homework. Quantity-based offers deserve special attention here. A sitewide 20% code discounts every order, including the customer who was buying anyway. A [volume offer](/volume-discounts) ("save 20% when you buy 3+") only pays out when the order grows. During the highest-traffic weekend of the year, that difference compounds fast. A [free shipping threshold](/free-shipping) is another shape that fits a small store well: it is easy to say and it nudges order size upward instead of cutting into every unit's margin. If you want the deeper mechanics behind quantity-based offers, our [complete guide to volume discounts](/blog/volume-discounts-on-shopify-the-complete-guide) covers tier design end to end. ## Decision two: your margin floor Before you pick a number, find the discount level at which your average order stops making money. Take your typical order, subtract product cost, shipping subsidy, transaction fees, and packaging. The number that remains is what you are negotiating with when you choose between 15% and 25%. Write the floor down. The reason to do this now, ten days out, is that BFCM has a way of generating pressure to go deeper mid-weekend when a competitor's email lands in your inbox. A number decided calmly beats a number decided at 11pm on Black Friday. Two protections worth setting up in advance: exclude your handful of lowest-margin products from the hero offer, and decide explicitly whether your offer can combine with any other active discount. Accidental stacking is how a planned 20% becomes an actual 35%. ## Decision three: what you will skip Things small stores can safely not do this BFCM: - **Hourly flash deals.** They reward whoever happens to be online and punish everyone else, and they require a war room you do not have. - **Doorbusters below cost.** Loss leaders work when you have the traffic to convert the loss into basket size. Most small stores do not, yet. - **Extending the sale "one last time" twice.** It trains your list to ignore every deadline you ever set again. ## The 10-day checklist Between now and Black Friday: set up the hero offer and test it in an incognito cart, including the mobile view. Check that the offer displays before the cart, not only in it; a discount nobody sees is a discount that does not convert. Schedule the start and end times, in your store's timezone, and confirm what happens to carts open at the boundary. Draft two emails: the announcement and the last-day reminder. That is enough. ## After the weekend Keep one note for December: which products actually drove the volume, and at what real margin. Your first BFCM produces something more valuable than the weekend's revenue, which is a baseline. Next year's plan gets built on it. We later wrote up how our own first BFCM went, from a builder's seat, in [we launched a discount app six weeks before BFCM](/blog/we-launched-a-discount-app-six-weeks-before-bfcm). If your hero offer is quantity-based, Discount Prime handles the tier setup, the product-page display, and the scheduling. But whatever tooling you use, the framework is the point: one offer, one floor, a short list of things you deliberately skipped. --- ## Quantity Breaks vs Volume Discounts: What Is the Difference and When to Use Each URL: https://www.discountprime.app/blog/quantity-breaks-vs-volume-discounts-shopify Category: Discounts & Promotions | Author: Discount Prime Team | Published: November 7, 2023 | Updated: July 15, 2026 | Read time: 4 min | Tags: shopify, quantity-breaks, volume-discounts, pricing-strategy, discount-guide > A quantity break is the product-page display that shows a customer what each quantity costs; a volume discount is the cart-side rule that actually lowers per-unit price as quantity rises. One communicates the savings, the other applies them. Most Shopify stores need both, running together, so buyers see the deal before they decide. *Two Shopify features get used as if they were the same thing, and the confusion quietly costs merchants the exact sale they were trying to win.* Quantity breaks and volume discounts sound interchangeable, and in casual conversation people treat the terms as synonyms. They are closely related, but they solve two different problems. Getting the distinction right is the difference between a customer who sees a reason to buy more and a customer who only discovers your deal after they have already decided how many to add. Here is the short version. A volume discount is the pricing rule: buy more, pay less per unit, applied automatically in the cart. A quantity break is the display: the tier table on the product page that shows the customer what each quantity costs before they commit. One is the mechanic. The other is how the mechanic gets communicated. Most stores need both, and the strongest setups run them together. ## What is a volume discount A volume discount is an automatic pricing rule that lowers the per-unit price as order quantity rises. Buy 1 at $20, buy 3 at $18 each, buy 6 at $16 each. It applies inside the cart through Shopify's discount engine, rewards larger orders instead of subsidizing existing demand, and requires no code for the customer to enter. Because it is a rule, a volume discount does its job whether or not the customer ever sees it advertised. That is also its weakness on its own: a rule the customer cannot see rarely changes the quantity they choose. ## What is a quantity break A quantity break is the on-page presentation of tiered pricing, usually a small table or set of options near the quantity selector, showing each quantity threshold and its price. It informs the buying decision at the moment the customer chooses how many to add, rather than revealing the savings at checkout after the choice is already made. A quantity break is persuasion, not enforcement. It shows the customer that 6 units cost $16 each instead of $20. For that promise to hold, a real pricing rule has to sit behind it. Displaying a price your store does not actually apply is worse than showing nothing. ## The difference in one table | Dimension | Volume discount | Quantity break | | --- | --- | --- | | What it is | A pricing rule | An on-page display | | Where it lives | Cart and checkout | Product page | | Its job | Apply the savings | Communicate the savings | | Reacts to | Quantity in the cart | The customer's attention | | Fails when | Nobody knows it exists | It promises a price no rule applies | | Best paired with | A quantity break | A volume discount | The row that matters most is the last one. These are two halves of the same offer, not competing options. ## When to use each **Run both by default.** For any buy-more-save-more offer, pair the cart-side rule with the product-page display. The rule guarantees the price; the display gets the customer to reach the tier in the first place. **Lead with the volume discount if you can only ship one.** The pricing has to be correct before you advertise it. A volume discount with no on-page display still charges the right amount; a quantity break with no rule behind it charges the wrong amount, which is a support problem waiting to happen. **Lean on the quantity break when the buying decision is quantity-first.** For consumables, packs, refills, and supplies, the customer's real question is "how many should I get?" A visible tier table answers that question on the page, which is exactly where the decision is made. ## A worked example Say you sell a coffee refill at $20 per bag with a fully-loaded cost of $12, so a 40% gross margin. You set a volume discount: 3 bags at $18 each, 6 bags at $16 each. Behind the scenes, the rule works. A customer who adds 6 bags is charged $96 instead of $120. But if the product page shows only the single-bag price, most customers add one or two bags and never trigger the tier. Attach a quantity break that displays "$20 each / $18 at 3 / $16 at 6" next to the quantity selector, and the customer can see the reason to size up before they decide. Check the floor while you are here: at 6 bags the per-unit price is $16 against a $12 cost, so margin holds at 25%. The display sells the larger order; the rule keeps that larger order profitable. Neither half does the job alone. ## Setting this up with Discount Prime Discount Prime runs the two halves together. You define the [volume discount](/volume-discounts) tiers once, and the matching [quantity break](/quantity-breaks) table displays on the product page automatically, applied through Shopify's native engine with no duplicate variants. For the full tier-design walkthrough, see our [complete guide to volume discounts](/blog/volume-discounts-on-shopify-the-complete-guide); and if you run more than one promotion at a time, our post on [how discount combinations work](/blog/discount-stacking-on-shopify-how-combinations-work) covers what stacks with what. You can find the app on the Shopify App Store. --- ## Volume Discounts on Shopify: The Complete Guide URL: https://www.discountprime.app/blog/volume-discounts-on-shopify-the-complete-guide Category: Discounts & Promotions | Author: Discount Prime Team | Published: October 24, 2023 | Updated: July 15, 2026 | Read time: 4 min | Tags: shopify, volume-discounts, quantity-breaks, pricing-strategy, discount-guide > A Shopify volume discount lowers per-unit price as quantity rises, rewarding larger orders instead of subsidizing existing demand. Use two or three tiers anchored just above typical order size, display them on the product page, and check tiers against your margin floor so deeper breaks never cost you profit. Volume discounts are the most underused discount type on Shopify. Most stores default to percentage-off codes because they are easy, but if your customers ever buy more than one of anything, [buy-more-save-more pricing](/volume-discounts) usually outperforms a generic code on both revenue and margin. This guide covers how volume discounts work on Shopify, how to design tiers that customers actually respond to, and the setup mistakes we see most often. ## What counts as a volume discount A volume discount lowers the price per unit as quantity increases. Buy 1 for $20, buy 3 for $18 each, buy 6 for $16 each. The customer is rewarded for concentrating more of their spending with you in a single order. That last part is why volume discounts behave differently from sitewide sales. A 15% sitewide code discounts every order, including the ones that would have happened anyway. A volume discount only pays out when the customer changes behavior and buys more. You are purchasing incremental units, not subsidizing existing ones. ## Why Shopify does not do this natively Out of the box, Shopify's discount system covers codes and automatic discounts with fairly simple conditions. Quantity-tiered pricing per product, [displayed on the product page](/quantity-breaks), is not something you can build in the admin alone. Historically merchants worked around this with duplicate variants ("Single", "3-Pack", "6-Pack"), which fragments inventory and analytics, or with Shopify Scripts, which require Shopify Plus. The modern answer is Shopify Functions, which lets apps add custom logic directly into Shopify's own discount engine. Discounts apply natively in cart and checkout, work on every plan, and coexist with the discount combinations system Shopify shipped this year. The line between the cart-side rule and the product-page display is worth understanding on its own, which is why we cover [quantity breaks versus volume discounts](/blog/quantity-breaks-vs-volume-discounts-shopify) in a separate post. ## Designing tiers that work **Use two or three tiers, not five.** Every tier adds a decision. Two well-placed tiers ("buy 3, buy 6") convert better than a staircase of five options. If you sell B2B, you can justify more depth; consumer buyers want the choice made simple. **Anchor the first tier just above typical behavior.** If most customers buy 2 units, put the first tier at 3. The discount should stretch the order, not reward the default. Check your average line-item quantity before setting anything. **Make the middle tier the obvious choice.** Classic pricing psychology applies: if you show 3 tiers, design the middle one to be the deal most people take, and let the top tier make it look reasonable. **Discount the unit price, not just the total.** "$16 per unit instead of $20" is more persuasive on a product page than "save $24 on 6". Per-unit framing matches how buyers of consumables and supplies actually think. ## Where to show the offer A volume discount that only appears in the cart is a volume discount most customers never learn about. The offer needs to be visible at the moment of the quantity decision, which is the product page. The pattern that works: a compact tier table or bar near the quantity selector, showing each break and the per-unit price. Then reinforce it in the cart ("Add 2 more to save 10%") for orders that landed just below a tier. ## The mistakes that cost margin **Tiers below your margin floor.** Know the fully-loaded cost of the product before you set the deepest tier. A 25% break on a product with 30% margin means your best customers are your least profitable orders. **Stacking you did not plan.** If a volume discount can combine with a sitewide code, your effective discount at the top tier might be far deeper than either number alone. Decide deliberately what combines with what; Shopify's combinations settings now give you real control here. **Forgetting variants.** A tier set on a product usually spans its variants. If your variants have meaningfully different costs (sizes, materials), check the math at each tier for the cheapest and most expensive variant, not just the default. **No end date on "temporary" tiers.** A promotional tier that quietly becomes permanent trains customers to never pay list price. If a tier is a promotion, schedule its end when you create it. ## How to measure whether it is working Watch three numbers: average line-item quantity on discounted products (it should rise), margin per order on those products (it should hold or rise), and the share of orders landing exactly at tier minimums (evidence customers are responding to the tiers rather than ignoring them). If quantity rises but margin falls, your tiers are too deep. If nothing changes, your tiers are invisible or placed above what anyone would plausibly buy. ## Setting this up with Discount Prime Discount Prime was built for exactly this. You define quantity tiers on products or collections, the discount applies automatically through Shopify's native engine, and tier pricing displays on the product page without duplicate variants or code. We explained the Functions bet behind it in our [launch note](/blog/discount-prime-is-live-on-the-shopify-app-store). Setup for a first campaign takes a few minutes, and you can find the app on the Shopify App Store. --- ## Discount Prime Is Live on the Shopify App Store URL: https://www.discountprime.app/blog/discount-prime-is-live-on-the-shopify-app-store Category: Discounts & Promotions | Author: Discount Prime Team | Published: October 10, 2023 | Updated: July 15, 2026 | Read time: 4 min | Tags: shopify, volume-discounts, quantity-breaks, shopify-functions, product-launch > Discount Prime is a Shopify volume discount app now live on the App Store. Version one ships volume discounts and quantity breaks, both automatic and built on Shopify Functions so they run natively on every plan, not just Plus, without duplicate variants or cart hacks. After six months of building, testing, and a review process that taught us more about our own app than we expected, Discount Prime is officially live on the Shopify App Store. This post is a short introduction: what the app does today, what it deliberately does not do yet, and why we made the technical choices we made. ## What version one does Discount Prime launches with two core capabilities: **[Volume discounts](/volume-discounts).** Buy more, save more. You define quantity tiers on products or collections, and the discount applies automatically in the cart. No codes for customers to remember, no manual price edits across variants. **[Quantity breaks](/quantity-breaks).** Tiered per-unit pricing displayed right on the product page, so a customer considering 10 units can see exactly what 25 or 50 would cost before they ever reach the cart. Both are configured from a single dashboard, both apply automatically, and both were built to survive the situations that break discount setups in real stores: multi-currency carts, variant-level pricing, and customers who combine offers in ways you did not plan for. ## What it does not do yet A lot, honestly. There is no free shipping module yet. No B2B pricing. No analytics beyond the basics. We have a roadmap full of these things, and we would rather ship each one properly than launch with ten half-features. If you install the app and find yourself wishing it did something specific, tell us. Early feedback is going to shape the next six months more than our own roadmap document will. ## Why we built on Shopify Functions Here is the one technical decision worth explaining, because it affects every merchant who installs the app. There have historically been two ways to customize discounts on Shopify: Scripts, which are limited to Shopify Plus and run Ruby code inside checkout, and apps that manipulate prices indirectly, with duplicate variants or draft orders and all the inventory chaos that comes with those tricks. In 2022 Shopify introduced Functions, a new way for apps to inject custom discount logic natively into Shopify's own discount engine. Shopify has been clear about the direction: Functions are the future, and Scripts are on their way out. We built Discount Prime on Functions from the first commit. That means: - Discounts apply inside Shopify's native engine, not through variant swapping or cart hacks - The app works on every plan, not just Plus - When Shopify improves the discount system (like this year's discount combinations), we inherit it instead of fighting it Betting on the platform's newest primitive was slower in the short term. There were weeks where a Scripts-style workaround would have shipped faster. We think it is the right call for anyone who plans to still be running their store, and this app, five years from now. ## Who this is for We built Discount Prime for merchants who think about discounts as pricing strategy, not just promotions. If you sell products people naturally buy in multiples (consumables, packs, supplies, B2B-ish catalogs), volume pricing is usually the highest-leverage discount you can run, and it is exactly the kind Shopify does not offer natively. If you want the full playbook, our [complete guide to volume discounts](/blog/volume-discounts-on-shopify-the-complete-guide) walks through tier design end to end. ## What is next The near-term roadmap, in rough order: free shipping discounts with a progress bar, buy X get Y offers, and tiered pricing for customer groups. We will announce each one here on the blog as it ships. If you want to try the app, it is live on the Shopify App Store now. And if you install it in these first weeks: thank you. Early merchants get an outsized say in what we build next, and we intend to honor that. --- # Case Studies > Scenario-based promotion architectures for specific Shopify merchant profiles, plus cross-industry strategy deep dives. Merchant profiles are modeled on patterns across real Discount Prime stores. 29 case studies. --- ## Fashion Brand End-of-Season Clearance URL: https://www.discountprime.app/case-studies/fashion-end-of-season-clearance Industry: Fashion & Apparel | Business model: Retail / DTC | Campaign types: Bulk Price Update, Tiered Spend Discount, Free Shipping | Published: July 12, 2026 | Read time: 18 min > A mid-sized Shopify fashion brand with roughly 3,500 SKUs must clear winter stock before its spring launch without eroding margins or brand perception. The chosen architecture layers a bulk price update clearance collection, a tiered spend discount, and a free shipping threshold, because inventory turnover, not conversion rate, is the governing objective. Key entities: Bulk Price Update, Tiered Spend Discount, Free Shipping Threshold, Flat Product Discount, Buy X Get Y, Clearance Collection, Campaign Exclusions, Campaign Priority, Inventory Turnover, Average Order Value, Margin Protection ### Frequently asked questions **Q: Should I run a storewide sale to clear out old season inventory?** A: No, a storewide discount is the wrong tool for seasonal clearance. It unnecessarily discounts spring arrivals, premium collections, and evergreen products, so margin loss outweighs the inventory gains. A better approach isolates the aging season in a dedicated clearance collection and excludes new arrivals, gift cards, and luxury lines from the campaign entirely. **Q: What is the best discount setup for an end of season fashion clearance on Shopify?** A: Combine three campaigns rather than picking one. Use a bulk price update to build a dedicated clearance collection with clean reduced prices, a tiered spend discount to lift basket size, and a free shipping threshold to cut checkout abandonment. Together they liquidate inventory, raise average order value, and keep new collection margins protected. **Q: Is a bulk price update better than a percentage off discount for clearance?** A: For a dedicated clearance section, yes. A bulk price update shows a clean new selling price such as $125 instead of a $180 item marked 30 percent off, which converts better through psychological pricing and clearer perceived savings. Percentage discounts create more promotional excitement but apply the same cut to every SKU, risking over-discounting on high demand products. **Q: Why is Buy X Get Y a bad fit for clearing winter apparel?** A: Buy X Get Y does not solve the actual problem. Winter apparel is highly size dependent and customers rarely want duplicate jackets, so the offer fails to move the jackets clogging the warehouse. It excels at cross-selling accessories, which means accessory stock runs out first while the expensive core inventory stays unsold. **Q: How do I stop overlapping promotions from conflicting with each other?** A: Set an explicit campaign priority and use product exclusions. Running bulk price update first, then tiered spend, then shipping prevents pricing conflicts while stacking customer value. Exclusions keep spring collection items, gift cards, new arrivals, and premium capsule products out of the clearance campaign, so discounts never reach inventory you want to sell at full price. ## Executive Summary Seasonal inventory is one of the largest hidden costs in the fashion industry. Every unsold winter jacket, sweater, and pair of boots occupies warehouse space, consumes working capital, and delays investment in the next collection. This case study follows a mid-sized Shopify fashion brand preparing for its Spring collection launch. The business must aggressively reduce winter inventory without damaging the perceived value of new arrivals or training customers to expect permanent discounts. Rather than applying a blanket storewide sale, we evaluate every realistic promotional strategy available in Discount Prime and design a campaign architecture that balances inventory liquidation, profitability, customer experience, and operational simplicity. This article demonstrates how a Shopify Solutions Architect approaches promotional planning - not merely how to configure software. ## Business Background ### Merchant Profile | Attribute | Detail | |---|---| | Industry | Fashion & Apparel | | Business Model | Direct-to-Consumer (DTC) | | Platform | Shopify | | Catalog Size | Approximately 3,500 SKUs | Product Catalog: - Winter jackets - Knitwear - Hoodies - Sweaters - Boots - Accessories - New Spring Collection ### Target Customers The brand primarily serves customers aged 20–40 who purchase fashionable seasonal clothing. Typical behavior: - Purchases 2–5 items - Shops during promotional events - Highly price sensitive at season end - Responds well to urgency ### Sales Cycle Fashion operates in cycles. | Cycle | Window | |---|---| | Winter products generate revenue during | October → February | | Spring products begin launching in | Late February → April | Every week unsold inventory remains reduces warehouse efficiency and delays cash recovery. ## Business Challenges The merchant faces four interconnected problems. ### 1. Excess Winter Inventory Thousands of products remain unsold. These products are unlikely to sell at full retail price. ### 2. Cash Flow Capital is trapped inside inventory. The merchant needs liquidity to purchase Spring inventory. ### 3. Warehouse Capacity Warehouse space is nearly full. New inventory is arriving within weeks. ### 4. Brand Protection The merchant wants customers to perceive Spring products as premium. Discounting everything would hurt future profitability. ## Business Objectives Prioritized objectives: | Priority | Objective | |-----------|-----------| | 1 | Reduce seasonal inventory | | 2 | Improve cash flow | | 3 | Protect Spring collection margins | | 4 | Maintain premium brand perception | | 5 | Increase average basket value where possible | Notice that increasing conversion rate is **not** the primary KPI. Inventory turnover is. Understanding this changes the entire promotion strategy. ## Step 1 - Understanding the Business As a Shopify Solutions Architect, we first avoid discussing discounts. Instead, we ask: Why are products not selling? The answer is simple. The season is ending. Demand has naturally declined. No promotional engine can change seasonal demand permanently. Instead, promotions should accelerate purchasing before demand disappears completely. This insight influences every decision that follows. ## Step 2 - Evaluating Possible Campaign Types Several Discount Prime campaign types could potentially solve this problem. Let's evaluate each objectively. ## Option 1 - Flat Product Discount ### Description Apply a percentage discount to all Winter Collection products. Example: - 30% Off Winter Collection | Advantages | Disadvantages | |---|---| | Extremely easy to understand | Same discount for every SKU | | Fast campaign setup | Doesn't encourage larger baskets | | High customer visibility | May over-discount high-demand products | | Immediate inventory movement | | | Factor | Assessment | |---|---| | Risk | Customers may delay purchases until future sales. | | Complexity | Low | | Expected ROI | High for inventory reduction. Moderate for profitability. | ## Option 2 - Bulk Price Update Instead of displaying $180 → 30% OFF, the merchant permanently displays $125 during the campaign. | Advantages | Disadvantages | |---|---| | Cleaner pricing | Lower promotional excitement | | Higher conversion | Requires pricing strategy | | Better psychological pricing | | | Ideal for clearance sections | | ### Best Use Case Dedicated Clearance Collection ## Option 3 - Tiered Spend Discount Example Spend $150 → 10% $250 → 15% $350 → 20% | Advantages | Disadvantages | |---|---| | Higher Average Order Value | Customers buying one jacket receive no incentive. | | Moves more inventory | Inventory liquidation becomes slower. | | Better customer value | | ## Option 4 - Buy X Get Y Example Buy Jacket Receive Scarf Free | Advantages | Disadvantages | |---|---| | Excellent cross-selling | Doesn't solve jacket inventory. | | Moves accessories | Accessory inventory may disappear first. | ## Option 5 - Free Shipping Campaign | Advantages | Disadvantages | |---|---| | Removes purchase friction | Too weak as a standalone clearance strategy. | | Improves checkout completion | | ## Campaign Comparison | Campaign | Inventory Reduction | Margin Protection | Complexity | Suitability | |------------|-------------------|-------------------|------------|-------------| | Flat Discount | Excellent | Medium | Low | Excellent | | Bulk Price Update | Excellent | High | Medium | Excellent | | Tiered Spend | Medium | High | Medium | Good | | Buy X Get Y | Low | Medium | High | Limited | | Free Shipping | Low | High | Low | Support Only | ## Final Architecture Decision Rather than choosing one campaign, we combine complementary strategies. ### Campaign 1 Bulk Price Update | Attribute | Detail | |---|---| | Purpose | Create a dedicated Clearance Collection. | | Reason | Customers respond better to clean pricing than complex discount labels. | ### Campaign 2 Tiered Spend Discount | Attribute | Detail | |---|---| | Purpose | Increase basket size. | | Example | Spend $250, receive additional discount. | This moves multiple winter products simultaneously. ### Campaign 3 Free Shipping Threshold | Attribute | Detail | |---|---| | Purpose | Reduce checkout abandonment. | Instead of lowering prices further, increase perceived value. ## Why We Rejected Other Options ### Buy X Get Y Not appropriate. Winter apparel is highly size dependent. Customers rarely want duplicate jackets. ### Storewide Discount Rejected. Would unnecessarily discount: - Spring arrivals - Premium collections - Evergreen products Margin loss would outweigh inventory gains. ## Campaign Configuration ### Campaign A | Attribute | Detail | |---|---| | Type | Bulk Price Update | | Applies To | Winter Collection | | Exclusions | Spring Collection, Gift Cards, New Arrivals, Luxury Capsule Collection | | Display | Show original price with new reduced selling price. | | Reason | Customers clearly see the savings. | ### Campaign B | Attribute | Detail | |---|---| | Type | Tiered Spend | | Threshold | Spend $200, receive additional incentive. | | Reason | Customers buying one jacket often add gloves, hats, or sweaters. This naturally increases basket value. | ### Campaign C | Attribute | Detail | |---|---| | Type | Free Shipping | | Threshold | Slightly above existing average order value. | | Purpose | Encourage customers to add one more item instead of abandoning checkout. | ## Campaign Interaction Priority 1. Bulk Price Update 2. Tiered Spend 3. Shipping This sequence prevents pricing conflicts while maximizing customer value. Excluded products ensure Spring inventory never enters the clearance campaign. ## Customer Experience A shopper visits the Winter Clearance page. They immediately notice: - Reduced prices - Clear savings - Free shipping progress - Additional spending incentive Instead of feeling overwhelmed by multiple promotions, every incentive supports the same purchasing decision. ## Risk Analysis ### Risk 1 Over-discounting. **Mitigation:** Exclude premium collections. ### Risk 2 Brand dilution. **Mitigation:** Separate Clearance Collection. Never mix with Spring arrivals. ### Risk 3 Promotion overlap. **Mitigation:** Use campaign exclusions and priorities. ### Risk 4 Remaining inventory after campaign. **Mitigation:** Schedule progressively deeper discounts over time rather than starting with maximum discounts. ## Expected Business Outcomes If executed correctly, the merchant should expect: - Faster inventory turnover - Improved warehouse availability - Better cash flow - Higher average basket value - Reduced carrying costs - Stronger customer perception of value - Minimal impact on premium product positioning Rather than relying on aggressive sitewide discounts, the merchant achieves strategic inventory liquidation while protecting future revenue opportunities. ## Future Optimization Roadmap Once the clearance campaign concludes, the merchant should shift focus from liquidation to customer retention. Recommended next steps include: 1. Launch personalized offers for customers who purchased during the clearance event. 2. Introduce product bundles for the new Spring collection to increase attachment sales. 3. Schedule future seasonal campaigns in advance using Discount Prime's campaign scheduling tools. 4. Segment VIP customers and reward repeat purchases with targeted pricing strategies. 5. Analyze campaign performance to identify which categories required the deepest discounts and adjust future buying decisions accordingly. This transforms a one-time clearance event into a continuous improvement process for merchandising and promotional planning. ## Key Takeaways Successful clearance campaigns are not about offering the biggest discount. They are about removing inventory while preserving long-term profitability and brand equity. The optimal solution for this merchant is not a single promotion, but a coordinated campaign architecture that: - Separates clearance inventory from new arrivals. - Uses direct price updates for transparency. - Encourages larger baskets through spend-based incentives. - Reduces checkout friction with free shipping. - Prevents conflicts through careful campaign prioritization and exclusions. By thinking like a solutions architect rather than simply a marketer, merchants can achieve operational, financial, and customer experience goals simultaneously. ## Conclusion End-of-season sales are inevitable in fashion, but margin erosion is not. A thoughtful promotional architecture allows merchants to recover working capital, free warehouse space, and prepare for the next season without sacrificing the perceived value of their brand. For this fashion retailer, the combination of **Bulk Price Update**, **Tiered Spend Discount**, and **Free Shipping** creates a balanced strategy that aligns promotional mechanics with business objectives, delivering a sustainable and scalable approach to seasonal inventory management. --- ## Increasing AOV for a Beauty & Cosmetics Brand URL: https://www.discountprime.app/case-studies/beauty-cosmetics-increase-aov Industry: Beauty & Cosmetics | Business model: Retail / DTC | Campaign types: Buy X Get Y (BOGO), Product Spend Discount, Tiered Spend Discount, Free Shipping | Published: July 12, 2026 | Read time: 20 min > A Shopify beauty brand with roughly 1,800 SKUs converts well but customers buy only one product, so rising acquisition costs squeeze profit. The solution is a three-campaign promotion architecture: Buy X Get Y cross-sells, a skincare-only Product Spend Discount, and a free shipping threshold. Together they raise basket size while protecting margins and premium positioning. Key entities: Average Order Value, Buy X Get Y, Product Spend Discount, Tiered Spend Discount, Flat Product Discount, Free Shipping Threshold, Units Per Transaction, Customer Acquisition Cost, Cross-selling, Premium brand positioning, Skincare routine ### Frequently asked questions **Q: How can a beauty brand increase average order value without discounting everything?** A: Use targeted promotions that reward completing a routine rather than sitewide markdowns. A beauty merchant can combine Buy X Get Y cross-sells, a Product Spend Discount limited to skincare, and a free shipping threshold. This increases basket size and units per transaction while protecting margins and preserving premium brand positioning, because discounts attach to complementary add-ons instead of hero products. **Q: Why is a flat discount on all skincare products a bad idea for raising AOV?** A: A flat product discount rewards customers even when they buy only one item, so it loses margin without increasing basket size. A shopper purchasing a single cleanser still gets the markdown. It is easy to set up and simple to message, but it fails at the core objective of getting customers to add complementary products to their cart. **Q: What is the best Shopify campaign type for cross-selling skincare products?** A: Buy X Get Y works best for skincare cross-selling. Pairing a purchase like a Vitamin C Serum with 30% off any moisturizer feels educational rather than promotional, because customers naturally combine those products. It creates natural cross-selling, is easy to understand, and introduces shoppers to complementary items. The main requirement is careful product pairing to protect profitability. **Q: Where should I set my free shipping threshold to get customers to add another item?** A: Set the free shipping threshold slightly above your current average order value. That way customers only need to add one more item to qualify, which feels achievable rather than out of reach. Free shipping reduces checkout abandonment and encourages incremental purchases, but it works as a supporting campaign and is insufficient as a primary growth strategy. **Q: Should I use a tiered quantity discount for cosmetics?** A: No. Quantity-based incentives do not match beauty shopping behavior, since shoppers rarely purchase five identical moisturizers. Cosmetics customers research before buying, typically purchase one hero product, and think in terms of completing a routine. Complementary cross-sell offers and spend-based thresholds fit that behavior far better than rewarding repeat purchases of the same item. ## Executive Summary Beauty and cosmetics brands often enjoy strong conversion rates but struggle with one critical metric: **Average Order Value (AOV)**. Customers typically arrive with a specific purchase intent - a foundation, a moisturizer, or a lipstick - and leave after purchasing only that single item. Although acquisition costs continue to rise, each customer generates less revenue than the business needs for sustainable growth. This case study explores how a Shopify beauty brand can use Discount Prime to encourage customers to purchase complete skincare and makeup routines instead of individual products. Rather than relying on aggressive discounts across the entire catalog, we design a promotional architecture that increases basket size while maintaining premium brand positioning and healthy profit margins. ## Merchant Profile | Attribute | Detail | |---|---| | Industry | Beauty & Cosmetics | | Business Model | Direct-to-Consumer (DTC) | | Platform | Shopify | | Catalog Size | Approximately 1,800 SKUs | The catalog includes: - Facial cleansers - Toners - Serums - Moisturizers - Sunscreens - Foundations - Concealers - Lipsticks - Eye makeup - Beauty accessories - Gift sets ## Customer Profile The merchant targets women between 20 and 45 years old. Typical shopping behavior: - Researches products before purchasing - Usually buys one hero product - Returns every few months - Responds well to educational content - Appreciates premium packaging - Values product compatibility Unlike fashion, cosmetics purchases are rarely impulsive. Customers usually know exactly what they want. The challenge is expanding that purchase naturally. ## Business Challenges The merchant has healthy traffic and a good conversion rate. However, several growth barriers exist. ### Challenge 1 Customers purchase only one product. Typical cart: - Cleanser only or - Foundation only The remaining complementary products are ignored. ### Challenge 2 Customer Acquisition Cost continues increasing. If every customer purchases only one item, profitability declines. Increasing AOV is significantly cheaper than acquiring new customers. ### Challenge 3 Customers don't understand complete skincare routines. They often purchase Serum without buying: - Cleanser - Moisturizer - SPF This limits both customer results and merchant revenue. ### Challenge 4 Premium Branding. The merchant wants to remain a premium skincare brand. Heavy sitewide discounts would damage brand perception. ## Business Objectives Prioritized KPIs | Priority | Objective | |-----------|-----------| | 1 | Increase Average Order Value | | 2 | Increase Units Per Transaction | | 3 | Improve Cross-Selling | | 4 | Maintain Premium Brand Positioning | | 5 | Increase Customer Satisfaction | Notice something important. Inventory liquidation is **not** the goal. Neither is customer acquisition. The business already acquires customers effectively. The objective is maximizing the value of each purchase. ## Understanding Customer Psychology Before choosing campaigns, we analyze customer behavior. Beauty shoppers rarely think in terms of discounts. Instead they think: - "I already need cleanser." - "I probably should buy moisturizer too." - "I might as well complete the routine." Successful promotions reduce decision friction rather than simply lowering prices. This insight drives every architectural decision. ## Evaluating Possible Campaign Types Several Discount Prime campaigns could improve AOV. Not all are equally effective. ## Option 1 - Buy X Get Y Example: Buy Serum → Receive Moisturizer 50% Off | Advantages | Disadvantages | |---|---| | Natural cross-selling | Requires careful product pairing | | Easy to understand | Improper combinations reduce profitability | | Introduces customers to complementary products | | | Excellent customer experience | | | Factor | Assessment | |---|---| | Complexity | Medium | | Expected Business Impact | Very High | Especially for skincare routines. ## Option 2 - Product Spend Discount Example: Spend $120 on Skincare → Receive 15% Off | Advantages | Disadvantages | |---|---| | Encourages customers to add more products | Some customers may spend just below the threshold. | | Protects margins | Requires careful threshold selection. | | Works across multiple categories | | | Simple customer messaging | | | Factor | Assessment | |---|---| | Expected Impact | High | ## Option 3 - Tiered Spend Discount Example | Spend | Receive | |---|---| | $100 | 10% | | $180 | 15% | | $250 | 20% | | Advantages | Disadvantages | |---|---| | Progressively rewards larger baskets | Doesn't educate customers about complementary products. | | Highly scalable | | | Excellent during promotional events | | ## Option 4 - Flat Product Discount Discount all skincare products 15%. | Advantages | Disadvantages | |---|---| | Easy setup | Rewards customers even when purchasing only one item. | | Simple messaging | Fails to increase basket size. | ## Option 5 - Free Shipping Campaign Example: Free Shipping over $100 | Advantages | Disadvantages | |---|---| | Reduces checkout abandonment | Insufficient as the primary growth strategy. | | Encourages incremental purchases | | | Excellent supporting campaign | | ## Campaign Comparison | Campaign | AOV Impact | Margin Protection | Customer Experience | Suitability | |------------|------------|------------------|--------------------|-------------| | Buy X Get Y | Excellent | High | Excellent | Excellent | | Product Spend Discount | Excellent | High | High | Excellent | | Tiered Spend | High | Medium | High | Good | | Free Shipping | Medium | High | Good | Support Only | | Flat Discount | Low | Low | Good | Poor | ## Architectural Decision Instead of rewarding customers for purchasing more of the same product, we reward them for purchasing an entire beauty routine. The final architecture includes three coordinated campaigns. ## Campaign 1 **Buy X Get Y** | Attribute | Detail | |---|---| | Purpose | Cross-sell complementary products. | | Example | Buy Vitamin C Serum → Receive Moisturizer 30% Off | | Another example | Buy Foundation → Receive Setting Spray 40% Off | Instead of discounting the original purchase, the promotion increases basket size. ## Campaign 2 **Product Spend Discount** Example: Spend $150 on Skincare → Receive 10% Off Unlike a cart-wide discount, only skincare products count toward the threshold. This keeps the promotion strategically focused. ## Campaign 3 **Free Shipping Threshold** Purpose: Provide one additional incentive for customers who are close to completing their skincare routine. Instead of reducing product prices further, the merchant increases perceived value. ## Why Other Campaigns Were Rejected ### Flat Product Discount Rejected. Customers purchasing only one cleanser still receive the discount. The business loses margin without increasing basket size. ### Bulk Price Update Rejected. The objective is not inventory liquidation. Changing base prices permanently weakens premium positioning. ### Tiered Quantity Discount Rejected. Beauty shoppers rarely purchase five identical moisturizers. Quantity-based incentives don't match customer behavior. ## Campaign Configuration ### Campaign A **Buy X Get Y** | Attribute | Detail | |---|---| | Applies To | Premium Serums | | Reward | Moisturizers | | Discount | 30% | | Reasoning | Customers naturally combine these products. The promotion feels educational rather than promotional. | ### Campaign B **Buy X Get Y** Foundation ↓ Setting Spray or Makeup Sponge Reasoning: Encourages complete makeup routines. ### Campaign C **Product Spend Discount** | Attribute | Detail | |---|---| | Applies To | Entire Skincare Collection | | Threshold | Slightly above the existing average skincare basket. | | Purpose | Encourage customers to add one complementary product. | ### Campaign D **Free Shipping** Threshold: Slightly above current AOV. Customers only need to add one more item. Psychologically this feels achievable. ## Storefront Experience A customer visits the product page for a Vitamin C Serum. They immediately see: > Complete your skincare routine. > Add any moisturizer today and receive 30% off. As additional products are added, the cart communicates: > Only $18 away from free shipping. > Spend another $25 on skincare to unlock an additional reward. Instead of overwhelming the shopper with discounts, the experience feels like expert product guidance. ## Campaign Interaction Priority 1. Buy X Get Y 2. Product Spend Discount 3. Free Shipping Each campaign serves a unique business objective. No promotion competes with another. The customer experiences one cohesive journey. ## Business Risks | Risk | Mitigation | |---|---| | Customers purchase discounted products without understanding why they pair together. | Use complementary products only. Avoid unrelated combinations. | | Margin erosion. | Discount lower-cost complementary items instead of hero products. | | Promotion fatigue. | Limit the number of simultaneous offers shown on product pages. Maintain clean storefront messaging. | | Customers manipulate promotions. | Configure rewards to apply only to designated complementary categories. Prevent stacking beyond intended limits. | ## Expected Business Outcomes A successful implementation should produce: - Higher Average Order Value - More products per order - Better cross-category sales - Improved customer experience - Greater product discovery - Increased profitability without aggressive markdowns - Stronger customer confidence in complete beauty routines Perhaps most importantly, customers perceive the brand as a trusted beauty advisor rather than a discount retailer. ## Future Optimization Roadmap After improving AOV, the merchant should focus on increasing Customer Lifetime Value. Recommended next initiatives include: 1. Introduce loyalty-exclusive skincare bundles. 2. Launch seasonal beauty kits using Buy X Get Y campaigns. 3. Create VIP pricing for repeat customers. 4. Segment promotions based on purchase history. 5. Schedule automated holiday campaigns for Mother's Day, Black Friday, and Holiday Gift Sets. 6. Use campaign analytics to identify the highest-performing product combinations and continuously optimize cross-selling strategies. Over time, promotional architecture evolves from simple discounts into a personalized merchandising strategy. ## Key Lessons Beauty customers do not simply buy products. They buy solutions. The most effective promotional strategy therefore encourages customers to complete routines instead of purchasing isolated items. Rather than offering broad discounts across the catalog, this merchant benefits from: - Intelligent complementary offers. - Spend-based incentives focused on skincare. - Free shipping as a behavioral nudge. - Educational product recommendations integrated into promotional messaging. The result is a higher-value shopping experience that benefits both the customer and the business. ## Conclusion Increasing Average Order Value is rarely about offering larger discounts. It is about designing promotions that align with how customers naturally shop. For this beauty merchant, combining **Buy X Get Y**, **Product Spend Discount**, and **Free Shipping** creates a promotion architecture that increases basket size while preserving premium positioning and long-term profitability. By thinking beyond discounts and focusing on customer purchase behavior, the merchant transforms every order into an opportunity to educate, cross-sell, and build lasting customer relationships. --- ## Building Repeat Purchases for a Health Supplements Brand URL: https://www.discountprime.app/case-studies/supplements-repeat-purchase-strategy Industry: Health & Supplements | Business model: Retail / DTC | Campaign types: Tiered Quantity Discount, Tiered Spend Discount, Buy X Get Y (BOGO) | Published: July 12, 2026 | Read time: 17 min > A Shopify supplement merchant with roughly 450 SKUs faces low repeat purchases, rising acquisition costs, and small initial orders. The recommended architecture layers three campaigns by priority: tiered quantity discounts for replenishment, Buy X Get Y for complementary wellness routines, and product spend discounts for complete bundles, prioritizing customer lifetime value over discount depth. Key entities: Customer Lifetime Value, Tiered Quantity Discount, Buy X Get Y, Product Spend Discount, Tiered Spend Discount, Flat Product Discount, Average Order Value, Repeat Purchase Rate, Customer Acquisition Cost, Replenishment behavior ### Frequently asked questions **Q: What discount strategy works best for a Shopify supplement store with low repeat purchase rates?** A: Combine tiered quantity discounts, Buy X Get Y, and product spend discounts. Tiered quantity discounts (for example 2 bottles 5% off, 3 bottles 15% off) match natural replenishment behavior. Buy X Get Y pairs complementary products like protein with creatine to build wellness routines. Product spend discounts reward customers assembling complete health bundles. Together they lift lifetime value instead of just today's revenue. **Q: Why are flat percentage discounts bad for supplement brands?** A: Flat product discounts create little long-term customer value and train customers to wait for the next sale. They are easy to implement and deliver an immediate sales lift, but discounting individual supplements gives almost no incentive to reorder. Supplement buying is habit-driven and consumable, so promotions should reinforce replenishment and routine-building rather than simple price cuts. **Q: Which supplement products should get quantity discounts?** A: Apply tiered quantity discounts to high-consumption items such as protein, fish oil, creatine, and greens powder. Customers consume these regularly, so buying two or three units at once feels natural and reduces shipping frequency. Limit quantity discounts to products with long shelf lives, otherwise customers may over-purchase items they cannot finish before expiration. **Q: How do I use Buy X Get Y to increase average order value in a supplement store?** A: Pair products with proven complementary usage so the offer reads as guidance rather than a discount. Effective pairings include protein with recovery, vitamin D with calcium, and sleep formula with magnesium. The promotion educates customers about routines they were not aware of, improves product discovery, and grows basket size. Careful pairing matters since not every supplement naturally complements another. **Q: How do I stop customers from becoming dependent on discounts?** A: Use promotions to introduce habits rather than as permanent price reductions. Discount complementary products instead of best-selling hero products to protect margins, and keep visible offers limited to the most relevant items so messaging stays simple. Bulk price updates are unnecessary without an inventory liquidation objective, and consistent pricing preserves customer trust. ## Executive Summary For supplement brands, the first sale is only the beginning of the customer relationship. Unlike fashion or consumer electronics, supplements are consumable products. A customer who experiences positive results is likely to purchase again - provided the merchant maintains engagement and makes reordering convenient. However, many Shopify supplement stores experience an expensive problem: customers buy once, then disappear. Acquiring replacement customers becomes increasingly expensive, while the true lifetime value of existing customers remains unrealized. This case study explores how a Shopify supplement merchant can use Discount Prime to transform one-time buyers into repeat customers through strategically designed promotions that encourage replenishment, larger recurring orders, and long-term customer loyalty. Rather than maximizing discounts, the architecture focuses on maximizing customer lifetime value (CLV). ## Merchant Profile | Attribute | Detail | |---|---| | Industry | Health & Nutritional Supplements | | Business Model | Direct-to-Consumer (DTC) | | Platform | Shopify | | Catalog | Approximately 450 SKUs including: Protein powders, Vitamins, Minerals, Pre-workout formulas, Recovery supplements, Fish oils, Greens, Immune support, Sleep aids, Bundles | ## Customer Profile Typical customers include: - Fitness enthusiasts - Athletes - Busy professionals - Health-conscious adults Unlike impulse purchases, supplement buying is habit-driven. Customers typically consume products over several weeks before needing replacements. This makes retention significantly more valuable than acquisition. ## Business Challenges | Challenge | Detail | |---|---| | Low Repeat Purchase Rate | Customers purchase once but rarely return. | | High Customer Acquisition Cost | Advertising costs continue increasing. Acquiring new customers is becoming less profitable. | | Customers Forget to Reorder | Many customers simply run out of products before remembering to purchase again. | | Small Initial Orders | Most customers buy only one supplement instead of building a complete wellness routine. | ## Business Objectives | Priority | Objective | |-----------|-----------| | 1 | Increase Customer Lifetime Value | | 2 | Increase Repeat Purchases | | 3 | Increase Average Order Value | | 4 | Improve Customer Satisfaction | | 5 | Reduce Customer Acquisition Dependency | Notice the strategic difference. Revenue growth should come from existing customers rather than continually increasing marketing spend. ## Understanding Customer Behavior Supplement customers generally purchase for one of three reasons: - Solving a health problem - Improving athletic performance - Maintaining long-term wellness Once trust has been established, purchasing decisions become easier. The challenge is encouraging customers to build complete wellness routines instead of buying isolated products. Promotions should reinforce healthy habits rather than create discount dependency. ## Evaluating Available Campaign Types ## Option 1 - Product Spend Discount Example | Spend | Receive | |---|---| | $120 on Supplements | 15% Off | | Advantages | Disadvantages | |---|---| | Encourages customers to purchase multiple products. | Only influences current purchases. | | Maintains healthy margins. | Doesn't directly encourage future orders. | | Flexible across categories. | | ## Option 2 - Tiered Spend Discount Example | Spend | Receive | |---|---| | $100 | 10% | | $180 | 15% | | $250 | 20% | | Advantages | Disadvantages | |---|---| | Excellent for increasing basket size. | Focuses on order size rather than long-term retention. | | Simple messaging. | | | Scalable. | | ## Option 3 - Buy X Get Y Example | Buy | Receive | |---|---| | Protein | Electrolytes 50% Off | | Multivitamin | Omega-3 40% Off | | Advantages | Disadvantages | |---|---| | Introduces complementary products. | Requires careful pairing. | | Builds complete wellness routines. | Not every supplement naturally complements another. | | Improves product discovery. | | ## Option 4 - Tiered Quantity Discount Example | Buy | Save | |---|---| | 3 Bottles | 15% | | Advantages | Disadvantages | |---|---| | Excellent for replenishment. | Not suitable for every supplement category. | | Reduces shipping frequency. | Some customers hesitate to purchase large quantities initially. | | Encourages larger stocking purchases. | | ## Option 5 - Flat Product Discount Simple percentage discount. | Advantages | Disadvantages | |---|---| | Easy implementation. | Creates little long-term customer value. | | Immediate sales lift. | Customers simply wait for future discounts. | ## Campaign Comparison | Campaign | Repeat Purchase | AOV | CLV Impact | Suitability | |-----------|----------------|-----|-------------|-------------| | Tiered Quantity | Excellent | High | Excellent | Excellent | | Buy X Get Y | High | High | High | Excellent | | Product Spend | Medium | High | Medium | Very Good | | Tiered Spend | Medium | High | Medium | Good | | Flat Discount | Low | Low | Low | Poor | ## Final Architecture Rather than focusing on one promotion, we design a customer lifecycle strategy. ## Campaign 1 Tiered Quantity Discount Purpose: Encourage customers to purchase multiple months' supply. Example | Buy | Offer | |---|---| | 1 Bottle | Regular Price | | 2 Bottles | 5% Off | | 3 Bottles | 15% Off | This aligns perfectly with replenishment behavior. ## Campaign 2 Buy X Get Y Purpose: Expand customer wellness routines. Example | Buy | Receive | |---|---| | Protein | Creatine 30% Off | | Sleep Formula | Magnesium 25% Off | These promotions educate customers while increasing basket size. ## Campaign 3 Product Spend Discount | Spend | Receive | |---|---| | $150 | Additional Savings | This encourages customers to build comprehensive health bundles. ## Why Other Campaigns Were Rejected ### Flat Product Discount Rejected. Discounting individual supplements provides little incentive for repeat purchases. ### Bulk Price Update Rejected. There is no inventory liquidation objective. Maintaining pricing consistency is important for customer trust. ### Free Shipping as Primary Campaign Rejected. Useful as support, but insufficient to drive long-term retention. ## Campaign Configuration ### Campaign A Tiered Quantity Discount | Attribute | Detail | |---|---| | Applies To | High-consumption supplements: Protein, Fish Oil, Creatine, Greens Powder | | Reasoning | Customers consume these regularly. Buying larger quantities is natural. | ### Campaign B Buy X Get Y Pair products with proven complementary usage. Examples | Buy | Pair With | |---|---| | Protein | Recovery | | Vitamin D | Calcium | | Sleep Formula | Magnesium | The promotion acts as product education. ### Campaign C Product Spend Discount Applies only to health supplements. | Attribute | Detail | |---|---| | Exclude | Gift cards, Merchandise, Accessories | | Purpose | Reward customers building complete wellness plans. | ## Customer Journey A customer purchases protein powder. The product page recommends: > Complete your recovery routine. Add Creatine today and save 30%. After adding both products: > Spend another $18 to unlock additional savings. Instead of appearing promotional, the experience feels like nutritional guidance. ## Campaign Interaction Priority 1. Tiered Quantity 2. Buy X Get Y 3. Product Spend Each campaign addresses a different stage of the purchase decision. No unnecessary overlap exists. Customers receive increasingly valuable incentives as their commitment grows. ## Business Risks | Risk | Mitigation | |---|---| | Customers over-purchase products they cannot consume before expiration. | Limit quantity discounts to products with long shelf lives. | | Margin erosion. | Discount complementary products instead of best-selling hero products. | | Promotion complexity. | Limit visible offers to the most relevant products. Maintain simple messaging. | | Customer dependence on discounts. | Use promotions primarily to introduce habits rather than permanent price reductions. | ## Expected Business Outcomes The merchant should expect: - Higher repeat purchase frequency - Larger replenishment orders - Increased Customer Lifetime Value - Better product discovery - Higher Average Order Value - Reduced reliance on paid acquisition - Stronger customer loyalty Most importantly, revenue becomes increasingly driven by returning customers rather than continuously replacing lost ones. ## Future Optimization Roadmap Once repeat purchase behavior improves, the merchant should evolve toward personalized promotions. Recommended initiatives include: 1. Create VIP pricing for loyal customers. 2. Reward customers based on purchase history. 3. Launch seasonal wellness campaigns. 4. Introduce B2B pricing for gyms, nutritionists, and clinics. 5. Build educational product bundles around specific health goals. 6. Analyze campaign performance to identify the highest-retention product combinations. Over time, promotional architecture evolves into a customer retention engine rather than a discount engine. ## Key Lessons Retention is significantly more profitable than acquisition. The most successful supplement brands do not compete by offering the biggest discounts. Instead, they help customers build healthy habits through thoughtful promotional architecture. For this merchant, combining: - Tiered Quantity Discounts - Buy X Get Y - Product Spend Discounts creates a balanced ecosystem that encourages replenishment, expands product adoption, and strengthens long-term customer relationships. ## Conclusion The objective of this merchant is not simply to increase today's revenue. It is to maximize the lifetime value of every customer acquired. By aligning promotions with natural consumption cycles and complementary wellness routines, Discount Prime becomes more than a discount platform - it becomes a customer retention strategy that supports sustainable business growth while delivering genuine value to customers. --- ## Protecting Dropshipping Margins During Supplier Promotions URL: https://www.discountprime.app/case-studies/dropshipping-supplier-promotions Industry: Dropshipping (multi-category) | Business model: Dropshipping | Campaign types: Dropshipping Pricing, Bulk Price Update, Flat Product Discount | Published: July 12, 2026 | Read time: 15 min > A Shopify dropshipper selling consumer electronics across roughly 12,000 SKUs faces weekly supplier price swings, fluctuating shipping costs, and margins ranging from 18% to 55%. Rather than passing supplier discounts straight to customers, the store adopts rule-driven Dropshipping Pricing plus spend discounts and a free shipping threshold, protecting minimum margin while staying price competitive. Key entities: Dropshipping Pricing, Supplier cost, Margin protection, Minimum margin, Product Spend Discount, Free Shipping Threshold, Bulk Price Update, Flat Product Discount, Automatic repricing, Average Order Value ### Frequently asked questions **Q: If my dropshipping supplier gives me a 10% discount, should I lower my Shopify prices by 10%?** A: No. A supplier discount does not automatically mean the customer price should drop by the same amount. With a $40 cost and $70 retail price, a 10% supplier discount brings cost to $36. You can reduce to $66, hold at $70, or sell at $68 to improve competitiveness while increasing profit. Evaluate all three options. **Q: How do I stop supplier price changes from destroying my margins on a large Shopify catalog?** A: Make pricing rule-driven instead of manual. Define supplier cost, desired margin, minimum margin, and promotional opportunities as inputs, and let the system output dynamic customer pricing. This scales to thousands of products, recalculates margins when supplier costs rise, restores pricing automatically when promotions end, and removes manual per-product editing errors. **Q: Why is a storewide percentage discount a bad idea for a dropshipping store?** A: Because margins differ too much between products. One item may carry a 55% margin while another carries only 18%, so applying an identical discount to both makes little business sense. Flat discounts ignore supplier costs, can destroy margins, and are not scalable, which makes their suitability poor for dropshipping catalogs. **Q: What promotion types actually work for a dropshipping electronics store?** A: Three work well together: Dropshipping Pricing to automatically calculate selling prices from supplier costs and protect margin, Product Spend Discount to increase basket size without affecting pricing logic, and a Free Shipping Threshold to raise average order value while offsetting shipping expenses. Storewide discounts, Buy X Get Y, and quantity discounts are poor fits. **Q: How does margin protection work when a supplier runs a promotion?** A: The system checks whether a price reduction is actually possible before passing it on. With a $95 supplier cost, $129 desired retail, and a 15% supplier promotion, it evaluates whether profit remains acceptable and whether competitive positioning improves. If those conditions fail, pricing stays unchanged. Not every supplier discount becomes a customer discount. ## Executive Summary Dropshipping is one of the most accessible eCommerce business models, but it is also one of the least forgiving when it comes to pricing mistakes. Unlike traditional retailers, dropshipping merchants do not own inventory. Every order depends on supplier pricing, shipping costs, exchange rates, and marketplace competition. A small pricing error can eliminate an entire month's profit. Many suppliers frequently announce promotions such as: - 10% off selected products - Seasonal manufacturer discounts - Limited-time wholesale price reductions - Overstock liquidation - New product launch incentives Most Shopify merchants simply reduce retail prices by the same percentage. This approach is fundamentally flawed. A supplier discount does not automatically mean the merchant should reduce customer prices by the same amount. Instead, promotions should maximize competitiveness while protecting profit margins. This case study demonstrates how Discount Prime's **Dropshipping Pricing** architecture can automate intelligent pricing decisions without risking profitability. ## Merchant Profile | Attribute | Detail | |---|---| | Industry | Consumer Electronics & Home Gadgets | | Business Model | Dropshipping | | Platform | Shopify | | Suppliers | AliExpress, CJ Dropshipping, Local distributors, Private manufacturers | | Catalog Size | Approximately 12,000 SKUs | ## Customer Profile Customers compare prices aggressively. Typical buying behavior includes: - Multiple product comparisons - Marketplace research - Coupon usage - Price sensitivity - Fast purchasing decisions The merchant competes directly with Amazon, Temu, Walmart Marketplace, and hundreds of Shopify stores. ## Business Challenges ### Challenge 1 Supplier prices change weekly. Updating thousands of retail prices manually is impossible. ### Challenge 2 Some supplier promotions create excellent opportunities. Others are too small to justify customer discounts. ### Challenge 3 Shipping costs fluctuate. Reducing retail prices without considering shipping destroys profitability. ### Challenge 4 Margins differ significantly. Example: | Product | Margin | |---|---| | Product A | 55% | | Product B | 18% | Applying identical discounts to both products makes little business sense. ## Business Objectives | Priority | Objective | |-----------|-----------| | 1 | Protect Profit Margin | | 2 | Automatically React to Supplier Pricing | | 3 | Increase Conversion Rate | | 4 | Remain Price Competitive | | 5 | Reduce Manual Price Management | Notice the priority order. Increasing sales is important. Protecting margin is even more important. ## Understanding the Economics of Dropshipping Many merchants believe: Supplier Price ↓ Retail Price ↓ Reality is much more complex. Example: | Item | Value | |---|---| | Supplier Cost | $40 | | Retail Price | $70 | | Margin | $30 | | Supplier offers | 10% Discount | | New Cost | $36 | The merchant now has options. | Option | Action | |---|---| | Option A | Reduce selling price to $66. | | Option B | Keep price at $70. | | Option C | Sell for $68 and improve competitiveness while increasing profit. | A professional pricing strategy evaluates all three possibilities. ## Evaluating Campaign Options ## Option 1 - Flat Product Discount | Advantages | Disadvantages | |---|---| | Easy implementation. | Ignores supplier costs. | | Simple messaging. | Can destroy margins. | | | Not scalable. | | Factor | Assessment | |---|---| | Suitability | Poor | ## Option 2 - Bulk Price Update | Advantages | Disadvantages | |---|---| | Updates retail prices efficiently. | Still requires manual pricing logic. | | Useful during supplier-wide promotions. | No margin awareness. | | Factor | Assessment | |---|---| | Suitability | Moderate | ## Option 3 - Product Spend Discount | Advantages | Disadvantages | |---|---| | Encourages larger orders. | Doesn't solve dynamic supplier pricing. | | Protects profitability. | | | Factor | Assessment | |---|---| | Suitability | Support Only | ## Option 4 - Dropshipping Pricing Advantages - Automatically calculates selling prices. - Protects minimum profit. - Adapts to supplier costs. - Supports margin protection. - Scalable to thousands of products. | Factor | Assessment | |---|---| | Suitability | Excellent | ## Campaign Comparison | Campaign | Margin Protection | Automation | Scalability | Suitability | |-----------|------------------|------------|-------------|-------------| | Dropshipping Pricing | Excellent | Excellent | Excellent | Excellent | | Bulk Price Update | Medium | Medium | High | Good | | Product Spend Discount | High | Medium | High | Support Only | | Flat Discount | Low | High | High | Poor | ## Architectural Decision Instead of creating promotional discounts manually, pricing should become rule-driven. The merchant's objective is no longer: "What discount should we offer?" Instead, the question becomes: "What selling price achieves our required margin while remaining competitive?" This changes the architecture completely. ## Campaign 1 | Attribute | Detail | |---|---| | Campaign | Dropshipping Pricing | | Purpose | Automatically calculate selling prices from supplier costs. | Benefits - Margin protection - Automatic repricing - Lower operational workload - Consistent pricing strategy ## Campaign 2 | Attribute | Detail | |---|---| | Campaign | Product Spend Discount | | Purpose | Increase basket size. | Customers purchasing multiple gadgets receive additional incentives without affecting pricing logic. ## Campaign 3 | Attribute | Detail | |---|---| | Campaign | Free Shipping Threshold | | Purpose | Increase Average Order Value while offsetting shipping expenses. | ## Why Other Campaigns Were Rejected | Campaign | Decision | Reasoning | |---|---|---| | Storewide Discount | Rejected. | Margins differ too much between products. | | Buy X Get Y | Rejected. | Electronics purchases are less complementary than fashion or cosmetics. Cross-selling opportunities are limited. | | Quantity Discounts | Rejected. | Customers rarely purchase multiple units of identical electronics. | ## Pricing Architecture Instead of manually setting retail prices, the merchant defines pricing rules. | Element | Detail | |---|---| | Pricing Inputs | Supplier Cost, Desired Margin, Minimum Margin, Promotional Opportunities | | Output | Dynamic customer pricing. | This architecture dramatically reduces manual intervention. ## Margin Protection One of the greatest strengths of the architecture is preventing accidental losses. Example | Item | Value | |---|---| | Supplier Cost | $95 | | Desired Retail | $129 | | Supplier Promotion | 15% | The system evaluates whether: - Price reduction is possible. - Profit remains acceptable. - Competitive positioning improves. If not, pricing remains unchanged. Not every supplier discount becomes a customer discount. ## Customer Experience From the shopper's perspective, nothing appears complicated. They simply see: - Competitive prices - Fast promotions - Consistent pricing The intelligence exists entirely behind the scenes. ## Business Risks | Risk | Mitigation | |---|---| | Supplier costs increase unexpectedly. | Automated pricing recalculates margins. | | Race-to-the-bottom pricing. | Maintain minimum acceptable margins. | | Supplier promotions end. | Automatically restore pricing. | | Manual pricing errors. | Centralize pricing rules instead of editing individual products. | ## Expected Business Outcomes The merchant should experience: - Higher pricing consistency - Better profitability - Faster response to supplier promotions - Reduced operational workload - Improved customer competitiveness - Scalable catalog management - Lower pricing errors Most importantly, the merchant gains confidence that every sale contributes positively to the business. ## Future Optimization Roadmap Once automated pricing is established, additional strategies become possible. Recommended next steps include: 1. Introduce customer-specific pricing for wholesale buyers. 2. Create category-specific pricing rules based on competitiveness. 3. Use seasonal promotional campaigns alongside dynamic pricing. 4. Segment products by profitability to optimize promotional investment. 5. Analyze pricing performance to identify suppliers delivering the highest-margin opportunities. ## Key Lessons The biggest mistake dropshipping merchants make is confusing supplier discounts with customer discounts. Professional pricing strategies focus on profitability first and promotions second. By implementing Dropshipping Pricing alongside spend-based incentives, merchants achieve a balance between competitiveness and financial sustainability. Pricing becomes an automated business process rather than a manual marketing activity. ## Conclusion In modern dropshipping, pricing is no longer a static number. It is a dynamic business decision influenced by supplier costs, customer expectations, competitive positioning, and desired profitability. Discount Prime enables merchants to automate these decisions through intelligent pricing rules, ensuring that every promotion supports long-term business growth instead of simply increasing short-term sales. The result is a scalable pricing architecture that protects margins while allowing merchants to respond confidently to changing supplier conditions. --- ## Wholesale & B2B Tiered Pricing That Grows Volume, Not Losses URL: https://www.discountprime.app/case-studies/wholesale-b2b-tiered-pricing Industry: Wholesale & B2B | Business model: B2B / Wholesale | Campaign types: Wholesale / B2B Pricing, Tiered Unit Pricing | Published: July 12, 2026 | Read time: 15 min > A Shopify merchant selling roughly 8,000 food packaging and restaurant supply SKUs serves retail buyers, small businesses, and large distributors who each negotiate separately. Manual codes and duplicate price lists do not scale, so the recommended architecture pairs Wholesale / B2B Pricing with Tiered Spend incentives and wholesale-only Free Shipping across four customer tiers, automating pricing while protecting margins. Key entities: Wholesale / B2B Pricing, Tiered Spend Incentives, Free Shipping campaign, Discount codes, Flat product discounts, Quantity discounts, Buy X Get Y, Bulk Price Update, Customer segmentation tiers, Margin protection ### Frequently asked questions **Q: How do I give wholesale customers automatic pricing on Shopify without discount codes?** A: Use Wholesale / B2B Pricing so price becomes part of the customer's identity rather than an active promotion. Discount Prime's Wholesale / B2B Pricing assigns customer-specific prices automatically, so when a wholesale buyer logs in they see their negotiated prices with no coupon codes and no manual approval. Sales reps stop generating invoices and custom codes by hand. **Q: Why is a single flat wholesale discount like 30% off a bad idea?** A: A single flat wholesale discount is financially unstable. A customer purchasing $500 receives the same discount as one purchasing $50,000, and high-margin products end up subsidizing low-margin ones. Flat discounts also cannot distinguish customer groups or support relationship-based pricing, which is why they rate poorly on segmentation, margin control, and scalability. **Q: What customer tiers should a wholesale Shopify store set up?** A: Four tiers work well. Tier 1 retail customers get standard pricing. Tier 2 small businesses get entry-level wholesale pricing. Tier 3 professional buyers get better pricing with higher order expectations. Tier 4 strategic partners get custom pricing at the highest purchasing volume. Pricing improves as the relationship grows, which rewards loyalty and protects margins. **Q: Should I use quantity discounts or Buy X Get Y for my wholesale customers?** A: Neither works as a wholesale pricing foundation. Buy X Get Y falls flat because wholesale customers purchase based on operational needs, so cross-selling rarely influences their decisions. Quantity discounts are useful for some products but insufficient as a complete wholesale strategy. Bulk price updates are also wrong because changing base prices affects retail customers too. **Q: How do I stop retail customers from getting wholesale prices, and protect margins?** A: Restrict wholesale pricing to eligible customer groups only, and establish minimum acceptable pricing to prevent margin erosion. Create clear qualification rules so customers are not segmented incorrectly. Centralize pricing policies rather than maintaining individual discounts, which keeps pricing manageable as the catalog and customer base grow. ## Executive Summary Wholesale commerce is fundamentally different from direct-to-consumer (DTC) retail. While DTC merchants focus on maximizing the value of individual orders, B2B businesses prioritize long-term customer relationships, predictable purchasing behavior, and sustainable profit margins across large-volume transactions. Many Shopify merchants attempt to serve wholesale customers by distributing discount codes or manually creating duplicate price lists. These approaches quickly become difficult to manage as the business grows. Different customer groups require different pricing structures, minimum order quantities, volume incentives, and margin controls. This case study explores how a growing wholesale merchant can build a scalable pricing architecture using **Discount Prime's Wholesale / B2B Pricing**, allowing every customer segment to receive the appropriate pricing automatically while maintaining profitability. ## Merchant Profile | Attribute | Detail | |---|---| | Industry | Food Packaging & Restaurant Supplies | | Platform | Shopify | | Business Model | Hybrid: Direct-to-Consumer, Wholesale, Restaurants, Cafés, Corporate Buyers, Distributors | ## Product Catalog Approximately 8,000 SKUs, including: - Disposable packaging - Cups - Lids - Food containers - Cleaning products - Kitchen supplies - Commercial accessories ## Customer Segments The merchant serves multiple customer types. | Segment | Purchasing Behavior | |---|---| | Retail Customers | Purchase 1–5 products, occasionally | | Small Businesses | Purchase monthly, higher order values, need predictable pricing | | Large Distributors | Purchase pallets, require negotiated pricing, repeat frequently | ## Business Challenges | # | Challenge | |---|---| | Challenge 1 | Every customer negotiates different pricing. Managing these discounts manually is impossible. | | Challenge 2 | Sales representatives spend too much time creating invoices and custom offers. | | Challenge 3 | Large customers expect wholesale pricing automatically. Instead they must request discounts. The buying experience feels outdated. | | Challenge 4 | Some customers receive discounts that reduce profit below acceptable levels. There is no consistent pricing policy. | ## Business Objectives | Priority | Objective | |-----------|-----------| | 1 | Automate Wholesale Pricing | | 2 | Protect Profit Margins | | 3 | Increase Repeat B2B Orders | | 4 | Simplify Sales Operations | | 5 | Improve Customer Experience | ## Understanding Wholesale Economics Wholesale pricing is not simply: Retail Price ↓ 20% Discount Professional B2B pricing considers: - Purchase volume - Customer relationship - Order frequency - Gross margin - Product category - Long-term customer value The objective is to maximize lifetime revenue rather than maximizing margin on every order. ## Typical Pricing Mistakes Many merchants create only one wholesale discount. Example "All Wholesale Customers Receive 30% Off." Problems: A customer purchasing $500 receives the same discount as one purchasing $50,000. High-margin products subsidize low-margin products. The pricing model becomes financially unstable. ## Evaluating Promotional Strategies ## Option 1 - Discount Codes | Advantages | Disadvantages | |---|---| | Simple. | Easy to share. | | | No customer segmentation. | | | Poor automation. | | Factor | Assessment | |---|---| | Suitability | Poor | ## Option 2 - Flat Product Discounts | Advantages | Disadvantages | |---|---| | Easy configuration. | Cannot distinguish customer groups. | | | No relationship-based pricing. | | Factor | Assessment | |---|---| | Suitability | Poor | ## Option 3 - Tiered Spend Discounts | Advantages | Disadvantages | |---|---| | Encourages larger orders. | Still temporary promotions rather than permanent customer pricing. | | Factor | Assessment | |---|---| | Suitability | Good Support Campaign | ## Option 4 - Wholesale / B2B Pricing Advantages - Customer-specific pricing - Margin protection - Automatic pricing - Scalable - Supports long-term relationships - Excellent customer experience | Factor | Assessment | |---|---| | Suitability | Excellent | ## Comparison Matrix | Strategy | Customer Segmentation | Margin Control | Automation | Scalability | |-----------|----------------------|---------------|------------|-------------| | Discount Codes | Low | Low | Medium | Poor | | Flat Discount | Low | Low | High | Poor | | Tiered Spend | Medium | Medium | High | Good | | Wholesale Pricing | Excellent | Excellent | Excellent | Excellent | ## Architecture Decision Instead of managing promotions individually, pricing should become part of the customer's identity. The question changes from: "What promotion is active?" to "What pricing model should this customer always receive?" This creates a fundamentally different pricing architecture. ## Customer Segmentation | Tier | Segment | Pricing | |---|---|---| | Tier 1 | Retail Customers | Standard pricing. | | Tier 2 | Small Business | Entry-level wholesale pricing. | | Tier 3 | Professional Buyers | Better pricing. Higher order expectations. | | Tier 4 | Strategic Partners | Custom pricing. Highest purchasing volume. | ## Pricing Philosophy Instead of giving every customer the maximum discount immediately, pricing improves as the relationship grows. Benefits include: - Encouraging repeat purchases - Rewarding loyalty - Protecting margins - Simplifying negotiations ## Recommended Architecture | # | Campaign | Purpose | |---|---|---| | Campaign 1 | Wholesale / B2B Pricing | Automatically assign customer-specific prices. | | Campaign 2 | Tiered Spend Incentives | Reward unusually large wholesale purchases. Example: Spend beyond the customer's normal order value. Unlock additional savings. | | Campaign 3 | Free Shipping | Applied only to qualifying wholesale customers. Reduces operational friction without reducing product prices. | ## Why Other Campaigns Were Rejected ### Buy X Get Y Wholesale customers purchase based on operational needs. Cross-selling promotions rarely influence purchasing decisions. ### Bulk Price Update Changing base product prices affects retail customers. Wholesale pricing should remain customer-specific. ### Quantity Discounts Useful for some products. Insufficient as a complete wholesale pricing strategy. ## Storefront Experience When a wholesale customer logs into their account, they immediately see: - Their negotiated prices - Their available products - Consistent pricing - No coupon codes - No manual approval The experience feels like a professional B2B portal rather than a consumer storefront. ## Operational Benefits Sales representatives no longer need to: - Generate invoices manually - Create custom discount codes - Answer pricing questions repeatedly - Approve every order Pricing becomes automated. The sales team focuses on relationships instead of administration. ## Risk Analysis | Risk | Mitigation | |---|---| | Incorrect customer segmentation. | Create clear qualification rules. | | Margin erosion. | Establish minimum acceptable pricing. | | Retail customers accessing wholesale pricing. | Restrict pricing to eligible customer groups. | | Complex pricing management. | Centralize pricing policies instead of maintaining individual discounts. | ## Expected Business Outcomes The merchant should experience: - Higher wholesale retention - Faster purchasing decisions - Reduced administrative work - Consistent pricing - Stronger customer loyalty - Improved profitability - Greater pricing transparency Most importantly, pricing evolves from a negotiation process into a scalable business system. ## Future Optimization Roadmap As the wholesale business expands, additional improvements include: 1. Introduce region-specific pricing. 2. Create distributor-exclusive product catalogs. 3. Build industry-specific customer segments. 4. Combine B2B pricing with seasonal promotional campaigns. 5. Analyze purchasing behavior to optimize customer tier progression. Eventually, pricing becomes a strategic competitive advantage rather than an operational challenge. ## Key Lessons Wholesale pricing is not about offering the largest discount. It is about creating a pricing system that rewards valuable customers while protecting the long-term health of the business. Discount Prime's Wholesale / B2B Pricing enables merchants to automate this process, delivering personalized pricing experiences without increasing operational complexity. The result is stronger customer relationships, higher purchasing frequency, and a scalable foundation for B2B growth. ## Conclusion As wholesale businesses grow, manual pricing inevitably becomes unsustainable. A modern pricing architecture should recognize customer relationships, automate pricing decisions, and preserve profitability across every transaction. By combining **Wholesale / B2B Pricing**, **Tiered Spend incentives**, and carefully designed customer segmentation, merchants can create a professional purchasing experience that scales with their business while maintaining healthy margins and operational efficiency. --- ## Cross-Selling Architecture for Home & Furniture Brands URL: https://www.discountprime.app/case-studies/home-furniture-cross-selling Industry: Home & Furniture | Business model: Retail / DTC | Campaign types: Buy X Get Y (BOGO), Tiered Spend Discount, Free Shipping | Published: July 12, 2026 | Read time: 22 min > A premium furniture retailer with $4 million in annual revenue and a $520 average order value grows by selling complete rooms, not isolated products. The promotion architecture layers room bundles, Buy X Get Y, spend-based discounts, and a free shipping threshold, because customers buy a finished living space and simple decisions convert better than random recommendations. Key entities: Cross-selling, Average Order Value, Bundle Pricing, Buy X Get Y, Product Spend Discount, Free Shipping Threshold, Flat Discounts, Room Bundles, Products Per Order, Decision Fatigue ### Frequently asked questions **Q: How do I increase average order value on my Shopify furniture store?** A: Build a promotion ecosystem rather than a single discount. Run room bundles to sell complete environments, Buy X Get Y to encourage complementary purchases, spend-based discounts to raise basket value, and a free shipping threshold to reduce checkout friction. Each promotion serves a different objective, so they reinforce each other instead of competing for the same customer. **Q: Why don't product recommendation widgets work for cross-selling?** A: Recommendation widgets fail because they do not tell a story. A customer viewing a sofa sees a random lamp, a random chair, a random cabinet. The suggestions may be technically correct, but psychologically they fall flat. Customers need guidance toward their next logical purchase, not random suggestions, so cross-selling must be designed as a purchase journey rather than a product list. **Q: Is bundle pricing better than a flat discount for furniture?** A: Bundle pricing is far stronger. Furniture buyers face decision fatigue across measurements, colors, materials, budget, and delivery, and bundles collapse five purchasing decisions into one. Simple decisions convert better. Flat discounts, by contrast, give money away to every customer including those already willing to buy, which is why they rank lowest among promotion strategies. **Q: What promotions should a furniture store run to sell more than one item per order?** A: Prioritize four promotions in this order: bundle pricing, Buy X Get Y, product spend discount, then free shipping. For example, buy a dining table and receive dining chairs at 20 percent off, or spend $2,000 and receive 10 percent off. A free shipping progress bar such as spend another $150 to unlock free delivery nudges customers to add lamps, cushions, and decor. **Q: What metrics should I track to know if my cross-selling is working?** A: Revenue alone is not enough. Track average order value, products per order, bundle adoption rate, cross-sell rate, revenue per visitor, gross margin, checkout completion, and customer lifetime value. Every metric reveals a different part of the purchasing journey, so watching them together shows whether customers are genuinely completing rooms rather than buying isolated products. ## Introduction One of the biggest growth opportunities for Shopify merchants isn't acquiring more customers. It's selling **more products to customers who are already buying.** This is especially true in the home and furniture industry. A customer buying a dining table rarely needs *only* a dining table. They also need: - Chairs - Lighting - Rugs - Tableware - Decorative accessories - Storage - Wall art The challenge is that most merchants attempt cross-selling incorrectly. They simply display: > "You may also like..." Unfortunately, product recommendations alone rarely change customer behavior. Successful cross-selling requires understanding **why** customers purchase complementary products and designing promotions that naturally guide them toward completing an entire living space instead of purchasing isolated products. This guide explains how a Shopify Solutions Architect designs a complete cross-selling architecture using Discount Prime. ## Why Cross-Selling Matters More Than Customer Acquisition Customer acquisition costs continue to increase every year. For many furniture retailers: - Paid advertising becomes more expensive. - Competition increases. - Profit margins shrink. Increasing Average Order Value by just 15% often produces greater profit than increasing traffic by 30%. That's because acquiring an existing customer's second product costs almost nothing. Cross-selling is therefore one of the highest ROI activities available to Shopify merchants. ## Merchant Scenario Imagine a premium furniture retailer selling: - Sofas - Dining Tables - Coffee Tables - TV Units - Office Furniture - Rugs - Lamps - Decorative Accessories | Attribute | Detail | |---|---| | Annual Revenue | $4 Million | | Average Order Value | $520 | **Business Goals** - Increase Average Order Value - Increase Products Per Order - Improve Customer Experience - Increase Margin - Reduce Marketing Dependency ## Understanding Customer Psychology A customer doesn't buy furniture. They buy a home. Nobody wakes up thinking: "I want a coffee table." They think: "I want my living room to feel complete." That distinction changes the entire promotional strategy. The objective isn't selling another product. The objective is helping customers complete a room. ## Traditional Cross-Selling Doesn't Work Many stores rely on simple recommendation widgets. | Attribute | Detail | |---|---| | Example | Customers viewing a sofa see: Random Lamp, Random Chair, Random Cabinet | The recommendations may be technically correct. But psychologically they fail. Why? Because they don't tell a story. Customers need guidance. Not random suggestions. ## Thinking Like a Solutions Architect Instead of asking: "What products should we recommend?" We ask: "What is the customer's next logical purchase?" This transforms cross-selling from product promotion into purchase journey design. ## Step One ### Define Complete Room Solutions Rather than thinking in products... Think in environments. | Room | Purchase Journey | |---|---| | Living Room | Sofa → Coffee Table → Rug → Lighting → Decor | | Dining Room | Dining Table → Dining Chairs → Sideboard → Lighting | | Bedroom | Bed → Nightstands → Mattress → Storage | | Office | Desk → Chair → Monitor Stand → Lighting | Each journey becomes a promotional opportunity. ## Evaluating Promotion Strategies ## Strategy 1 ### Buy X Get Y | Factor | Assessment | |---|---| | Example | Buy Dining Table, receive Dining Chairs 20% OFF | | Architecture Score | ★★★★★ | **Advantages** - Natural purchasing behavior - Excellent customer experience - Higher basket value - Easy messaging ## Strategy 2 ### Bundle Pricing | Factor | Assessment | |---|---| | Example | Complete Living Room Bundle | | Includes | Sofa, Coffee Table, Rug | | Price | Bundle Price | | Architecture Score | ★★★★★ | **Advantages** - Simplifies buying decisions - Higher perceived value - Better conversion - Premium presentation ## Strategy 3 ### Product Spend Discount | Factor | Assessment | |---|---| | Spend | $2,000 | | Receive | 10% OFF | | Advantages | Encourages customers to complete rooms instead of purchasing individual products. | | Architecture Score | ★★★★★ | ## Strategy 4 ### Free Shipping Progress Furniture shipping is expensive. Instead of lowering prices... Increase perceived value. | Factor | Assessment | |---|---| | Example | Spend another $150, unlock Free Delivery | | Architecture Score | ★★★★☆ | Customers naturally add: - Lamps - Cushions - Decor ## Strategy 5 ### Flat Discounts Simple. Easy. Effective? Not really. Every customer receives a discount. Even customers already willing to purchase. | Factor | Assessment | |---|---| | Architecture Score | ★★☆☆☆ | ## Final Promotion Architecture Instead of one promotion... We build an ecosystem. ### Campaign One | Attribute | Detail | |---|---| | Promotion | Room Bundles | | Purpose | Sell complete environments. | ### Campaign Two | Attribute | Detail | |---|---| | Promotion | Buy X Get Y | | Purpose | Encourage complementary purchases. | ### Campaign Three | Attribute | Detail | |---|---| | Promotion | Spend-Based Discounts | | Purpose | Increase basket value. | ### Campaign Four | Attribute | Detail | |---|---| | Promotion | Free Shipping Threshold | | Purpose | Reduce checkout friction. | ## Customer Journey Imagine a customer shopping for a sofa. | Store | Customer Journey | |---|---| | Traditional Store | Customer buys sofa. Leaves. Finished. | | Architected Store | Customer buys sofa → Recommended Coffee Table → Recommended Rug → Bundle Savings → Spend Progress → Free Shipping Goal → Complete Living Room | Same customer. Same traffic. Much higher revenue. ## Campaign Priority 1. Bundle Pricing 2. Buy X Get Y 3. Product Spend Discount 4. Free Shipping Each promotion serves a different objective. None compete. Everything feels intentional. ## Why Bundle Pricing Wins Customers experience decision fatigue. Furniture purchases involve: - Measurements - Colors - Materials - Budget - Delivery Bundles reduce complexity. Instead of making five purchasing decisions... Customers make one. Simple decisions convert better. ## Storefront Experience | Stage | Flow | |---|---| | Product Page | Premium Sofa → "Complete Your Living Room" → Coffee Table → Matching Rug → Bundle Savings → Progress Toward Free Shipping → Checkout | The shopping experience feels like working with an interior designer instead of browsing a catalog. ## Measuring Success Revenue isn't enough. Track: - Average Order Value - Products Per Order - Bundle Adoption Rate - Cross-Sell Rate - Revenue Per Visitor - Gross Margin - Checkout Completion - Customer Lifetime Value Every metric reveals a different part of the purchasing journey. ## Common Mistakes - ❌ Random recommendations - ❌ Discounting premium furniture - ❌ Showing too many promotions - ❌ Mixing unrelated categories - ❌ Ignoring customer purchase intent - ❌ Treating accessories as afterthoughts ## Future Optimization As the business grows: - Create room-specific landing pages. - Develop seasonal furniture bundles. - Offer exclusive pricing for interior designers. - Introduce B2B pricing for hospitality businesses. - Analyze which products naturally sell together. - Replace assumptions with data. ## Enterprise Scaling Strategy Once the merchant operates multiple brands or international stores, promotions should become increasingly personalized. Future architecture may include: - Customer-specific room recommendations - Regional pricing - Seasonal merchandising - AI-powered product pairing - Dynamic promotional rules - Margin-aware campaign optimization At this stage, Discount Prime evolves from a discount engine into a merchandising platform. ## Key Lessons Successful cross-selling isn't about showing more products. It's about helping customers achieve their goals. The strongest furniture brands don't sell sofas. They sell living rooms. They don't sell dining tables. They sell memorable family dinners. Promotions should reinforce that emotional outcome. By combining: - Bundle Pricing - Buy X Get Y - Spend-Based Discounts - Free Shipping Progress merchants increase revenue while improving the customer experience. Customers feel guided rather than pressured. ## Conclusion Cross-selling is one of the most profitable growth strategies available to Shopify merchants. Yet many stores reduce it to a "Related Products" widget. A true promotion architecture goes much further. It understands customer intent. It organizes products into meaningful journeys. It rewards customers for completing solutions rather than purchasing isolated items. With Discount Prime, merchants can design sophisticated cross-selling strategies that increase Average Order Value, strengthen brand perception, and create shopping experiences that feel consultative instead of transactional. The result is not simply higher revenue. It is a better way to sell. --- ## Building a Free Shipping Strategy That Actually Increases Profit URL: https://www.discountprime.app/case-studies/profitable-free-shipping-strategy Industry: All industries | Business model: Retail / DTC | Campaign types: Free Shipping, Tiered Spend Discount | Published: July 12, 2026 | Read time: 22 min > Free shipping on every order raises conversion but destroys margin, as one Shopify home decor retailer found with a $78 average order value against $11 shipping. The better approach is threshold-based free shipping set slightly above current average order value, reinforced with progress bars, spend discounts, and Buy X Get Y, so shipping changes buying behavior instead of just absorbing cost. Key entities: Free shipping threshold, Average Order Value, Gross margin, Contribution margin, Progress bar, Buy X Get Y, Product spend discount, VIP free shipping, Cart abandonment, Customer segmentation ### Frequently asked questions **Q: Is offering free shipping on every order a good idea for my Shopify store?** A: Usually not. Free shipping on every order is simple and attractive, but it is expensive, reduces profit, and encourages small purchases. A home decor store with a $78 average order value and $11 average shipping cost saw higher conversion but lower profitability because customers happily bought a single candle or cushion, and many of those orders lost money. **Q: How do I set a free shipping threshold that actually increases average order value?** A: Set the threshold slightly above your current average order value, not below it. With an average order value of $78, a $95 free shipping threshold works better than $50 because it prompts customers to ask what else they can add. Setting thresholds below current average order value is a common mistake that gives away shipping on baskets customers would have bought anyway. **Q: Why do customers prefer free shipping over an equivalent discount?** A: People dislike paying separately for delivery. A $100 product with free shipping and a $92 product with $8 shipping are financially identical but psychologically very different. Free shipping removes that friction, which means it creates perceived value without reducing product prices. That is why behavioral economists find customers often value free shipping more than an equal product discount. **Q: Do cart progress bars really help increase order value?** A: Yes. A progress bar showing a customer they are only $12 away from free shipping creates motivation, curiosity, achievement, and momentum. Most customers respond by adding products rather than removing them. It feels like progress rather than marketing, which is why visual goal tracking is increasingly common in eCommerce and why not communicating progress is a common mistake. **Q: What metrics should I track to know if my free shipping promotion is profitable?** A: Track profitability, not just free shipping order counts. The metrics that matter are average order value, shipping cost percentage, gross margin, revenue per visitor, cart abandonment, products per order, checkout conversion, and net profit per order. Revenue without profitability is misleading, so calculate contribution margin including cost of goods, shipping, transaction fees, and marketing cost before launching any shipping incentive. ## Introduction Ask almost any Shopify merchant what promotion converts best, and one answer appears repeatedly: **Free Shipping.** Customers love it. Marketing teams love advertising it. Conversion rates often improve immediately. But here's the uncomfortable truth: **free shipping is one of the least understood promotions in eCommerce.** Many merchants simply display: > Free Shipping on All Orders Sales increase. Profit disappears. Why? Because shipping isn't free. The merchant is paying for it. This article explains how Shopify merchants should think about free shipping - not as a marketing expense, but as a strategic tool for influencing customer behavior while protecting profitability. Instead of asking: > "Should we offer free shipping?" A Solutions Architect asks: > "What customer behavior should free shipping encourage?" That question changes everything. ## The Psychology Behind Free Shipping Behavioral economists have studied free shipping for years. Interestingly, customers often value **free shipping more than an equivalent product discount.** For example: | Option | Product | Shipping | |---|---|---| | Option A | $100 | Free | | Option B | $92 | $8 | Financially identical. Psychologically completely different. People dislike paying separately for delivery. Free shipping removes that psychological friction. The lesson? Free shipping creates value without necessarily reducing product prices. ## Merchant Scenario Imagine a Shopify home décor retailer. | Attribute | Detail | |---|---| | Annual Revenue | $3.2 Million | | Average Order Value | $78 | | Average Shipping Cost | $11 | | Gross Margin | 52% | The merchant currently offers: ✔ Free Shipping On Every Order **Results:** higher conversion, lower profitability. Customers happily purchase one candle. One cushion. One picture frame. The merchant loses money fulfilling many of these orders. The promotion encourages the wrong behavior. ## Business Objectives The merchant wants to: - Increase Average Order Value - Maintain Conversion Rate - Protect Gross Margin - Reduce Small Orders - Improve Customer Experience Notice something important. The objective isn't reducing shipping costs. The objective is changing purchasing behavior. ## The Wrong Way to Offer Free Shipping Many merchants believe: > Higher Conversion = Better Promotion Not always. Consider: | Attribute | Detail | |---|---| | Average Order | $45 | | Shipping Cost | $12 | | Gross Margin | 40% | Giving away shipping removes a large portion of total profit. Sales increase. Profit declines. Growth becomes unsustainable. ## Thinking Like a Solutions Architect Instead of asking: > "When should shipping become free?" Ask: > "What basket size creates enough profit to justify free shipping?" This small change transforms shipping from a cost into an investment. ## Step One ### Understand Contribution Margin Before creating any promotion, calculate: 1. Revenue 2. Cost of Goods 3. Shipping 4. Transaction Fees 5. Marketing Cost 6. Net Contribution Only after understanding contribution margin should shipping incentives be introduced. ## Step Two ### Determine the Ideal Free Shipping Threshold Suppose: | Attribute | Detail | |---|---| | Current Average Order Value | $78 | Rather than setting free shipping at $50, set it slightly above current purchasing behavior. **Example:** Free Shipping Over $95. Now customers naturally ask: "What else can I add?" Exactly the behavior we want. ## Customer Psychology Imagine a customer has $83 in their cart. The store says: > You're only **$12 away** from Free Shipping. What happens? Most customers don't remove products. They add products. This is one of the strongest psychological effects in retail. Customers begin searching for: - Candles - Decorative accessories - Small furniture - Wall décor - Storage baskets Instead of paying for shipping… they receive another product. Everyone wins. ## Promotion Strategies Compared ### Strategy One Free Shipping On Every Order | Advantages | Disadvantages | |---|---| | Simple. | Expensive. | | Highly attractive. | Reduces profit. | | | Encourages small purchases. | | Factor | Assessment | |---|---| | Architecture Score | ★★☆☆☆ | ### Strategy Two Threshold-Based Free Shipping Advantages - Increases AOV. - Protects margins. - Easy messaging. | Factor | Assessment | |---|---| | Architecture Score | ★★★★★ | ### Strategy Three VIP Free Shipping Offer free shipping only to: - Loyalty Members - VIP Customers - Repeat Buyers Advantages - Rewards loyalty. - Improves retention. | Factor | Assessment | |---|---| | Architecture Score | ★★★★★ | ### Strategy Four Category-Based Free Shipping Example: | Category | Shipping | |---|---| | Furniture | Free Shipping | | Accessories | Standard Shipping | Advantages - Protects margins. - Matches operational costs. | Factor | Assessment | |---|---| | Architecture Score | ★★★★☆ | ## The Discount Prime Architecture Instead of relying on a single promotion, we create a behavioral system. | Campaign | Mechanism | Purpose | |---|---|---| | Campaign One | Free Shipping Threshold | Increase basket value. | | Campaign Two | Product Spend Discount | Encourage customers to continue shopping after reaching the shipping threshold. | | Campaign Three | Buy X Get Y | Recommend complementary products. Customers reach shipping goals naturally. | | Campaign Four | Progress Bar | Visual motivation. Show customers exactly how close they are to unlocking free shipping. Progress creates momentum. | ## Customer Journey 1. Customer enters store. 2. Adds one table lamp. 3. Cart Value: $82. 4. Progress Bar: Only $13 until Free Shipping. 5. Customer adds candles. 6. Cart: $97. 7. Free Shipping unlocked. 8. Checkout completed. Revenue increased. Shipping cost stayed constant. Customer satisfaction improved. ## Why Progress Bars Matter People love finishing goals. A progress bar creates: - Motivation - Curiosity - Achievement - Momentum Instead of feeling like marketing, it feels like progress. This is why modern eCommerce increasingly uses visual goal tracking. ## Measuring Success Don't simply monitor: ✔ Number of Free Shipping Orders Instead measure: - Average Order Value - Shipping Cost Percentage - Gross Margin - Revenue Per Visitor - Cart Abandonment - Products Per Order - Checkout Conversion - Net Profit Per Order Revenue without profitability is misleading. ## Common Mistakes - ❌ Free shipping on every order. - ❌ Shipping thresholds below current AOV. - ❌ Ignoring shipping costs. - ❌ Static thresholds all year. - ❌ Not communicating progress. - ❌ Offering free shipping on oversized products without analysis. ## Advanced Strategies As the business grows, free shipping becomes more sophisticated. Examples include: - Seasonal thresholds. - Region-specific shipping rules. - VIP-only shipping. - Wholesale shipping policies. - Dynamic thresholds during promotional events. - Combined promotional goals. Instead of one universal shipping rule, different customer segments receive different incentives. ## Enterprise Architecture Large Shopify merchants often combine: - Free Shipping - Product Spend Discounts - Bundles - Customer Segmentation - Wholesale Pricing - Dynamic Campaign Priorities Every promotion supports another. No promotion operates independently. This is promotion architecture - not promotion management. ## Expected Business Outcomes Merchants implementing threshold-based free shipping typically experience: - Higher Average Order Value - More products per order - Lower shipping cost percentage - Better checkout completion - Higher customer satisfaction - Improved profitability - Stronger customer engagement Most importantly: customers feel rewarded rather than charged. ## Key Lessons Free shipping should never exist simply because competitors offer it. It should encourage specific customer behavior. The best shipping strategy: - Protects margins. - Encourages larger baskets. - Creates visual purchasing goals. - Integrates with other promotions. - Improves customer experience. Shipping is not merely a logistics expense. It is one of the most powerful behavioral tools available to Shopify merchants. ## Conclusion Free shipping has become an expectation in modern eCommerce. However, successful merchants understand that expectations must be managed intelligently. Instead of eliminating shipping costs indiscriminately, they design promotional architectures that reward customers for behaviors that improve business performance. By combining threshold-based free shipping, progress bars, complementary product recommendations, and spend-based incentives, merchants transform shipping from a business expense into a strategic growth engine. The result is higher Average Order Value, healthier margins, and a customer experience that feels effortless rather than promotional. The best free shipping strategy isn't the cheapest one. It's the one that changes customer behavior in ways that benefit everyone. --- ## Seasonal Promotion Planning for Shopify URL: https://www.discountprime.app/case-studies/seasonal-promotion-planning Industry: All industries | Business model: Retail / DTC | Campaign types: Campaign Scheduling, Bulk Price Update, Tiered Spend Discount | Published: July 12, 2026 | Read time: 24 min > Shopify merchants who launch discounts only when sales slow train customers to wait for the next sale. A better approach plans promotions across four seasons: growth through bundles and Buy X Get Y, expansion through spend thresholds, retention through VIP pricing, and inventory optimization through clearance. Campaigns follow a 90-day planning timeline, because architecture beats reactive discounting. Key entities: Seasonal promotion planning, Promotion calendar, Buy X Get Y, Bundle pricing, Tiered spend discounts, Bulk price updates, Wholesale pricing, Customer segmentation, Campaign priorities and exclusions, Average order value ### Frequently asked questions **Q: When should I start planning a seasonal promotion for my Shopify store?** A: Start 90 days before launch. That first phase is business planning: which products will launch, which inventory needs liquidation, which categories deserve investment, and which customer segments to target. Campaign design follows at 60 days, configuration at 30 days, marketing preparation at 14 days, then monitoring during launch week and analysis afterward. **Q: What kind of discount should I run if I want to increase average order value?** A: Use a product spend discount to lift average order value. Different business goals map to different mechanics: Buy X Get Y for cross-selling, bulk price updates for clearing inventory, tiered spend for rewarding large orders, tiered quantity for increasing units, wholesale pricing for customer-specific rates, and free shipping for reducing checkout friction. **Q: Why do my discounts stop working over time?** A: Running discounts only when sales slow trains customers to wait for the next sale, which makes revenue unpredictable and promotions less effective. Reactive merchants manage discounts; high-performing merchants design promotional architectures built around what customers will want next month, next quarter, and next season. Promotions belong inside an annual merchandising strategy, not scattered as isolated events. **Q: How do I stop multiple discounts from conflicting with each other on Shopify?** A: Define priority, eligibility, exclusions, and customer segments for every campaign. Running several unrelated promotions at once, such as a 20% collection discount plus Buy X Get Y plus free shipping, can produce unexpected pricing behavior. Instead, layer campaigns so each supports the next stage of the customer journey and nothing overlaps accidentally. **Q: What metrics should I track to know if a seasonal promotion worked?** A: Track gross sales, net sales, gross margin, average order value, units per transaction, conversion rate, repeat purchase rate, inventory turnover, and customer lifetime value. Revenue alone is not enough, since each metric answers a different business question. Measuring only revenue is one of the most common seasonal promotion mistakes, alongside ignoring inventory levels and skipping post-campaign review. ## Introduction Most Shopify merchants think about promotions only when sales begin to slow down. Traffic drops. Conversion decreases. Inventory starts accumulating. Then someone says: > "Let's run a discount." Although this reaction is common, it is also one of the biggest reasons promotions become less effective over time. High-performing merchants don't create promotions because sales are declining. They create promotions because **they already know what customers will want next month, next quarter, and next season.** The difference is simple: reactive merchants manage discounts. Successful merchants design promotional architectures. This article explores how Shopify merchants should plan promotions throughout the entire year using Discount Prime - not as isolated campaigns, but as an integrated business strategy. ## Promotions Are Not Events Many businesses think promotions look like this: January → Nothing → February → Nothing → Black Friday → 50% OFF → Christmas → 40% OFF → Nothing This creates unpredictable revenue. Customers quickly learn: > "I'll wait for the next sale." Instead, promotions should become part of an annual merchandising strategy. ## Why Seasonal Planning Matters Every retail business has predictable buying cycles. | Industry | Buying Cycles | |---|---| | Fashion | Spring Collection, Summer Collection, Fall Collection, Winter Clearance | | Beauty | Mother's Day, Holiday Gift Sets, Valentine's Day, Black Friday | | Home & Furniture | Spring Renovation, Back to School, Holiday Decorating, End-of-Year Clearance | | Electronics | Product Launches, Prime Day, Back to School, Black Friday, Cyber Monday | Although products differ, the planning process remains remarkably similar. ## Merchant Scenario Imagine a Shopify merchant selling home décor products. | Attribute | Detail | |---|---| | Annual Revenue | $6 Million | | Catalog | 4,500 Products | | Marketing Team | 6 Employees | | Operations Team | 18 Employees | Without planning, every promotional campaign becomes an emergency project. With planning, campaigns become predictable business processes. ## The Four Seasons of Promotion Instead of thinking in months, think in business objectives. ## Season One ### Growth | Factor | Detail | |---|---| | Objective | Acquire customers. | | Recommended Promotions | Bundles, Buy X Get Y, Product Spend Discounts | | Avoid | Heavy markdowns. | The goal is introducing customers to the brand. ## Season Two ### Expansion | Factor | Detail | |---|---| | Objective | Increase Average Order Value. | | Recommended Promotions | Bundle Pricing, Tiered Spend Discounts, Free Shipping Thresholds | | Focus | Cross-selling. | ## Season Three ### Retention | Factor | Detail | |---|---| | Objective | Increase Customer Lifetime Value. | | Recommended Promotions | VIP Pricing, Quantity Discounts, Personalized Promotions | | Focus | Reward loyal customers instead of acquiring new ones. | ## Season Four ### Inventory Optimization | Factor | Detail | |---|---| | Objective | Recover working capital. | | Recommended Promotions | Bulk Price Updates, Collection Discounts, Clearance Campaigns | This is where deeper discounts become appropriate. ## The Promotion Calendar Professional merchants rarely create campaigns one week before launch. Instead, campaigns follow a structured timeline. | Phase | What Happens | |---|---| | 90 Days Before | **Business Planning.** Questions: Which products will launch? Which inventory requires liquidation? Which categories deserve investment? Which customer segments should be targeted? | | 60 Days Before | **Campaign Design.** Determine: Promotion Types, Customer Segments, Budget, Margin Targets, Success Metrics. | | 30 Days Before | **Configuration.** Create Discount Prime campaigns. Test campaign interactions. Verify exclusions. Validate priorities. | | 14 Days Before | **Marketing Preparation.** Prepare: Email Campaigns, Landing Pages, Product Collections, Advertising Assets, Social Media. | | Launch Week | Monitor: Conversion, Revenue, Margin, Customer Feedback, Inventory Movement. | | After Campaign | Analyze everything. The promotion may end. Learning never ends. | ## Choosing the Right Campaign Different business goals require different promotional mechanics. | Business Goal | Recommended Campaign | |---------------|---------------------| | Increase AOV | Product Spend Discount | | Cross-Sell Products | Buy X Get Y | | Clear Inventory | Bulk Price Update | | Reward Large Orders | Tiered Spend | | Increase Quantity | Tiered Quantity | | Customer-Specific Pricing | Wholesale Pricing | | Margin Protection | Dropshipping Pricing | | Reduce Checkout Friction | Free Shipping | One promotion cannot solve every problem. Architecture always beats simplicity. ## Promotion Layering One of the biggest mistakes merchants make is activating five unrelated promotions simultaneously. Instead, each campaign should support another. Example: Product Launch → Bundle Pricing → Spend Threshold → Free Shipping → Customer Retention Every promotion supports the next stage of the customer journey. ## Campaign Priorities Imagine three promotions: 20% Collection Discount → Buy X Get Y → Free Shipping Without priorities, unexpected pricing behavior may occur. Professional promotional systems define: - Priority - Eligibility - Exclusions - Customer Segments Every campaign has a purpose. Nothing overlaps accidentally. ## Customer Segmentation Not every customer deserves the same promotion. Example: | Customer Segment | Promotion | |---|---| | First-Time Visitors | Welcome Offers | | Returning Customers | Cross-Sell Campaigns | | VIP Customers | Exclusive Pricing | | Wholesale Buyers | B2B Pricing | Segmenting promotions improves profitability while enhancing customer experience. ## Measuring Success Seasonal promotions should never be evaluated using revenue alone. Track: - Gross Sales - Net Sales - Gross Margin - Average Order Value - Units Per Transaction - Conversion Rate - Repeat Purchase Rate - Inventory Turnover - Customer Lifetime Value Each metric answers a different business question. ## Common Seasonal Mistakes - ❌ Planning promotions too late. - ❌ Running the same promotion every holiday. - ❌ Ignoring inventory levels. - ❌ Forgetting customer segmentation. - ❌ Discounting new arrivals. - ❌ Measuring only revenue. - ❌ Never reviewing campaign performance. ## Enterprise Promotion Calendar Large Shopify merchants often maintain annual promotional roadmaps. Example: | Month | Campaign | |---|---| | January | Inventory Cleanup | | February | Spring Launch | | April | Easter Campaign | | May | Mother's Day | | June | Summer Collection | | August | Back to School | | October | Holiday Preparation | | November | Black Friday | | December | Holiday Gifts | Notice something important. Nothing is reactive. Everything is planned. ## Promotion Architecture Using Discount Prime Rather than creating independent campaigns throughout the year, merchants should build reusable promotional frameworks. For example: | Layer | Component | |---|---| | Foundation Layer | Customer Segmentation | | Growth Layer | Bundle Promotions | | Conversion Layer | Spend Discounts | | Retention Layer | Loyalty Campaigns | | Operational Layer | Bulk Price Updates | | Optimization Layer | Analytics | Instead of rebuilding campaigns every season, merchants optimize an existing architecture. ## Expected Business Outcomes Merchants following structured seasonal planning typically experience: - More predictable revenue - Better inventory turnover - Higher Average Order Value - Improved customer retention - Reduced operational stress - Better promotional consistency - Stronger profitability Most importantly, marketing becomes proactive rather than reactive. ## Key Lessons Successful promotions don't begin with discounts. They begin with planning. The highest-performing Shopify merchants understand: every campaign should support a business objective. Every promotion should influence customer behavior. Every season requires a different promotional strategy. Discount Prime provides the flexibility to execute these strategies, but success comes from the architecture behind the campaigns - not simply activating more discounts. ## Conclusion Seasonal promotions should never feel like emergency responses to declining sales. Instead, they should be carefully designed components of an annual growth strategy. By aligning promotional mechanics with merchandising goals, customer behavior, inventory planning, and profitability targets, Shopify merchants can transform promotions into one of their strongest competitive advantages. The businesses that win each season aren't necessarily the ones offering the biggest discounts. They're the ones who planned the season before it began. --- ## Enterprise Promotion Architecture for Shopify URL: https://www.discountprime.app/case-studies/enterprise-promotion-architecture Industry: Fashion & Lifestyle Retail | Business model: Retail / Enterprise | Campaign types: Multiple campaign types, Conflict management, Campaign priorities | Published: July 12, 2026 | Read time: 40 min > NorthPeak Fashion, a $62 million Shopify Plus retailer with 75,000 products across 12 countries, faced eleven conflicting Black Friday promotional rules. Rather than adding discounts, it built a promotion architecture: a fixed evaluation order from identity resolution through shipping, plus a priority hierarchy where employee and wholesale pricing outrank retail campaigns, producing predictable pricing and protected margins. Key entities: Promotion architecture, Conflict matrix, Campaign priority hierarchy, Identity resolution, Wholesale pricing, VIP loyalty program, Outlet Collection, Buy X Get Y, Free shipping threshold, Customer segmentation, Gross margin ### Frequently asked questions **Q: How do you stop Shopify discounts from conflicting with each other during Black Friday?** A: Assign every campaign a defined priority so only one rule can win at each stage. NorthPeak Fashion used a hierarchy running from Employee Pricing at 100 down through Wholesale, VIP, Luxury Exclusions, Outlet, Collection Discounts, Buy X Get Y, Spend Discounts, and Free Shipping at 30. Each campaign has one responsibility, so pricing is decided before checkout begins. **Q: What order should a Shopify pricing engine evaluate promotions in?** A: Evaluate in this sequence: identity resolution, customer segmentation, campaign eligibility, product rules, collection rules, cart rules, shipping rules, conflict resolution, then final checkout. The order matters because changing the sequence changes the final price. Cart promotions such as spend thresholds depend on already-discounted pricing rather than original catalog prices, so shipping must be calculated last. **Q: How do I protect full-price collections from a store-wide Shopify sale?** A: Evaluate product exclusions before any discount logic runs. NorthPeak marked its Luxury Collection as never discount, so those products exit the pricing engine immediately and no later campaign can touch them. The Winter Collection was excluded from the 25% Black Friday sale to preserve premium positioning after its recent launch. Exclusions first, discounts second. **Q: Will a Black Friday sale override my wholesale customers' negotiated prices?** A: It should not, and preventing that requires customer identity to be resolved before pricing starts. Wholesale pricing sits at priority 95, just under employee pricing, so contracted B2B rates win over retail campaigns. Wholesale, VIP, and employee rates are pricing models rather than marketing campaigns, and they must never conflict with retail promotions. **Q: What metrics should an enterprise Shopify store track for a promotion instead of just revenue?** A: Track margin and inventory health alongside revenue. NorthPeak monitored gross margin, net margin, revenue, average order value, units per transaction, inventory turnover, clearance sell-through rate, VIP retention, wholesale growth, shipping cost percentage, and campaign adoption rate. Each KPI reflects a different business objective, such as a finance floor of 42% gross margin. ## Introduction As Shopify businesses grow, promotions become increasingly difficult to manage. A startup with twenty products may only need one campaign: > 15% OFF Everything. Simple. Predictable. Easy. But what happens when the business grows into an enterprise retailer? Imagine operating: - 75,000 Products - 18 Collections - 4 Brands - 12 Countries - B2C Customers - Wholesale Customers - VIP Members - Outlet Products - Seasonal Collections - Multiple Warehouses Suddenly, promotions stop being marketing campaigns. They become operational systems. The question is no longer: > "How do we create a discount?" Instead it becomes: > "How do we orchestrate hundreds of promotional rules without creating pricing conflicts?" This is the story of **NorthPeak Fashion**, a fictional - but realistic - enterprise Shopify merchant preparing for its biggest commercial event of the year: Black Friday. ## Meet NorthPeak Fashion NorthPeak Fashion is one of the fastest-growing Shopify Plus retailers in Europe. | Business Profile | Detail | |---|---| | Annual Revenue | $62 Million | | Products | 75,000 | | Active Customers | 1.8 Million | | Countries | 12 | The business also runs: - Shopify Markets Enabled - B2C + B2B - VIP Loyalty Program - Outlet Collection - Seasonal Collections - Wholesale Portal Unlike small retailers, every department has different priorities. ## The Monday Morning Meeting Two weeks before Black Friday. Everyone gathers in the boardroom. Marketing speaks first. ### Marketing Director "We should launch a 25% Black Friday Sale." Everyone nods. Then Merchandising interrupts. ### Head of Merchandising "Not on the Winter Collection. Those products just launched." Finance raises another concern. ### Finance Director "If gross margin drops below 42%, our quarterly targets are gone." Warehouse Operations joins the discussion. ### Operations Manager "The Outlet warehouse is completely full. Those products MUST move." Customer Success has another request. ### Loyalty Manager "Our VIP members expect exclusive benefits." B2B Sales enters. ### Wholesale Director "Our wholesale customers already have negotiated pricing. Black Friday shouldn't overwrite their contracts." Shipping Team adds one final requirement. ### Logistics Manager "Free Shipping is already running across Europe." Silence fills the room. Every stakeholder is right. Every stakeholder has valid business requirements. Unfortunately, many of those requirements directly conflict with each other. ## The Real Problem This isn't a discount problem. This is an architecture problem. Most Shopify merchants think promotions are independent. Enterprise businesses know something different: every promotion affects every other promotion. ## Business Requirements NorthPeak identifies eleven active promotional rules. | # | Campaign | Rule | Notes | |---|---|---|---| | 1 | Black Friday | 25% OFF | Eligible: most catalog | | 2 | Winter Collection | No Discount | Premium positioning must remain | | 3 | Outlet Collection | 40% OFF | Inventory liquidation | | 4 | VIP Customers | Additional benefits | | | 5 | Wholesale Pricing | Customer-specific pricing | | | 6 | Buy Two Knitwear | Receive Scarf Free | | | 7 | Spend $300 | Receive 15% OFF | | | 8 | Spend $400 | Free Shipping | | | 9 | Luxury Collection | Never Discount | | | 10 | Employee Pricing | Internal pricing only | | | 11 | Regional Promotions | | Germany: different campaign. France: different campaign. United Kingdom: different campaign. | At this point, promotions are no longer campaigns. They are business rules. ## Visualizing the Conflict Imagine one customer. Sarah. | Attribute | Detail | |---|---| | Customer Type | VIP Customer | | Location | Lives in Germany | | Timing | Shopping during Black Friday | | Basket | Buying Outlet Products | | Basket | Buying Luxury Accessories | | Cart Value | $420 | Question. Which promotion applies? Everything? Nothing? Some? This is where promotion engines fail. ## Thinking Like a Solution Architect Instead of starting with discounts, start with decision flow. Every checkout follows the same journey. ```text Customer ↓ Identity Resolution ↓ Customer Segmentation ↓ Campaign Eligibility ↓ Product Rules ↓ Collection Rules ↓ Cart Rules ↓ Shipping Rules ↓ Conflict Resolution ↓ Final Checkout ``` The order matters. Changing the sequence changes pricing. ## Step One - Identity Resolution Before calculating prices, identify the customer. Questions include: is the customer - Retail? - VIP? - Employee? - Wholesale? - Distributor? Without identity, pricing cannot begin. ## Step Two - Product Eligibility Now evaluate products. Some products may be eligible, others excluded. | Example | Rule | |---|---| | Luxury Collection | Never Discount | The product exits the pricing engine immediately. No additional campaign can affect it. ## Step Three - Collection Rules Now evaluate collections. | Collection | Rule | |---|---| | Outlet Collection | 40% OFF | | Winter Collection | Excluded | Already we see multiple campaigns disappearing. ## Step Four - Customer Rules Customer-specific pricing now applies. | Customer Type | Pricing | |---|---| | Wholesale | Special Pricing | | VIP | Exclusive Benefits | | Employees | Internal Pricing | Notice something important. These are not marketing campaigns. They are pricing models. ## Step Five - Cart Promotions Now evaluate cart behavior. | Cart Trigger | Reward | |---|---| | Spend $300 | 15% OFF | | Spend $400 | Free Shipping | These campaigns depend on previous pricing, not original catalog prices. Order matters. ## Step Six - Bundle Evaluation Customer buys Sweater + Beanie + Scarf. Bundle Campaign becomes eligible. Reward applied, only after eligibility verification. ## The Conflict Matrix Without priorities, unexpected pricing appears. NorthPeak designs the following hierarchy. | Priority | Campaign | |----------|----------| | 100 | Employee Pricing | | 95 | Wholesale Pricing | | 90 | VIP Pricing | | 80 | Luxury Exclusions | | 70 | Outlet Discounts | | 60 | Collection Discounts | | 50 | Buy X Get Y | | 40 | Spend Discounts | | 30 | Free Shipping | Every campaign has one responsibility. No campaign competes with another. ## Why Priority Matters Imagine a wholesale customer buying an outlet product. Which price wins? Wholesale? Outlet? Both? Without architecture, every answer seems reasonable. With architecture, the answer is already defined before checkout begins. No ambiguity exists. ## Promotion Orchestration Notice something surprising. NorthPeak isn't running eleven promotions. It's running one promotional ecosystem. Each campaign supports another. Each campaign understands its boundaries. Each campaign knows when to stop. That is orchestration. ## Customer Journey 1. Sarah enters the store. 2. VIP recognized. 3. Germany pricing loaded. 4. Luxury handbag excluded. 5. Outlet boots discounted. 6. Bundle unlocked. 7. Cart exceeds $400. 8. Free Shipping unlocked. 9. Checkout. The customer experiences one seamless purchase. Behind the scenes, the pricing engine evaluated hundreds of business rules. ## Where Discount Prime Fits At this point, Discount Prime is no longer acting as a simple discount application. It becomes the orchestration layer responsible for coordinating: - Collection discounts - Product discounts - Buy X Get Y campaigns - Bundle promotions - Product Spend Discounts - Tiered Spend campaigns - Quantity Discounts - Free Shipping thresholds - Wholesale pricing - Customer segmentation - Regional campaign rules Each capability solves one part of the pricing puzzle. Together, they form a promotion architecture. ## Measuring Success Enterprise retailers rarely evaluate promotions using revenue alone. NorthPeak monitors: - Gross Margin - Net Margin - Revenue - Average Order Value - Units Per Transaction - Inventory Turnover - Clearance Sell-Through Rate - VIP Retention - Wholesale Growth - Shipping Cost Percentage - Campaign Adoption Rate Every KPI reflects a different business objective. ## Lessons Learned After Black Friday, NorthPeak's leadership identifies several key insights. Promotions failed in previous years not because discounts were too small. They failed because campaigns competed with each other. By introducing a structured promotion architecture: - Pricing became predictable. - Margins remained protected. - Customer experience improved. - Operational workload decreased. - Merchandising gained greater control. - Finance gained pricing confidence. - Marketing could launch campaigns faster. The biggest improvement wasn't a larger discount. It was a better system. ## Enterprise Promotion Principles Every enterprise Shopify merchant should follow these principles: 1. Promotions should support business objectives - not replace them. 2. Customer identity must be resolved before pricing. 3. Product exclusions should be evaluated before discounts. 4. Every campaign requires a defined priority. 5. Shipping should be calculated after pricing. 6. Wholesale pricing should never conflict with retail campaigns. 7. Promotions should be orchestrated as one ecosystem. ## Conclusion As Shopify businesses scale, promotion management evolves into promotion architecture. What begins as a simple percentage discount eventually becomes a network of interconnected pricing rules affecting customers, products, collections, regions, shipping, loyalty programs, and wholesale relationships. The retailers that succeed are not those offering the largest discounts. They are the ones whose promotional systems remain predictable, scalable, and aligned with business objectives. Discount Prime enables merchants to build this architecture by combining flexible campaign types with clear prioritization, customer segmentation, and intelligent promotion orchestration. Because enterprise commerce is no longer about creating more discounts. It's about ensuring every promotion works together as part of a single, well-designed system. --- ## From Discounts to Intelligent Commerce URL: https://www.discountprime.app/case-studies/promotion-operating-system Industry: All industries | Business model: Retail / Enterprise | Campaign types: Full campaign portfolio, Profit analytics, Conflict management | Published: July 12, 2026 | Read time: 40 min > As Shopify merchants scale across brands, markets, and customer types, promotions stop being marketing campaigns and become business infrastructure that touches margin, inventory, logistics, and loyalty. The answer is a Promotion Operating System: six layers running from identity through eligibility, pricing, behavior, checkout, and optimization, so every campaign resolves into one correct commercial outcome. Key entities: Promotion Operating System, Promotional maturity stages, Promotion conflicts, Promotion layers, Customer segmentation, Wholesale pricing, VIP pricing, Bundles and BOGO, Spend thresholds, Margin rules ### Frequently asked questions **Q: Why do promotions get harder to manage as my Shopify store grows?** A: Because at scale promotions stop being marketing campaigns and become business infrastructure. Once a catalog expands across brands, markets, and customer segments, a discount touches revenue, inventory, warehouse operations, shipping, forecasting, cash flow, vendor relationships, loyalty, wholesale pricing, regional pricing, and profitability. Every department sees a different symptom, so nobody is looking at the same problem. **Q: What is a Promotion Operating System?** A: A Promotion Operating System is a single commercial architecture where every campaign, customer, product, warehouse, market, and business objective work together. It is the sixth and final stage of promotional maturity, connecting marketing, finance, merchandising, operations, logistics, customer success, and technology into one system rather than a pile of disconnected discount campaigns. **Q: What are the stages of promotional maturity for an ecommerce brand?** A: There are six stages. Stage one is simple discounting across the whole store. Stage two is category promotions by collection. Stage three is customer segmentation such as VIP and wholesale pricing. Stage four is behavioral promotions like bundles and spend thresholds. Stage five is promotion architecture with shared priorities and conflict resolution. Stage six is a Promotion Operating System. **Q: Why do my Shopify discounts keep conflicting with each other?** A: Promotion conflicts are symptoms, not the actual problem. The real problem is missing architecture. When VIP, outlet, wholesale, Black Friday, bundle, and free shipping offers overlap, none of them is wrong on its own. The system simply has no way to understand the relationships between them, so it cannot decide the correct commercial outcome. **Q: What metrics should I track instead of discount performance?** A: Track business outcomes rather than campaign activity. The metrics that describe business health include inventory turnover, margin, revenue, average order value, customer lifetime value, campaign adoption, wholesale growth, VIP retention, promotion conflicts, operational efficiency, and customer satisfaction. These show whether pricing decisions are strengthening the business, not just whether a discount was used. ## Introduction Most Shopify merchants believe promotions are marketing tools. They create campaigns. Activate discounts. Watch sales increase. Turn promotions off. Repeat next month. This approach works - until the business begins to grow. As catalogs expand, customer segments multiply, international markets open, and operational complexity increases, promotions stop behaving like marketing campaigns. They become business infrastructure. This article explores the final stage of promotional maturity. Not how to create another discount. But how to build a **Promotion Operating System** that supports every commercial decision inside a Shopify business. This is the story of **Everlane Collective**, a fictional enterprise retailer operating multiple brands across several markets. ## Meet Everlane Collective Everlane Collective is no longer a simple online store. It has evolved into a commerce organization. **Business Overview** - 5 Brands - 140,000 Products - 17 Shopify Markets - B2C - B2B - Marketplace Sales - Retail Stores - Dropshipping Vendors - Regional Warehouses - Loyalty Program - Enterprise ERP - Marketing Automation **Annual Revenue:** $180 Million At this scale, pricing decisions affect every department. ## The CEO's Question Every Monday morning the executive team reviews one dashboard. One question appears repeatedly. > Why are promotions becoming harder to manage every quarter? | Team | Belief | | --- | --- | | Marketing | Believes they need more campaigns. | | Finance | Believes discounts are too aggressive. | | Operations | Believes inventory planning is failing. | | Customer Success | Believes loyalty members need more exclusive offers. | | Technology | Believes the pricing logic has become impossible to maintain. | Nobody is wrong. But nobody is looking at the same problem. ## Promotions Are No Longer Marketing Inside enterprise commerce, promotions influence: - Revenue - Inventory - Warehouse Operations - Shipping - Forecasting - Cash Flow - Vendor Relationships - Customer Loyalty - Wholesale Pricing - Regional Pricing - Profitability A discount is no longer a marketing event. It is a business decision. ## The Evolution of Promotional Maturity Every merchant progresses through similar stages. ### Stage One **Simple Discounting.** One campaign. Entire store. Easy. ### Stage Two **Category Promotions.** Collections receive different pricing. Inventory becomes a consideration. ### Stage Three **Customer Segmentation.** VIP customers. Wholesale pricing. First-time buyer incentives. Repeat customer rewards. ### Stage Four **Behavioral Promotions.** Bundles. Spend thresholds. Free shipping. Quantity incentives. Customer behavior becomes the objective. ### Stage Five **Promotion Architecture.** Multiple campaigns. Shared priorities. Business rules. Conflict resolution. Automation. ### Stage Six **Promotion Operating System.** Every commercial decision becomes connected: Marketing. Finance. Merchandising. Operations. Logistics. Customer Success. Technology. One system. ## The Commerce Operating Model Every customer enters through a single decision engine. ```text Customer → Identity → Market → Currency → Customer Type → Product Eligibility → Collection Eligibility → Inventory Rules → Margin Rules → Campaign Engine → Shipping Engine → Checkout → Analytics → Optimization ``` Notice something. Discounts represent only one step. ## Connecting Every Department A promotion affects everyone. | Department | Objective | | --- | --- | | Marketing | Wants higher conversion. | | Finance | Protects profitability. | | Merchandising | Protects premium collections. | | Warehouse | Moves inventory. | | Customer Success | Rewards loyalty. | | Technology | Maintains system integrity. | A promotion operating system balances every objective simultaneously. ## The Promotion Layers Instead of thinking in campaigns, think in layers. ### Layer One **Identity.** Who is shopping? ### Layer Two **Eligibility.** What products qualify? ### Layer Three **Pricing.** Which pricing model applies? Retail? VIP? Wholesale? Dropshipping? ### Layer Four **Behavior.** Bundles. BOGO. Spend thresholds. Quantity discounts. ### Layer Five **Checkout.** Shipping. Taxes. Regional rules. ### Layer Six **Optimization.** Analytics. Testing. Iteration. Learning. Every layer depends on the previous one. ## Why Promotion Conflicts Exist Promotion conflicts are symptoms. Not problems. The real problem is missing architecture. **Example:** VIP + Outlet + Wholesale + Black Friday + Bundle + Free Shipping None of these promotions are wrong. The system simply needs to understand their relationships. ## The Discount Prime Role Discount Prime should not be viewed as a collection of campaign types. Instead it becomes the orchestration platform responsible for coordinating promotional intent. Its responsibility is to answer one question: > Given this customer, this cart, these products, these business rules, and these priorities... > What is the correct commercial outcome? That is fundamentally different from calculating a percentage discount. ## Enterprise Principles Large merchants eventually adopt several principles. - Promotions never exist without objectives. - Objectives never exist without measurement. - Pricing never exists without governance. - Governance never exists without architecture. - Architecture never exists without documentation. - Documentation never exists without ownership. Promotion maturity is organizational maturity. ## Measuring Success The executive dashboard no longer tracks discounts. Instead it measures business outcomes. - Inventory Turnover - Margin - Revenue - Average Order Value - Customer Lifetime Value - Campaign Adoption - Wholesale Growth - VIP Retention - Promotion Conflicts - Operational Efficiency - Customer Satisfaction These metrics describe business health - not campaign activity. ## Looking Beyond Discounts The future of commerce will not belong to businesses with the largest promotions. It will belong to businesses capable of making intelligent commercial decisions automatically. - Artificial Intelligence - Behavior Prediction - Dynamic Pricing - Personalized Commerce - Margin Optimization - Customer Intent - Inventory Forecasting All of these systems depend upon one foundation: a structured promotion architecture. Without it, automation simply scales complexity. With it, automation scales intelligence. ## The Road Ahead As Shopify continues evolving toward enterprise commerce, promotion systems will increasingly resemble operating systems rather than marketing utilities. Campaigns will become reusable business components. Customer segments will become dynamic. Pricing decisions will become contextual. Promotions will become predictive rather than reactive. Businesses will spend less time creating campaigns, and more time designing commercial strategies. ## Final Thoughts Every article in this series explored a different challenge. - Fashion clearance - Beauty cross-selling - Health retention - Dropshipping pricing - Wholesale pricing - Furniture merchandising - Free shipping - Seasonal planning - Enterprise architecture Together they reveal a single idea. Promotions are not isolated features. They are connected business decisions. Discount Prime exists to orchestrate those decisions. Not by encouraging merchants to create more discounts, but by helping them create better commerce. ## Conclusion Commerce has evolved. | Group | Expectation | | --- | --- | | Customers | Expect personalization. | | Businesses | Demand profitability. | | Operations | Require automation. | | Marketing | Seeks flexibility. | | Finance | Requires governance. | | Technology | Demands scalability. | Meeting all of these expectations with disconnected promotional campaigns is impossible. The solution is not another discount. The solution is a Promotion Operating System: a system where every campaign, every customer, every product, every warehouse, every market, and every business objective work together through a single commercial architecture. Because the future of Shopify isn't about managing promotions. It's about orchestrating commerce. --- ## How to Launch a New Product on Shopify Without Destroying Your Margins URL: https://www.discountprime.app/case-studies/product-launch-without-destroying-margins Industry: All industries | Business model: Retail / DTC | Campaign types: Buy X Get Y (BOGO), Tiered Spend Discount, Free Shipping | Published: July 12, 2026 | Read time: 22 min > A premium skincare brand launching a $79 Vitamin C Serum at 2,000 units monthly and 68 percent margin should not discount the hero product. Instead, layer bundle pricing, Buy X Get Y cross-sells, spend-based rewards, and a free shipping progress bar. This builds average order value, repeat purchases, and premium positioning rather than training customers to wait for sales. Key entities: Buy X Get Y, Bundle Pricing, Product Spend Discount, Free Shipping Progress Bar, Flat Product Discount, Average Order Value, Gross Margin, Customer Lifetime Value, Premium positioning, Customer Journey Architecture ### Frequently asked questions **Q: Should I discount a new product at launch?** A: No, not the new product itself. A discount signals the item is already worth less than its listed price, which lowers perceived value instead of creating excitement. It also conditions customers to wait for future markdowns and weakens premium positioning. Offer value elsewhere instead, through complementary product offers, bundles, and spend-based rewards that protect the hero product's price. **Q: What promotions should I run for a Shopify product launch without killing my margins?** A: Combine four campaigns: Bundle Pricing to introduce complete routines, Buy X Get Y for cross-selling, a Product Spend Discount to increase basket size, and a Free Shipping Progress Bar to reduce checkout abandonment. Run them in that priority order so each supports the next, with no conflicts and no duplicated incentives across the customer journey. **Q: Why are sitewide discounts a bad idea when launching a new product?** A: A sitewide sale creates confusion rather than attention. A new product is supposed to be the focus, but a storewide promotion turns every product into the promotion, so innovation stops standing out. Launch discounts of this kind also erode margins and train customers to wait for the next sale rather than buy at full price. **Q: Is Buy X Get Y better than a flat percentage discount for a new product?** A: Yes. A flat product discount is easy to set up but immediately lowers perceived value and teaches customers to wait for the next sale, making it a poor fit for premium launches. Buy X Get Y raises average order value, improves the customer experience, encourages routine building, and protects hero product pricing. Example: buy the serum, get the moisturizer 40 percent off. **Q: What metrics should I track to know if my product launch worked?** A: Revenue alone tells only part of the story. Monitor conversion rate, average order value, units per transaction, bundle adoption rate, cross-sell rate, repeat purchase rate, gross margin, and customer lifetime value. These show whether the launch built a lasting customer relationship or just a short revenue spike, which matters because a launch begins a customer lifecycle rather than ending one. ## Introduction Launching a new product is one of the most exciting moments for any Shopify merchant. Months of research, product sourcing, branding, photography, inventory planning, and marketing all lead to a single question: **How should we price and promote the new product?** Surprisingly, this is where many businesses make their biggest mistake. To generate excitement, merchants often launch with aggressive discounts: - 30% OFF Launch Sale - Buy One Get One Free - Sitewide Discounts - Massive Coupon Campaigns While these promotions can produce impressive first-week sales, they often create long-term problems: - Customers become conditioned to wait for discounts. - Premium positioning is weakened. - Profit margins disappear. - Existing customers feel penalized for paying full price later. - Future pricing becomes difficult to justify. Launching a product successfully isn't about offering the largest discount. It's about creating demand while protecting long-term profitability. This guide explains how a Shopify Solutions Architect approaches product launches using Discount Prime. ## The Most Common Product Launch Mistakes Before designing a promotion strategy, let's examine why many launches fail. ### Mistake #1: Discounting Too Early Many merchants assume lower prices automatically increase demand. However, a discount tells customers something else: > "This product is already worth less than its listed price." Instead of creating excitement, large launch discounts often reduce perceived value. ### Mistake #2: Sitewide Promotions A new product should create attention. A storewide sale creates confusion. Instead of highlighting innovation, every product suddenly becomes the promotion. ### Mistake #3: Ignoring Existing Customers Loyal customers are often the first people interested in new products. Yet many launches treat first-time visitors and loyal customers exactly the same. This misses an opportunity to reward repeat buyers. ### Mistake #4: No Purchase Journey Many launches focus only on the first purchase. Successful launches consider: - Discovery - First Purchase - Cross-selling - Repeat Purchase - Customer Loyalty A launch is not an event. It is the beginning of a customer lifecycle. ## Business Scenario Imagine a premium skincare brand launching a new Vitamin C Serum. | Attribute | Detail | |---|---| | Retail Price | $79 | | Expected Monthly Sales | 2,000 Units | | Gross Margin | 68% | Business Goals - Build awareness - Encourage product trials - Protect premium positioning - Increase Average Order Value - Introduce complementary products Notice something important. The objective isn't maximizing first-day revenue. The objective is building a successful product over the next three years. ## Thinking Like a Solutions Architect A marketer asks: "What promotion should we run?" A Solutions Architect asks: "What customer behavior do we want to create?" That difference changes everything. Instead of rewarding discounts, we reward desirable purchasing behavior. ## Customer Journey Architecture A successful launch consists of five stages. ### Stage 1 | Attribute | Detail | |---|---| | Stage | Product Discovery | | What happens | The customer discovers the new serum. | | Goal | Generate interest. | | Discount | No discount required. | ### Stage 2 | Attribute | Detail | |---|---| | Stage | First Purchase | | What happens | The customer decides to try the product. | | Goal | Reduce purchase hesitation. | | Approach | Instead of reducing the serum price, offer value elsewhere. | ### Stage 3 | Attribute | Detail | |---|---| | Stage | Routine Building | | What happens | The customer realizes the serum works best with a Cleanser, Moisturizer, and Sunscreen. | | Goal | Now complementary promotions become valuable. | ### Stage 4 | Attribute | Detail | |---|---| | Stage | Increasing Basket Size | | What happens | Instead of buying one product, customers purchase complete skincare routines. | ### Stage 5 | Attribute | Detail | |---|---| | Stage | Customer Retention | | What happens | Satisfied customers reorder. | | Result | This creates sustainable growth. | ## Evaluating Promotional Strategies Let's evaluate every realistic Discount Prime campaign. ## Strategy 1 ### Flat Product Discount | Advantages | Disadvantages | |---|---| | Easy messaging. | Immediately lowers perceived value. | | Simple setup. | Customers wait for future discounts. | | Immediate sales. | Not recommended for premium launches. | | Factor | Assessment | |---|---| | Example | 20% OFF New Serum | | Architecture Score | ⭐⭐ | ## Strategy 2 ### Buy X Get Y Advantages - Higher AOV - Better customer experience - Encourages routine building - Protects hero product pricing | Factor | Assessment | |---|---| | Example | Buy Vitamin C Serum, receive Moisturizer 40% OFF | | Architecture Score | ⭐⭐⭐⭐⭐ | ## Strategy 3 ### Product Spend Discount Instead of discounting the hero product, customers earn rewards by expanding their basket. Excellent strategy. | Factor | Assessment | |---|---| | Example | Spend $150, receive 10% OFF | | Architecture Score | ⭐⭐⭐⭐⭐ | ## Strategy 4 ### Free Shipping Progress Customers love completing goals. Instead of reducing prices, increase perceived value. | Factor | Assessment | |---|---| | Architecture Score | ⭐⭐⭐⭐ | ## Strategy 5 ### Bundle Pricing Launch Bundle - Cleanser - Serum - Moisturizer Instead of introducing one product, introduce an entire skincare solution. | Factor | Assessment | |---|---| | Architecture Score | ⭐⭐⭐⭐⭐ | ## Final Promotion Architecture Rather than running one campaign, we combine four campaigns. ### Campaign One | Attribute | Detail | |---|---| | Campaign | Buy X Get Y | | Purpose | Cross-selling. | ### Campaign Two | Attribute | Detail | |---|---| | Campaign | Bundle Pricing | | Purpose | Introduce complete skincare routines. | ### Campaign Three | Attribute | Detail | |---|---| | Campaign | Product Spend Discount | | Purpose | Increase basket size. | ### Campaign Four | Attribute | Detail | |---|---| | Campaign | Free Shipping Progress Bar | | Purpose | Reduce checkout abandonment. | ## Campaign Priority 1. Bundle Pricing 2. Buy X Get Y 3. Product Spend Discount 4. Free Shipping Each campaign supports the next. No conflicts. No duplicated incentives. One customer journey. ## Why We Don't Discount the Hero Product The new serum is the star. Stars should not immediately become discounted products. Instead: - Discount complementary products. - Reward larger baskets. - Increase perceived value. - Protect positioning. ## Storefront Experience A customer lands on the product page. Instead of seeing "20% OFF", they experience something much stronger. ✔ Complete Your Routine ✔ Add Moisturizer and Save ✔ You're Only $18 Away From Free Shipping ✔ Save More When You Build Your Routine Every message encourages better purchasing behavior. ## Measuring Success A successful launch isn't measured only by revenue. Monitor: - Conversion Rate - Average Order Value - Units Per Transaction - Bundle Adoption Rate - Cross-sell Rate - Repeat Purchase Rate - Gross Margin - Customer Lifetime Value Revenue alone tells only part of the story. ## Common Mistakes to Avoid ❌ Launching with the biggest discount. ❌ Running sitewide promotions. ❌ Ignoring complementary products. ❌ Rewarding only first purchases. ❌ Forgetting post-purchase strategy. ## Future Optimization After launch: | Phase | Action | |---|---| | Week 2 | Analyze bundle performance. | | Week 4 | Adjust spend thresholds. | | Month 2 | Launch customer-specific promotions. | | Month 3 | Introduce VIP campaigns. | | Month 6 | Analyze repeat purchase behavior. | Continuous optimization always outperforms one-time promotional events. ## Key Takeaways Launching a product successfully requires more than discounts. It requires understanding customer psychology, purchasing behavior, and long-term brand positioning. The strongest product launches: - Protect margins. - Increase Average Order Value. - Introduce complementary products. - Reward customer behavior instead of reducing prices. - Create repeat customers rather than one-time buyers. Discount Prime enables merchants to design promotion architectures that achieve these objectives without sacrificing profitability. ## Conclusion A product launch is not simply a marketing campaign. It is the foundation of a product's entire commercial lifecycle. Merchants that rely on aggressive discounts often achieve short-term excitement at the expense of long-term profitability. By combining intelligent bundling, complementary offers, spend-based incentives, and free shipping thresholds, Shopify merchants can launch products with confidence while protecting margins and strengthening their brand. The best product launch isn't the one with the biggest discount. It's the one that creates the strongest customer relationship. --- ## Discount Analytics That Explain Every Order URL: https://www.discountprime.app/case-studies/discount-analytics-that-explain-every-order Industry: Multi-Channel Retail | Business model: Retail / Enterprise | Campaign types: Profit Analytics, Campaign Attribution, Order-Level Breakdown | Published: July 14, 2026 | Read time: 15 min > Order-level profit analytics let a multi-brand Shopify retailer explain every discounted order: which campaign triggered, how much discount applied, what shipping cost was absorbed, and what estimated profit remained. Attribution showed a $60,000 campaign out-earning a $120,000 campaign on profit, and daily cost syncing surfaced a supplier price increase weeks before month-end reporting would have caught it. Key entities: order-level profit attribution, estimated profit per order, Shopify cost price sync, campaign profitability comparison, margin health signals, Healthy / Thin Margin / Loss classification, discount given vs revenue, AOV uplift measurement, supplier cost increase detection, multi-brand Shopify analytics, revenue vs profit reporting ### Frequently asked questions **Q: How do I know which Shopify discount campaign is actually profitable?** A: Measure each campaign by estimated profit, not revenue. Attribute every discounted order to the campaign that triggered it, then subtract the discount given, the shipping cost absorbed, and the real product cost synced from Shopify. Discount Prime's profit analytics do this automatically and classify each campaign as Healthy, Thin Margin, or Loss against your own thresholds, so the highest-revenue campaign can be compared honestly with the highest-profit one. **Q: Why is my revenue growing while my margin is shrinking on Shopify?** A: This pattern usually means discounts, shipping subsidies, or rising supplier costs are consuming a growing share of each order. Revenue reports hide it because they stop at the sale. Break orders down individually: campaign applied, discount amount, shipping effect, product cost, and estimated profit. Merchants often find one or two campaigns discounting heavily for thin returns, or a product category whose cost increased while its price did not. **Q: What should an order-level discount breakdown show?** A: A complete breakdown shows five things for a single order: which campaign triggered, how much discount was applied and to which products, how shipping affected the total, what the products cost the merchant, and the estimated profit that remained. With that view, support can explain any price a customer paid, finance can verify any margin, and marketing can prove which campaign deserves credit for the order. **Q: Do Shopify reports show profit per discounted order?** A: Native Shopify reports show revenue, order counts, and total discounts, but they do not compute per-order profit or attribute orders to specific discount campaigns. To see profit per discounted order you need analytics that combine real cost prices with campaign data. Discount Prime syncs Shopify cost prices daily and calculates estimated profit for every discounted order, then rolls the results up to each campaign. **Q: How can discount analytics catch supplier cost increases early?** A: When cost prices sync daily, a supplier increase immediately thins the estimated profit on every new order containing the affected products. Margin health signals then flag the related campaign or category as Thin Margin even though its discount settings never changed. That turns a silent margin leak into a visible alert within days, letting the merchant reprice the category long before month-end reconciliation would reveal the problem. ## Introduction Ask a growing Shopify merchant how last month's promotions performed, and the answer usually arrives as revenue: "The sale did $120,000." Ask how much profit that sale created, and the room goes quiet. Dashboards confirm that revenue increased, that orders were placed, that discounts applied correctly. What they cannot answer are the questions every scaling business eventually asks. Which campaign generated the highest profit? Which orders carried the best margins? Did free shipping actually lift average order value? Was the discount worth giving? Instead of asking: > "Which campaign generated the most sales?" A Solutions Architect asks: > "Which campaign created the most profit per order, and can I prove it at the order level?" That second question requires a different analytics architecture. This study designs one. ## Merchant Scenario Consider EverPeak Commerce, a fictional multi-brand Shopify retailer selling outdoor equipment, apparel, and accessories. | Attribute | Detail | |---|---| | Industry | Multi-Channel Retail | | Annual Revenue | $52 Million | | Products | 48,000 | | Monthly Orders | 63,000 | | Active Campaigns | 25+ | Every week the team launches new promotions: wholesale pricing, BOGO offers, tiered discounts, shipping incentives, flat product discounts. Sales keep growing. Yet every executive meeting ends with the same unanswered question: "Which promotions are actually making us more money?" Nobody can answer with confidence. ## The Reporting Gap Marketing celebrates record revenue. Finance questions shrinking margins. Operations watches fulfillment costs climb. Each department reads a different report and reaches a different conclusion. EverPeak is not missing data. It is missing **context**. Revenue reports show what sold, but nothing connects a specific order back to the campaign that triggered it, the discount it received, the shipping cost it absorbed, and the profit that remained. At 63,000 orders per month, reconstructing that story by hand in the Shopify admin is not a reporting workflow. It is archaeology. ## Business Objectives | Priority | Objective | |---|---| | 1 | Attribute every discounted order to the campaign that triggered it | | 2 | Measure estimated profit per order, not just revenue | | 3 | Surface margin problems in days, not at month-end | | 4 | Give marketing, finance, operations, and support one source of truth | | 5 | Achieve all of this without a data engineering project | ## Evaluating Analytics Approaches ### Option 1: Admin Reports Plus Spreadsheets Export Shopify reports, join them with cost data in spreadsheets, rebuild the model every month. | Advantages | Disadvantages | |---|---| | No new tooling. | Manual, slow, and error-prone at 63,000 orders. | | Familiar to finance. | Cost data goes stale the day it is exported. | | | No order-level campaign attribution. | | Factor | Assessment | |---|---| | Architecture Score | ★★☆☆☆ | ### Option 2: A Standalone BI Platform | Advantages | Disadvantages | |---|---| | Powerful, flexible querying. | Requires pipelines and a dedicated analyst. | | Handles any data source. | Knows nothing about discount campaigns. | | | Profit logic must be built and maintained by hand. | | Factor | Assessment | |---|---| | Architecture Score | ★★★☆☆ | ### Option 3: Revenue-Only App Reporting Most discount tools report usage: how many times an offer applied and how much revenue it touched. | Advantages | Disadvantages | |---|---| | Zero setup. | Revenue without cost is a vanity metric. | | Campaign-aware. | Cannot classify any order as profitable or not. | | Factor | Assessment | |---|---| | Architecture Score | ★★☆☆☆ | ### Option 4: Profit-Aware Order-Level Analytics Analytics built into the discount platform itself, computing **Estimated Profit** from real Shopify cost prices that auto-sync daily, and attributing every discounted order to the campaign that produced it. | Advantages | Disadvantages | |---|---| | Attribution is native, never reconstructed. | Depends on maintained cost prices in Shopify. | | Profit is visible per order, per campaign, per store. | | | Margin health signals flag problems automatically. | | | Factor | Assessment | |---|---| | Architecture Score | ★★★★★ | ## Comparison Matrix | Approach | Attribution | Profit Visibility | Freshness | Effort | |---|---|---|---|---| | Spreadsheets | Manual | Monthly | Stale | High | | BI Platform | Custom-built | Possible | Pipeline-dependent | Very high | | Revenue-only reporting | Partial | None | Real time | None | | Profit-aware analytics | Native | Per order | Daily cost sync | Low | ## The Discount Prime Architecture | Layer | Mechanism | Purpose | |---|---|---| | Cost foundation | Real Shopify cost prices, auto-synced daily | Ground every profit figure in actual product costs. | | Order breakdown | Order-level analytics | Show each order's campaign, discount amount, shipping effect, and Estimated Profit. | | Attribution | Campaign-level rollups | Aggregate revenue, discount given, and profit to the campaign that triggered them. | | Health signals | Healthy / Thin Margin / Loss classification | Flag orders and campaigns against merchant-defined margin thresholds automatically. | Nothing in this architecture is a new promotion. It is an evidence layer under the 25+ campaigns EverPeak already runs. ## Anatomy of One Order Support questions an order. Finance questions a margin. Previously that meant a search across Shopify, spreadsheets, and three reports. Now the team opens one order and reads the whole pricing journey: | Line | Amount | |---|---| | Products (4 items) | $312.00 | | Tiered Spend Discount (cart-level) | -$46.80 | | Shipping subsidy absorbed | -$12.40 | | Product cost (synced from Shopify) | -$168.50 | | Estimated Profit | $84.30 | | Margin health | Healthy ✔ | Support can explain exactly why the customer paid what they paid. Finance can see what the order actually earned. Marketing can see which campaign deserves the credit. The question changes from "What happened?" to "We can see exactly what happened." ## The Two-Campaign Lesson The clearest payoff arrives in the first month. Two campaigns run side by side: | Metric | Campaign A | Campaign B | |---|---|---| | Revenue | $120,000 | $60,000 | | Discount given | $31,000 | $9,500 | | Estimated Profit | $14,200 | $27,900 | | Margin health | Thin Margin | Healthy | By revenue, Campaign A looks twice as successful. By profit, Campaign B earns nearly double while discounting far less. Without order-level attribution, EverPeak would have scaled the wrong campaign. Marketing stops asking which campaign generated the most sales and starts asking which campaign created the most value. ## Finding Problems Early One afternoon the margin health view shows a pattern: a single campaign keeps producing lower margins than its configuration predicts. Drilling into its orders reveals the cause. One product category recently absorbed a supplier cost increase, and because cost prices sync daily, every new order in that category now reports a thinner Estimated Profit. The promotion is not the problem. The base pricing is. EverPeak reprices the category within days. Without per-order profit data, the leak would have run silently until month-end reconciliation, if it was caught at all. ## Metrics That Measure Success Do not stop at redemption counts. EverPeak tracks: - Estimated Profit per order and per campaign - Discount given as a percentage of attributed revenue - AOV uplift of discounted orders against baseline behavior - Share of orders classified Healthy vs Thin Margin vs Loss - Shipping subsidy absorbed per shipping campaign - Profit per campaign type: wholesale, tiered, BOGO, shipping Revenue explains outcomes. Profit explains quality. Attribution explains influence. ## Common Mistakes - ❌ Measuring promotions by sales volume alone. - ❌ Ignoring profitability until month-end reconciliation. - ❌ Reviewing each campaign in isolation from the others. - ❌ Searching multiple systems to explain one order. - ❌ Assuming the higher-revenue campaign is the better campaign. - ❌ Letting Shopify cost prices go unmaintained, which corrupts every profit figure downstream. ## Key Lessons Analytics should not merely answer "How much did we sell?" It should answer "Why did we sell it, and what did we keep?" The architecture that delivers this is not complicated: real cost prices synced daily, Estimated Profit computed per order, every order attributed to its campaign, and margin health signals watching the whole portfolio. Once every order becomes explainable, every pricing decision becomes defensible. ## Conclusion EverPeak Commerce did not need more campaigns. It needed to understand the twenty-five it already ran. Order-level profit analytics turned a revenue-versus-margin argument between departments into a shared, evidence-based view of the business: which campaigns earn, which quietly leak, and why each order looks the way it does. Dashboards tell you what happened. Order-level analytics tell you why. For a merchant running dozens of simultaneous promotions, that difference is the difference between guessing and knowing. --- ## Monitor Store Health from One Dashboard URL: https://www.discountprime.app/case-studies/monitor-store-health-from-one-dashboard Industry: Multi-Channel Retail | Business model: Retail / Enterprise | Campaign types: Profit Analytics, Margin Health Monitoring, Multiple campaign types | Published: July 14, 2026 | Read time: 14 min > A multi-storefront Shopify retailer running 20+ simultaneous promotions replaced five disconnected morning reports with one profit-aware dashboard. Revenue, estimated profit from real cost prices, discount given, top campaigns, margin health signals, and recent orders sit on a single screen, so marketing, finance, operations, support, and management answer 'is the business healthy today?' in seconds instead of hours. Key entities: store health dashboard, profit-aware analytics, estimated profit tile, margin health signals, Healthy / Thin Margin / Loss classification, top campaigns ranking, revenue mix by campaign type, recent discounted orders feed, free shipping ROI measurement, single source of truth reporting, multi-storefront Shopify retail ### Frequently asked questions **Q: How do I monitor my Shopify store's health in one place?** A: Consolidate five signals onto one screen: revenue from discounted orders, estimated profit computed from real product costs, total discount given, your top-performing campaigns, and the latest discounted orders. Discount Prime's dashboard presents all of these together and classifies campaigns as Healthy, Thin Margin, or Loss, so a morning health check takes seconds and every tile drills down into order-level detail when something looks unusual. **Q: Should I measure discount campaigns by revenue or by profit?** A: By profit. A campaign generating record sales can still lose money once discounts, shipping subsidies, and product costs are subtracted. Displaying estimated profit next to revenue changes the conversation from 'we sold more' to 'we earned more.' Revenue-only measurement routinely leads merchants to scale their highest-revenue campaign while a smaller, quieter campaign actually earns more per order. **Q: What is margin health monitoring for Shopify discounts?** A: Margin health monitoring automatically classifies each discount campaign and order as Healthy, Thin Margin, or Loss against thresholds the merchant defines. The calculation uses real Shopify cost prices that sync daily, so when costs rise or a discount cuts too deep, the affected campaign changes status on the dashboard. Managers stop searching reports for financial issues because the issues surface themselves. **Q: How do I know if my free shipping campaign is paying off?** A: Track both sides of the equation continuously: the shipping subsidy your store absorbs on qualifying orders, and the revenue and estimated profit those orders generate. If subsidized orders show larger baskets and healthy margins after shipping costs, the campaign is working. If the subsidy grows faster than the profit, the threshold is set too low. A profit-aware dashboard shows this comparison per shipping campaign. **Q: What metrics belong on an ecommerce operations dashboard?** A: Six metrics cover most daily decisions: revenue from discounted orders, estimated profit, total discount given, promotion-influenced order count, the profit ranking of top campaigns, and the share of campaigns classified Healthy versus Thin Margin versus Loss. Add a recent-orders feed for anomaly spotting. Together these explain growth, sustainability, effectiveness, risk, and execution on one screen. ## Introduction Every morning at a growing Shopify business begins with the same question: "How is the business doing today?" For most merchants, answering it is surprisingly hard. Sales live in one report. Discount performance requires another screen. Profitability comes from a spreadsheet. Shipping costs sit somewhere else entirely. By the time everything has been reviewed, half the morning is gone and nobody is sure the numbers even agree. Instead of asking: > "Which report should I open first?" A Solutions Architect asks: > "What is the smallest set of numbers that tells me whether the business is healthy, and can everyone see the same set?" This study designs that set: a single profit-aware dashboard for a multi-storefront retailer. ## Merchant Scenario Consider Peak Commerce Group, a fictional retailer operating several Shopify storefronts across different product categories. | Attribute | Detail | |---|---| | Industry | Multi-Channel Retail | | Annual Revenue | $48 Million | | Products | 42,000 | | Monthly Orders | 61,000 | | Active Promotions | 20+ | Every week the company launches new campaigns: wholesale pricing, tiered discounts, BOGO promotions, free shipping, flat product discounts. Each one generates valuable data. The challenge is not collecting information. The challenge is understanding the overall health of the business quickly. ## Five Reports, Five Answers Every department watches its own numbers. Marketing looks at revenue. Finance reviews profit. Operations monitors shipping. Support tracks customer orders. Management wants one answer: "Is the business healthy today?" The information already exists. It simply is not connected. When five teams read five disconnected reports, they reach five different conclusions about the same Monday. ## Business Objectives | Priority | Objective | |---|---| | 1 | Answer "is the business healthy?" in under a minute each morning | | 2 | Put estimated profit next to revenue, not in a separate tool | | 3 | Surface underperforming campaigns automatically | | 4 | Give five departments one shared source of truth | | 5 | Turn analytics from historical reporting into operational guidance | ## Evaluating Monitoring Approaches ### Option 1: Native Reports, Opened Daily The status quo: Shopify reports plus app screens plus exports, reviewed one by one. | Advantages | Disadvantages | |---|---| | No new tooling. | 30 to 60 minutes of manual review daily. | | Data is accurate per source. | No profit view; no cross-report consistency. | | | Problems found only if someone looks in the right place. | | Factor | Assessment | |---|---| | Architecture Score | ★★☆☆☆ | ### Option 2: A Weekly Consolidation Spreadsheet | Advantages | Disadvantages | |---|---| | One document for everyone. | Always a week old. | | Finance controls the logic. | Manual, fragile, and unowned when the builder is away. | | Factor | Assessment | |---|---| | Architecture Score | ★★☆☆☆ | ### Option 3: An External BI Dashboard | Advantages | Disadvantages | |---|---| | Fully customizable. | Requires pipelines, cost modeling, and an analyst. | | Can blend non-Shopify data. | Campaign context must be rebuilt by hand. | | Factor | Assessment | |---|---| | Architecture Score | ★★★☆☆ | ### Option 4: A Profit-Aware Operational Dashboard A dashboard inside the discount platform itself, summarizing revenue from discounted orders, **Estimated Profit** from real Shopify cost prices, discount given, top campaigns, margin health, and recent orders in one view. | Advantages | Disadvantages | |---|---| | Profit and revenue side by side, updated continuously. | Scope is promotional performance, not full company P&L. | | Margin health signals surface problems automatically. | | | Every tile drills down into order-level detail. | | | Factor | Assessment | |---|---| | Architecture Score | ★★★★★ | ## Comparison Matrix | Approach | Time to Answer | Profit Visibility | Freshness | Shared Truth | |---|---|---|---|---| | Native reports daily | 30-60 min | None | Real time | Low | | Weekly spreadsheet | Days | Approximate | Stale | Medium | | External BI | Minutes | Custom-built | Pipeline-dependent | Medium | | Profit-aware dashboard | Seconds | Native | Daily cost sync | High | ## The Discount Prime Architecture | Element | Mechanism | Purpose | |---|---|---| | Headline tiles | Revenue, Estimated Profit, discount given, influenced orders | Answer "healthy or not?" in one glance. | | Top Campaigns | Campaign performance ranking | Show which of the 20+ promotions actually drives results. | | Margin health | Healthy / Thin Margin / Loss classification | Flag campaigns and orders against merchant-defined thresholds. | | Revenue mix | Contribution by campaign type | Reveal how wholesale, tiered, BOGO, and shipping campaigns compose total sales. | | Recent orders | Latest discounted transactions | Turn unusual orders into immediate operational signals. | The dashboard does not replace deep analytics. It decides what deserves attention first, and every element links into order-level detail when investigation is needed. ## A Monday Morning Walkthrough Here is what the routine looks like once the dashboard is the first screen of the day: | Tile | Reading | |---|---| | Revenue (discounted orders, 7 days) | $612,000 | | Estimated Profit | $148,000 | | Discount given | $71,400 | | Promotion-influenced orders | 9,800 | 1. The Head of Marketing scans revenue trends: up 6% week over week. 2. Finance checks Estimated Profit next to revenue: margins holding. 3. Operations scans margin health: one tiered campaign has slipped from Healthy to Thin Margin. 4. The ecommerce manager opens Top Campaigns: a wholesale campaign leads on profit, not the flashiest BOGO. 5. Customer success spot-checks Recent Orders and traces one unusual order into its full breakdown. Five departments. One dashboard. One shared understanding of the business, before the first meeting starts. ## Margin Health as an Early Warning The most valuable tile is the one nobody has to interpret. Campaigns and orders are automatically classified as **Healthy**, **Thin Margin**, or **Loss** against thresholds the merchant defines, using real Shopify cost prices that sync daily. When that tiered campaign slips to Thin Margin, nobody discovered it by searching. The dashboard surfaced it. Drilling in shows discounted orders in one category earning less than expected, and the team reprices before the week is out. A campaign generating thousands in sales and a campaign generating a loss look identical on a revenue chart. They look completely different here. ## Measuring Shipping Promotions Free shipping campaigns create the most uncertainty: sales rise, but so does shipping expense. Because the dashboard tracks both sides continuously, Peak Commerce can see the subsidy absorbed per shipping campaign next to the revenue and profit those orders produced. Instead of assuming free shipping works, they measure whether it does. ## Metrics That Measure Success - Estimated Profit alongside revenue, daily - Discount given as a share of discounted revenue - Share of campaigns classified Healthy vs Thin Margin vs Loss - Profit ranking of top campaigns, not just sales ranking - Shipping subsidy absorbed vs revenue from shipping campaigns - Time from margin problem to detection The last metric is the quiet one that matters most: issues found in days cost far less than issues found at month-end. ## Common Mistakes - ❌ Reviewing sales without checking profit. - ❌ Evaluating each campaign in isolation instead of as part of the whole business. - ❌ Waiting for monthly reports before making pricing decisions. - ❌ Switching between multiple dashboards every morning. - ❌ Treating analytics as historical reporting instead of operational guidance. - ❌ Letting each department keep its own private version of the truth. ## Key Lessons Peak Commerce Group did not need more data. It needed one place where the right data came together. Revenue explains growth. Profit explains sustainability. Campaign performance explains effectiveness. Margin health explains risk. Recent orders explain execution. Together they form a complete picture of business health, and the dashboard becomes the operational command center rather than another report. ## Conclusion Growing a Shopify business is not just about launching more promotions. It is about understanding what those promotions do to the business every single day. A unified, profit-aware dashboard turns disconnected reports into one answer: revenue, Estimated Profit, discount given, top campaigns, margin health, and recent orders on a single screen, with order-level detail one click away. Successful businesses are not built on having more reports. They are built on making better decisions, faster, from numbers everyone trusts. --- ## Bulk Price Updates for Supplier Cost Changes URL: https://www.discountprime.app/case-studies/bulk-price-updates-for-supplier-cost-changes Industry: Electronics Distribution | Business model: B2B / Wholesale | Campaign types: Bulk Price Update | Published: July 14, 2026 | Read time: 15 min > When suppliers raised wholesale costs 8% overnight, a Shopify electronics distributor with 74,000 SKUs used Bulk Price Update to reprice the 18,000 affected products in minutes. A percentage-based change preserved price relationships from $20 cables to $2,000 servers, a temporary 3% adjustment later absorbed currency volatility, and profit analytics verified that margins in the affected categories recovered to Healthy. Key entities: Bulk Price Update, percentage-based repricing, supplier cost increase response, catalog price consistency, temporary price adjustment, currency volatility pricing, high-SKU catalog management, margin erosion from stale prices, profit analytics verification, electronics distribution pricing, fixed vs percentage price change ### Frequently asked questions **Q: How do I update thousands of Shopify prices at once?** A: Use a bulk price update tool instead of manual edits or CSV round-trips. Discount Prime's Bulk Price Update changes prices directly and in bulk: select the affected products, choose percentage or fixed change, choose increase or decrease, and apply. A catalog-wide change that would take days by hand completes in minutes, with no spreadsheets, no variant-mapping errors, and no missed products. **Q: Should I use a percentage or a fixed amount for bulk price changes?** A: Use a percentage when responding to supplier or market cost changes across a varied catalog. A fixed $5 increase is 25% of a $20 cable but only 0.25% of a $2,000 router, which distorts pricing relationships between products. A percentage change moves every product proportionally, so good-better-best structures stay intact. Fixed amounts only make sense when every affected product sits in a narrow price band. **Q: What happens to my margins if I delay repricing after a supplier cost increase?** A: Every order completed at the old price absorbs the cost increase, so margin erodes silently from the day the supplier raises prices until the day your catalog catches up. Nothing looks broken: sales continue and no pricing rule fails, which is exactly why the leak goes unnoticed. Over a multi-day manual repricing effort on thousands of SKUs, that absorbed cost compounds into a measurable profitability decline. **Q: Can I make a temporary price increase on Shopify and reverse it later?** A: Yes. Because Bulk Price Update supports both increases and decreases, percentage or fixed, you can apply a temporary adjustment and step it back when conditions change. A common pattern is a small temporary increase, for example 3%, across import-heavy categories while exchange rates are unfavorable, then an equivalent decrease once rates stabilize. Repricing becomes a two-way operational instrument rather than a one-way emergency. **Q: How fast should I reprice after a supplier raises costs?** A: Same day is the realistic target with bulk tooling. The economic cost of a supplier increase is proportional to the response window, because every interim order sells at yesterday's price against today's costs. High-SKU distributors treat repricing as a rehearsed procedure: confirm affected supplier groups, apply a percentage Bulk Price Update to those products, then check profit analytics to verify new orders return to healthy margins. ## Introduction Pricing does not always change because a merchant wants it to. Sometimes the market changes first. Supplier invoices increase, exchange rates move, freight doubles, and yesterday's price list quietly becomes a liability. Many Shopify merchants keep selling at yesterday's prices anyway. Not by choice: updating thousands of products manually simply takes days, and every hour spent editing is another hour selling below the new market reality. Instead of asking: > "How fast can we edit 18,000 products?" A Solutions Architect asks: > "How do we make repricing a repeatable response to market events, not an emergency project?" This study designs that response for a high-SKU electronics distributor. ## Merchant Scenario Consider NovaTech Distribution, a fictional wholesaler importing networking equipment, computer accessories, and consumer electronics from manufacturers across Asia and Europe. | Attribute | Detail | |---|---| | Industry | Electronics Distribution | | Annual Revenue | $58 Million | | Products | 74,000 | | Suppliers | 180 | | Purchase Orders | New POs every week | Product costs change constantly. Exchange rates move daily. Supplier price lists refresh monthly. NovaTech operates on one accepted reality: prices are never permanent. ## The Monday Morning Email One Monday, updated supplier price lists arrive. Several manufacturers have raised wholesale prices by approximately **8%**. Nothing unusual, except the blast radius: more than **18,000 Shopify products** are affected. Marketing cannot manually edit them. Operations cannot review every SKU. And waiting several days means selling inventory at prices that no longer reflect what replacement stock will cost. The business is not merely delaying an update. It is absorbing the increase on every order shipped in the meantime. ## The Cost of Slow Repricing Pricing delays never appear on a sales report. They appear later, as shrinking margins. | Day | State | Effect | |---|---|---| | Day 0 | Supplier costs rise 8% | Catalog still shows old prices | | Days 1-3 | Manual editing in progress | Every completed order absorbs the increase | | Day 4+ | Catalog partially updated | Inconsistent prices across similar products | No campaign is broken. No pricing rule has failed. The catalog simply has not caught up with the market, and each completed order reflects yesterday's costs instead of today's reality. ## Business Objectives | Priority | Objective | |---|---| | 1 | Move 18,000 prices in minutes, not days | | 2 | Preserve price relationships across a $20 to $2,000 catalog | | 3 | Target only the affected supplier groups | | 4 | Verify margins recovered after the change | | 5 | Make the whole procedure repeatable for the next increase | ## Evaluating Repricing Approaches ### Option 1: Manual Per-Product Editing | Advantages | Disadvantages | |---|---| | Full control per SKU. | Days of work for 18,000 products. | | No tooling required. | Guaranteed missed products and typos. | | | Margin bleeds the entire time. | | Factor | Assessment | |---|---| | Architecture Score | ★☆☆☆☆ | ### Option 2: CSV Export and Re-Import | Advantages | Disadvantages | |---|---| | Faster than manual edits. | Fragile: one formula error rewrites the catalog. | | Spreadsheet math is flexible. | No preview, no easy reversal, variant mapping risks. | | Factor | Assessment | |---|---| | Architecture Score | ★★☆☆☆ | ### Option 3: Fixed-Dollar Bulk Adjustment Apply the same dollar amount to every affected product. | Advantages | Disadvantages | |---|---| | One fast operation. | Does not scale across price points: $5 is 25% of a $20 cable and 0.25% of a $2,000 router. | | | Distorts the catalog's pricing relationships. | | Factor | Assessment | |---|---| | Architecture Score | ★★☆☆☆ | ### Option 4: Percentage-Based Bulk Price Update Use **Bulk Price Update** to apply a percentage increase directly to the affected product groups. | Advantages | Disadvantages | |---|---| | 18,000 products repriced in minutes. | Requires clean product grouping to target accurately. | | Proportional change preserves catalog balance. | | | Works as increase or decrease, so it is reversible. | | | Factor | Assessment | |---|---| | Architecture Score | ★★★★★ | ## Comparison Matrix | Approach | Speed | Consistency | Scales Across Prices | Reversible | |---|---|---|---|---| | Manual editing | Days | Poor | Yes, in theory | Painfully | | CSV round-trip | Hours | Fragile | Yes | Risky | | Fixed-dollar bulk | Minutes | High | No | Yes | | Percentage Bulk Price Update | Minutes | High | Yes | Yes | ## The Discount Prime Architecture | Play | Mechanism | Purpose | |---|---|---| | Supplier response | Bulk Price Update, percentage increase, +8% | Reprice the 18,000 affected products in one operation the day the price list arrives. | | Volatility buffer | Bulk Price Update, temporary +3% | Absorb currency-driven cost spikes, then decrease again when rates stabilize. | | Seasonal adjustments | Bulk Price Update on targeted product groups | Respond to freight, packaging, and energy cost changes per category instead of rebuilding pricing. | | Verification | Profit analytics with real Shopify cost prices | Confirm post-change orders classify as Healthy rather than Thin Margin or Loss. | Note what this architecture is not: it is not a discount campaign. Bulk Price Update changes base prices directly, which is exactly right when the underlying cost of goods has moved. ## The 8% Response, Step by Step 1. Supplier price lists arrive Monday morning; finance confirms the affected brands. 2. The team selects the 18,000 affected products by supplier product group. 3. Bulk Price Update is configured: percentage change, direction increase, value 8%. 4. The update runs. Within minutes, every selected product reflects the new pricing. 5. Profit analytics, fed by daily cost price syncing, confirm new orders in those categories return to Healthy margins. | Product | Old Price | New Price (+8%) | |---|---|---| | USB-C cable | $18.90 | $20.41 | | Managed switch | $249.00 | $268.92 | | Rack server chassis | $2,000.00 | $2,160.00 | No spreadsheets. No manual editing. No missed products. ## Why Percentage Changes Win Supplier increases rarely hit every product equally in absolute dollars, which is why fixed adjustments break down across a wide catalog. A percentage change moves a $20 product and a $2,000 product proportionally, so the relationships customers understand, good, better, best, stay intact. The pricing model remains consistent and the catalog remains balanced, no matter how many SKUs the change touches. ## Temporary Adjustments for Volatility Later in the year, currency fluctuation raises import costs again. This time the change is not permanent, so neither is the response: a temporary **3% increase** across import-heavy categories while exchange rates stabilize. When conditions improve, the same tool steps prices back down just as quickly. That is the deeper shift. Bulk pricing stops being a maintenance chore performed under duress and becomes an operational instrument the business uses in both directions. ## Metrics That Measure Success - Time from supplier notification to storefront repricing - Share of affected SKUs updated in the first operation - Estimated Profit per order in affected categories, before and after - Share of post-change orders classified Healthy vs Thin Margin vs Loss - Margin absorbed during the response window - Price consistency across comparable products The first metric is the headline: hours instead of days is the entire economic argument. ## Common Mistakes - ❌ Updating products one by one. - ❌ Waiting until every supplier has sent a price list before acting on any of them. - ❌ Applying inconsistent manual increases across the catalog. - ❌ Using fixed-dollar increases across products with very different prices. - ❌ Repricing without verifying margins recovered afterward. - ❌ Treating each cost change as a one-off emergency instead of a rehearsed procedure. ## Key Lessons Price management is not about editing products. It is about responding to business conditions. Markets move, suppliers adjust, and costs change; the merchants who reprice quickly protect their margins, while those who delay usually discover the impact only after profitability has already declined. Percentage-based bulk updates turn an 18,000-product problem into a minutes-long procedure, and profit analytics close the loop by proving the margins actually recovered. ## Conclusion Modern commerce moves too quickly for manual price updates. When supplier costs change overnight, a merchant needs to respond across thousands of products immediately, proportionally, and reversibly. For NovaTech Distribution, Bulk Price Update transformed repricing from a multi-day scramble into a same-morning response: 8% across 18,000 products in minutes, verified by profit analytics, and repeatable for every cost change that follows. Successful pricing is not determined by how often prices change. It is determined by how quickly the business can adapt when they do. --- ## Margin Health Alerts: Spot Unprofitable Shopify Promotions Early URL: https://www.discountprime.app/case-studies/margin-health-alerts-for-shopify-promotions Industry: Multi-Channel Retail | Business model: Retail / DTC | Campaign types: Profit Analytics, Margin Health Alerts | Published: July 14, 2026 | Read time: 15 min > Margin health alerts grade every Shopify order and campaign as Healthy, Thin Margin, or Loss against merchant-defined thresholds, using real Shopify cost prices that sync daily. Instead of waiting for end-of-campaign finance reports, merchants see unprofitable promotions within hours and can pause or reprice them before a small pricing error becomes an expensive trend. Key entities: margin health alerts, profit analytics, Estimated Profit, Shopify cost prices, Healthy / Thin Margin / Loss classification, merchant-defined margin thresholds, unprofitable promotion detection, supplier cost changes, campaign-level margin monitoring, operational early warning system ### Frequently asked questions **Q: How do I know if my Shopify promotion is losing money?** A: Compare each order's revenue against real product costs, not just discount depth. A profit analytics tool like Discount Prime pulls Shopify cost prices, calculates Estimated Profit per order and per campaign, and grades each one Healthy, Thin Margin, or Loss against thresholds you define. A campaign showing negative estimated margin, for example -3%, is actively losing money and should be paused or repriced immediately. **Q: What are margin health signals in Discount Prime?** A: Margin health signals classify orders and campaigns into three states: Healthy means margin sits comfortably above your defined threshold and needs no attention, Thin Margin means the order is profitable but only barely and deserves review, and Loss means the margin is negative and requires immediate action. The thresholds are merchant-defined, so a luxury brand and a wholesale distributor can each set levels that match their own economics. **Q: Why did my profitable campaign suddenly start losing money?** A: The most common cause is a cost change the pricing team has not absorbed yet: a supplier raises costs, shipping rates change, or discounts stack deeper than planned while sale prices stay fixed. Because revenue still looks strong, the problem is invisible in sales reports. Profit analytics that sync Shopify cost prices daily recalculate Estimated Profit automatically, so affected orders flip to a Loss signal within hours instead of surfacing in a finance review weeks later. **Q: Should I wait for finance reports to review promotion profitability?** A: No. End-of-campaign finance reviews are accurate but arrive days or weeks after the damage is done, and a high-volume store can complete hundreds of unprofitable orders in a single weekend. A stronger pattern is continuous classification: every order is graded against margin thresholds the moment it lands, loss-making campaigns surface at the top of the dashboard, and finance reviews become confirmation rather than discovery. **Q: How should I set margin thresholds for my store?** A: Start from your business economics rather than a generic benchmark. Calculate your typical gross margin after product cost, shipping, and fees, then set the Healthy threshold at the level where a campaign meets its profit objective and the Loss threshold at zero or your minimum acceptable margin. Revisit both numbers quarterly, because supplier mix, shipping rates, and discount strategy all drift over time. ## Introduction Ask a Shopify merchant how their last promotion performed and you will usually hear revenue numbers. Orders were up. Conversion improved. The campaign "worked." Here is the uncomfortable truth: most promotional losses are not caused by bad campaigns. They are caused by good campaigns whose economics quietly changed while nobody was watching. A supplier raises costs. A discount runs slightly deeper than planned. Shipping expenses creep upward. Hundreds of orders complete before anyone opens a report. Instead of asking: > "How did our campaigns perform last month?" a solutions architect asks: > "Which campaign is losing money right now, and how quickly would we know?" That question changes the design problem. The merchant does not need better reporting. It needs an early warning system: an analytics architecture where problems find the manager instead of the manager searching for problems. ## Merchant Scenario Consider **NorthPeak Outdoor**, a fictional multi-channel Shopify retailer selling camping equipment, hiking accessories, and seasonal outdoor products. | Attribute | Detail | |---|---| | Industry | Outdoor & Camping Equipment | | Platform | Shopify | | Annual Revenue | $32 Million | | Products | 18,000 | | Monthly Orders | 37,000 | | Active Promotions | 15 to 20 at any time | NorthPeak experiments constantly with pricing: wholesale offers, BOGO campaigns, free shipping thresholds, seasonal discounts. Every campaign generates reports covering revenue, orders, conversion rate, average order value, gross profit, and margin. The information exists. The problem is recognizing when action is required. Managers cannot review 37,000 orders manually, and finance reports arrive days after promotions have already shaped profitability. NorthPeak does not need more reports. It needs clearer signals. ## The Weekend That Exposed the Gap During a holiday campaign, one of NorthPeak's suppliers unexpectedly increased product costs. The pricing team had not yet updated every affected product. Orders kept flowing all weekend, and sales looked fantastic. On Monday morning, finance discovered that dozens of products had been selling below the company's acceptable margin for two full days. The campaign was not broken. Every discount executed exactly as configured. **The visibility was broken.** Nothing in the stack could say, on Saturday afternoon, "these specific orders are now unprofitable." ## Why Dashboards Full of Numbers Fail People do not process dozens of metrics equally. They respond to visual patterns. A dashboard filled with visually identical numbers forces a manager to hunt for anomalies, and hunting does not scale past a handful of campaigns. The architectural insight is simple: an analytics layer should **classify**, not just display. Every order and every campaign should land in a category that already encodes the required response. Attention becomes a routed resource instead of a scarce one. ## Evaluating Monitoring Options ### Option 1: End-of-Campaign Finance Review Finance exports orders into spreadsheets after each campaign, matches costs manually, and calculates realized margin. | Advantages | Disadvantages | |---|---| | Accurate once complete. | Days or weeks of latency. | | No new tooling required. | Losses accumulate before detection. | | | Consumes analyst hours on every campaign. | | Factor | Assessment | |---|---| | Architecture Score | ★★☆☆☆ | ### Option 2: Manual Daily Order Sampling An operations manager spot-checks a sample of yesterday's orders each morning and escalates anything suspicious. | Advantages | Disadvantages | |---|---| | Faster than post-campaign review. | Sampling misses concentrated problems. | | Builds team pricing intuition. | Cannot scale to 37,000 monthly orders. | | | Depends entirely on one person's diligence. | | Factor | Assessment | |---|---| | Architecture Score | ★★☆☆☆ | ### Option 3: Threshold-Based Margin Health Alerts Define what "healthy" means for this specific business, then let the analytics layer grade every order and campaign automatically as **Healthy**, **Thin Margin**, or **Loss**. | Advantages | Disadvantages | |---|---| | Problems surface within hours, not weeks. | Requires accurate product cost data. | | Covers 100% of orders, not a sample. | Thresholds must be defined deliberately. | | Attention flows only to exceptions. | | | Factor | Assessment | |---|---| | Architecture Score | ★★★★★ | The decision is clear. The remaining work is making the classification trustworthy. ## The Discount Prime Architecture Margin health alerts are only as good as the cost data beneath them, so the architecture starts at the cost layer and builds upward. | Layer | Mechanism | Purpose | |---|---|---| | Cost foundation | Real Shopify cost prices, auto-synced daily | Estimated Profit reflects reality even when suppliers reprice overnight. | | Order grading | Margin health signals (Healthy / Thin Margin / Loss) | Every order is scored against merchant-defined thresholds as it lands. | | Campaign grading | Profit analytics per campaign | Each of the 15 to 20 active promotions carries its own live health status. | | Escalation view | Dashboard ordered by signal severity | Loss items surface first. Healthy items request no attention at all. | Notice what this design would have done during the supplier incident: the cost increase syncs from Shopify, Estimated Profit recalculates, and affected orders flip to Loss within hours. The alert reaches operations on Saturday, not finance on Monday. ## How the Three Signals Work | Signal | Meaning | Required Response | |---|---|---| | Healthy | Margin comfortably above the defined threshold | None. Confidence, not investigation. | | Thin Margin | Still profitable, but only barely | Monitor. Investigate before it becomes expensive. | | Loss | Negative margin on real cost data | Act immediately. Identify the campaign and reprice. | **Healthy** does not celebrate success. It reduces unnecessary investigation, which is what frees a small operations team to run twenty promotions at once. **Thin Margin** is an invitation to look closer. Perhaps supplier costs rose, discounts drifted deeper, or shipping expenses changed. Nothing demands intervention yet, but something deserves a scheduled review. **Loss** means the business is not earning less. It is paying customers to shop. These orders surface instantly so operations can identify the campaign and adjust pricing before hundreds of additional orders repeat the pattern. ## A Monday Morning Walkthrough Here is what NorthPeak's operations manager sees at 9:00 a.m., before opening a single report: | Campaign | Estimated Margin | Signal | Action | |---|---|---|---| | Campaign A | +28% | Healthy | None | | Campaign B | +12% | Thin Margin | Review discount depth and supplier costs this week | | Campaign C | -3% | Loss | Pause or reprice today | The colors prioritize the investigation. The numbers explain why. Campaign C gets fixed before lunch instead of after the quarter closes, and Campaign A never steals a minute of attention it does not need. ## Setting Thresholds That Fit the Business Every business measures healthy profitability differently. A luxury brand may treat anything under 40% as thin. A wholesale distributor may operate comfortably at 12%. A manufacturer watches different targets entirely. Because Discount Prime evaluates margin health against **merchant-defined thresholds**, the classification reflects the economics of the specific business rather than a generic assumption. NorthPeak set Healthy at 20% and Loss at 0%, then revisited both numbers each quarter as its supplier mix changed. ## Measuring Success Do not measure this architecture by revenue. Measure it by detection speed and attention efficiency: - Time from margin problem to first alert - Share of orders classified Healthy - Loss orders per week, trending toward zero - Estimated Profit per campaign, not just per store - Finance hours spent on emergency margin reports - Number of campaigns paused or repriced mid-flight The last metric sounds negative. It is not. Every mid-flight correction is a loss that used to run unnoticed for weeks. ## Common Mistakes - ❌ Reviewing profitability only after a campaign ends. - ❌ Treating every order as equally worth inspecting. - ❌ Relying solely on spreadsheets for margin control. - ❌ Monitoring revenue while ignoring margin quality. - ❌ Waiting for finance to discover operational problems. - ❌ Running promotions on stale or missing cost data. Each mistake shares one property: it adds delay, and delay is what converts a small pricing error into an expensive trend. ## Key Lessons Dashboards should guide attention, not display information. Healthy campaigns deserve confidence. Thin margins deserve observation. Losses deserve immediate action. NorthPeak's realization was that color was never the feature. **Prioritization was.** The three-signal system works because it turns 37,000 monthly orders into a short, ranked list of things worth a human's time. ## Conclusion Successful discount campaigns are not measured only by sales. They are measured by sustainable profitability, and profitability erodes fastest in the gap between when a problem starts and when someone notices. Margin health alerts close that gap. Built on real Shopify cost prices that sync daily, graded against thresholds the merchant defines, and surfaced as Healthy, Thin Margin, or Loss, they transform analytics from historical reporting into operational awareness. The fastest way to protect profit is not reading more reports. It is seeing the right warning before the loss becomes a trend. --- ## Preventing Double Discounting with Automatic Conflict Protection URL: https://www.discountprime.app/case-studies/prevent-double-discounting-on-shopify Industry: Fashion & Lifestyle Retail | Business model: Retail / Enterprise | Campaign types: Conflict Protection, Flat Product Discount, Campaign Priorities | Published: July 14, 2026 | Read time: 15 min > Double discounting happens when independent teams target the same products with overlapping promotions, such as a 20% campaign and a 15% Shopify automatic discount applying together. Discount Prime prevents it with real-time conflict detection before activation, auto-exclude, explicit campaign priorities, and stacking protection against Shopify amount-off discounts, so customers receive exactly one intended discount per product. Key entities: double discounting, discount stacking, real-time conflict detection, auto-exclude, campaign priorities, Shopify automatic discounts, Flat Product Discount, promotion governance, temporary conflict protection, order-level profit analytics ### Frequently asked questions **Q: How do I stop discounts from stacking on Shopify?** A: Use a discount platform with built-in conflict management rather than manual coordination. Discount Prime detects overlapping campaigns before activation, can auto-exclude overlapping products, and lets explicit priorities decide which campaign wins. Its campaigns can also be protected from combining with Shopify's own automatic and code-based amount-off discounts, so a product in an active campaign receives exactly one intended discount instead of an accidental combination. **Q: What happens when two discounts target the same product on Shopify?** A: Without protection, both can apply and the product is discounted twice. For example, an $80 dress in a 20% campaign should sell for $64, but if a 15% Shopify automatic discount also fires, the customer pays $54.40 and the merchant gives away an unplanned $9.60 per unit. With conflict protection, the overlapping discount is blocked for that product while the campaign runs, and the customer pays the intended $64. **Q: Why did my Shopify promotion cost more margin than planned?** A: The most common cause is unintended stacking: another automatic discount, a support coupon, or a scheduled clearance rule targeted the same products as your campaign, and both applied at checkout. No system malfunctions in this scenario, since each discount behaves exactly as configured. Review orders for multiple discount lines, then add conflict detection and stacking protection so overlapping promotions cannot fire together on the same products. **Q: Should I delete old Shopify discounts to avoid conflicts?** A: Usually no. Most existing discounts remain valid and will be needed again after your campaign ends. A better pattern is temporary protection: conflicting Shopify amount-off discounts are prevented from applying to campaign products only while the campaign is active, and normal behavior returns automatically afterward. This preserves every promotion, avoids emergency re-creation work, and still guarantees customers never receive two discounts on one product. **Q: How can multiple teams run Shopify promotions without overlapping?** A: Move enforcement from meetings into the platform. When conflict rules are systematic, marketing, support, and operations can each launch campaigns independently: the system flags overlaps before activation, auto-excludes shared products or applies a priority, and blocks stacking with Shopify amount-off discounts. Teams launch faster because they no longer cross-check every active discount, and finance verifies outcomes through order-level profit analytics. ## Introduction Every successful Shopify store eventually reaches the same milestone: more promotions, more marketing campaigns, more discount codes, more automatic discounts. At first, discount management is simple. One promotion, one campaign, one rule. Then the business grows, and different teams begin creating promotions independently. Marketing launches a seasonal sale. Customer support issues a recovery coupon. Operations schedules an automatic clearance discount. Each promotion makes sense on its own. Together, they can accidentally discount the same products twice. Instead of asking: > "What discount should we run next?" a solutions architect asks: > "What happens when two discounts meet on the same product, and who decided that?" This case study designs a conflict protection architecture for a retailer whose promotions started interacting in ways nobody planned. ## Merchant Scenario Consider **Urban Avenue**, a fictional fashion retailer operating multiple Shopify storefronts selling apparel and accessories. | Attribute | Detail | |---|---| | Industry | Fashion & Lifestyle Retail | | Platform | Shopify (multiple storefronts) | | Annual Revenue | $38 Million | | Products | 26,000 | | Monthly Orders | 52,000 | | Marketing Campaigns | 40+ per month | Urban Avenue's promotional stack spans several tools: Shopify automatic discounts, Shopify discount codes, seasonal campaigns, and Discount Prime. Four teams create promotions, and no single person can see them all. Everything worked well, until one weekend campaign produced an unexpected result. ## The Promotion That Worked Too Well Marketing launched a "Summer Collection" campaign using a Discount Prime **Flat Product Discount**: selected products automatically received 20% off. At the same time, another team had already scheduled a Shopify automatic discount of 15% off the exact same collection. Neither team realized the overlap. Customers did not see one promotion. They received both. | Checkout Line | Amount | |---|---| | Summer dress, list price | $80.00 | | Discount Prime campaign (20% off) | -$16.00 | | Shopify automatic discount (15% off) | -$9.60 | | Customer pays | $54.40 | | Intended sale price | $64.00 | | Unplanned giveaway per unit | $9.60 | On a product with a 55% gross margin, that extra $9.60 consumed most of the profit the sale was supposed to keep. Multiply it across a weekend of orders and the campaign that "worked too well" quietly erased its own margin. ## The Investigation Finance reviewed the campaign expecting healthy promotional costs. Instead, they found dozens of orders where products had received multiple overlapping discounts. The important finding: **no bug had occurred**. Every system behaved exactly as configured. The real problem was governance. Nobody, and no system, had prevented two independent promotions from targeting the same products at the same time. That distinction matters because it defines the fix. You cannot patch a bug that does not exist. You have to design coordination into the architecture itself. ## Evaluating Coordination Strategies ### Option 1: Manual Cross-Team Coordination Every team checks a shared promotion calendar and audits active Shopify discounts before launching anything. | Advantages | Disadvantages | |---|---| | No new tooling. | Depends on perfect human discipline. | | Teams stay informed. | Breaks the first time someone is rushed. | | | Slows every launch with audit overhead. | | Factor | Assessment | |---|---| | Architecture Score | ★★☆☆☆ | ### Option 2: Centralize All Discounts Under One Team Route every promotion, including support coupons and clearance rules, through a single owner. | Advantages | Disadvantages | |---|---| | One view of everything. | Creates a bottleneck for 40+ monthly campaigns. | | Consistent policy. | Support and operations lose autonomy. | | | The owner becomes a single point of failure. | | Factor | Assessment | |---|---| | Architecture Score | ★★★☆☆ | ### Option 3: Automatic Conflict Protection Let the discount platform detect overlaps itself: conflicts are flagged before a campaign activates, overlapping products are auto-excluded or resolved by explicit priority, and Discount Prime campaigns are protected from stacking with Shopify's own amount-off discounts. | Advantages | Disadvantages | |---|---| | Enforcement is systematic, not cultural. | Teams must understand the resolution rules. | | Every team keeps launching independently. | | | Conflicts are caught before customers see them. | | | Factor | Assessment | |---|---| | Architecture Score | ★★★★★ | ## The Discount Prime Architecture Urban Avenue's protection is built in layers, each answering a different question. | Layer | Mechanism | Purpose | |---|---|---| | Campaign layer | Flat Product Discount (20% off Summer Collection) | The single promotion customers are meant to see. | | Detection layer | Real-time conflict detection before activation | Overlapping campaigns are flagged before they go live, not after checkout. | | Resolution layer | Auto-exclude plus campaign priorities | Overlapping products are removed automatically, or an explicit priority decides which campaign wins. | | Stacking guard | Protection from Shopify amount-off discounts | Conflicting Shopify automatic and code discounts are prevented from applying to campaign products while the campaign runs. | | Verification layer | Profit analytics with Estimated Profit | Order-level margin confirms each product gave exactly the intended discount. | ## How Conflict Protection Behaves When a Discount Prime campaign becomes active, the system checks for automatic and code-based amount-off discounts targeting the same products. If a conflict exists, those overlapping discounts are prevented from applying to the affected products while the campaign is active. When the campaign ends, normal behavior returns. No manual intervention. No emergency fixes. No forgotten promotions. This is deliberately **temporary** protection. Urban Avenue did not want to delete its Shopify discounts; most were still valid and would be needed again. They simply should not fire at the same time as an active campaign on the same products. Conflict protection preserves every promotion and only prevents the overlap. ## Customer Journey With Protection Replay the same weekend with the architecture in place: 1. Customer opens the Summer Collection. 2. A dress lists at $80.00 and shows the campaign price of $64.00 with a strikethrough original price. 3. The 15% Shopify automatic discount targets the same dress, but conflict protection blocks it for this product while the campaign runs. 4. At checkout, the customer pays exactly $64.00. 5. In profit analytics, the order reports the planned 20% discount and a healthy Estimated Profit. Customers receive exactly the intended promotion. Nothing more, nothing less. And the 15% automatic discount resumes untouched the day the campaign ends. ## Marketing Moves Faster, Not Slower Governance tools usually slow teams down. This one does the opposite. Previously, every launch required cross-checking every active Shopify discount across marketing, support, operations, and ecommerce. Now campaign managers launch with confidence because the platform enforces the rule they used to enforce by meeting. The result is less coordination overhead, fewer mistakes, and faster campaign execution across 40+ monthly campaigns. Conflict protection turned promotional management into a controlled system instead of a collection of independent campaigns. ## Measuring Success - Orders receiving more than one product discount (target: zero unplanned) - Estimated Profit per campaign versus plan - Discount rate per order compared to the configured rate - Pricing disputes reaching customer support - Time from campaign idea to launch - Conflicts detected and resolved before activation The first metric is the headline. Everything else proves the system paid for itself. ## Common Mistakes - ❌ Launching campaigns without checking existing Shopify discounts. - ❌ Assuming teams always communicate promotional schedules. - ❌ Letting multiple systems discount the same products independently. - ❌ Discovering conflicts only after customers complete checkout. - ❌ Deleting valid discounts instead of temporarily protecting against overlap. Each mistake increases financial risk while making pricing less predictable for customers. ## Key Lessons Successful promotions are not only about attractive discounts. They are about ensuring every campaign behaves exactly as planned. The safest promotion is not the largest discount. **It is the one customers receive exactly once.** Automatic conflict protection removed the need for manual coordination while preserving every team's ability to create campaigns independently. The result was not fewer promotions. It was smarter promotion management. ## Conclusion As Shopify stores grow, managing discounts becomes less about creating promotions and more about controlling how they interact. Urban Avenue's incident was not a discount problem; it was an architecture problem, and it was solved at the architecture layer. Real-time conflict detection catches overlaps before activation. Auto-exclude and campaign priorities resolve them deterministically. Stacking protection keeps Shopify amount-off discounts from doubling an active campaign, and profit analytics verifies the outcome on every order. Customers should remember the value of your promotion. Not the mistake of receiving it twice. --- ## Minimum Purchase Rules: Qualify Before or After Other Discounts? URL: https://www.discountprime.app/case-studies/minimum-purchase-before-or-after-discounts Industry: Multi-Channel Retail | Business model: Retail / DTC | Campaign types: Free Shipping, Execution Order, Tiered Spend Discount | Published: July 14, 2026 | Read time: 16 min > When customers stack coupons with threshold promotions, merchants must decide which cart total qualifies: the original value or the discounted payable amount. Discount Prime makes execution order a per-campaign setting, so loyalty campaigns can qualify on the pre-discount cart to reward intent while free shipping qualifies on the post-discount total to protect margin, both in the same store. Key entities: minimum purchase requirement, execution order, before or after other discounts, free shipping threshold, discount stacking, loyalty coupons, Tiered Spend Discount, free shipping progress bar, qualification logic, per-campaign policy ### Frequently asked questions **Q: Should a free shipping threshold count the cart before or after a coupon?** A: For free shipping, most merchants should evaluate the threshold after other discounts. Shipping has a real fulfillment cost, so eligibility should match what the customer actually pays. A $120 cart with a $30 coupon leaves a $90 payable total, which no longer clears a $100 threshold. Evaluating after discounts either recovers the shipping cost or nudges the customer to add items until the payable total qualifies again. **Q: What happens when a customer applies a coupon and drops below the minimum purchase?** A: It depends on the campaign's execution order. If the minimum purchase requirement is evaluated before other discounts, the customer keeps the benefit because the original cart met the threshold. If it is evaluated after other discounts, the benefit is removed because the payable amount fell below the requirement. Discount Prime lets merchants choose this behavior per campaign, and a progress bar widget can show customers the updated gap to requalify. **Q: How do I stop loyalty coupons from removing rewards customers already earned?** A: Set those campaigns to evaluate their minimum purchase requirement before other discounts reduce the cart. The qualification then reads the original cart value, so a VIP customer who builds a qualifying basket keeps the reward even after applying a loyalty or birthday coupon. This execution order suits loyalty programs, membership perks, and subscription benefits, where the goal is recognizing purchasing intent rather than protecting fulfillment cost. **Q: Why do marketing and finance disagree about who qualifies for a promotion?** A: Because each team is reading a different number, and both numbers are legitimate. Marketing sees the original cart value as proof of purchasing intent, while finance sees the discounted payable amount as the revenue that must justify the benefit. The disagreement disappears when execution order becomes an explicit per-campaign policy: intent-driven campaigns qualify before other discounts, cost-driven benefits like free shipping qualify after them. **Q: Can I use different qualification rules for different campaigns in one Shopify store?** A: Yes. Discount Prime evaluates minimum purchase requirements before or after other discounts as a per-campaign setting, so one store can run both policies simultaneously. A merchant can let a VIP spend-tier campaign qualify on the pre-discount cart while a holiday free shipping campaign qualifies on the post-discount total. Each campaign declares which total it reads, so stacked coupons produce predictable outcomes instead of support disputes. ## Introduction Most merchants think a minimum purchase requirement is simple. Spend $100, unlock free shipping. Spend $150, qualify for a gift. But sophisticated stores rarely run one promotion at a time. Customers combine a coupon code, a loyalty reward, a wholesale price, and a seasonal promotion in the same checkout. Suddenly one question decides everything: should the customer qualify based on the cart **before** other discounts reduce it, or **after**? Instead of asking: > "Which discount executes first?" a solutions architect asks: > "Which cart total should decide who earns this promotion, and what behavior are we rewarding?" That single decision can completely change who receives a promotion. This case study designs an execution-order architecture for a merchant whose promotions started interacting with one another. ## Merchant Scenario Consider **Summit Outdoor Supply**, a fictional multi-channel Shopify merchant selling hiking equipment, camping gear, and outdoor accessories. | Attribute | Detail | |---|---| | Industry | Outdoor Gear & Accessories | | Platform | Shopify | | Annual Revenue | $36 Million | | Products | 18,500 | | Monthly Orders | 28,000 | Summit frequently combines promotions: seasonal sales, VIP coupons, loyalty rewards, BOGO campaigns, and free shipping. Everything worked, until the promotions began stacking in the same checkout. ## The Checkout That Split the Company A customer filled their cart with $120 of products. The store offered free shipping on orders above $100. The customer then applied a 25% loyalty coupon. | Checkout Line | Amount | |---|---| | Cart value | $120.00 | | Free shipping threshold | $100.00 | | Loyalty coupon (25%) | -$30.00 | | Payable amount | $90.00 | The support team immediately received two different opinions. Marketing said: "They originally spent more than $100. They earned free shipping." Finance replied: "They are only paying $90. The order no longer justifies it." Both teams were correct. The business simply had never decided which amount should matter. ## The Real Question Should promotional eligibility be based on the original cart value or the discounted cart value? Neither answer is universally correct. Each serves a different business objective, which is exactly why execution order should be a per-campaign decision rather than a store-wide default. ## Evaluating Qualification Strategies ### Option 1: One Rule for Every Campaign Pick a single evaluation order and apply it to every promotion in the store. | Advantages | Disadvantages | |---|---| | Simple to explain internally. | Forces loyalty perks and shipping subsidies into the same policy. | | Predictable configuration. | Every campaign inherits a compromise. | | Factor | Assessment | |---|---| | Architecture Score | ★★☆☆☆ | ### Option 2: Always Qualify Before Other Discounts Minimum purchase requirements are evaluated on the original cart, before coupons reduce it. In the disputed checkout, the customer built a $120 cart, so free shipping stays unlocked even though they pay $90. | Advantages | Disadvantages | |---|---| | Rewards demonstrated purchasing intent. | Expensive benefits ship on shrunken orders. | | Coupons never claw back earned perks. | Shipping and gift costs become unpredictable. | | Excellent for loyalty experiences. | | | Factor | Assessment | |---|---| | Architecture Score | ★★★☆☆ | ### Option 3: Always Qualify After Other Discounts Requirements are evaluated on what the customer actually pays. The same $120 cart minus the $30 coupon leaves $90, below the threshold, so free shipping is not unlocked. | Advantages | Disadvantages | |---|---| | Protects margin on costly benefits. | Feels punitive to loyal customers using earned rewards. | | Eligibility always matches real revenue. | Can increase support tickets and coupon frustration. | | Factor | Assessment | |---|---| | Architecture Score | ★★★☆☆ | ### Option 4: Execution Order Per Campaign Discount Prime evaluates minimum purchase requirements **before or after other discounts as a per-campaign setting**. Loyalty campaigns qualify on intent; expensive fulfillment benefits qualify on payable value. | Advantages | Disadvantages | |---|---| | Each campaign's logic matches its objective. | Requires deciding the objective explicitly. | | Loyalty stays generous, shipping stays funded. | | | Factor | Assessment | |---|---| | Architecture Score | ★★★★★ | ## The Discount Prime Architecture Summit adopted both strategies at once, one per campaign. | Campaign | Mechanism | Execution Order | Purpose | |---|---|---|---| | VIP Appreciation | Tiered Spend Discount (cart-level), gated to VIP-tagged customers | Before other discounts | Reward demonstrated intent. Loyalty coupons never remove perks already earned. | | Holiday Free Shipping | Free Shipping with a $100 minimum | After other discounts | Reserve the shipping subsidy for orders whose payable value still exceeds $100. | | Threshold visibility | Free shipping progress bar widget | Not applicable | Show customers exactly how far their qualifying total is from the threshold. | The two campaigns coexist in the same checkout without contradiction because each one declares which total it cares about. ## The Same Cart, Two Outcomes Execution order is easiest to see with one cart evaluated both ways against the $100 threshold: | Question | Before Other Discounts | After Other Discounts | |---|---|---| | Qualifying total | $120.00 | $90.00 | | Threshold met? | Yes | No | | Free shipping | Granted | Not granted | Same customer, same cart, same coupon. The only variable is which total the campaign reads, and that variable is a business policy, not a technicality. ## Customer Journey Walk the holiday configuration end to end: 1. A customer adds $86 of camping gear. The progress bar shows: add $14 more for free shipping. 2. They add a $34 headlamp. Cart: $120. The bar confirms free shipping is within reach. 3. They apply a 25% loyalty coupon. Payable total: $90. 4. The Holiday Free Shipping campaign, set to qualify after other discounts, re-evaluates: $90 is below $100, so shipping is not free. The progress bar reflects the updated gap honestly. 5. The customer adds a $12 fuel canister to bring the payable total to $102. Free shipping unlocks. Notice what the "after" setting did: instead of shipping a $90 order for free, it recovered $12 of additional basket value. Meanwhile, a VIP customer in the VIP Appreciation campaign keeps their earned tier reward regardless of the coupon, because that campaign qualifies before discounts. ## Matching Execution Order to Intent Summit stopped asking "what executes first?" and started asking "what behavior are we trying to reward?" The mapping became a standard part of campaign design: | Business Objective | Execution Order | |---|---| | Rewarding loyal and VIP customers | Before other discounts | | Membership and subscription perks | Before other discounts | | Preventing coupon frustration | Before other discounts | | Controlling shipping subsidy costs | After other discounts | | High-value gifts and BOGO rewards | After other discounts | | Preventing excessive discount stacking | After other discounts | If the objective is recognizing customer commitment, qualify before discounts. If the objective is protecting margin on a benefit with real fulfillment cost, qualify after. ## Measuring Success - Support tickets about promotion eligibility (Summit's fell sharply once outcomes became predictable) - Shipping subsidy cost as a share of qualifying orders - Average payable value of orders that unlock free shipping - Coupon redemption rate among VIP customers - Basket additions triggered by the progress bar after a coupon is applied ## Common Mistakes - ❌ Using the same execution order for every promotion. - ❌ Assuming all minimum purchase rules should behave identically. - ❌ Designing campaigns without modeling stacked discounts. - ❌ Treating execution order as a technical setting instead of a business policy. - ❌ Hiding the qualifying total from customers, then fielding the confusion in support. Each mistake creates customer confusion, unnecessary promotional cost, or both. ## Key Lessons Execution order is not about which discount runs first. It is about defining what qualifies as a successful purchase. Every promotion answers a business question: should customer intent matter most, or should final revenue determine eligibility? Once that decision is explicit, choosing the correct execution strategy is simple, and each campaign behaves exactly as intended, not because the discounts changed, but because the qualification logic finally reflects the strategy. ## Conclusion Modern Shopify stores rarely run one promotion at a time. Customers combine coupons, loyalty rewards, and seasonal offers throughout the same checkout, and execution order is what makes those promotions work together intentionally rather than accidentally. Discount Prime makes the choice per campaign: evaluate minimum purchase requirements before other discounts to reward intent, or after them to protect margin. Summit Outdoor Supply used both in the same store, and the debate between marketing and finance ended because each campaign now answers the question itself. The smartest promotions do not just calculate discounts correctly. They reward the right customer behavior. --- ## Discount Safety Rules: Free Shipping That Never Exceeds Product Value URL: https://www.discountprime.app/case-studies/discount-safety-rules-for-free-shipping Industry: Specialty Retail & Marketplace Sellers | Business model: Retail / DTC | Campaign types: Free Shipping, Discount Safety Rules | Published: July 14, 2026 | Read time: 15 min > A discount safety rule caps a free shipping discount at the value of the products in the order, so a Shopify store never pays more to ship an order than the order earns. A fictional craft supplies retailer, CraftNest Supplies, kept its shipping promotion live while eliminating edge-case losses such as $7 orders that required $18 express delivery. Key entities: free shipping campaigns, discount safety rules, shipping discount cap, product value cap, negative-margin orders, edge-case order economics, express and remote shipping costs, free shipping progress bar, profit analytics, margin health signals ### Frequently asked questions **Q: How do I stop a free shipping promotion from losing money on cheap orders?** A: Add a safety rule that caps the shipping discount at the value of the products in the order. Normal orders are unaffected because shipping usually costs less than the products. On edge cases, such as an $8 order with $18 express shipping, the discount is limited to $8, the customer pays the $10 difference, and the merchant never spends more on delivery than the order earns. **Q: What is a discount safety rule for shipping?** A: A discount safety rule is a financial boundary attached to a shipping promotion. In Discount Prime, a Free Shipping campaign can cap the shipping discount at the value of the products in the order and can also set a margin-safe subsidy cap, the maximum shipping amount the merchant covers. The promotion stays generous for typical orders while the worst case is bounded automatically at checkout. **Q: Can a shipping discount cost more than the products in an order?** A: Yes. Shipping cost and product value are set independently, so a low-value cart shipped by express carrier or to a remote or international destination can cost more to deliver than it earns. A $7 parts order with an $18 shipping rate means the merchant pays $11 more than the product revenue. Capping the shipping discount at product value makes this scenario mathematically impossible. **Q: Should I remove free shipping if some orders are unprofitable?** A: Usually not. If only a fraction of one percent of orders invert, removing the promotion punishes the 99 percent of healthy orders to fix the exceptions. A better design keeps the free shipping threshold, adds a safety rule capping the shipping discount at product value, and uses a progress bar to grow small carts. The incentive stays intact and the losses stop. **Q: How do I find orders where shipping made the order unprofitable?** A: Use profit analytics that work from real product cost data. Discount Prime syncs Shopify cost prices daily, computes Estimated Profit per order, and classifies each order Healthy, Thin Margin, or Loss against thresholds you define. Filtering for Loss orders on free shipping campaigns surfaces the small purchases, remote zones, and express deliveries where the shipping subsidy exceeded the margin. ## Introduction Free shipping is one of the highest-converting promotions in eCommerce. It is also one of the very few promotions with no natural upper limit on what it can cost. A percentage discount can never give away more than the product's price. A shipping discount can, because shipping cost and product value are set by two different systems that never consult each other. Most merchants ask: > "Will free shipping increase our conversion rate?" A solutions architect asks a harder question: > "What is the most this promotion could ever pay on a single order, and would we accept that number if we saw it on an invoice?" This case study designs a **Free Shipping** campaign for a specialty retailer whose catalog makes that question urgent: thousands of inexpensive products that occasionally travel by expensive carriers. The answer is not to weaken the promotion. It is to attach a **discount safety rule** that caps the shipping discount at the value of the products in the order, so the campaign can never spend more delivering an order than the customer spends filling it. ## Merchant Scenario Imagine CraftNest Supplies, a Shopify merchant selling specialty crafting materials, replacement parts, and hobby accessories to a mix of individual makers and marketplace resellers. | Attribute | Detail | |---|---| | Industry | Specialty Retail & Marketplace Sellers | | Annual Revenue | $11 Million | | Products | 9,300 | | Average Product Price | $18 | | Monthly Orders | 24,000 | CraftNest ran recurring shipping promotions built around a generous shipping discount. The logic was straightforward: remove delivery friction, increase completed checkouts. For the overwhelming majority of orders, the strategy worked exactly as intended. Then logistics data started telling a different story. ## The $7 Order One customer ordered replacement parts worth $7. The destination required express delivery, and the carrier charged $18. The promotion did what it was configured to do: it discounted the entire shipping charge. | Line | Amount | |---|---| | Product revenue | $7 | | Shipping paid by merchant | $18 | | Shipping paid by customer | $0 | | Net position before product costs | -$11 | CraftNest had effectively paid the carrier more than the customer paid for the products. The order was not a bug. The campaign performed precisely as designed. Nobody had designed a boundary. ## Diagnosing the Exposure The operations team pulled every order where shipping spend exceeded product revenue. A pattern emerged immediately: small purchases, remote delivery zones, international destinations, expedited services. Each case was individually rare. Together they were expensive. | Metric | Estimate | |---|---| | Monthly orders | 24,000 | | Edge-case rate | ~0.5% | | Affected orders per month | ~120 | | Average loss per affected order | $9 | | Annualized margin leak | ~$13,000 | The finding matters because averages hide it. With an $18 average product price and typical domestic rates, the average order looked healthy. The losses lived entirely in the tail of the distribution, which is exactly where unmonitored promotions do their damage. ## Evaluating the Options ### Option 1: Remove Shipping Promotions | Advantages | Disadvantages | |---|---| | Eliminates the loss instantly. | Sacrifices a proven conversion driver. | | Zero configuration effort. | Punishes 99.5% of orders to fix 0.5%. | | Factor | Assessment | |---|---| | Architecture Score | ★☆☆☆☆ | ### Option 2: Raise the Spend Threshold A higher qualification threshold improves the economics of the average qualifying order, but it does not bound the worst case. A $60 cart can still trigger $40 of international express shipping. | Advantages | Disadvantages | |---|---| | Improves average order economics. | Does not limit the worst case. | | Easy to communicate. | Still exposed to remote and express deliveries. | | Factor | Assessment | |---|---| | Architecture Score | ★★★☆☆ | ### Option 3: Exclude Cheap Products and Remote Regions | Advantages | Disadvantages | |---|---| | Targets known losses directly. | 9,300 products to classify and maintain. | | | Carrier rates change faster than exclusion lists. | | | Degrades the offer for legitimate customers. | | Factor | Assessment | |---|---| | Architecture Score | ★★☆☆☆ | ### Option 4: Cap the Discount at Product Value Keep the promotion. Add one rule: **the shipping discount may never exceed the value of the products in the order.** If the calculated discount stays below product value, nothing changes. If it would exceed product value, the system limits it automatically. | Advantages | Disadvantages | |---|---| | Bounds the worst case mathematically, on every order. | A small share of orders receives partial rather than full shipping savings. | | No product lists or region tables to maintain. | | | Invisible to virtually all customers. | | | Factor | Assessment | |---|---| | Architecture Score | ★★★★★ | ## The Discount Prime Architecture Discount Prime's Free Shipping campaign supports a spend or quantity threshold plus safety rules that limit merchant exposure, including a rule that caps the shipping discount at the value of products in the order. The full design pairs the incentive with its guardrail and with the analytics that prove the guardrail works. | Campaign | Mechanism | Purpose | |---|---|---| | Campaign One | Free Shipping with spend threshold | Keep the conversion incentive live for qualifying carts. | | Campaign Two | Safety rule: shipping discount capped at product value | Guarantee no order ships for more than it earns. | | Campaign Three | Free shipping progress bar widget | Show shoppers exactly how far they are from qualifying, nudging small carts upward. | | Campaign Four | Profit analytics with margin health signals | Classify every order Healthy, Thin Margin, or Loss against real Shopify cost prices, and confirm shipping losses stay at zero. | A companion control, the margin-safe **shipping subsidy cap**, can additionally fix the maximum dollar amount of shipping the merchant covers per order. CraftNest's core risk came from low product values, so the product-value rule leads; the subsidy cap can layer on later if carrier volatility becomes the dominant threat. ## Checkout Walkthrough | | Order One | Order Two | |---|---|---| | Products | $42 | $8 | | Shipping cost | $12 | $18 | | Calculated shipping discount | $12 | $18 | | Safety rule triggered | No | Yes | | Applied shipping discount | $12 | $8 | | Customer pays for shipping | $0 | $10 | Order One behaves like any healthy free shipping order: the discount is below product value, the customer pays nothing for delivery, and the order stays profitable. Order Two is the edge case. The rule caps the discount at $8, the value of the products. The customer still receives meaningful shipping savings, and the merchant never pays more to deliver the order than the order itself earns. ## Customer Journey 1. A shopper adds replacement parts worth $8 to the cart. 2. The free shipping progress bar shows the qualification threshold; the shopper adds a $14 tool kit. 3. Cart value: $22. Shipping to a remote address: $18. 4. The safety rule checks the numbers: $18 is below $22, so shipping is fully covered. 5. Checkout completes. Profit analytics classifies the order Thin Margin rather than Loss. Notice the second-order effect. The progress bar pushed the cart from $8 to $22, which moved the order out of the danger zone before the safety rule was even needed. The incentive and the guardrail reinforce each other. ## Designing for the Exception Most shipping promotions are designed around the average order, and averages are exactly where this class of loss hides. Small products, heavy packages, remote destinations, international deliveries, expedited services: these combinations may represent a fraction of one percent of volume, yet they generate the largest per-order losses in the program. A well-placed safety rule triggers rarely, perhaps once in every 200 orders. That is the point. It is not a discount strategy; it is a boundary condition. The campaign rewards customers on every order and protects the business on the handful of orders where economics invert. ## Measuring Success Track the guardrail, not just the promotion: - Count of orders where the safety rule triggered - Total shipping subsidy as a percentage of revenue - Orders classified Loss in profit analytics, with a target of zero caused by shipping - Conversion rate and average order value, to confirm the cap costs nothing visible - Finance hours spent reviewing anomalous orders If the rule never triggers, the threshold may be doing all the work. If it triggers often, the catalog or carrier mix has shifted and the campaign design deserves a fresh look. ## Common Mistakes - ❌ Assuming shipping cost is always lower than product value. - ❌ Offering fixed shipping discounts with no financial limit. - ❌ Designing promotions around the average order and ignoring the tail. - ❌ Treating remote, international, and express deliveries as identical to domestic ground. - ❌ Discovering unprofitable orders in month-end reports instead of preventing them at checkout. ## Key Lessons A promotion has two constituencies: the customer it rewards and the business it must not harm. Free shipping earns its place by removing friction, but a shipping discount without a boundary is an open-ended liability written into the checkout. Capping the shipping discount at product value is a one-line rule with a mathematical guarantee: no order can ever cost more to ship than it earns. Most orders never touch the limit, and that is exactly how a good guardrail behaves. Preventing even a hundred inverted orders a month protects thousands of dollars of margin per year without changing what the vast majority of customers experience. ## Conclusion Free shipping should encourage customers to complete their purchase. It should never quietly convert profitable checkouts into negative-margin transactions when an inexpensive product meets an expensive carrier. For a merchant like CraftNest Supplies, the fix was not a smaller promotion but a smarter one: a Free Shipping campaign with a discount safety rule that caps the shipping discount at the value of the products in the order, a progress bar that grows small carts before they become edge cases, and profit analytics that verify every order lands Healthy or Thin Margin rather than Loss. The smartest promotion is not the one that gives away the most. It is the one that can keep giving, month after month, because its worst case was designed before its first order. --- ## Control Your Shipping Liability with a Free Shipping Subsidy Cap URL: https://www.discountprime.app/case-studies/control-your-shipping-liability Industry: Home & Furniture | Business model: Retail / DTC | Campaign types: Free Shipping, Shipping Subsidy Cap | Published: July 14, 2026 | Read time: 15 min > A shipping subsidy cap fixes the maximum shipping amount a merchant covers in a free shipping campaign. Deliveries at or below the cap ship free; costlier deliveries ask the customer to pay only the difference. A fictional furniture retailer, Oak & Home, paired a $150 threshold with a $10 cap to keep conversion strong while making freight exposure predictable. Key entities: free shipping threshold, shipping subsidy cap, shipping liability, oversized product shipping, freight and remote-zone surcharges, conversion rate protection, average order value, free shipping progress bar, profit analytics, home and furniture ecommerce ### Frequently asked questions **Q: How do I offer free shipping on furniture without losing money on freight?** A: Pair a spend threshold with a shipping subsidy cap. Set free shipping above your average order value, then define the maximum shipping amount you cover per order, for example $10. Most deliveries rate below the cap and ship completely free. When a remote freight delivery rates at $95, you still cover only your cap and the customer pays the difference, so no single order can blow up the campaign. **Q: What is a shipping subsidy cap?** A: A shipping subsidy cap is the maximum shipping cost a merchant agrees to cover on a qualifying free shipping order. In Discount Prime's Free Shipping campaign it is a margin-safe rule: if the carrier rate is at or below the cap, the customer pays nothing; if it exceeds the cap, the customer pays only the remainder. It converts an unbounded logistics promise into a fixed, budgetable investment per order. **Q: What happens when shipping costs more than the subsidy cap?** A: The order still qualifies for the promotion. The merchant covers shipping up to the cap and the customer pays only the difference. With a $10 cap and an $18 rate, the merchant pays $10 and the customer pays $8. The incentive stays meaningful for the shopper, while the merchant's worst-case shipping liability on any single order remains a known, configured number. **Q: Will a shipping cap hurt my conversion rate?** A: For most stores, no. The majority of deliveries rate below a sensibly chosen cap, so most customers experience straightforward free shipping and never see the rule. Only unusually expensive deliveries surface a partial fee at checkout. Merchants who add a cap typically keep conversion stable, grow average order value through the threshold, and gain a predictable shipping budget in exchange for a small share of partial fees. **Q: How do I set the right maximum shipping amount to cover?** A: Start from your shipping rate distribution, not from a guess. Find the rate that covers roughly 80 to 90 percent of qualifying orders in full, and set the cap there so the rule only touches genuine outliers. Then verify with profit analytics: track subsidy per order, the share of customers paying a partial fee, and Estimated Profit per order, and adjust the cap if freight-heavy orders still classify as Loss. ## Introduction Every free shipping campaign is a financial promise, and most merchants sign it without reading the fine print they themselves wrote. Shipping is not free. Someone always pays, and in a free shipping campaign that someone is the merchant, at whatever rate the carrier decides to charge for that particular box to that particular zip code. For stores selling lightweight products, the exposure is small and stable. For merchants shipping furniture, oversized items, or long-distance freight, a single delivery can erase the profit of an otherwise excellent order. Most merchants ask: > "What threshold should unlock free shipping?" A solutions architect asks a second question that matters just as much: > "What is the maximum shipping cost we are willing to absorb on any single order?" The first question shapes customer behavior. The second defines the business's liability. This case study designs a **Free Shipping** campaign that answers both, using a threshold to grow carts and a margin-safe **shipping subsidy cap** to turn an open-ended logistics commitment into a fixed, budgetable investment per order. ## Merchant Scenario Consider Oak & Home, a Shopify retailer selling premium furniture and home decor across the United States. | Attribute | Detail | |---|---| | Industry | Home & Furniture | | Annual Revenue | $29 Million | | Products | 6,400 | | Average Order Value | $420 | | Monthly Orders | 7,800 | Unlike an apparel merchant, Oak & Home faces dramatic shipping variance. A decorative pillow costs about $6 to deliver. A dining table can exceed $180 in freight, special handling, and remote-zone surcharges. Unlimited free shipping on every order was never financially realistic, yet removing free shipping entirely hurt conversion in a category where customers strongly expect it. ## The Freight Problem Marketing launched a familiar campaign: free shipping on orders over $150. It worked. Sales increased, and so did shipping expenses. Most orders remained profitable. A minority did not. Customers in remote regions placed large furniture orders that required premium freight services, and the company honored the promise on every one of them. The promotion was not broken; it was unbounded. Two orders with identical cart totals could cost the business $8 or $95 to deliver, and the campaign treated them identically. | Order | Cart Total | Actual Shipping Cost | Merchant Pays | |---|---|---|---| | Typical decor order | $240 | $8 | $8 | | Remote freight order | $460 | $95 | $95 | The finance team's conclusion: the problem was not the threshold. It was treating every shipping cost the same. ## Evaluating the Options ### Option 1: Unlimited Free Shipping Above the Threshold | Advantages | Disadvantages | |---|---| | Simple promise, easy marketing. | Liability per order is unbounded. | | Strong conversion in furniture retail. | Freight-heavy orders quietly destroy margin. | | | Shipping budget is unpredictable. | | Factor | Assessment | |---|---| | Architecture Score | ★★☆☆☆ | ### Option 2: Remove Free Shipping | Advantages | Disadvantages | |---|---| | Eliminates shipping exposure. | Conversion drops in a category where free delivery is expected. | | | Competitors keep the incentive. | | Factor | Assessment | |---|---| | Architecture Score | ★☆☆☆☆ | ### Option 3: Category-Based Shipping Rules Free shipping on decor, standard rates on furniture. | Advantages | Disadvantages | |---|---| | Matches operational cost structure. | Excludes the highest-value orders from the incentive. | | Protects freight margin directly. | Complex messaging across 6,400 products. | | Factor | Assessment | |---|---| | Architecture Score | ★★★☆☆ | ### Option 4: Free Shipping with a Subsidy Cap Keep the $150 threshold. Add one rule: the business covers shipping up to a defined maximum per order. If the rate is at or below the cap, the customer ships free. If it exceeds the cap, the customer pays only the difference. | Advantages | Disadvantages | |---|---| | Liability per order is fixed and known in advance. | A small share of customers pays a partial shipping fee. | | Every order still receives the incentive. | | | Shipping budget becomes forecastable. | | | Factor | Assessment | |---|---| | Architecture Score | ★★★★★ | ## The Discount Prime Architecture Discount Prime's Free Shipping campaign combines a spend threshold with a margin-safe subsidy cap: the maximum shipping amount the merchant covers on any qualifying order. | Campaign | Mechanism | Purpose | |---|---|---| | Campaign One | Free Shipping, $150 spend threshold | Keep the conversion driver and pull average carts upward. | | Campaign Two | Shipping subsidy cap, $10 per order | Fix the maximum shipping liability on every single order. | | Campaign Three | Free shipping progress bar widget | Show shoppers how close they are to the threshold and grow baskets. | | Campaign Four | Profit analytics with margin health signals | Track Estimated Profit per order from real Shopify cost prices and confirm freight-heavy orders stay Healthy or Thin Margin, never Loss. | For catalogs where cheap products can meet expensive carriers, a second safety rule can also cap the shipping discount at the value of products in the order. Oak & Home's $420 average order value makes that scenario unlikely, so the subsidy cap carries the design. ## Checkout Walkthrough Two customers, identical carts, different destinations. | | Customer A | Customer B | |---|---|---| | Cart total | $240 | $240 | | Shipping rate | $8 | $18 | | Subsidy cap | $10 | $10 | | Merchant covers | $8 | $10 | | Customer pays | $0 | $8 | | Merchant's worst case | $10 | $10 | Customer A experiences completely free shipping. Customer B, whose delivery is unusually expensive, still receives a $10 subsidy and pays only the remainder. Both customers qualified, both were rewarded, and the business's exposure was identical and known before either order existed. ## Customer Journey 1. A shopper adds a $128 side table to the cart. 2. The free shipping progress bar shows: add $22 more to unlock free shipping. 3. The shopper adds a $34 table runner. Cart: $162. Threshold met. 4. Shipping to a metro address rates at $9. It is under the $10 cap, so delivery is free. 5. Checkout completes. Profit analytics records the $9 subsidy against the order's Estimated Profit and classifies it Healthy. The same journey to a remote address with a $26 freight rate ends differently only at step four: the merchant covers $10, the customer pays $16, and the order still closes profitably instead of silently absorbing a $26 hit. ## Why Caps Do Not Hurt Conversion Oak & Home never advertised the restriction, and most shoppers never encountered it: the majority of deliveries rated below the cap, so their experience was simply free shipping. Only unusually expensive deliveries surfaced a partial fee, at checkout, where the customer could see the real freight rate and the subsidy applied against it. This is the essential asymmetry of the design. The incentive is visible to everyone. The boundary is visible only to the small set of orders that need it. Conversion is driven by the former; solvency is protected by the latter. ## When This Design Fits The subsidy cap earns its keep wherever shipping costs fluctuate widely between orders: furniture, mattresses, fitness equipment, garden supplies, automotive parts, commercial equipment, large electronics, and building materials. In these categories, managing shipping exposure is as important as managing the discount itself, and a cap converts an unpredictable cost line into a fixed per-order investment. ## Measuring Success - Shipping subsidy per order, which should never exceed the cap - Total shipping spend as a percentage of revenue, now forecastable - Share of orders where the customer paid a partial shipping fee - Conversion rate and average order value against the pre-cap baseline - Orders classified Loss in profit analytics, with freight-driven losses trending to zero Within a quarter, a merchant in this position should expect stable conversion, higher average order value from the threshold, and a shipping budget that finance can predict instead of merely observe. ## Common Mistakes - ❌ Offering unlimited free shipping regardless of delivery cost. - ❌ Ignoring oversized and remote-zone surcharges when modeling a campaign. - ❌ Treating every destination as if it cost the same to serve. - ❌ Launching shipping promotions with no per-order financial limit. - ❌ Measuring the campaign on conversion alone while freight erodes the margin. ## Key Lessons Free shipping is not about paying every delivery bill. It is about reducing purchase friction while keeping the economics of each order intact. A threshold shapes behavior; a subsidy cap defines liability. A campaign needs both, because the first grows revenue and the second guarantees the growth is worth having. The cap also changes the internal conversation. Marketing no longer negotiates with finance over whether free shipping is affordable; the affordability is a configured number, enforced automatically at checkout on every order. ## Conclusion The best free shipping campaigns balance generosity with sustainability. Customers want confidence that delivery will not become a surprise cost. Merchants need confidence that the promotion will not become an unlimited commitment. For a merchant like Oak & Home, a Free Shipping campaign with a $150 threshold, a $10 margin-safe subsidy cap, a progress bar to grow carts, and profit analytics to verify the result delivers exactly that balance. Successful free shipping is not measured by how much you give away on any one order. It is measured by how consistently you can afford to keep offering it on every order. --- ## Guided Reward Selection: Making BOGO Free Gifts Impossible to Miss URL: https://www.discountprime.app/case-studies/guided-reward-selection-for-bogo Industry: Beauty & Cosmetics | Business model: Retail / DTC | Campaign types: Buy X Get Y (BOGO), BOGO Popup, Floating Button | Published: July 14, 2026 | Read time: 15 min > Most BOGO campaigns lose redemptions after qualification, when customers cannot find their free gift. A BOGO popup that opens the moment a shopper qualifies, backed by a floating button that reopens the selector anytime before checkout, guides customers from earning a reward to receiving it. A fictional skincare brand, Bloom Beauty, lifted redemption without changing the discount itself. Key entities: Buy X Get Y campaigns, BOGO popup, floating reward button, reward redemption rate, free gift with purchase, guided reward selection, mobile shopping experience, choice and perceived value, A/B testing for rewards, beauty and cosmetics promotions ### Frequently asked questions **Q: Why do customers qualify for my BOGO offer but never add the free gift?** A: Usually because the final step is undesigned. Customers earn the reward, then have to search the catalog to find eligible gifts, and many give up or forget before checkout. Session data typically shows qualified shoppers browsing collections, opening tabs, and completing purchase without the reward. The fix is interface, not incentive: present eligible rewards in a popup the instant the shopper qualifies. **Q: What is a BOGO popup on Shopify?** A: A BOGO popup is a storefront widget that opens automatically when a customer qualifies for a Buy X Get Y promotion. Instead of searching the store, the customer sees every eligible reward in one focused window, picks a gift, and it is added to the cart at no charge. In Discount Prime, the BOGO popup pairs with a floating button so the reward selector stays one click away until checkout. **Q: How do customers pick their free gift if they close the popup?** A: A floating button remains visible throughout the shopping session. Closing the reward popup does not cancel or hide the offer; the button keeps the earned reward accessible, and one tap reopens the selector whenever the customer is ready. This matters because many shoppers want to keep browsing before choosing, and a persistent reminder converts postponed decisions into redeemed rewards instead of forgotten ones. **Q: Should I auto-add the free gift or let customers choose?** A: Let customers choose when the reward pool has meaningful variety. A chosen gift carries higher perceived value than an assigned one, and auto-adding a fixed product risks sending the wrong shade, scent, or size. Auto-add suits campaigns with exactly one sensible reward. For everything else, guided selection through a popup preserves choice while removing the searching that kills redemption rates. **Q: How can I test which BOGO reward works best?** A: Run reward experiments. Discount Prime's Experiments feature A/B tests rewards inside a Buy X Get Y campaign, so you can compare curated gift sets against each other and measure which drives the highest redemption and attachment. Keep the qualifying rule constant, vary only the reward pool, and let redemption rate and units per order decide. The promotion then improves with every cycle. ## Introduction A customer qualifies for your Buy X Get Y promotion. They added the right products, crossed the threshold, and earned a free gift. This is the most valuable moment in the campaign, and it is exactly where most BOGO promotions quietly fail. Not because the discount is too small. Not because the gift is unattractive. Because the customer does not know what to do next. Search the catalog? Add another product? Was the reward applied already? When a redemption rate disappoints, most merchants ask: > "Why don't customers want the free gift?" A solutions architect asks a different question: > "How many steps stand between earning the reward and receiving it?" This case study designs a **Buy X Get Y (BOGO)** campaign where the answer is one step: choose. The mechanics of the discount never change. What changes is the interface around it, a **BOGO popup** that presents eligible rewards the instant a shopper qualifies, and a **floating button** that keeps the choice available until checkout. ## Merchant Scenario Imagine Bloom Beauty, a Shopify brand selling premium skincare and cosmetics. | Attribute | Detail | |---|---| | Industry | Beauty & Cosmetics | | Annual Revenue | $14 Million | | Products | 1,800 | | Monthly Orders | 31,000 | | Returning Customers | 67% | Bloom Beauty runs frequent BOGO promotions. A typical offer: buy two facial cleansers, choose one travel-size product free. The campaigns generate strong traffic and healthy qualification numbers. Redemption, however, consistently lands below expectations. ## The Redemption Gap Marketing's first hypothesis was that customers simply did not value the gift. Analytics said otherwise. Customers qualified for the promotion, reached checkout, and completed their purchase without ever adding the reward they had earned. Support tickets exposed the real problem: - "I qualified for the promotion. Where do I choose my gift?" - "Which products are free?" - "Did I miss something?" The promotion was not confusing. The experience was. Earning a reward and receiving a reward are two different journeys, and only the first one had been designed. ## What Session Recordings Showed Session recordings revealed a consistent pattern among qualified shoppers: | Behavior | Consequence | |---|---| | Unlock the reward, return to collections | Leaves the buying flow | | Browse dozens of pages hunting eligible items | Friction, especially on mobile | | Open multiple tabs to compare rules | Confusion about what qualifies | | Give up or forget before checkout | Earned reward never redeemed | The free gift existed in the catalog the entire time. Customers simply could not find it fast enough to keep caring. Every extra step between qualification and redemption taxed the promotion's conversion power. ## Evaluating the Options ### Option 1: Auto-Add a Fixed Reward Automatically place one predetermined gift in the cart at qualification. | Advantages | Disadvantages | |---|---| | Zero customer effort. | Removes choice, which carries perceived value. | | No interface to explain. | Wrong shade or scent for many shoppers. | | | Marketing locked to a single reward per campaign. | | Factor | Assessment | |---|---| | Architecture Score | ★★★☆☆ | ### Option 2: Banner Instructions Announce the rules in a site-wide banner and let customers self-serve. | Advantages | Disadvantages | |---|---| | Easy to implement. | Explains the offer, not the next step. | | | Customers still search the catalog manually. | | | Weakest experience on mobile. | | Factor | Assessment | |---|---| | Architecture Score | ★★☆☆☆ | ### Option 3: Guided Reward Selection The moment a shopper qualifies, a reward popup opens showing every eligible gift. Choose, add, continue shopping. If the shopper closes it, a floating button keeps the reward one tap away until checkout. | Advantages | Disadvantages | |---|---| | Zero searching; the reward finds the customer. | Requires thoughtful widget configuration. | | Preserves choice and its perceived value. | | | Persistent reminder prevents forgotten rewards. | | | Strongest improvement for mobile shoppers. | | | Factor | Assessment | |---|---| | Architecture Score | ★★★★★ | ## The Discount Prime Architecture Discount Prime's Buy X Get Y campaign supports four reward targets, and rewards can apply once per order or repeat for every qualified group. Reward selection surfaces through the BOGO popup and the floating button, so customers pick their gift without searching. | Campaign | Mechanism | Purpose | |---|---|---| | Campaign One | Buy X Get Y: buy 2 cleansers, choose 1 travel-size gift | The core offer, unchanged from the original promotion. | | Campaign Two | BOGO popup widget | Present all eligible rewards the instant the shopper qualifies. | | Campaign Three | Floating button widget | Keep the reward reopenable in one click until checkout. | | Campaign Four | Experiments (A/B testing for rewards) | Test which curated gift set drives the highest redemption and attachment. | Two configuration decisions matter most. First, curate the reward pool: a focused set of travel-size products reads as a gift, while an unfiltered collection reads as homework. Second, decide whether the reward applies once per order or repeats per qualified group; for Bloom Beauty, repeating rewards turn a two-cleanser rule into a reason to buy four. ## Customer Journey 1. A shopper adds two facial cleansers at $29 each. Cart: $58. 2. The qualification triggers instantly; the BOGO popup opens: "Pick your free gift," showing three curated travel-size products. 3. The shopper is not ready and closes the popup to keep browsing. 4. The floating button stays visible in the corner with the reward available. 5. Two pages later, the shopper taps it, reopens the selector, and picks a travel-size serum. 6. The gift lands in the cart at $0. Checkout total: $58, three items. No catalog search. No support ticket. No abandoned reward. The discount cost the merchant exactly what the original campaign already budgeted; the interface simply made sure the value was actually delivered. ## Why Guided Selection Works People do not enjoy searching for rewards. They enjoy receiving them. Every step between earning and receiving a gift is friction, and friction compounds fastest at the exact moment enthusiasm peaks. There is a second effect worth designing for: choice. When customers select their own gift from a curated set, the perceived value of the promotion rises without any increase in its actual cost. A chosen gift feels personal; an assigned one feels like inventory clearance. ## The Mobile Multiplier Mobile shoppers benefit most. Scrolling collections on a phone is slow, and multi-tab rule-checking is worse. A focused popup that presents eligible rewards in place keeps mobile customers inside the buying flow instead of sending them on a catalog expedition. For a brand where most sessions are mobile, guided selection is not a nice-to-have; it is the difference between a promotion that works on desktop and one that works everywhere. ## What Marketing Gains Guided selection also changes what the marketing team can offer. Instead of promoting one predetermined gift, they promote a choice: "pick your free travel-size favorite." Campaign creative gets stronger, the same mechanic serves multiple customer preferences, and the Experiments feature closes the loop by testing which reward sets redeem best. The promotion becomes a system that improves with each cycle rather than a static offer. ## Measuring Success - Reward redemption rate: qualified orders that include the gift - Popup open, selection, and dismissal rates - Floating button reopen rate, the recovered redemptions - Mobile versus desktop redemption gap, which should narrow - Support tickets mentioning gifts or promotions - Attachment effects: units per order and repeat purchase rate on gifted products Within weeks, a merchant in this position should expect more qualified customers actually redeeming, fewer gift-related support requests, and mobile shoppers completing BOGO journeys at rates that finally resemble desktop. ## Common Mistakes - ❌ Expecting customers to locate free gifts manually in the catalog. - ❌ Hiding eligible rewards inside large collections. - ❌ Publishing promotional rules without showing the next step. - ❌ Assuming customers understand how BOGO campaigns work. - ❌ Treating a closed popup as a declined reward instead of a postponed one. ## Key Lessons Earning a reward and receiving a reward are different experiences, and campaigns are usually engineered only for the first. Bloom Beauty's promotion never changed: same trigger, same gift, same cost. Redemption moved because the final step moved, from the customer's memory to the store's interface. The design principle generalizes to any promotion with a choice in it: present the choice at the moment it is earned, keep it available until it is used, and never make the customer reconstruct your campaign rules from a banner. ## Conclusion The best promotions do not end when customers unlock a reward. They end when customers successfully receive it. For a merchant like Bloom Beauty, a Buy X Get Y campaign backed by the BOGO popup, the floating button, and reward A/B testing closes the gap between qualification and redemption. Customers never wonder where their free gift went, because the easiest reward to redeem is the one presented exactly when it is earned. --- ## Progressive BOGO Rewards That Keep Orders Growing URL: https://www.discountprime.app/case-studies/progressive-bogo-rewards Industry: Health & Nutrition | Business model: Retail / DTC | Campaign types: Buy X Get Y (BOGO), Repeat Per Qualified Group | Published: July 14, 2026 | Read time: 15 min > Switching a Shopify Buy X Get Y campaign from apply-once to repeat-for-every-qualified-group lets the reward scale with the order: buy 2 get 1 free, buy 4 get 2, buy 6 get 3. For consumables such as supplements, this turns a one-time incentive into a continuing reason to add units, raising average order value without deepening the discount. Key entities: Buy X Get Y (BOGO), repeat for every qualified group, apply once per order, average order value, consumable product promotions, BOGO popup, floating reward button, quantity and value table widget, profit analytics, margin health signals, campaign conflict detection ### Frequently asked questions **Q: What is the difference between apply once per order and repeat for every qualified group in a BOGO campaign?** A: Apply once per order grants a single reward no matter how much the customer buys: 2 units or 20 units both earn one free item. Repeat for every qualified group grants a new reward each time the buy condition is met again, so buy 2 get 1 becomes buy 4 get 2 and buy 6 get 3. The first mode controls promotional cost; the second scales the incentive with order size. **Q: How do I increase average order value with a Buy X Get Y promotion on Shopify?** A: Let the reward repeat for every qualified group instead of applying once, then make the ladder visible. In Discount Prime, a BOGO popup and floating button let customers pick each free gift without searching, and a quantity table on the product page shows that buying 4 earns 2 free and buying 6 earns 3. Customers who already planned future purchases consolidate them into one larger order. **Q: When should a BOGO reward apply only once per order?** A: Use apply-once for high-value products, luxury goods, premium electronics, expensive gift items, and products with thin margins. In those categories, controlling promotional cost matters more than maximizing basket size, and a single reward still drives participation. Reserve repeating rewards for consumables such as supplements, coffee, pet food, skincare, and household essentials, where customers repurchase on a schedule and larger orders are genuinely useful to them. **Q: Do progressive BOGO rewards hurt profit margins?** A: Not if the unit economics are checked first. The discount rate per qualified group stays constant, so a healthy buy 2 get 1 structure stays healthy at buy 6 get 3. The risk is enabling repeats on thin-margin products. Discount Prime classifies every order Healthy, Thin Margin, or Loss against real Shopify cost prices, so a merchant can see the campaign's estimated profit and catch erosion early. **Q: How do customers know they can earn more than one free gift?** A: They have to be shown, or they behave as if rewards stop at one. Surface the structure in three places: a BOGO popup that opens when a group qualifies and lets the customer pick a gift, a floating button that keeps unclaimed rewards visible while browsing, and a quantity and value table on the product page that lays out the full ladder, such as buy 4 get 2 and buy 6 get 3. ## Introduction Most Buy One Get One briefs start with the same question: how generous should the free gift be? A solutions architect starts somewhere else entirely. > Instead of asking "How do we get customers to unlock the reward?", ask "What should the customer's motivation look like after the first reward is unlocked?" That second question exposes a design flaw in most BOGO campaigns. They are built to pull customers toward a single milestone, and they go silent the moment that milestone is reached. Consider **PureFuel Nutrition**, a realistic Shopify scenario: a supplement brand whose best-performing promotion was quietly capping its own results. ## Merchant Profile | Attribute | Detail | |---|---| | Industry | Health & Nutrition (sports supplements) | | Platform | Shopify | | Business Model | Retail / DTC | | Annual Revenue | $16 Million | | Products | 420 | | Monthly Orders | 22,000 | | Average Order Value | $74 | PureFuel sells protein powders, creatine, electrolytes, and daily vitamins to athletes and fitness enthusiasts. Its flagship promotion was simple and effective: **Buy 2, Get 1 Free** on best-selling products. ## The Three-Product Ceiling The campaign converted well. Then the analytics team noticed a pattern: nearly every qualifying order contained exactly three units. Customers bought two, collected the free third, and stopped. Orders of six, nine, or twelve units were rare, even though most customers repurchase supplements monthly and could easily have consolidated future purchases into one order. The promotion was doing exactly what it was configured to do. It pulled customers to the first milestone and then removed every reason to continue. The discount was never the constraint. The **reward structure** was. ## Diagnosing the Reward Structure A Buy X Get Y campaign in Discount Prime carries a setting most merchants never revisit: whether the reward applies **once per order** or **repeats for every qualified group**. PureFuel's campaign used apply-once. A customer buying 2 units or 20 units received the same single free item, so the marginal incentive for the fourth unit onward was zero. | Reward mode | Buy 2 | Buy 6 | Buy 20 | |---|---|---|---| | Apply once per order | 1 free | 1 free | 1 free | | Repeat for every qualified group | 1 free | 3 free | 10 free | The rows describe the same discount. They describe completely different customer journeys. ## Evaluating the Options The team weighed four candidate designs before touching the campaign. ### Option 1: Deepen the Discount Change Buy 2 Get 1 to Buy 2 Get 2, or promote a more valuable free gift. | Advantages | Disadvantages | |---|---| | Easy to launch. | Gives margin away to customers who would have bought three units anyway. | | Strong headline. | Does nothing to reward the fourth, fifth, or sixth unit. | | Factor | Assessment | |---|---| | Architecture Score | ★★☆☆☆ | ### Option 2: Switch to Tiered Quantity Discounts Replace the free gift with percentage breaks: 3+ units save 10%, 6+ units save 15%. | Advantages | Disadvantages | |---|---| | Scales with quantity by design. | Loses the free-product framing, which customers value more than an equivalent percentage. | | Predictable margin math. | Retrains an audience that already understands and likes the current offer. | | Factor | Assessment | |---|---| | Architecture Score | ★★★☆☆ | ### Option 3: Keep BOGO, Apply Once The status quo. | Advantages | Disadvantages | |---|---| | Tightly controlled promotional cost. | Order size hard-caps at the first milestone. | | Simple to explain. | Bulk buyers such as gyms receive the same reward as a single customer. | | Factor | Assessment | |---|---| | Architecture Score | ★★☆☆☆ | ### Option 4: BOGO That Repeats per Qualified Group Same product, same discount, one configuration change: the reward repeats every time the customer qualifies again. | Advantages | Disadvantages | |---|---| | The incentive scales naturally with customer intent. | Promotional cost grows with volume, so cost data must be monitored. | | Keeps the free-gift psychology customers respond to. | Needs clear on-page communication, or customers will not know rewards repeat. | | Factor | Assessment | |---|---| | Architecture Score | ★★★★★ | ## The Progressive Reward Ladder | Units purchased | Free units earned | Customer reads it as | |---|---|---| | 2 | 1 | Buy 2, get 1 free | | 4 | 2 | Buy 4, get 2 free | | 6 | 3 | Buy 6, get 3 free | | 20 | 10 | Every pair keeps earning | The reward stops being a fixed destination and becomes a moving target. The purchasing question shifts from "Should I stop here?" to "How close am I to the next free product?" ## The Discount Prime Architecture | Campaign | Mechanism | Purpose | |---|---|---| | Campaign One | Buy X Get Y, repeat for every qualified group | The core engine: every additional pair of paid units unlocks another free unit, on the same terms. | | Campaign Two | BOGO popup and floating button | Customers pick their free product from a curated reward list without searching; the floating button keeps unclaimed rewards one tap away. | | Campaign Three | Quantity and value table widget | Shows the full reward ladder on the product page so bulk buyers can plan larger orders in advance. | | Campaign Four | Profit analytics with margin health signals | Every order is classified Healthy, Thin Margin, or Loss against real Shopify cost prices, so the repeating reward never silently erodes margin. | Real-time conflict detection protects the design: promoted products are auto-excluded from overlapping percentage campaigns, and the BOGO campaign is protected from stacking with Shopify's own amount-off discount codes. ## Customer Journey Take a $36 protein tub with an $11 unit cost. 1. A customer adds 2 tubs. The BOGO popup opens: "Pick your free product." 2. She selects a free electrolyte mix and sees the ladder: add 2 more paid units, earn another free item. 3. She adds 2 more tubs for next month. A second free reward unlocks automatically. 4. She checks out with 4 paid units and 2 free rewards. | Line | Amount | |---|---| | 4 x protein tub | $144.00 | | 2 x free reward | $0.00 | | Order total | $144.00 | | Previous typical qualifying order (2 paid, 1 free) | $72.00 | Order value doubled while the discount per qualified group stayed identical. In profit analytics, the order still reads Healthy: roughly $66 of product cost across six units against $144 of revenue. ## Why Consumables Fit This Model Progressive rewards worked at PureFuel because its customers already planned future purchases. Protein powder, creatine, electrolytes, and daily vitamins run out on a schedule, so a repeating reward simply invites customers to consolidate next month's purchase into today's order. The same logic applies to coffee, pet food, skincare, snacks, household essentials, and office supplies. Customers reduce shopping trips; the merchant raises average order value. Nobody is pushed to buy things they will not use. ## Fairer Treatment for Bulk Buyers Several gyms and sports clubs placed large orders with PureFuel every month. Under apply-once, a 30-unit institutional order earned exactly the same reward as a 3-unit personal one. Under repeat-per-group, larger purchases naturally unlocked proportionally larger rewards, and the sales team fielded noticeably fewer requests for one-off custom bulk discounts. The campaign priced fairness in automatically. ## Where Apply-Once Still Wins Repeat rewards are not a universal default. Apply-once remains the right architecture for high-value products, luxury goods, premium electronics, and anything with thin margins, where controlling promotional cost matters more than maximizing basket size. Discount Prime exposes the choice per campaign, so a merchant can run both patterns side by side: a repeating reward on consumables and a single controlled reward on premium bundles, with conflict detection keeping the two from overlapping. ## Measuring Success - Units per qualifying order, not just conversion rate - Share of orders that continue past the first milestone - Average order value on promoted products - Estimated Profit per campaign, from real Shopify cost prices - Margin health mix: Healthy vs Thin Margin vs Loss orders - Volume of manual bulk-quote requests (this should fall) ## Common Mistakes - ❌ Treating apply-once as the only BOGO mode and blaming the discount when orders plateau. - ❌ Enabling repeating rewards on thin-margin products without checking cost data first. - ❌ Hiding the ladder: if customers cannot see that rewards repeat, they behave as if rewards do not. - ❌ Making customers hunt for their gift instead of surfacing it through the BOGO popup and floating button. - ❌ Letting a repeating BOGO stack with sitewide codes because conflict rules were never configured. ## Key Lessons PureFuel's promotion was never limited by its discount. It was limited by a reward structure that went silent after the first milestone. Switching Buy X Get Y from apply-once to repeat-for-every-qualified-group aligned the incentive with how supplement customers actually buy: repeatedly, and in consolidation-friendly categories. The result was not a more generous promotion. It was a smarter one, at the same discount rate. ## Conclusion A BOGO campaign does not end when the customer unlocks the first reward; that is where the next purchasing decision begins. For consumable and replenishable products, configuring Buy X Get Y to repeat for every qualified group turns a one-time incentive into a continuing reason to add to cart, while profit analytics and conflict protection keep the economics honest. Sometimes the most valuable reward is not the first one. It is the next one the customer knows they can still earn. --- ## Wholesale Progress Bars That Drive Larger B2B Orders URL: https://www.discountprime.app/case-studies/wholesale-progress-bars Industry: B2B Distribution | Business model: B2B / Wholesale | Campaign types: Wholesale / B2B Pricing, Tiered Unit Pricing, Discount Progress Bar | Published: July 14, 2026 | Read time: 16 min > Wholesale buyers often stop one unit short of a pricing tier because nothing on the page shows they are close. Pairing Tiered Unit Pricing with a live discount progress bar, gated to logged-in B2B accounts, turns invisible brackets into visible goals: a message like 'Add 1 more case to unlock $7.90 per unit' grows order size without deepening any discount. Key entities: wholesale progress bar, Tiered Unit Pricing, Wholesale / B2B Pricing, quantity breaks, customer-gated pricing, discount progress bar widget, quantity and value table widget, B2B buying psychology, procurement approval, profit floor, average order value ### Frequently asked questions **Q: How do I show wholesale customers how close they are to the next pricing tier on Shopify?** A: Add a discount progress bar to the product page and cart. In Discount Prime, the widget reads the active Tiered Unit Pricing campaign and updates live as quantity changes, showing messages such as 'Add 1 more case to unlock $7.90 per unit.' A quantity and value table can sit alongside it to show the full bracket structure, and both surfaces are gated so only logged-in wholesale accounts see B2B prices. **Q: Why do wholesale buyers stop ordering just below a quantity break?** A: Because the break is invisible at the moment of decision. Buyers order the quantity on their purchase plan, and discovering that one more case triggers a better unit price requires opening a spreadsheet and recalculating. Session data in this scenario showed buyers repeatedly stopping at 9, 24, and 49 units, one below each tier. Once a progress bar surfaced the next price on the page, the same buyers crossed the threshold on their own. **Q: What is tiered unit pricing on Shopify?** A: Tiered unit pricing sets a different per-unit price at each quantity bracket, for example $10.20 per unit below 10 cases, $8.90 from 10 cases, $7.90 from 25, and $7.20 from 50. When an order crosses a threshold, the whole quantity reprices at the new tier. It suits wholesale and B2B catalogs where buyers purchase in cases or pallets and plan quantities against procurement budgets rather than promotions. **Q: Do progress bars actually increase wholesale order size?** A: Yes, when a real tier sits within reach, because they change the buyer's math at the decisive moment. Crossing a tier can even make the larger order cheaper in total: 24 cases at $8.90 per unit costs $2,563.20, while 25 cases at $7.90 costs $2,370.00. A progress bar that states this plainly gives both the buyer and their procurement approver a ready justification, so orders cluster at tier thresholds instead of one unit below. **Q: How do I keep retail customers from seeing wholesale tier prices?** A: Gate the wholesale campaign by customer identity rather than by page. Discount Prime restricts Wholesale / B2B Pricing using customer tags, Shopify segments, logged-in state, or purchase history, so tier prices, progress bars, and quantity tables render only for approved B2B accounts. Retail visitors see the standard catalog from the same store and product pages, which lets one Shopify install serve DTC and wholesale together. ## Introduction Wholesale buyers rarely buy on impulse. They calculate, compare, and build purchasing plans before completing an order, and one question sits inside almost every B2B checkout: "If I buy a little more, do I get a better price?" When the answer is not visible, buyers stop. Some place a smaller order; others postpone entirely. Most merchants respond by making the tiers more generous. A solutions architect asks a different question first. > Instead of asking "How deep should our wholesale tiers go?", ask "Can the buyer see the next better price at the exact moment they choose a quantity?" Consider **Metro Industrial Supply**, a realistic Shopify scenario: a wholesale distributor whose pricing strategy was working and whose communication of it was not. ## Merchant Profile | Attribute | Detail | |---|---| | Industry | B2B Distribution (cleaning products, maintenance equipment, industrial consumables) | | Platform | Shopify | | Business Model | B2B / Wholesale | | Annual Revenue | $24 Million | | Wholesale Customers | 5,800 | | Products | 14,000 | | Average Monthly Orders | 18,000 | Metro's customers place predictable repeat orders in boxes, cases, and pallets. Their purchasing teams are not hunting for promotions; they are optimizing procurement budgets. ## The Invisible Tier Problem Metro already ran tiered wholesale pricing: one price at 10 units, a better price at 25, the best price at 50. The strategy was sound. The customers simply could not see it. Nothing on the product page explained how close a buyer was to the next tier. A review of customer sessions surfaced the telltale pattern: buyers kept stopping at quantities like 9, 24, and 49. One unit short of the next bracket, again and again. Buyers were not refusing better prices. They did not know they were close enough to unlock them. The pricing was not failing. The communication was. ## Why Buyers Stop One Unit Short Wholesale buyers are rational, but they are also human. Without on-page feedback, capturing a tier requires opening a spreadsheet, recalculating totals, and defending the change internally. Most buyers skip that work and order the quantity on their purchase plan. The discount exists; the motivation does not. Visible progress removes exactly that friction: it reduces uncertainty, simplifies the decision, and turns an abstract price list into a goal that is one case away. ## Evaluating the Options ### Option 1: Deepen the Tier Discounts Make each bracket more generous so the tiers become impossible to ignore. | Advantages | Disadvantages | |---|---| | Simple lever to pull. | Gives margin away without fixing the visibility problem. | | Easy to announce. | Buyers who stop at 24 units still stop at 24 units. | | Factor | Assessment | |---|---| | Architecture Score | ★★☆☆☆ | ### Option 2: Explain Tiers Through the Sales Team Have representatives walk every account through the bracket structure. | Advantages | Disadvantages | |---|---| | Personal, relationship-friendly. | Does not scale across 5,800 customers. | | Handles edge cases well. | Absent at the moment of decision, inside the cart. | | Factor | Assessment | |---|---| | Architecture Score | ★★☆☆☆ | ### Option 3: Publish a Static Tier Table Add a quantity and value table to every product page. | Advantages | Disadvantages | |---|---| | Full transparency, always available. | Static: it does not react to the quantity in the cart. | | Helps buyers plan ahead. | The buyer still does the arithmetic alone. | | Factor | Assessment | |---|---| | Architecture Score | ★★★☆☆ | ### Option 4: Tiered Unit Pricing with a Live Progress Bar Keep the pricing model. Add a discount progress bar that reacts to quantity in real time: "Add 1 more case to unlock the next wholesale price." | Advantages | Disadvantages | |---|---| | Motivates at the exact moment of decision. | Requires clean tier configuration to avoid confusing messages. | | No change to pricing, so no margin given away. | Needs customer gating so retail visitors never see B2B prices. | | Factor | Assessment | |---|---| | Architecture Score | ★★★★★ | ## The Tier Structure Metro sells its core consumables in cases of 12, priced per unit. | Cases per order | Price per unit | |---|---| | 1 to 9 | $10.20 | | 10 to 24 | $8.90 | | 25 to 49 | $7.90 | | 50+ | $7.20 | The brackets never changed during this project. Only their visibility did. ## The Discount Prime Architecture | Campaign | Mechanism | Purpose | |---|---|---| | Campaign One | Wholesale / B2B Pricing, gated by customer tag and logged-in state | Only approved wholesale accounts see B2B prices; retail visitors see the standard catalog. | | Campaign Two | Tiered Unit Pricing | Encodes the bracket structure: $8.90 at 10 cases, $7.90 at 25, $7.20 at 50, per unit. | | Campaign Three | Discount progress bar on product page and cart | Live feedback as quantity changes: "Add 1 more case to unlock $7.90 per unit." | | Campaign Four | Quantity and value table widget | The full bracket table stays visible for buyers planning next quarter's volumes. | Two guardrails complete the design. Margin-based tiers keep each bracket priced from real cost data rather than guesswork, and a **profit floor** (cost plus minimum profit, enforced at checkout) guarantees that no tier, however deep, ever sells below cost. Profit analytics then classifies every wholesale order Healthy, Thin Margin, or Loss, so finance can audit the tiers with numbers instead of instinct. ## Buyer Journey A facilities contractor is reordering commercial degreaser. 1. She logs in to her wholesale account and adds her usual 24 cases (288 units) at the 10+ price of $8.90 per unit. 2. The progress bar responds immediately: nearly full, with the message "Add 1 more case to unlock $7.90 per unit." 3. She adds the 25th case. The entire order reprices at the 25+ tier. | Scenario | Quantity | Unit price | Order total | |---|---|---|---| | Original order | 24 cases (288 units) | $8.90 | $2,563.20 | | One more case | 25 cases (300 units) | $7.90 | $2,370.00 | The larger order costs **$193.20 less** than the smaller one, and the buyer can see it without a spreadsheet. That single line in the interface is the entire strategy: the store does the calculation the buyer used to do alone. ## Supporting Sales and Procurement The progress bar changed two conversations outside the storefront. Sales representatives fielded far fewer pricing questions, because the product page now answered "am I close to a better price?" automatically; calls shifted from tier explanations to product recommendations. And procurement teams inside larger accounts gained a ready-made justification for approvals: "adding one case reduces the price across the entire order" is an argument a purchasing manager can forward without a meeting. The interface supported the buying decision before a representative ever got involved. ## Measuring Success - Average wholesale order value and cases per order - Share of orders landing exactly at tier thresholds versus one unit below - Sessions where quantity increases after the progress bar message appears - Pricing questions logged by the sales team (this should fall) - Estimated Profit per tier from real Shopify cost prices - Margin health mix across wholesale orders: Healthy, Thin Margin, Loss ## Common Mistakes - ❌ Deepening tier discounts when the real problem is that buyers cannot see the tiers. - ❌ Showing the current price but never the next one, leaving the strongest motivator invisible. - ❌ Leaving B2B brackets visible to retail visitors instead of gating them by customer tag and login. - ❌ Overloading the product page with every tier detail instead of the one next achievable goal. - ❌ Building tiers from list price instead of margin, so the deepest bracket quietly sells near cost. ## Key Lessons Metro did not redesign its pricing strategy. It redesigned how customers understood that strategy. The tiers, the brackets, and the margins all stayed where they were; a progress bar simply moved the tier logic to the exact moment and place where quantity decisions happen. Buying more became easier to justify, both for the buyer and for the procurement team behind them. ## Conclusion A wholesale pricing strategy creates value only when customers understand it. Tiered Unit Pricing defines the incentive; the discount progress bar makes it visible; customer gating keeps it wholesale-only; the profit floor and profit analytics keep it safe. The objective is not pressuring buyers into unnecessary purchases. It is helping them recognize when a slightly larger order genuinely creates more value. Wholesale buyers do not chase discounts. They chase the next better price, and when that price is visible, larger orders follow naturally. --- ## Temporary Customer Rules for Wholesale Campaigns URL: https://www.discountprime.app/case-studies/temporary-customer-segments-for-wholesale Industry: Industrial Distribution | Business model: B2B / Wholesale | Campaign types: Wholesale / B2B Pricing, Customer Matching Rules | Published: July 14, 2026 | Read time: 15 min > Short-term wholesale promotions do not need permanent Shopify customer segments. Campaign-level customer matching rules, such as orders greater than 0 or a 5+ orders purchase history, define the audience inside the campaign itself and disappear when it ends. Audiences stay accurate against live behavior, launches get faster, and the Shopify admin stays free of stale, overlapping segments. Key entities: customer matching rules, Shopify customer segments, campaign-scoped audiences, purchase history targeting, Wholesale / B2B Pricing, customer tags, campaign scheduling, campaign priorities, administrative debt, profit floor ### Frequently asked questions **Q: Should I create a new Shopify customer segment for every promotion?** A: No. Reserve permanent segments for long-term structure, such as approved wholesale accounts or distributor tiers, and define short-term promotional audiences inside the campaign instead. Discount Prime campaigns accept customer matching rules based on tag, segment, logged-in state, or purchase history, so a two-week offer can target customers with at least one order without creating any permanent object. When the campaign ends, its rule ends with it and there is nothing to clean up. **Q: How do I target wholesale customers by number of orders on Shopify?** A: Use a purchase-history matching rule on the campaign. In Discount Prime, a Wholesale / B2B Pricing campaign can require, for example, more than zero orders for a reactivation offer or 5+ orders for a loyalty price. The rule is evaluated against each customer's live order history at login, so newly qualifying customers join automatically and no export, tagging pass, or manual list maintenance is needed. **Q: What happens to a campaign's customer rules when the campaign ends?** A: They end with the campaign. Because the eligibility rule is stored inside the campaign rather than as a separate Shopify segment, deactivating or scheduling the campaign to end removes the audience logic at the same time. There is nothing to archive, untag, or delete afterward, and the rule remains visible in the campaign record, so anyone reviewing past promotions can still see exactly who qualified and why. **Q: When should I use permanent customer segments instead of campaign rules?** A: Use permanent segments or tags for audiences that describe who a customer is over the long term: approved wholesale accounts, distributor tier assignments, regional groupings, or key accounts reviewed annually. These structures are reused across many campaigns and systems, so they deserve a permanent home. Use campaign-level matching rules for audiences that only exist because a promotion exists, such as a two-week reactivation offer, anniversary pricing, or trade show incentives. **Q: How do I run a limited-time wholesale promotion without discount codes?** A: Gate the campaign by customer identity instead of by code. A Discount Prime wholesale campaign combines a matching rule, for example 5+ orders, with campaign scheduling, so qualifying customers automatically see promotional pricing at login during the campaign window. Nothing can be forwarded or leaked the way a shared code can, campaign priorities prevent stacking with baseline wholesale pricing, and the profit floor keeps every discounted price above cost plus minimum profit. ## Introduction As wholesale businesses grow, customer management grows with them. Some customers deserve better pricing, some qualify for a seasonal promotion, some have ordered for years, and some placed their first order yesterday. The reflexive answer is always the same: create another customer segment. Then another. A few years later the Shopify admin is full of segments built for campaigns that ended months ago. A solutions architect frames the decision differently. > Instead of asking "Which segment should this campaign target?", ask "Does this audience need to exist after the campaign ends?" Consider **NorthBridge Industrial**, a realistic Shopify scenario: a B2B supplier that stopped creating permanent customer segments for temporary marketing ideas, and started defining audiences only where and when they were needed. ## Merchant Profile | Attribute | Detail | |---|---| | Industry | Industrial Distribution (electrical equipment and safety products) | | Platform | Shopify | | Business Model | B2B / Wholesale | | Annual Revenue | $27 Million | | Wholesale Customers | 8,600 | | Products | 21,000 | | Returning Customers | 71% | NorthBridge supplies contractors across North America and launches multiple pricing campaigns every month: VIP contractor pricing, spring promotions, distributor rewards, regional incentives, reactivation offers. Every campaign needs a different audience. ## The Segment Graveyard For years, every one of those audiences became a Shopify Customer Segment. It worked at first. Then the list started to look like this: | Segment | Status | |---|---| | Contractors - April | Campaign ended over a year ago | | Contractors - Spring | Overlaps with two other segments | | Contractors - VIP | Qualification logic outdated | | Contractors - Expo | Event passed; audience never reused | | Contractors - 5 Orders | Duplicated by Contractors - 10 Orders | | Contractors - Reactivation | Nobody remembers the original criteria | Dozens of entries, many unused, some overlapping, several encoding logic nobody could explain. And nobody wanted to delete anything, because nobody remembered which segments something else might still depend on. That is administrative debt, and it compounds with every campaign. ## The Two-Week Campaign The breaking point was a modest promotion. NorthBridge wanted to reward wholesale customers who had already placed at least one successful order. The campaign would run for exactly two weeks. The audience would never be used again. Creating one more permanent segment for a fourteen-day promotion felt absurd. The team went looking for a way to define the audience inside the campaign itself. ## Evaluating the Options ### Option 1: Another Permanent Shopify Segment Build the audience the usual way and target it. | Advantages | Disadvantages | |---|---| | Familiar workflow. | One more permanent object for a two-week idea. | | Reusable if the campaign repeats. | Joins the graveyard the day the promotion ends. | | Factor | Assessment | |---|---| | Architecture Score | ★★☆☆☆ | ### Option 2: Manual Customer Tagging Export qualifying customers, tag them, target the tag, untag them later. | Advantages | Disadvantages | |---|---| | Precise control over membership. | Manual work at both ends of the campaign. | | Tags are visible on the customer record. | New qualifying customers are missed unless someone re-runs the export. | | Factor | Assessment | |---|---| | Architecture Score | ★★☆☆☆ | ### Option 3: A Shared Discount Code Email a code to the qualifying list and let the code do the gating. | Advantages | Disadvantages | |---|---| | Fast to launch. | Codes travel: anyone who receives a forward can use it. | | Easy to explain. | Eligibility is defined by who got the email, not by actual purchase behavior. | | Factor | Assessment | |---|---| | Architecture Score | ★★☆☆☆ | ### Option 4: Campaign-Level Customer Matching Rules Define eligibility inside the Discount Prime campaign itself with a customer matching rule based on purchase history. | Advantages | Disadvantages | |---|---| | The rule lives and dies with the campaign; zero cleanup. | Rules are per-campaign, so genuinely permanent audiences still belong in segments. | | Evaluated against live behavior, so new qualifiers join automatically. | Teams must learn to leave long-term structures out of it. | | Factor | Assessment | |---|---| | Architecture Score | ★★★★★ | ## Permanent vs Campaign-Scoped Audiences The architecture question is not "segments or rules?" It is "which lifetime does this audience have?" | Audience | Lifetime | Right tool | |---|---|---| | Approved wholesale accounts | Permanent business structure | Customer tag or Shopify segment | | Distributor tier assignments | Permanent, reviewed yearly | Shopify segment | | Two-week reactivation offer | Days | Campaign matching rule | | Anniversary pricing for loyal buyers | One event | Campaign matching rule (purchase history) | | Trade show or regional incentive | One event | Campaign matching rule | Permanent structures describe who a customer is. Campaign rules describe who qualifies right now. ## The Discount Prime Architecture | Campaign | Mechanism | Purpose | |---|---|---| | Campaign One | Wholesale / B2B Pricing, gated by contractor tag | The permanent baseline: approved wholesale accounts always see their negotiated pricing. | | Campaign Two | Reactivation pricing with matching rule "orders greater than 0", scheduled for two weeks | The original promotion: every customer with at least one successful order qualifies automatically, no segment created. | | Campaign Three | Loyalty pricing with purchase-history rule "5+ orders" | A later campaign; the team changed one number in the rule instead of building a new audience. | | Campaign Four | Anniversary pricing keyed to significant purchase history | Twentieth-anniversary thank-you for the most loyal buyers, without manually selecting hundreds of companies. | Campaign scheduling starts and ends each promotion automatically, and campaign priorities resolve overlaps: while an event campaign runs, the customer receives the better eligible price, never both stacked. Real-time conflict detection flags any collision with the baseline wholesale campaign before activation. ## Campaign Walkthrough Take the anniversary campaign, offering 12% off wholesale prices to customers with 5+ orders. 1. Lakeside Electrical, a contractor with 7 past orders, logs in to its wholesale account. 2. The matching rule evaluates its live purchase history: 7 orders, qualified. No list was ever built. 3. Its usual $1,840 wholesale cart reprices to $1,619.20 under anniversary pricing. 4. A first-time buyer logging in the same day sees standard wholesale pricing only. | Line | Amount | |---|---| | Wholesale cart (baseline pricing) | $1,840.00 | | Anniversary pricing (12% off, 5+ orders) | $1,619.20 | | Customer saves | $220.80 | The profit floor guards the downside: because anniversary pricing is margin-based and enforced at checkout as cost plus minimum profit, no qualifying discount can push any product below cost. Profit analytics classifies the campaign's orders Healthy, Thin Margin, or Loss, so a generous gesture stays a measured one. ## Scheduling and Self-Cleanup When the two-week reactivation window closed, the campaign deactivated on schedule and its eligibility rule disappeared with it. Nothing to archive, nothing to untag, nothing for a future colleague to puzzle over. The next promotion started from a clean admin instead of an archaeology project. Over a year of monthly campaigns, that is dozens of permanent objects never created. Campaign logic also became self-documenting. Anyone opening a campaign sees exactly who qualifies and why, because the rule sits inside the campaign rather than in a separately maintained list with a cryptic name. ## Who Benefits Most Campaign-scoped eligibility pays off fastest for wholesale distributors, B2B manufacturers, trade suppliers, and commercial retailers running frequent temporary audiences: loyalty campaigns, reactivation offers, seasonal wholesale promotions, trade show pricing, end-of-quarter incentives. The higher the campaign frequency, the more administrative debt this pattern avoids. ## Measuring Success - Time from campaign idea to launch - Count of permanent segments created per quarter (this should approach zero for promotions) - Share of eligible customers who transact during each campaign window - Repeat-order rate among reactivated and loyalty-matched customers - Estimated Profit per campaign, with margin health signals per order - Stale segments remaining in the Shopify admin over time ## Common Mistakes - ❌ Creating a permanent Shopify segment for every short-term campaign. - ❌ Duplicating the same customer logic across segments, tags, and email lists. - ❌ Leaving unused segments in place because nobody remembers what depends on them. - ❌ Gating behavior-based offers with shareable discount codes instead of matching rules. - ❌ Going to the other extreme and rebuilding genuinely permanent audiences as campaign rules. ## Key Lessons Not every campaign deserves a permanent customer segment. Segments are the right tool for long-term business structure: who is a wholesale account, who is a distributor, who belongs to which region. Campaigns are temporary by nature, so their eligibility should be too. When the rule lives inside the campaign, launch gets faster, cleanup disappears, and the audience always reflects live behavior rather than a list exported the week before. ## Conclusion Customer eligibility should be as flexible as the campaigns it supports. Permanent segments remain essential for organizing a wholesale business; customer matching rules serve the other need, letting merchants target a two-week promotion at "customers with more than five orders" without adding a single permanent object to Shopify. The cleanest admin is not the one with the most carefully named segments. It is the one where the smartest customer segment is the rule that disappears when the campaign is over. --- ## Metafield-Based Product Targeting: Let Your ERP Drive Shopify Discounts URL: https://www.discountprime.app/case-studies/metafield-based-product-targeting Industry: Enterprise Wholesale Distribution | Business model: B2B / Wholesale | Campaign types: Wholesale / B2B Pricing, Metafield Targeting, Bulk Price Update | Published: July 14, 2026 | Read time: 15 min > Enterprise Shopify merchants can target discount campaigns by ERP-synced metafields instead of collections or tags. A Wholesale / B2B Pricing campaign that targets pricing_group = dealer prices the exact catalog the ERP defines, so new or reclassified products qualify automatically after each sync. Business rules stay in the ERP, campaign maintenance drops to near zero, and complexity no longer scales with catalog size. Key entities: metafield-based product targeting, ERP to Shopify product sync, pricing group classification, Wholesale / B2B Pricing, Shopify Plus enterprise catalogs, Bulk Price Update, campaign conflict detection, customer-gated pricing, single source of truth for pricing rules, B2B discount automation ### Frequently asked questions **Q: How do I target Shopify discounts by metafield instead of collections?** A: Use a discount app that supports metafield-based product targeting, such as Discount Prime. Sync a structured field like pricing_group from your ERP or PIM to every product, then set the campaign to include products where that metafield matches a value, for example pricing_group = dealer. The campaign re-evaluates eligibility from the metafield, so you never rebuild collections or edit product lists when eligibility changes. **Q: Why are product tags a bad way to manage B2B discount eligibility?** A: Tags are flat labels with no key-value structure, so each eligibility state needs its own tag and stale tags must be cleaned up manually. Tag sprawl grows with every season, program, and campaign, and tags leak into storefront filters and search. Metafields solve both problems: they carry structured values like pricing_group = government, stay invisible to shoppers, and can be written automatically by your ERP during nightly sync. **Q: Can my ERP control which Shopify products get wholesale pricing?** A: Yes. Map one ERP classification field, such as a pricing group or margin class, to a Shopify product metafield in your integration. A wholesale campaign then targets that metafield value, so the ERP remains the single source of truth for eligibility. When the ERP reclassifies a product or adds a new line, the next sync updates the metafield and the product's pricing changes automatically, with no campaign edits in Shopify. **Q: What happens when thousands of products change discount eligibility at once?** A: With collection or tag-based targeting, someone must rebuild lists by hand, which can take days and immediately goes stale. With metafield-based targeting, a bulk ERP update flows through the normal product sync and every affected product gains or loses campaign eligibility automatically. One distributor scenario saw 7,000 products change eligibility in a quarter; the metafield rule absorbed the change with zero manual campaign work. **Q: How do I keep contract or government-priced products out of promotions on Shopify?** A: Give those products an exclusive classification, such as pricing_group = government or contract, synced from your ERP as a metafield. Promotional campaigns target other values only, so restricted products can never qualify. Add real-time conflict detection with auto-exclude and campaign priorities as a second guardrail: if a product ever matches two campaigns, the overlap is flagged before activation and the correct campaign wins. ## Introduction Every growing Shopify catalog eventually collides with the same operational wall: the products are governed by one system, while the promotions are governed by another. For enterprise wholesalers, product truth lives in the ERP. Costs, suppliers, categories, contract eligibility, pricing groups: all of it is already classified, already maintained, already correct. Yet most discount tooling asks merchants to rebuild that intelligence by hand, one collection or product tag at a time. Instead of asking: > "Which products should receive this discount?" a solutions architect asks: > "What business rule should define this campaign?" That shift is the entire architecture. This case study designs a wholesale pricing system in which the ERP keeps making the decisions and Discount Prime simply executes them, using **metafield-based product targeting**. ## Merchant Scenario Consider Atlas Industrial Group, an enterprise wholesale distributor supplying industrial equipment across North America. | Attribute | Detail | |---|---| | Industry | Enterprise Wholesale Distribution | | Annual Revenue | $84 Million | | Products | 92,000+ | | Warehouses | 11 | | Suppliers | 230 | | ERP | Microsoft Dynamics 365 | | Storefront | Shopify Plus | Every product in Shopify originates in the ERP: names, inventory, cost, supplier, category, availability, and above all the **pricing group** that decides how each product may be sold. Only one thing does not live there: promotional rules. Those were rebuilt inside Shopify, by hand, every week. ## The Synchronization Problem The marketing team launches new wholesale campaigns every month, and eligibility changes constantly. Some products qualify for distributor pricing. Others belong to government contracts and can never be promoted. To keep campaigns accurate, employees manually mirror the ERP: collections rebuilt, tags added, products imported, campaigns edited. Hours of work reproduce answers the ERP already holds. The breaking point arrives during a quarterly promotion, when more than 7,000 products change pricing eligibility at once. The ERP updates every record automatically. Shopify does not. The team spends nearly two full days rebuilding collections, and by the time they finish, the ERP has already changed hundreds of products again. The business is not struggling with pricing. It is struggling with synchronization. ## Business Objectives | Priority | Objective | |---|---| | 1 | Eliminate manual product selection from campaign management | | 2 | Keep the ERP as the single source of truth for eligibility | | 3 | Support several wholesale pricing models in parallel | | 4 | Make campaign complexity independent of catalog size | | 5 | Guarantee contract and government products are never promoted | ## Option 1: Manual Collections Build a Shopify collection per campaign and rebuild it whenever eligibility changes. | Advantages | Disadvantages | |---|---| | Familiar to every Shopify team. | Rebuilt by hand after every ERP change. | | No integration work required. | Duplicates business logic outside the ERP. | | | Collections created purely for pricing pollute merchandising. | | | Collapses entirely at 92,000 products. | | Factor | Assessment | |---|---| | Architecture Score | ★☆☆☆☆ | ## Option 2: Tag-Based Targeting Push a promotional tag from the ERP and target campaigns at that tag. | Advantages | Disadvantages | |---|---| | Tags can be written automatically during sync. | Tags are flat labels with no key-value meaning. | | Better than rebuilding collections. | Tag sprawl: one tag per state, per season, per program. | | | Stale tags must be removed as carefully as they were added. | | | Tags leak into storefront filters and search. | | Factor | Assessment | |---|---| | Architecture Score | ★★★☆☆ | ## Option 3: Metafield-Based Targeting The ERP synchronizes one structured field, `pricing_group`, with every product. Inside Discount Prime, the wholesale campaign targets products where `pricing_group = dealer`. That is the entire rule. | Advantages | Disadvantages | |---|---| | Business rules stay inside the ERP. | Requires one field added to the sync mapping. | | Key-value structure carries real meaning. | | | Invisible to storefront navigation and search. | | | One rule covers 92,000 products or 500,000. | | | Factor | Assessment | |---|---| | Architecture Score | ★★★★★ | ## Comparison Matrix | Approach | Source of Truth | Automation | Catalog Scale | Storefront Side Effects | |---|---|---|---|---| | Manual Collections | Shopify | None | Poor | High | | Tag-Based Targeting | Split | Partial | Fair | Medium | | Metafield Targeting | ERP | Full | Excellent | None | ## The Discount Prime Architecture The final design keeps one metafield as the bridge and lets each `pricing_group` value drive its own campaign. | Campaign | Mechanism | Purpose | |---|---|---| | Dealer Wholesale Pricing | Wholesale / B2B Pricing targeting `pricing_group = dealer`, gated to customers tagged as dealers | Margin-based dealer tiers applied automatically to the exact catalog the ERP defines. | | Government Contract Pricing | Wholesale / B2B Pricing targeting `pricing_group = government`, gated by Shopify segment | Contract pricing isolated from every promotional campaign. | | Clearance Repricing | Bulk Price Update on `pricing_group = clearance` | Permanent markdowns for inventory reduction, applied in bulk without touching other groups. | | Guardrails | Real-time conflict detection with auto-exclude, plus campaign priorities | If a product ever carries two eligible campaigns, the overlap is caught before activation and the correct campaign wins. | ## One Metafield, Six Pricing Models The same field supports every commercial program the ERP already tracks. | pricing_group value | Pricing behavior | |---|---| | dealer | Dealer wholesale tiers | | industrial | Margin-based wholesale pricing | | government | Contract pricing only, never promoted | | contract | Excluded from all campaigns | | clearance | Bulk Price Update markdowns | | standard | Retail price | Marketing no longer manages products. It manages business logic. ## Customer Journey Walk through a dealer purchase after the redesign. 1. A purchasing manager logs in. Her account carries the dealer customer tag, so the Dealer Wholesale Pricing campaign activates. 2. She opens an industrial fastener kit: list price $148.00, Shopify cost price $96.20, `pricing_group = dealer`. 3. The campaign applies the dealer tier automatically. No code, no request, no sales rep. 4. She orders 40 units and checks out. | Line | Detail | |---|---| | List price (40 units) | $5,920.00 | | Dealer price at $122.84/unit | $4,913.60 | | Discount given | $1,006.40 | | Estimated Profit (from real cost prices) | $1,065.60 | | Margin health | Healthy | Three weeks later a supplier introduces a new product line. The ERP assigns `pricing_group = dealer`, the nightly sync completes, and every new product is priced correctly the moment it appears. No campaign edits. No forgotten products. ## Measuring Success Track operational metrics alongside financial ones: - Hours spent per month on campaign maintenance - Time from ERP change to storefront eligibility - Pricing eligibility errors per quarter - Estimated Profit per campaign in profit analytics - Margin health distribution (Healthy / Thin Margin / Loss) - Dealer reorder frequency The first three should trend toward zero effort. The last three prove the pricing itself stays sound. ## Common Mistakes - ❌ Building collections that exist only to feed discounts. - ❌ Duplicating ERP business rules inside Shopify. - ❌ Maintaining promotional eligibility in spreadsheets. - ❌ Editing product tags by hand after every ERP update. - ❌ Letting campaign complexity grow with catalog size. ## Key Lessons Atlas did not automate discounts. It automated decision making. The ERP already knew every answer; Discount Prime did not need to replace that intelligence, only to read it. When a campaign is defined by a metafield rule instead of a product list, growth stops creating operational work: the rule for 92,000 products is the same rule for 500,000. Metafields bridge two worlds that should never merge. Business logic stays inside enterprise systems. Customer pricing stays inside Shopify. ## Conclusion Enterprise commerce is not about managing more products. It is about managing fewer decisions. When promotional logic already exists inside an ERP, rebuilding it inside Shopify creates cost, delay, and error. Metafield-based product targeting lets the ERP remain the single source of truth while Wholesale / B2B Pricing, Bulk Price Update, and conflict detection execute the strategy automatically. Once the campaign is defined by a business rule rather than a product list, everything else becomes automation. --- ## Minimum Margin Protection for Wholesale Pricing on Shopify URL: https://www.discountprime.app/case-studies/minimum-margin-protection-for-wholesale-pricing Industry: Wholesale Electronics Distribution | Business model: B2B / Wholesale | Campaign types: Wholesale / B2B Pricing, Profit Floor | Published: July 14, 2026 | Read time: 15 min > Automated wholesale pricing needs a profit floor: cost plus a minimum profit, enforced at checkout. When a calculated B2B discount would fall below the floor, the engine applies the minimum allowed price instead, so campaigns never sell below acceptable profit even when supplier costs rise faster than retail prices. Fixed-amount floors suit high-ticket gear; percentage floors suit commodity catalogs. Key entities: profit floor, minimum margin protection, Wholesale / B2B Pricing, margin-based pricing tiers, Shopify cost price sync, selling below cost prevention, fixed minimum profit per unit, minimum profit percentage, margin health signals, Estimated Profit analytics, supplier cost increases ### Frequently asked questions **Q: How do I stop wholesale discounts from selling below cost on Shopify?** A: Add a profit floor to the wholesale campaign: a rule defined as cost plus a minimum profit, enforced at checkout. Discount Prime's Wholesale / B2B Pricing calculates the tiered discount normally, then checks the result against the floor. If the calculated price would fall below it, the engine applies the minimum allowed value instead. Because the floor uses real Shopify cost prices that sync daily, it stays correct when supplier costs change. **Q: Should a wholesale profit floor be a fixed amount or a percentage?** A: Use both, by category. High-ticket products like enterprise networking equipment run low percentage margins, so a fixed minimum profit per unit, for example cost plus $45, guarantees every order funds operations. Commodity accessories with volatile costs are better protected by a minimum profit percentage, for example cost plus 20%, which scales with the product's value. Both configurations serve the same goal: pricing never crosses into unprofitable territory. **Q: What happens when supplier costs rise but my retail prices have not been updated?** A: Without protection, an automated wholesale discount keeps reducing the old retail price and can quietly erase the margin. In one scenario, a cost increase from $612 to $718 turned an 18% wholesale discount into a 2.6% margin. A profit floor prevents this: because it is computed from current cost prices synced daily, the floor rises with the cost and the checkout price stops discounting at cost plus your minimum profit. **Q: Why is my wholesale campaign generating revenue but no profit?** A: The usual cause is a blanket percentage discount applied to products whose costs have shifted. The pricing engine works as configured, but some products no longer have room for the discount, so large orders produce strong revenue and near-zero profit. Fix it with two controls: a profit floor that enforces cost plus minimum profit at checkout, and profit analytics that classify each order Healthy, Thin Margin, or Loss so drift is visible early. **Q: Do wholesale customers notice when a profit floor overrides their discount?** A: In practice, no. The floor only activates on products where the standard discount would breach minimum profit, and the customer still sees a genuine wholesale price below retail. In a typical example, the floor moved a unit price from $737.18 to $763.00 against an $899.00 retail price, still a 15.1% saving. The customer keeps a competitive discount while the merchant keeps a guaranteed minimum profit on every unit. ## Introduction Wholesale pricing exists to reward loyal customers. Better prices encourage larger orders, and larger orders strengthen long-term relationships. But every wholesale merchant eventually meets an uncomfortable truth: not every product can afford another discount. Some already run on razor-thin margins. Some absorb frequent supplier cost changes. Some enter a campaign before their inventory costs have stabilized. Applying the same wholesale discount to all of them looks fair and can be financially reckless. Instead of asking: > "How large a discount should wholesale customers receive?" a solutions architect asks: > "What should happen when a discount would push a price below our minimum acceptable profit?" This case study designs an automated wholesale pricing architecture with a **profit floor**: a hard boundary the pricing engine enforces at checkout so campaigns never sell below the profit the business requires. ## Merchant Scenario Consider BrightSource Distribution, a Shopify wholesale supplier of networking equipment, office electronics, and business accessories. | Attribute | Detail | |---|---| | Industry | Wholesale Electronics Distribution | | Annual Revenue | $41 Million | | Products | 18,700 | | Wholesale Customers | 4,500 | | Daily Orders | 2,100+ | BrightSource recently replaced manually maintained price lists with automated wholesale pricing. Discounts are calculated dynamically per customer group, and the strategy works beautifully. Until one product nearly erases a day's profit. ## One Order, Almost No Profit A commercial customer places a large order for enterprise networking switches. Wholesale pricing applies automatically and checkout completes normally. That afternoon, finance reviews the invoice: strong revenue, almost no profit. The pricing engine did exactly what it was configured to do. The problem is the product. Supplier costs rose several weeks earlier, retail prices have not yet been updated, and the wholesale discount keeps reducing a selling price that no longer has room to give. | Attribute | Before cost increase | After cost increase | |---|---|---| | Supplier cost | $612.00 | $718.00 | | Retail price | $899.00 | $899.00 (not yet updated) | | Wholesale price (18% off) | $737.18 | $737.18 | | Profit per unit | $125.18 | $19.18 | | Margin | 17.0% | 2.6% | Across 60 units, the order produced $44,230.80 in revenue and only $1,150.80 in profit. The campaign was not broken. It was missing one business rule: a floor. ## Option 1: Manual Price Reviews Finance reviews large wholesale orders and flags risky pricing after the fact. | Advantages | Disadvantages | |---|---| | No configuration required. | Catches losses after the sale, not before. | | Human judgment on edge cases. | Cannot scale to 2,100+ daily orders. | | | Sales reps end up requesting manual overrides. | | Factor | Assessment | |---|---| | Architecture Score | ★☆☆☆☆ | ## Option 2: Shrink the Discount Everywhere Lower the blanket wholesale discount until even the riskiest product stays profitable. | Advantages | Disadvantages | |---|---| | Simple to configure. | Punishes 18,000 healthy products for a handful of risky ones. | | Removes the worst-case loss. | Makes pricing uncompetitive where margin room exists. | | | Still breaks the next time a supplier cost jumps. | | Factor | Assessment | |---|---| | Architecture Score | ★★☆☆☆ | ## Option 3: Per-Product Price Lists Maintain exact wholesale prices for every product and customer tier. | Advantages | Disadvantages | |---|---| | Total control per SKU. | 18,700 products times multiple tiers is unmanageable. | | | Every supplier cost change demands manual repricing. | | | Recreates the spreadsheet problem automation was meant to solve. | | Factor | Assessment | |---|---| | Architecture Score | ★★☆☆☆ | ## Option 4: A Profit Floor Keep automated, margin-based wholesale tiers, and add a profit floor: cost plus a minimum profit, enforced at checkout. When a calculated wholesale price would fall below the floor, the engine stops discounting and applies the minimum allowed value instead. | Advantages | Disadvantages | |---|---| | Discounts stay aggressive where margin exists. | Requires accurate cost data (auto-synced daily from Shopify). | | Losses become structurally impossible. | | | Adapts automatically as supplier costs change. | | | Customers still receive a competitive price. | | | Factor | Assessment | |---|---| | Architecture Score | ★★★★★ | ## Comparison Matrix | Strategy | Loss Prevention | Competitiveness | Scales to 18,700 SKUs | Maintenance | |---|---|---|---|---| | Manual reviews | After the fact | High | No | Constant | | Smaller blanket discount | Partial | Low | Yes | Low | | Per-product price lists | High | High | No | Extreme | | Profit floor | Guaranteed | High | Yes | Near zero | ## The Discount Prime Architecture | Campaign | Mechanism | Purpose | |---|---|---| | Wholesale Tiers | Wholesale / B2B Pricing with margin-based tiers, gated by customer tag | Competitive automated pricing for 4,500 commercial accounts. | | Profit Floor | Cost plus minimum profit, enforced at checkout | The boundary: no campaign can ever sell below the minimum acceptable profit. | | Cost Sync | Real Shopify cost prices, auto-synced daily | The floor always reflects current supplier costs, not last quarter's. | | Profit Analytics | Estimated Profit per order with margin health signals | Orders classified Healthy / Thin Margin / Loss so drift is visible before it compounds. | ## Choosing the Floor per Category Different catalogs need different definitions of "minimum acceptable profit." BrightSource configures the floor two ways. | Category | Floor type | Floor value | Reasoning | |---|---|---|---| | Enterprise networking | Fixed minimum profit | Cost + $45 per unit | High-ticket items run low percentage margins; every unit must fund a fixed contribution to operations. | | Office electronics | Minimum profit percentage | Cost + 12% | Mid-range products tracked against a profitability target. | | Accessories | Minimum profit percentage | Cost + 20% | Commodity items with volatile costs need proportional protection. | Both approaches serve one purpose: prevent pricing from crossing the point where healthy business becomes unprofitable business. ## Customer Journey Replay the original incident with the floor in place. 1. The same customer orders the same enterprise switches. Cost, auto-synced from Shopify, now reads $718.00. 2. The wholesale tier calculates $737.18, which sits below the floor of $763.00 (cost + $45). 3. The engine applies the floor price instead. Checkout completes at $763.00 per unit, still 15.1% below the $899.00 retail price. | Line | Without floor | With floor | |---|---|---| | Unit price | $737.18 | $763.00 | | Profit per unit | $19.18 | $45.00 | | 60-unit order profit | $1,150.80 | $2,700.00 | | Margin health | Thin Margin | Healthy | The customer still receives a genuine wholesale discount. The business keeps the profit it planned for. Neither side experiences friction: the floor is invisible except on the invoice finance no longer has to worry about. ## Measuring Success - Estimated Profit per wholesale campaign, not just revenue - Share of orders classified Healthy versus Thin Margin versus Loss - Number of manual price override requests from sales reps - Finance hours spent reviewing risky orders - Wholesale reorder frequency and average order value The goal is a Loss count of zero, with the Thin Margin band shrinking as retail prices catch up to supplier costs. ## Common Mistakes - ❌ Applying identical wholesale discounts across every product. - ❌ Ignoring supplier cost changes between repricing cycles. - ❌ Relying entirely on manual pricing reviews. - ❌ Launching wholesale campaigns without a profit floor. - ❌ Measuring wholesale success by revenue instead of Estimated Profit. ## Key Lessons Wholesale pricing is not only about rewarding customers. It is about protecting the business that serves them. BrightSource's most valuable pricing rule was never the discount itself; it was the boundary that stopped the discount from going too far. Because the floor is computed from real, daily-synced cost prices, it holds even when suppliers reprice mid-quarter and retail prices lag behind. A floor also changes behavior upstream. Merchants launch larger campaigns with confidence because the worst case is already defined, and finance stops treating every big order as a potential incident. ## Conclusion Every successful wholesale strategy balances two objectives: deliver competitive pricing and maintain sustainable profitability. A profit floor makes those goals cooperate instead of compete. Customers keep receiving attractive wholesale prices; the merchant keeps a guaranteed minimum profit on every unit, enforced automatically at checkout and verified in profit analytics. The best discount is not always the lowest price. Sometimes it is the one that keeps both the customer and the business winning for years. --- ## Wholesale Pricing When Cost Data Is Missing: Skip or Fall Back? URL: https://www.discountprime.app/case-studies/wholesale-pricing-when-cost-data-is-missing Industry: Industrial Supply & Wholesale Distribution | Business model: B2B / Wholesale | Campaign types: Wholesale / B2B Pricing, Cost-Based Pricing, Fallback Rules | Published: July 14, 2026 | Read time: 16 min > Cost-based wholesale pricing needs an explicit fallback rule for products missing cost data: skip the product so pricing never runs on guesswork, or fall back to the product price so sales continue uninterrupted. Skipping protects margin and suits thin-margin, high-ticket catalogs; price fallback protects the sale and suits fast-turnover repeat-order catalogs. Both rules run per campaign in one store. Key entities: missing product cost data, fallback rules for wholesale pricing, cost-based B2B pricing, skip product fallback, product price fallback, supplier data sync failure, Wholesale / B2B Pricing, margin protection vs sales continuity, Estimated Profit analytics, margin health classification ### Frequently asked questions **Q: What happens to wholesale pricing when a Shopify product has no cost data?** A: It depends on the campaign's fallback rule. In Discount Prime's Wholesale / B2B Pricing you choose the behavior per campaign: skip the product, which keeps it purchasable at its normal price but outside the wholesale calculation, or fall back to the product price, which uses the selling price as the pricing base so the discount still applies. Once cost data returns through your normal sync, the product rejoins cost-based pricing automatically. **Q: Should I skip products without cost data or use the product price as a fallback?** A: Match the rule to your margin profile. Skip products when margins are thin and items are expensive, as in industrial equipment, medical devices, or automotive parts, because one mispriced order can erase the profit. Fall back to product price when margins are healthier and customers place routine repeat orders, as in office supplies or general merchandise, because pricing continuity is worth more than a small loss of precision. **Q: How do I keep a supplier data outage from breaking my B2B pricing?** A: Configure the failure behavior before the outage happens. Set a per-campaign fallback rule for missing cost data, either skip the product or use the product price, so the pricing engine responds automatically instead of forcing an emergency decision. Avoid pausing the whole campaign, which punishes every product with good data, and avoid backfilling guessed costs, which corrupts profit analytics long after the feed recovers. **Q: Why is cost-based wholesale pricing better than a fixed percentage discount?** A: A fixed percentage discount ignores what each product actually earns, so low-margin items can slip below profitability while high-margin items are underpriced against their potential. Cost-based pricing calculates the wholesale price from actual cost and target margin, keeping every sale profitable regardless of category. The tradeoff is data dependency: cost-based pricing needs accurate cost fields, which is why a fallback rule for missing data is essential. **Q: How can I tell what fallback-priced orders actually earned?** A: Use profit analytics that compute Estimated Profit from real Shopify cost prices and classify orders as Healthy, Thin Margin, or Loss. Compare fallback-priced orders against cost-based orders once cost data is restored, and track how many products are currently selling without cost data and how long recovery takes. Those numbers turn the fallback rule into an evidence-based decision you can revisit instead of a one-time guess. ## Introduction Wholesale pricing is only as reliable as the data behind it. Cost-based pricing works exactly as designed when every product carries accurate cost information. But real businesses rarely operate with perfect data: suppliers delay updates, ERP synchronizations fail, new products arrive before cost fields are populated, and imported catalogs occasionally miss critical pricing values. Instead of asking: > "How do we make sure cost data is never missing?" a solutions architect asks: > "What should the pricing engine do when cost data is missing anyway?" The first question is a data-quality project that never truly finishes. The second is a business rule you can configure today. This case study designs cost-based wholesale pricing with explicit **fallback rules**, so a broken supplier feed becomes a controlled decision instead of an incident. ## Merchant Scenario Consider North Supply Co., a distributor of industrial tools, safety equipment, and construction supplies serving contractors and commercial buyers across North America. | Attribute | Detail | |---|---| | Industry | Industrial Supply & Wholesale Distribution | | Annual Revenue | $32 Million | | Products | 27,400 | | Suppliers | 48 | | Wholesale Customers | 3,800 | | Daily Orders | 1,600+ | Every night, product data synchronizes from 48 supplier systems into Shopify: inventory, product cost, selling price, and supplier information. The company's wholesale campaign calculates prices from actual cost and margin rather than fixed percentage discounts, so every sale stays profitable regardless of category. Most mornings, everything works. ## The Tuesday Morning Outage One supplier suffers a system outage and its nightly export fails. By the time the team arrives, more than 1,600 freshly updated products are missing exactly one field: cost. Inventory is correct. Selling prices exist. Products are available. But cost is the field that powers the entire wholesale pricing strategy. The operations meeting produces two immediate, opposing answers. One manager says: "Use the selling price instead." Another disagrees: "If we don't know the cost, we shouldn't calculate wholesale pricing at all." Neither answer is wrong. They represent two different business priorities: protect the margin, or protect the sale. ## Option 1: Pause the Whole Campaign Deactivate wholesale pricing until every cost field is restored. | Advantages | Disadvantages | |---|---| | Zero risk of mispriced orders. | Punishes 25,800 products with perfect data. | | | 3,800 wholesale customers lose their pricing overnight. | | | Turns a supplier's outage into your outage. | | Factor | Assessment | |---|---| | Architecture Score | ★☆☆☆☆ | ## Option 2: Backfill Estimated Costs Manually enter approximate costs so the calculation can proceed. | Advantages | Disadvantages | |---|---| | Campaign keeps running everywhere. | 1,600 guesses under time pressure. | | | Fabricated costs poison profit analytics. | | | Estimates linger long after the real data returns. | | Factor | Assessment | |---|---| | Architecture Score | ★★☆☆☆ | ## Option 3: Skip the Product Configure the campaign's fallback rule to exclude any product with no cost. The products remain visible and purchasable at their normal price; they simply do not participate in wholesale pricing until accurate cost data returns. | Advantages | Disadvantages | |---|---| | Profitability is never calculated on guesswork. | Some wholesale buyers temporarily see list prices. | | Zero manual intervention. | | | Products rejoin the campaign automatically after the next sync. | | | Factor | Assessment | |---|---| | Architecture Score | ★★★★☆ | ## Option 4: Use the Product Price Configure the fallback rule to use the product's selling price as the pricing base whenever cost is unavailable. | Advantages | Disadvantages | |---|---| | Sales continue uninterrupted across the catalog. | Pricing precision drops for affected products. | | Repeat buyers keep their expected experience. | Margins on fallback-priced orders are unverified. | | Zero manual intervention. | | | Factor | Assessment | |---|---| | Architecture Score | ★★★★☆ | ## Comparison Matrix Options 3 and 4 score identically because they answer different questions correctly. The choice is a business-model decision, not a software decision. | Strategy | Margin Certainty | Sales Continuity | Analytics Integrity | Manual Work | |---|---|---|---|---| | Pause campaign | Total | None | Preserved | High | | Backfill estimates | Illusory | Full | Corrupted | Extreme | | Skip product | Total | Partial | Preserved | None | | Fall back to price | Reduced | Full | Flagged | None | ## Matching Fallback to Business Model North Supply runs two divisions on the same pricing engine, and each configures the fallback differently. | Division | Catalog profile | Margin profile | Fallback rule | |---|---|---|---| | Industrial equipment | High-ticket tools and machinery | Thin, a few points on expensive items | Skip products without cost data | | Office supplies | Thousands of inexpensive, fast-turnover items | Healthier, more forgiving | Fall back to product price | The industrial division cannot afford a pricing mistake on expensive equipment, so it chooses certainty. The office supplies division serves organizations placing routine weekly orders; stopping their pricing over a delayed cost update would create friction worth more than the precision lost. It chooses continuity. ## The Discount Prime Architecture | Campaign | Mechanism | Purpose | |---|---|---| | Industrial Wholesale | Wholesale / B2B Pricing with cost-based margin tiers, gated by customer tag; fallback: skip product | Guaranteed-profitable pricing; uncertain products sit out until cost returns. | | Office Supplies Wholesale | Wholesale / B2B Pricing, gated by customer tag; fallback: use product price | Uninterrupted B2B experience for routine repeat orders. | | Profit Floor | Cost plus minimum profit, enforced at checkout | Hard boundary wherever cost data exists. | | Profit Analytics | Estimated Profit from real Shopify cost prices, margin health signals | Healthy / Thin Margin / Loss classification exposes how fallback pricing actually performed. | ## Customer Journey Follow the Tuesday morning outage through both divisions. 1. A contractor logs in to the industrial store. His account carries the wholesale tag, so cost-based tiers apply. 2. He adds a torque wrench set and a safety harness. The wrench set synced normally; the harness came from the failed supplier feed. | Product | Cost data | Campaign behavior | Price paid | |---|---|---|---| | Torque wrench set (list $139.00) | $84.00 | Cost-based tier applied | $109.20 | | Safety harness (list $96.00) | Missing | Skipped by campaign | $96.00 | 3. The same morning, an office manager reorders copy paper from the office supplies store. The carton's cost is also missing, but this campaign falls back to product price: a $42.00 list price receives the 12% wholesale reduction and sells at $36.96. Her weekly order goes through untouched. 4. Two days later the supplier feed recovers. The harness regains its cost field and rejoins the industrial campaign automatically. Nobody edits anything. ## Measuring Success - Count of products currently priced without cost data - Time from data loss to restored campaign coverage - Estimated Profit on fallback-priced orders versus cost-based orders - Margin health distribution (Healthy / Thin Margin / Loss) per division - Wholesale conversion and reorder rate during supplier outages Profit analytics matter most on the fallback path: they show what pricing continuity actually cost, in dollars, so the rule can be revisited with evidence. ## Common Mistakes - ❌ Assuming cost data will always be present because the sync "usually works." - ❌ Pausing an entire wholesale program over a partial data failure. - ❌ Backfilling guessed costs that corrupt profit reporting. - ❌ Forcing one fallback philosophy across divisions with different margin profiles. - ❌ Never reviewing what fallback-priced orders earned after the fact. ## Key Lessons Missing product cost is not a technical issue. It is a business decision that deserves an explicit answer before the outage, not during it. Skipping uncertain products protects margin; falling back to product price protects the sale. Both are correct for the business that chooses them deliberately, and both run on the same pricing engine within the same store. The deeper lesson is architectural: a pricing strategy should anticipate imperfect data as a normal operating condition. Supplier integrations change, imports fail, catalogs evolve. The question is never whether missing data will occur, only how the system should respond when it does. ## Conclusion Wholesale pricing is about more than calculating discounts. It is about making confident decisions when perfect information is unavailable. Some merchants choose certainty and skip products without cost data. Others choose continuity and fall back to the product price. Neither is inherently right; the best system offers both, per campaign, so each division can act on its own commercial priorities. In wholesale commerce, success is not determined by having perfect data. It is determined by knowing exactly what your store should do when the data is not perfect. --- ## Discount Display Settings That Make a Shopify Sale Impossible to Miss URL: https://www.discountprime.app/case-studies/discount-display-settings Industry: Fashion & Apparel | Business model: Retail / DTC | Campaign types: Flat Product Discount, Display Settings, Sale Badge | Published: July 14, 2026 | Read time: 14 min > A Shopify apparel retailer's correctly configured 30% summer sale underperformed because discounted products looked identical to full-price products. Instead of deepening the discount, the fix is display settings: strikethrough original prices, sale badges, a Summer Sale campaign label, and identical presentation across collection, product, search, and recommendation pages. The percentage never changed; perception did. Key entities: discount display settings, strikethrough pricing, compare-at price, sale badges, campaign labels, promotion visibility, Flat Product Discount, collection page presentation, search and recommendation surfaces, conversion psychology, profit analytics ### Frequently asked questions **Q: Why aren't my sale prices showing on my Shopify store?** A: Usually the discount is applying correctly at checkout but the storefront presentation is not configured. Check your discount app's display settings: enable the original price with strikethrough next to the discounted price, turn on sale badges for product cards, and verify the presentation renders on collection pages, search results, and recommendations, not just product pages. Some themes also need the compare-at price enabled in collection card templates. **Q: Should I show the original price with a strikethrough during a sale?** A: Yes. A discounted product showing only $70 reads as a $70 product, not a deal. Showing $100 struck through next to $70 makes the $30 saving tangible without asking the customer to calculate anything. Customers respond to visual patterns, a crossed-out price, a badge, a highlighted sale price, far more than to percentages, so the strikethrough is often the single highest-impact display setting a merchant can enable. **Q: Do sale badges actually increase engagement on Shopify collection pages?** A: Sale badges make discounted products recognizable while customers scan a collection page, before they open any product. Without badges, shoppers must click into individual products to discover a promotion exists, and most never do. With a clear badge on every discounted card, sale items stand out during browsing, click-through into promoted products rises, and the campaign becomes visible at the exact moment customers decide what to look at. **Q: Why is my Shopify discount not increasing sales?** A: Before assuming the percentage is too small, walk your storefront as a customer. If discounted products look identical to full-price products, no original price is struck through, no badge marks the sale, and labels differ across pages, customers simply never notice the promotion. Deepening an invisible discount just makes it more expensive. Fix the display first: strikethrough pricing, sale badges, a named campaign label, and consistent presentation everywhere. **Q: How do I make discount prices consistent across collection pages, search, and product pages?** A: Standardize the presentation in your discount app's display settings rather than styling each surface separately. Define one format, original price struck through, highlighted sale price, one badge, one campaign label, and apply it across collection, product, search, and recommendation surfaces. Consistency matters because customers enter from ads, search, and carousels, not just the homepage, and every surface must tell the same story to sustain buying confidence. ## Introduction When a promotion underperforms, most merchants reach for the same three levers: increase the percentage, extend the campaign, or launch another one. Each lever costs margin. None of them asks whether customers ever noticed the original offer. The instinctive question is: > "Is 30% off enough?" A solutions architect asks something more fundamental: > "Can a customer tell, at a glance, which products are on sale and exactly what they save?" If the answer is no, deepening the discount just makes an invisible offer more expensive. This case study works through a scenario where the discount engine was configured perfectly and the campaign still failed, because the storefront never communicated it. ## Merchant Scenario Consider Avenue Apparel, a modern fashion retailer selling contemporary clothing across North America. | Attribute | Detail | |---|---| | Industry | Fashion & Apparel | | Annual Revenue | $8.4 Million | | Products | 6,800 | | Collections | 34 | | Monthly Visitors | 280,000 | | Returning Customers | 42% | | Average Order Value | $96 | The company prepares its annual Summer Sale: **30% off the entire Summer Collection**, configured as a Flat Product Discount. The campaign activates on time, prices recalculate instantly, and every order checks out at the correct discounted amount. Technically, nothing is wrong. ## The Invisible Promotion Three days after launch, the marketing team reviews performance. Revenue is up only slightly. Product views on discounted items are almost unchanged. With 280,000 monthly visitors browsing, customers behave as if nothing changed. The team's first instincts are the expensive ones: raise the promotion to 40%, or extend it to the whole catalog. Before either decision, the eCommerce manager asks one question that redirects the entire investigation: > "What if customers aren't seeing the discount?" ## The Store Walkthrough Instead of opening analytics, the team opens the storefront as a customer would. The problems are immediate: - Discounted products look identical to full-price products - Original prices are nowhere to be seen, so $70 reads as just the price, not a deal - Sale badges are missing from product cards - Campaign labels are inconsistent from page to page - A shopper must open an individual product page before any hint of a discount appears The promotion is not invisible because of pricing. It is invisible because of **presentation**. ## Business Objectives The merchant wants to: - Make every discounted product recognizable at a glance - Communicate the exact savings without customer math - Give the sale a coherent identity across the store - Keep the storefront premium, not bargain-bin - Achieve all of this without touching the 30% discount ## Evaluating the Options ### Option One: Deepen the Discount to 40% | Advantages | Disadvantages | |---|---| | Bigger headline number. | Sacrifices a third more margin per unit. | | Fast to implement. | Does nothing for visibility: 40% invisible is still invisible. | | | Trains customers to wait for deeper cuts. | | Factor | Assessment | |---|---| | Architecture Score | ★★☆☆☆ | ### Option Two: Extend the Sale to the Entire Catalog | Advantages | Disadvantages | |---|---| | More products carry a discount. | Multiplies the margin cost across 6,800 products. | | | Dilutes the seasonal story of the campaign. | | | Every new discounted product inherits the same visibility problem. | | Factor | Assessment | |---|---| | Architecture Score | ★★☆☆☆ | ### Option Three: Fix the Display Settings Keep the 30% exactly as it is. Change only how it is presented. Advantages: - Zero additional margin cost - Addresses the actual root cause - Improves every current and future campaign - Configurable inside the existing campaign, no redesign required | Factor | Assessment | |---|---| | Architecture Score | ★★★★★ | ## Comparison Matrix | Strategy | Margin Cost | Fixes Root Cause | Effect on Future Campaigns | |---|---|---|---| | Deepen to 40% | High | No | Trains discount-waiting | | Extend to Catalog | Very High | No | Dilutes campaign identity | | Fix Display Settings | None | Yes | Every campaign benefits | ## The Discount Prime Architecture The redesign is a presentation layer wrapped around the unchanged discount. | Element | Mechanism | Purpose | |---|---|---| | Summer Sale | Flat Product Discount, 30% off the Summer Collection | The offer itself, untouched. | | Strikethrough pricing | Show the original price with strikethrough next to the discounted price | Savings become tangible without mental math. | | Sale badge | Badge on every discounted product card | Collection pages become scannable for deals. | | Campaign label | Every promoted product labeled "Summer Sale" | Random markdowns become one coordinated event. | | Consistent surfaces | Identical presentation across collection, product, search, and recommendation pages | The offer looks the same wherever it is discovered. | ### Before and After The change on a single product card: | | Before | After | |---|---|---| | Original price | Hidden | $100 with strikethrough | | Selling price | $70 | $70, visually highlighted | | Badge | None | Sale badge with -30% | | Label | None | Summer Sale | | What the shopper reads | "This costs $70" | "I save $30 on this" | Nothing about the discount calculation changed. Only its presentation did. The same $70 stopped being a price and became a deal. ## Consistency Across Every Surface During testing, the team finds a second layer of the problem: collection pages, product pages, search results, and recommended-product carousels each present pricing differently. The same discount is communicated four different ways, and in one place not at all. Standardizing the presentation matters because customers rarely enter through the front door. Some land on a product page from an ad, some arrive through on-site search, some meet a product in a recommendation carousel. Every one of those surfaces must tell the same story: strikethrough original price, highlighted sale price, one badge, one label. Consistency builds confidence, and confident customers complete purchases. ## Customer Journey 1. A returning customer opens the Summer Collection page. 2. Discounted items now carry a sale badge, so she spots deals without opening anything. 3. A jacket shows $100 struck through, $70 highlighted, labeled Summer Sale. 4. She adds the jacket, then a pair of jeans presented the same way: $90 struck through, $63. 5. Her cart shows the running story: $190 of product for $133, a saving of $57. 6. Search results and the recommendation carousel repeat the identical presentation, so nothing breaks the narrative before checkout. The discount engine behaves exactly as it did in week one. The difference is that the customer can finally see it working. ## Why Presentation Changes Behavior Customers do not calculate discounts. They recognize visual patterns: a crossed-out price, a badge, a campaign label, a clearly highlighted sale price. Each element removes a unit of uncertainty, and uncertainty is the real tax on conversion. Display settings change no mathematics. They change **perception**, and perception is what a browsing customer acts on. A premium execution matters too: one clear badge and readable pricing communicate value without turning a fashion storefront into a clearance rack. ## Measuring Success - Product views on discounted items, the metric that first exposed the problem - Click-through rate from collection pages into sale products - Add-to-cart rate on badged versus unbadged products - Pricing questions reaching support, which should fall - Checkout conversion during the campaign window - **Estimated Profit** in Discount Prime's profit analytics: because the discount is unchanged, per-unit margin holds, so incremental volume translates directly into profit ## Common Mistakes - ❌ Displaying only the discounted price and hiding the original. - ❌ Using inconsistent promotional labels across the store. - ❌ Showing different pricing styles on collection, search, and product pages. - ❌ Leaving discounted products visually identical to full-price products. - ❌ Raising the discount percentage before auditing how the current one is displayed. - ❌ Never walking the storefront as a customer after launching a campaign. ## Key Lessons Avenue Apparel entered the campaign believing it needed a larger discount. It needed better communication. The discount engine was never the problem; presentation was. The 30% stayed exactly the same, and the campaign transformed because customers could finally recognize it on every page they touched. Display settings are not decoration. They are the bridge between pricing logic and customer perception. ## Conclusion A promotion only works when customers can see it. Before spending margin on a deeper discount or a wider campaign, audit the display: is the original price struck through, is the sale price highlighted, is there a badge on the card, does the campaign have a name, and is all of it identical across collection pages, product pages, search, and recommendations? For most Shopify merchants, improving promotional visibility delivers more impact than increasing the discount itself. Sometimes the most effective optimization is not changing the offer. It is making sure customers actually see it. --- ## Forty Ambassadors, Forty Codes, One Campaign URL: https://www.discountprime.app/case-studies/ambassador-program-bulk-discount-codes Industry: Health & Supplements | Business model: Retail / DTC | Campaign types: Free Shipping & Cart Incentives, Unique Discount Codes (Bulk) | Published: July 14, 2026 | Read time: 15 min > A Shopify supplement brand pays 40 ambassadors on real performance using one Free Shipping & Cart Incentives campaign unlocked by a batch of bulk unique discount codes. The codes are set to unlimited uses each, so an ambassador's audience can reuse them, with a once-per-customer limit for abuse control. Each code's redemption counter becomes the commission figure, and its order history settles disputes. Key entities: bulk unique discount codes, ambassador and affiliate attribution, uses per code, per-customer redemption limit, Free Shipping & Cart Incentives, code redemption counter, commission payouts, code export to CSV, fixed code batch size, guest checkout identity limits, profit analytics ### Frequently asked questions **Q: How do I track which influencer or ambassador drove a sale on Shopify?** A: Give each partner their own code from a single bulk unique code batch instead of sharing one code across everyone. In Discount Prime, one campaign generates the batch, and every redemption is recorded against the specific code used, with the order breakdown showing "Unlocked by code". The codes list then shows how many times each ambassador's code was used, which is the number you pay commissions on. **Q: Can a bulk unique discount code be used more than once?** A: Yes, but you must change the default. Bulk codes default to single use, because the most common bulk scenario is a personal one-time code mailed to one shopper. For an ambassador or affiliate code that is posted publicly and reused by a whole audience, set uses per code to unlimited, and keep a once-per-customer limit so a single shopper still cannot redeem the same code twice. **Q: Which Shopify discount campaigns support bulk unique codes?** A: In Discount Prime, bulk unique codes are available on three campaign types: Free Shipping & Cart Incentives, Wholesale / B2B Pricing, and Tiered Unit Pricing. Tiered Quantity Discount and Product Spend Discount support a single shared code only, and Flat Product Discount and Bulk Price Update are automatic-only with no code at all. The mechanic of your offer therefore decides whether a batch of codes is even possible. **Q: Should I create one campaign per influencer or one campaign with many codes?** A: Use one campaign with many codes. A campaign per partner means the reward, dates, and eligibility rules live in dozens of places and inevitably drift apart, and maintenance costs more hours than the commissions are worth. One campaign with a bulk code batch keeps a single reward and rule set while still telling every partner apart, because attribution lives on the code rather than on the campaign. **Q: Can I add more codes to an existing bulk code batch later?** A: No. The batch is fixed when the campaign is saved, so codes cannot be appended afterward and needing one more means building a new campaign. Plan the size up front: generate spare codes beyond your current partner count so new ambassadors joining mid-quarter can be onboarded from the reserve. Also expect to export the batch and match each code to a partner name yourself, since the app tracks codes, not owners. ## Introduction Bulk unique discount codes are usually pictured one way: a list of customers, one personal code each, redeemed once and retired. That scenario is real and it is common. It is not the only reason a merchant reaches for a batch of codes. Sometimes the batch is not for a thousand individual shoppers. It is for forty channels, each one shared publicly and reused by hundreds of people. Instead of asking: > "How do we generate a code for every customer?" a solutions architect asks: > "How many things do we need to tell apart, and how many times must each code be allowed to work?" Those are two separate questions, and confusing them is what breaks ambassador programs. This case study designs a commission-ready attribution architecture for a supplement brand paying forty creators on performance. ## Merchant Scenario Consider **NorthPeak Supplements**, a fictional Shopify brand selling protein, pre-workout, and recovery products direct to consumers. | Attribute | Detail | |---|---| | Industry | Health & Supplements | | Platform | Shopify | | Annual Revenue | $4.8 Million | | Products | 60 | | Ambassador Partners | 40 | | Reward Offered | 15% off plus free shipping over $60 | NorthPeak grew a micro-ambassador program: forty fitness creators, each posting to their own audience, each sharing a discount code. Commissions are paid on one number, the revenue an ambassador's code actually generated. That number has to be trustworthy per ambassador, with no manual guesswork. ## The Shared Code That Proved Nothing The program started with a single code that every ambassador shared. `NORTHPEAK15` Orders arrived, so in one sense it worked. It failed at the only job that mattered: nobody could say which ambassador sent which sale. Commission conversations turned into arguments about whose audience actually converted, with no data to settle them. The problem was never the discount. It was that one code cannot answer a question about forty channels. ## Business Objectives | Priority | Objective | |---|---| | 1 | Attribute every discounted order to the ambassador who earned it | | 2 | Keep one reward, one rule set, and one schedule across all forty partners | | 3 | Let each code be reused by an ambassador's whole audience, not once | | 4 | Settle payout disputes with evidence instead of screenshots | | 5 | Onboard new ambassadors mid-quarter without rebuilding anything | ## Evaluating Attribution Strategies ### Option 1: One Shared Code | Advantages | Disadvantages | |---|---| | Trivial to launch. | Zero per-ambassador attribution. | | One code for creators to remember. | Commissions become a negotiation, not a calculation. | | | The code leaks beyond the ambassador audiences entirely. | | Factor | Assessment | |---|---| | Architecture Score | ★★☆☆☆ | ### Option 2: Forty Separate Campaigns Give every ambassador their own campaign with its own code. | Advantages | Disadvantages | |---|---| | Perfect attribution per creator. | Forty places for the reward, dates, and rules to drift apart. | | Each partnership can be tuned. | A discount changed for one creator and forgotten on three others. | | | Maintenance costs more hours than the commissions are worth. | | Factor | Assessment | |---|---| | Architecture Score | ★★★☆☆ | ### Option 3: One Campaign, One Batch of Unique Codes One reward, one set of rules, forty distinguishable keys into the same campaign. | Advantages | Disadvantages | |---|---| | Attribution is per code, so per ambassador. | The batch is fixed at creation and cannot be extended later. | | The offer can never drift between partners. | Matching a code to a creator's name stays a spreadsheet step. | | Every code carries its own live usage counter. | | | Factor | Assessment | |---|---| | Architecture Score | ★★★★★ | ## Comparison Matrix | Strategy | Attribution | Rule Consistency | Maintenance | Dispute Evidence | |---|---|---|---|---| | One shared code | None | Perfect | None | None | | Forty campaigns | Per creator | Drifts constantly | Very high | Good | | One batch of unique codes | Per creator | Perfect | Low | Order-level | ## Where Bulk Codes Are Actually Available Bulk unique codes are not offered on every campaign type, and that constraint decides the build before any creative decision does. | Campaign type | Code support | |---|---| | Flat Product Discount | None. Automatic only. | | Bulk Price Update | None. Automatic only. | | Tiered Quantity Discount | Single shared code only. | | Product Spend Discount | Single shared code only. | | Free Shipping & Cart Incentives | Single code or bulk unique codes. | | Wholesale / B2B Pricing | Single code or bulk unique codes. | | Tiered Unit Pricing | Single code or bulk unique codes. | NorthPeak's reward, 15% off plus free shipping above $60, is a cart-level incentive, which places it in **Free Shipping & Cart Incentives**. That was as much a constraint as a choice: it is one of only three campaign types where forty distinguishable, reusable codes are possible at all. ## The Discount Prime Architecture | Element | Mechanism | Purpose | |---|---|---| | The campaign | Free Shipping & Cart Incentives: 15% off plus free shipping over $60, storewide, July 1 to September 30 | One reward and one rule set for the whole program. | | The keys | Discount codes: bulk unique codes, 50 generated, prefix `AMB-` | Forty ambassadors get a distinguishable code; ten stay in reserve. | | Reuse rule | Uses per code: unlimited | An ambassador's code is posted publicly and must keep working all quarter. | | Abuse rule | Per-customer limit: once per customer | The code stays open, but no single shopper redeems it twice. | | Payout evidence | Codes list with times used, plus "Unlocked by code" on every order | Commissions are calculated from redemptions, not from screenshots. | ## The Setting Nobody Warns You About Bulk codes default to **single use**, because the most common bulk scenario is a personal one-time code mailed to one shopper. NorthPeak's scenario is the opposite: an ambassador's code is posted publicly and reused by everyone in that audience who decides to buy. Left at the default, every ambassador code would have died the moment the first follower redeemed it, and the program's opening week would have been spent answering "my code stopped working" messages from confused creators. | Setting | Value | What it governs | |---|---|---| | Uses per code | Unlimited | How many times one code can ever be redeemed. | | Per-customer limit | Once per customer | How many times one shopper can use that code. | Two settings, two different jobs. The whole program depends on not confusing them. Note the honest limit of the second one: a per-customer cap relies on recognizing the same shopper through an account or matched email, so guest checkout under three addresses still looks like three customers. ## Ambassador Journey 1. The batch generates fifty codes shaped like `AMB-7K4QH2P9`. The app knows the codes exist; it does not know which creator owns which. 2. NorthPeak exports the batch to a spreadsheet the day it is created and matches one code to one creator by hand, then emails each ambassador privately before anyone posts. 3. A follower hears about NorthPeak, adds $74 of protein and recovery products, and enters `AMB-7K4QH2P9` at checkout. The cart clears $60, so 15% comes off and shipping is free. 4. The redemption is recorded against that specific code. The order breakdown reads `Unlocked by code: AMB-7K4QH2P9`. 5. At month end, the codes list shows `AMB-7K4QH2P9 · 34 times used`. Times used against average order value becomes the figure the ambassador is paid on. Five minutes of matching a code list to a spreadsheet replaced a week of chasing self-reported sales numbers. ## When an Ambassador Disputes a Payment One creator was certain their audience had ordered more than they were credited for. NorthPeak opened that exact code and read its redemption history: every order the code had ever unlocked, in sequence, with dates. The conversation ended in minutes instead of becoming a recurring monthly argument. This is the quiet value of per-code attribution: it does not only calculate the payout, it defends it. ## Why the Batch Was Sized at Fifty A batch is fixed at creation. Codes cannot be appended to it later, and needing one more code means building a new campaign. NorthPeak knew the program would grow during the quarter, so day one produced fifty codes for forty ambassadors. When ambassador forty-one signed in August, a code was already waiting instead of a second campaign being built to onboard one person. ## What the Batch Still Could Not Do The codes list gives an honest, reliable number per code. It does not produce a finished "revenue per ambassador" report with names attached. Matching a code to a name, and a name to a payout, remains a spreadsheet job. NorthPeak treated that five-minute step as part of running the program rather than as something missing from the app. The app generates, validates, tracks, and exports codes; distributing them and naming their owners is the merchant's half of the workflow. ## Metrics That Measure Success - Redemptions per ambassador code, the number commissions are paid on - Revenue and Estimated Profit per code, from real Shopify cost prices - Share of the program's revenue concentrated in the top five ambassadors - Codes issued versus codes ever redeemed, which exposes inactive partners - Payout disputes per quarter, which should approach zero - Repeat purchase rate of customers acquired through ambassador codes ## Common Mistakes - ❌ Leaving uses per code at its single-use default for a code meant to be shared publicly. - ❌ Sizing the batch to today's headcount, leaving no room for the program to grow. - ❌ Expecting the app to label each code with an ambassador's name automatically. - ❌ Building one campaign per recipient when a single batch would do the same job without the drift. - ❌ Promising strict per-customer limits on guest checkout, where the same shopper cannot always be recognized. - ❌ Paying commissions on self-reported numbers when the codes list already holds the honest one. ## Key Lessons The biggest lesson was not about ambassadors, commissions, or the 15% offer. It was that **bulk** and **single use** are two separate decisions, not one feature. The same batch that works perfectly for a thousand one-time personal codes needed exactly one setting changed to work for forty reusable channel codes. Knowing which decision to make, and why, mattered far more than the size of the batch. ## Conclusion A batch of unique codes is not only for handing one code to one customer. It is for handing one distinguishable key to each of many channels, however those channels choose to use it. For a merchant like NorthPeak Supplements, one Free Shipping & Cart Incentives campaign, one batch of fifty codes with unlimited uses and a once-per-customer limit, and one exported spreadsheet turned a forty-creator ambassador program into a measurable, defensible payout process. The real work was never generating codes. It was deciding, deliberately, how many times each one is allowed to work. --- ## One Code Said On Air: Measuring a Podcast Sponsorship URL: https://www.discountprime.app/case-studies/podcast-sponsorship-single-discount-code Industry: Food & Beverage | Business model: Retail / DTC | Campaign types: Product Spend Discount, Single Discount Code | Published: July 14, 2026 | Read time: 14 min > A Shopify coffee roaster measures an 8-week podcast sponsorship with one memorable shared code on a Product Spend Discount campaign: spend $50, get 20% off. A 500-use total redemption cap bounds the exposure, a once-per-customer limit stops repeat redemption, and the code's counter answers the only question that mattered, how many orders the show sent. Key entities: single shared discount code, podcast sponsorship measurement, Product Spend Discount, total redemption cap, once per customer limit, code as a key, not a discount, case-insensitive code matching, campaign scheduling, cost per acquired customer, profit analytics ### Frequently asked questions **Q: Should I use a single discount code or unique codes for a podcast sponsorship?** A: Use a single shared code. A host can read only one code on air, to one audience, so unique per-listener codes have no delivery channel and nothing to tell apart. Uniqueness only pays off when there are multiple recipients to distinguish. Pick a code that survives being heard once while driving, then read it identically in every episode so the counter stays one clean number. **Q: How do I cap how many times a discount code can be used on Shopify?** A: Set a total redemption cap on the code, for example 500 uses campaign-wide, plus a per-customer limit so one shopper redeems it only once. The cap is cheap insurance: if an episode is reposted and overperforms, the campaign stops discounting on its own instead of quietly eating margin for weeks. Without a cap, merchants usually learn about an overperforming promotion from the finance report. **Q: Why was my discount code accepted but the discount did not apply?** A: Because a code is a key, not the discount itself. It unlocks the campaign, and the campaign's own rules still decide the outcome. If the campaign requires a $50 cart and the shopper has $22 of products, a valid code is accepted and no discount applies. That is by design, and it is the first thing to check before assuming a code is broken. **Q: Which Shopify discount campaign types support a discount code?** A: In Discount Prime, Product Spend Discount and Tiered Quantity Discount support a single shared code, while Free Shipping & Cart Incentives, Wholesale / B2B Pricing, and Tiered Unit Pricing support either a single code or bulk unique codes. Flat Product Discount and Bulk Price Update are automatic-only and offer no code. A spend-threshold offer such as spend $50 get 20% off therefore runs as a Product Spend Discount with one shared code. **Q: Is a discount code case sensitive at checkout?** A: No. Discount Prime matches codes case-insensitively and trims surrounding spaces, so beans20 works exactly like BEANS20. This matters for spoken-word channels such as podcasts and radio, where listeners type from memory and get the capitalization wrong. What a code cannot do is limit redemptions per person on guest checkout, since a shopper using three email addresses looks like three customers. ## Introduction Sponsorship marketing runs on one fragile thing: memory. A host reads an ad once. A listener hears it in the car, on a walk, or half-distracted while cooking. If the code is hard to say or hard to remember, the sale never happens. Yet the merchant still needs an answer when the flight ends. Did the sponsorship work? The instinct in most planning meetings is to reach for sophistication: > "Let's give every listener a unique code so we can track them individually." A solutions architect asks a plainer question first: > "How many channels does this code actually need to answer for?" Uniqueness only pays off when there is more than one recipient to tell apart. This case study designs the measurement architecture for a coffee roaster whose answer to that question was one. ## Merchant Scenario Consider **Bramble Coffee Roasters**, a fictional Shopify brand selling whole-bean and ground coffee direct to consumers. | Attribute | Detail | |---|---| | Industry | Food & Beverage | | Platform | Shopify | | Annual Revenue | $2.1 Million | | Products | 140 | | Monthly Orders | 3,600 | | Average Order Value | $54 | After trying banner ads, paid social, and email, Bramble signed an eight-week sponsorship with a food and lifestyle podcast. One host. One ad read per episode. One audience. The offer is simple: spend $50, get 20% off. ## The Temptation to Overbuild The first proposal was a batch of a thousand unique codes, one per listener. It sounded rigorous. It made no sense. A batch of unique codes needs a distribution channel per code. Here the host can only read **one** code on air, to one audience, at one time. There is no mechanism to hand a listener their personal code, and no second recipient to distinguish from the first. A thousand codes would have had nowhere to go. The sophistication would not have bought a single extra fact. It would only have added a generation step, an export, and a distribution problem that does not exist. ## Business Objectives | Priority | Objective | |---|---| | 1 | Attribute podcast-driven orders to the sponsorship, cleanly | | 2 | Give the host a code that survives being spoken once, out loud | | 3 | Cap the campaign's exposure before a single episode airs | | 4 | Stop the same listener redeeming the offer repeatedly | | 5 | Read performance week over week without building a dashboard | ## Evaluating Code Strategies ### Option 1: Bulk Unique Codes | Advantages | Disadvantages | |---|---| | Per-recipient attribution, in theory. | No way to deliver a personal code over the air. | | Leak-resistant by design. | One host and one audience means nothing to tell apart. | | | Adds generation, export, and distribution work for zero extra insight. | | Factor | Assessment | |---|---| | Architecture Score | ★★☆☆☆ | ### Option 2: No Code, Automatic Discount | Advantages | Disadvantages | |---|---| | Zero friction at checkout. | The sponsorship becomes unmeasurable. | | Nothing to remember. | Every shopper gets the offer, including those who never heard the ad. | | Factor | Assessment | |---|---| | Architecture Score | ★★☆☆☆ | ### Option 3: One Memorable Shared Code One code, easy to say aloud, easy to remember without writing it down, read identically in every episode. | Advantages | Disadvantages | |---|---| | Matches the channel exactly: one host, one code, one counter. | No visibility into which ad read or which episode converted. | | Survives being heard once while driving. | A shared code can be reposted beyond the audience. | | A usage cap and per-customer limit bound the exposure. | | | Factor | Assessment | |---|---| | Architecture Score | ★★★★★ | ## Comparison Matrix | Strategy | Fits One Channel | Attribution | Delivery Cost | Exposure Control | |---|---|---|---|---| | Bulk unique codes | No | Per recipient | High, undeliverable on air | High | | Automatic discount | Partly | None | None | Low | | Single shared code | Yes | Per channel | None | High with a cap | ## Which Campaign Type Even Offers a Code The campaign type is not a free choice. It is decided by the mechanic of the offer and by where codes exist at all. | Campaign type | Code support | |---|---| | Flat Product Discount | None. Automatic only. | | Bulk Price Update | None. Automatic only. | | Product Spend Discount | Single shared code only. | | Tiered Quantity Discount | Single shared code only. | | Free Shipping & Cart Incentives | Single code or bulk unique codes. | | Wholesale / B2B Pricing | Single code or bulk unique codes. | | Tiered Unit Pricing | Single code or bulk unique codes. | Bramble's offer is a spend threshold, which belongs to **Product Spend Discount**, and Product Spend Discount offers a single shared code with no bulk mode behind it. The decision to use one code was therefore not really a decision. The campaign type made it, and it happened to be exactly what a podcast sponsorship needs. ## The Discount Prime Architecture | Element | Mechanism | Purpose | |---|---|---| | The campaign | Product Spend Discount: spend $50, get 20% off, targeted at coffee and brew equipment, September 1 to October 26 | One offer, scheduled to start and end with the ad flight. | | The key | Single discount code: `BEANS20` | A code a host can say once and a listener can remember in the car. | | Budget guard | Total redemption cap: 500 uses campaign-wide | If an episode overperforms, the discount stops on its own instead of quietly eating margin. | | Abuse guard | Once per customer | The offer rewards a purchase decision, not a habit of reusing the code. | | Measurement | Code counter on the campaigns list, plus "Unlocked by code" on every order | Weekly performance without a spreadsheet or a custom dashboard. | ## The Cap That Bought Peace of Mind Sponsorship response is not predictable. An episode can underperform, or it can be reposted into a large Facebook group and send far more traffic than planned. Bramble set the total redemption cap not because they expected to reach it, but because if they did, they wanted the campaign to stop discounting by itself rather than run unnoticed for another six weeks. The cap costs nothing when the campaign performs as expected, and it is the single cheapest piece of insurance in the whole flight. The per-customer limit does a different job: each listener redeems `BEANS20` once, not once per order. Its honest limit is identity. Discount Prime enforces it by recognizing the same shopper through an account or matched email, so a guest checking out under three addresses still looks like three customers. Bramble accepted that trade-off rather than forcing every listener to create an account just to act on an ad. ## Listener Journey 1. A listener hears the ad, adds a $62 bag of coffee and a brew kit, and types `beans20` in lowercase at checkout. Matching is case-insensitive and stray spaces are trimmed, so it applies exactly like the capitalized version. 2. The cart clears $50, so 20% comes off. The order breakdown records `Unlocked by code: BEANS20`. 3. A second listener, curious but not convinced, adds a single $22 bag and tries the same code. The code is **accepted**, but no discount applies: the cart never reached $50. That third step is the one worth internalizing. A code is a key, not a discount. It unlocks the campaign; the campaign's own rules still decide the outcome. It became the first line of every support reply about "the code did not work." | Cart | Code entered | Result | |---|---|---| | $62 | BEANS20 | 20% applied, order attributed to the podcast | | $22 | BEANS20 | Code valid, threshold not met, no discount | | $62 | Same customer, second order | Code rejected, once per customer | ## Watching the Flight Live No custom dashboard was needed. On the campaigns list, one line told the whole story: `BEANS20 · 214 used` That counter, read weekly, was enough to know the sponsorship was working and to decide whether to renew before the flight ended. What one code cannot tell you is equally clear. It does not reveal which of two ad reads drove more orders, or which minute of an episode a listener paused to buy. One code answers "how many," never "which moment." For a single host on a single show, that is the right amount of tracking to pay for. If Bramble later sponsors five shows at once, the answer changes shape but not kind: five single codes, one per host, each with its own counter, still no batch required. ## Metrics That Measure Success - Redemptions of the sponsorship code, week over week across the flight - Revenue and Estimated Profit from code-unlocked orders, from real Shopify cost prices - Average order value of podcast orders against the $54 store baseline - Cost per acquired customer: sponsorship fee divided by first-time buyers using the code - Redemptions against the 500-use cap, watched as an exposure gauge - Repeat purchase rate of listeners three months after the flight ## Common Mistakes - ❌ Reaching for a bulk batch of codes when there is only one channel to hand them out through. - ❌ Launching a sponsorship code with no total redemption cap, then learning about an overperforming episode from the finance report. - ❌ Assuming a rejected code means a broken code, when it usually means the cart did not clear the threshold. - ❌ Requiring an account for every redemption, which loses the casual listeners the ad was bought to reach. - ❌ Changing the code mid-flight because a second host prefers a different word, splitting one clean number into two partial ones. - ❌ Choosing a code that cannot survive being spoken once, out loud, to a distracted listener. ## Key Lessons A single shared code is not a smaller version of a bulk campaign. It is the correct architecture for a single channel, full stop. The usage cap did more for the team's peace of mind than the discount depth ever did. And understanding that the code is only a key, not the discount itself, meant most support tickets could be answered in one line. ## Conclusion Not every discount code needs a batch behind it. When a promotion has exactly one channel, one host, one ad read, one audience, then a single shared code with a usage cap and a per-customer limit is the whole solution, not a stepping stone toward something more elaborate. For merchants running sponsorships, single-channel affiliate deals, or one-time public promotions, the right question is never "how do we make this more sophisticated." It is "how many channels does this code need to answer for." For Bramble Coffee Roasters the answer was one, so the code was one too. --- # Glossary > Plain-English definitions of the Shopify discount and pricing terms merchants use. Published at https://www.discountprime.app/glossary. 14 terms. **Volume discount**: A discount that lowers the price as a customer buys more units, set across quantity tiers (for example 10% off at 3+, 15% off at 6+). It is used to increase average order value and units per order. **Quantity break**: Another name for a volume discount: the unit price drops automatically when the cart reaches a set quantity. The available breaks are usually shown on the product page to encourage larger orders. **Tiered pricing**: Pricing that changes at different quantity or spend levels. It comes in two forms: tiered quantity discounts (a discount per bracket) and tiered unit pricing (a fixed per-unit price per bracket, common for wholesale). **Tiered unit pricing**: A model where each quantity bracket has a specific price per unit (for example $9/unit at 1 to 9, $7/unit at 10+). It is widely used for wholesale and B2B buyers. **BOGO (Buy X Get Y)**: A promotion where buying one or more items unlocks a reward on others, such as buy one get one free, a percentage off, or a fixed amount off a second product. **Bulk discount**: A discount applied across many products at once, often combined with bulk price updates that reprice a large catalog in a single action rather than editing products one by one. **Wholesale pricing**: Special prices for trade or B2B buyers, usually unlocked by customer tag, segment, or login. It often uses tiered unit pricing so the per-unit price improves with volume. **B2B pricing**: Customer-specific pricing for business buyers, gated by tag, segment, login, or purchase history, so only approved accounts see the trade prices while guests see retail. **Margin-based discount**: A discount taken out of your profit margin rather than your selling price, so deeper discounts never touch your cost. A profit floor of cost plus a minimum profit keeps every sale above cost. **Profit margin**: The difference between an item's selling price and its cost. Net margin per campaign measures the real profit a promotion produces after discounts and shipping, using your Shopify cost prices. **Average order value (AOV)**: The average amount a customer spends per order. Volume discounts, quantity breaks, and free-shipping thresholds are common tactics for lifting AOV. **Discount stacking and conflicts**: When two or more promotions apply to the same products at once. Without conflict detection, stacked discounts can silently combine and erode margin, so catching overlaps before activation matters. **Free shipping threshold**: A minimum cart value that unlocks free shipping (for example free shipping over $50). A progress bar that shows how much more is needed is a proven way to raise average order value. **Cart-spend discount**: A discount unlocked by total cart value rather than quantity, often in tiers (spend more, save more). It rewards bigger baskets across different products. --- # Help Center > Complete product documentation for Discount Prime: setup, every campaign type, campaign management, and troubleshooting. Published at https://help.discountprime.app. 69 articles. --- ## Bulk Price Update URL: https://help.discountprime.app/en/articles/14879390-bulk-price-update ### WHAT IS IT A Bulk Price Update campaign sets a new fixed price for one or more products, replacing the original price entirely for the duration of the campaign. Unlike a percentage discount, this changes the actual price shown to the customer, not just the checkout deduction. When the campaign ends or is deactivated, all prices revert automatically to their original values. ### HOW IT DIFFERS FROM A FLAT DISCOUNT Flat Product Discount: - Shows original price + a discount line in the cart - Has a "sale" or "% off" label visible to customers - Good for: seasonal sales, promotional events Bulk Price Update: - Shows ONLY the new price (no discount label) - Optionally shows the original price with a strikethrough - Good for: clearance pricing, price testing, limited-edition increases ### WHEN USE IT - Clearance pricing: Backpack $129.99 → $99.99 - Price testing: Run a lower price for 2 weeks to measure conversion - Markdown sale: All crossbody bags → $69.99 (was $89.99) - Price increase: Limited-edition item: $49.99 → $65.00 - Wholesale catalog: Set B2B prices for specific products ### STEP BY STEP: CREATE A BULK PRICE UPDATE CAMPAIGN Scenario used in this guide: Goal: Set Travel Backpack ($129.99) to a clearance price of $99.99. #### Step 1: Go to Create Campaign From the Discount Prime sidebar, click Campaigns → Create Campaign. #### Step 2: Choose Campaign Type Click the Bulk Price Update card under the Pricing tab.  #### Step 3: Name Your Campaign Enter a name like: Backpack Clearance – $99.99 #### Step 4: Select Products Click Browse products and select all the products you want to reprice.  #### Step 5: Set the New Price Choose the pricing method: - Fixed new price: enter the exact new price (e.g., $99.99) - Percentage reduction: e.g., reduce by 23% from the original - Fixed amount reduction: e.g., subtract $30.00 from the original  #### Step 6: Adjust Cents (Optional) Enable Adjust Cents to control the cent value of all repriced products. Example: set cents to .99 → all prices end in .99 ($X.99) Accepted range: 0.00 to 0.99 #### Step 7: Price Protection (Optional) Enable Price Protection to set a minimum floor price. The campaign will never set a product below this amount. Useful when repricing multiple products with varying original prices.  #### Step 8: Schedule (Optional) Set a start and/or end date. When the end date passes, all prices revert to original automatically. #### Step 9: Save the Campaign  ### STEP BY STEP: VERIFY THE CAMPAIGN WORKS Test scenario: Campaign: Travel Backpack ($129.99) → new price $99.99 #### Step 1: Go to the Product Page Open the Travel Backpack product page. The price should show $99.99 with the original price struck through: $129.99.  #### Step 2: Add to Cart Add 1 Backpack. The cart should show: - Line price: $99.99 - No separate discount entry, the price itself is $99.99 #### Step 3: Test 2× Quantity Add a 2nd Backpack. Total should be $199.98 ($99.99 × 2). Verification: Cart: 1 Backpack → $99.99 Cart: 2 Backpacks → $199.98 Cart: 1 Backpack + non-campaign item → Backpack $99.99, other item at original price #### Step 4: Check Non-Campaign Products Add a product not in this campaign (e.g., Leather Belt $24.99). Its price should remain unchanged. #### Step 5: Deactivate and Verify Reversion Deactivate the campaign from the Campaigns list. Return to the product page. Price should revert to $129.99. #### Step 6: Test a Price Increase Scenario If using this campaign to increase a price (e.g., $49.99 → $65.00 for a limited edition item): The product page should show $65.00 with NO strikethrough (since it's an increase, not a markdown). #### TIPS & COMMON MISTAKES No discount label is shown: Customers see the new price directly. If you want a visible "SALE" or percentage badge to appear, use a Flat Product Discount instead. Deactivate before creating a conflicting campaign: If you need to run a product discount on the same product, deactivate the Bulk Price Update first. Always set a price floor when repricing multiple products: Otherwise, a $5 item might accidentally drop to $0 when using percentage or fixed reduction methods. The percentage method is safer for varied catalogs: If repricing 30 products with different prices, a percentage reduction is more consistent than a fixed amount. ### MINI FAQ **## Does this show a discount label at checkout like a percentage-off badge?** No, the product's actual price changes; there's no separate discount line, just the new price. **## What happens to the price when the campaign ends or is deactivated?** The price reverts automatically to its original value. **## Can I set a floor so prices never drop too low?** Yes, enable Price Protection to set a minimum floor price that no product will go below. ### Best for: Dropshipping and Wholesale/B2B stores doing direct, permanent repricing. --- ## Buy X Get Y \(BOGO\) URL: https://help.discountprime.app/en/articles/14879365-buy-x-get-y-bogo ### WHAT IS IT Buy X, Get Y (BOGO) campaigns reward customers who buy a qualifying product or quantity by offering a free or discounted item. The reward is added automatically to the cart, no code required. Discount Prime supports five BOGO types to cover a wide range of scenarios. ### BOGO TYPES AT A GLANCE Buy same, get same free: Buy 2 of item A → 1 of item A is free Buy from collection, get the cheapest free: Buy from a collection → the cheapest item in the cart becomes free Buy from collection A, get from collection B: Buy from one collection → get a reward from another Buy X items, get % off Y items: Buy a quantity → get a percentage off additional items Free Gift with purchase: Cross a spend threshold → a gift item is added to the cart at $0 ### WHEN USE IT - Clear excess inventory → Buy same, get same free - Increase basket size → Buy from collection A, get from B - Bundle deal → Buy X items, get % off Y items - Loyalty reward/gift → gift with purchase - Cross-sell → Buy from the collection, get the cheapest free ### STEP BY STEP: CREATE A BOGO CAMPAIGN Scenario used in this guide: Goal: Customer buys 2 Canvas Totes → gets 1 Slim Card Holder free. #### Step 1: Go to Create Campaign From the Discount Prime sidebar, click Campaigns → Create Campaign #### Step 2: Choose Campaign Type Click the Buy X Get Y card.  #### Step 3: Pick a Scenario (Optional) Buy 2 get 1 free → pre-fills: Buy qty = 2, Get qty = 1, Discount = Free (100%)  #### Step 4: Name Your Campaign Enter a name like: Buy 2 Totes, Get a Card Holder Free  #### Step 5: Set the "Customer Buys" Condition Define what the customer must buy: - Product or collection: which products qualify - Minimum quantity: how many they must add (e.g. 2)  #### Step 6: Set the "Customer Gets" Reward Define the reward: - Product or collection: which item do they get - Quantity: how many they get (e.g., 1) - Discount: Free (100%), a percentage off, or a fixed amount off  #### Step 7: Set Repeat Rewards (Optional) Toggle Allow multiple redemptions to allow customers to trigger the reward more than once in a single order (e.g., buy 4 totes → 2 card holders free). Set a maximum number of rewards to cap the total free items per order.  #### Step 8: Enable the Storefront Widget (Recommended) Toggle the BOGO widget ON. This shows customers a progress popup on the cart page: "Add 1 more Canvas Tote to unlock your free Card Holder!" Once unlocked: "Your free Card Holder has been added!"   #### Step 9: Schedule (Optional) Set a start/end date. BOGOs work well for limited-time promotions. #### Step 10: Save the Campaign  ### STEP-BY-STEP: VERIFY THE CAMPAIGN WORKS Test scenario: Campaign: Buy 2 Canvas Tote ($49.99 each) → get 1 Slim Card Holder ($14.99) free Expected discount: −$14.99 Expected total: $99.98 #### Step 1: Add 1 Qualifying Product Add 1 Canvas Tote. The BOGO widget should appear saying: "Add 1 more Canvas Tote to get a free Card Holder." Confirm no reward is applied yet. #### Step 2: Trigger the Reward Add a 2nd Canvas Tote. Widget updates to: "Reward ready! Add your free Card Holder."   #### Step 3: Claim the Reward Add 1 Slim Card Holder. It should appear in the cart at $0.00 with a discount label showing −$14.99.  Verification table: Cart: 1 Tote → no reward, widget shows "Add 1 more" → pay $49.99 Cart: 2 Totes, no Card Holder → widget shows "Add Card Holder to claim" Cart: 2 Totes + 1 Card Holder → Card Holder = $0, discount = −$14.99 → pay $99.98 Cart: 4 Totes + 2 Card Holders (repeat ON) → 2 rewards: −$29.98 → pay $199.96 #### Step 4: Test the Conflict Case If a product in this BOGO already belongs to another active campaign, a conflict panel appears in the campaign form. Use Move to pull it into this campaign. Move to exclude it. ### TIPS & COMMON MISTAKES Reward product must be in the cart: For most BOGO types, customers must manually add the reward product. The discount fires only when both qualifying AND reward products are in the cart. Free Gift (custom rule) is different: The Gift is auto-added to the cart, and the customer does not choose it. Widget placement: The BOGO widget shows on the cart page by default. Enable "Show on product page" to show it earlier in the shopping flow. Always set a reward maximum: Without a cap, a customer buying 100 units would earn 50 free items. Always set a max for high-volume stores. ### MINI FAQ **## Does the customer have to manually add the reward product to their cart?** For most BOGO types yes, except Free Gift with Purchase, where the reward is added automatically once the spend threshold is crossed. **## Can a customer earn the reward more than once in the same order?** Only if you enable "Allow multiple redemptions" and set a maximum number of rewards per order. **## What happens if the reward product is already in another campaign?** A conflict panel appears in the BOGO campaign form, letting you Move the product into this campaign or Remove it to exclude it. ### Best for: Retail & DTC stores running bundles, cross-sell, or clearance promotions. --- ## Buy X Get Y Floating Button Widget URL: https://help.discountprime.app/en/articles/16000435-buy-x-get-y-floating-button-widget The Buy X Get Y floating button (FAB) is a small, always-visible button that lets shoppers reopen the BOGO rewards popup at any time, even after they've dismissed it once. It's specific to Buy X Get Y campaigns. ### WHERE TO FIND IT Go to Widgets in your Discount Prime admin, then open the Buy X Get Y floating button card.  ### WHAT YOU CAN CONFIGURE #### Display - Display widget on store: master on/off switch #### General - Remove close button: hides the small "x" badge on the floating button - Position: Left or Right side of the screen - Border radius: slider (0-50) controlling how rounded the button is #### Colors - FAB background color: button background - FAB icon color: icon color inside the button - Close button color: background of the small "x" badge - Close button icon color: color of the "x" icon itself A live preview shows the floating button positioned exactly as it will appear on your storefront.  ### NO TEXT TO TRANSLATE This widget is purely icon and color based, it has no editable text fields, so there's no Language dropdown or translation step for it. It looks the same regardless of a shopper's storefront language. ### STEP-BY-STEP: CONFIGURE THE WIDGET 1. Go to Widgets -> Buy X Get Y floating button. 2. Toggle "Display widget on store" ON. 3. Choose the Position (left or right) and adjust the Border radius. 4. Optionally toggle Remove close button if you don't want shoppers to dismiss it. 5. Set the FAB and close button colors. 6. Check the preview, then click Save. ### STEP-BY-STEP: VERIFY IT WORKS 1. Confirm you have an active Buy X Get Y campaign. 2. In an Incognito tab, add the qualifying product(s) to your cart, then dismiss the BOGO popup if it appears. 3. Confirm the floating button appears in your configured position and color, and clicking it reopens the popup.  ### TIPS & COMMON MISTAKES - Requires an active BOGO campaign, this widget only has something to reopen when a reward is actually available. - Requires the app embed to be active, same as every other Discount Prime widget. - Requires the buy-x-get-y plan feature (Prime and above). - Removing the close button is permanent for shoppers, they won't be able to dismiss the floating button once it appears, use this deliberately. ### MINI FAQ **## Why is there no text field to edit on this widget?** It's a purely visual icon button, styling and position only, so there's nothing to write or translate. **## What happens if I remove the close button?** Shoppers can't dismiss the floating button once it appears, it stays visible for the rest of their session. **## Does this widget do anything without the BOGO popup enabled?** Not really, its whole purpose is reopening the BOGO popup, so it's most useful alongside it. --- ## Buy X Get Y Popup Widget URL: https://help.discountprime.app/en/articles/16000432-buy-x-get-y-popup-widget The Buy X Get Y popup widget shows an announcement modal when a shopper's cart qualifies for a BOGO reward, letting them pick and add the reward product without leaving their current page. It's specific to Buy X Get Y campaigns. ### WHERE TO FIND IT Go to Widgets in your Discount Prime admin, then open the Buy X Get Y pop-up card.  ### WHAT YOU CAN CONFIGURE #### Display - Display widget on store: master on/off switch #### Text Customization - Title (default "Your current cart qualifies for these rewards"): 55 character limit - Subtitle (default "Now you are able to choose between them. Add before checking out!"): 80 character limit - Select button label (default "Select"): 20 character limit - Add to Cart button label (default "Add to Cart"): 20 character limit - Continue Shopping button label (default "Continue Shopping"): 20 character limit - Remove Continue Shopping button (checkbox, default off): hides that button entirely #### Discount Badge - Badge type: show the reward's value as a Percentage or an Amount badge - Show free gift badge: toggle a badge on free-gift rewards #### Color Palette - Theme colors: Primary color, Secondary color, Border color - Element colors: Popup background, Header background, Header text color, Sale badge color #### Advanced - Dismiss behavior: Dismiss until triggered again, Dismiss for 2 minutes, or Keep showing, controls how long the popup stays hidden after a shopper closes it A live storefront-style preview shows the popup with sample products and your current text/color settings.  ### MULTI-LANGUAGE SUPPORT If your store publishes more than one language in Shopify (Settings -> Languages), a Language dropdown appears above the Text Customization fields, covering the title, subtitle, and all three button labels. - Hidden when your store only publishes one language. - Untranslated text falls back to your default language's text on the storefront. - A dot next to a language name flags it as having untranslated text. ### STEP-BY-STEP: CONFIGURE THE WIDGET 1. Go to Widgets -> Buy X Get Y pop-up. 2. Toggle "Display widget on store" ON. 3. Edit the title, subtitle, and button labels (and translations, if applicable). 4. Choose the badge type and whether to show a free-gift badge. 5. Set the color palette to match your theme. 6. Choose a dismiss behavior under Advanced. 7. Check the preview, then click Save. ### STEP-BY-STEP: VERIFY IT WORKS 1. Confirm you have an active Buy X Get Y campaign. 2. In an Incognito tab, add the qualifying product(s) to your cart until the reward condition is met. 3. Confirm the popup appears with your custom title, subtitle, and colors, and that selecting a reward adds it to the cart.  4. Close the popup and re-trigger the condition to confirm your dismiss behavior setting works as expected. ### TIPS & COMMON MISTAKES - Requires an active BOGO campaign, this widget styles the popup, it doesn't create the reward logic itself. See "Buy X Get Y (BOGO)". - Requires the app embed to be active, same as every other Discount Prime widget. - Requires the buy-x-get-y plan feature (Prime and above). - Character limits are strict, the title, subtitle, and button labels all have max lengths; longer text gets cut off in the editor, not just visually truncated on the storefront. ### MINI FAQ **## Can I stop the popup from reappearing after a shopper closes it?** Yes, set Dismiss behavior to "Dismiss until triggered again" or "Dismiss for 2 minutes" instead of "Keep showing". **## What's the difference between the percentage and amount badge type?** It controls whether the reward's discount badge displays as a % off value or a $ off value. **## Does removing the Continue Shopping button close the whole popup?** No, it just removes that specific button. Shoppers can still close the popup another way, or reopen it later via the floating button. --- ## Campaign Conflicts: How They Work and How to Resolve Them URL: https://help.discountprime.app/en/articles/13752468-campaign-conflicts-how-they-work-and-how-to-resolve-them A conflict happens when the same product or variant is included in more than one active **price-modifying campaign** at the same time. To keep pricing predictable and prevent discount stacking issues, each product or variant can belong to **only one active price-modifying campaign** at a time. If a product is already affected by another active campaign, it will be automatically excluded from the new campaign and marked as **Conflicted**.  --- #### Important: What counts as a price-modifying campaign? Conflicts apply only to campaigns that directly change product prices, such as: - General Discount(Flat Product Discount) - Tiered Pricing(Tiered Unit Pricing) - Bulk Price Changes (Bulk Price Update) - Tiered Quantity Discount - Tiered Volume Discount (Product Spend Discount) Order-level ( Tiered Spend Discount (Cart-level))campaigns (cart-based discounts) follow a different stacking policy and do not create product-level conflicts. --- #### What happens when a conflict occurs? When a conflict is detected:  - The affected products are automatically excluded from the new campaign. - The campaign status may show: - **Conflicted** - or **Active — No eligible products** (if all products were excluded) - You can review and resolve the conflict before or after activation.  No price changes are applied unexpectedly. --- ### How to Resolve a Conflict You have three main options:  --- #### Option 1 — Keep products in their existing campaign (Recommended) The product stays in the campaign where it is already active. Result:  - It remains excluded from the new campaign. - No existing pricing is changed. This is the safest option. --- #### Option 2 — Move products to this campaign The product will be removed from its current active campaign and assigned to the new one. Result: - The previous campaign will no longer affect this product. - The new campaign will take control of pricing. Use this when the new campaign should override the previous one.  --- #### Option 3 — Decide per product (Advanced) You can review each conflicted product individually and choose: - Keep in existing campaign - Move to this campaign This gives full control when multiple campaigns overlap.  --- ### Why does a campaign show “No eligible products”? This happens when: - The campaign is active - But all products are excluded due to conflicts  The campaign remains active so you can resolve conflicts or wait for other campaigns to expire. To fix this: 1. Open the campaign 2. Review the **Excluded due to conflicts** section  3. Resolve or reassign products 4. Recalculate eligibility --- ### Managing Conflicted Products Inside a Campaign In the Edit Campaign page, you may see: **Products excluded due to conflicts**  For each product, you can see:  - Which campaign it conflicts with - Whether that campaign is active - Whether you can manage it (based on your plan) If your plan allows exclusions management (Basic or higher):  - You can remove the exclusion - Then recalculate eligibility If your plan is Free:  - Conflicted products are visible - But cannot be manually changed --- ### Best Practices to Avoid Conflicts ✔ Plan campaign timing (avoid overlapping product discounts) ✔ Use Resolve Conflicts before activating new campaigns ✔ Clearly define whether a campaign should replace or complement another ✔ Review the campaign list regularly for “No eligible products” --- ### Need Help? If you're unsure which campaign should control pricing: - Review the conflicting campaign from the Resolve screen - Check which campaign is currently active - Decide which pricing strategy should apply Conflicts are designed to protect your store from unintended discount stacking and pricing errors. --- ## Campaign Statuses Explained URL: https://help.discountprime.app/en/articles/8276286-campaign-statuses-explained Campaign statuses in Discount Prime play a pivotal role in seamlessly managing and tracking your discount campaigns. This guide will provide an in-depth overview of these statuses, explain their significance, and help you grasp their importance in monitoring and optimizing your campaigns. Let's embark on a journey to explore the campaign statuses in Discount Prime. ##### 1. Active A campaign with the "Active" status is in full swing and is currently running in your store. This status signifies that the discount linked to the campaign is actively applied to eligible products. Customers can take advantage of the enticing discounts offered by the active campaign. ##### 2. Scheduled The "Scheduled" status indicates that a campaign is primed to become active at a specific future date and time. While it is inactive, the campaign is set to automatically transition to the "Active" status as scheduled, allowing you to plan and prepare your promotions in advance. ##### 3. Inactive When a campaign bears the "Inactive" status, it signifies that the merchant has chosen to deactivate the campaign. Consequently, the discount or offer linked to the campaign is no longer applied to any products and remains invisible to customers. Inactive campaigns can be reactivated should you decide to rerun them. ##### 4. Expired Upon reaching the scheduled end date, a campaign automatically shifts to the "Expired" status. This status indicates that the campaign is no longer active, and the associated discount is no longer applicable to any products. It's a natural conclusion to the campaign's journey. ##### 5. Action Required The "Action required" status is triggered when using the automatic discount code mechanism for campaigns involving minimum quantities or tier-based discounts. Shopify limits the number of active automatic discount codes, allowing a maximum of 25 codes at a given time. If creating a new campaign surpasses this limit, the status switches to "Action required." To proceed, you must deactivate some existing discount codes in Shopify, ensuring compliance with this limitation. Once done, you can successfully activate the campaign. ##### 6. Queued In the "Queued" status, a campaign waits its turn to be lined up for processing by the system. ##### 7. Processing During the "Processing" state, the system identifies eligible products based on the defined filters and calculates the number of variants that meet the campaign criteria. This crucial step occurs before the discount is applied to the products, ensuring precision. ##### 8. Adding Discount to Products The "Adding discount to products" status signals that the campaign actively applies the discount to the relevant products individually. The system diligently updates specified product prices to reflect the discounted amounts. The numbers displayed in parentheses, such as (740/1200), represent the progress of the discount application. For instance, 740 out of 1200 variants have already received discounts in the example provided. ##### 9. Reverting to Original Prices This status, "Reverting to original prices," indicates that the campaign is removing discounts and restoring the prices of affected products to their original values. The numbers displayed in parentheses, such as (820/1320), convey the progress of the discount removal. In this example, 820 variants are yet to be reverted to their original prices out of 1320 variants. ##### 10. Needs Upgrade A campaign bearing the "Needs upgrade" status signifies that an upgrade is required to proceed. In Discount Prime, each plan features specific limits on the number of variants eligible for discounts. For instance, “free plan” users can discount up to 100 variants, while “basic plan” users can discount up to 1000 variants, and so forth. If the campaign exceeds the number of variants your current plan allows, the status remains "Needs upgrade" until you upgrade to a plan that accommodates the required number of variants. ##### 11. Deactivating Shopify Discounts When a merchant activates the "Prevent combination with Shopify discounts" setting from the settings page, the Shopify discounts linked to their previously active Discount Prime campaigns will also be deactivated. During this process, the status of those campaigns will be "Deactivating Shopify discounts" until the update is successfully completed. ##### 12. Restoring Shopify Discounts Conversely, when the merchant deactivates the "Prevent combination with Shopify discounts" setting from the settings page, the Shopify discounts associated with their previous active Discount Prime campaigns will be reinstated. During this process, the status of those campaigns will be "Restoring Shopify discounts" until the update concludes. ##### **13. Conflict** The “Conflict” status appears when one or more products or variants in your campaign are already included in another active price-modifying campaign. To ensure pricing accuracy and prevent unintended discount stacking, Discount Prime allows each product or variant to belong to only one active price-modifying campaign at a time. When a conflict is detected, the affected products are automatically excluded from the new campaign until you review and resolve the overlap. You can choose to keep the products in their existing campaign or move them to the new one, depending on which promotion should take priority. This status helps maintain clear pricing logic and protects your store from overlapping discount rules. Understanding these campaign statuses empowers you to manage your discount campaigns effectively, ensuring that they align with your promotional goals and provide a seamless shopping experience for your customers. Whether you're gearing up for a significant sale or fine-tuning your discount strategies, Discount Prime's campaign statuses are your trusty guide in navigating the world of e-commerce promotions. Feel free to refer back to this comprehensive guide whenever you need clarity on the status of your campaigns. Happy campaigning! --- ## Can I Schedule a Campaign to Start Automatically in the Future? URL: https://help.discountprime.app/en/articles/13867274-can-i-schedule-a-campaign-to-start-automatically-in-the-future #### 1) Short Explanation Yes, you can schedule a campaign to start automatically at a future date and time. If your campaign did not start as expected, the issue is usually related to: - Store timezone mismatch - Campaign not saved - Conflict with another campaign - Start date set incorrectly This guide explains how to configure future scheduling correctly and how to troubleshoot common issues. --- #### 2) Quick Check Before investigating further, confirm: - The campaign status is Active (not Inactive) - A future Start Date and Time are set - The End Date (if set) is later than the Start Date - The store timezone is correct - There are no campaign conflicts - You clicked Save after setting the schedule If any of these are not correct, the campaign may not launch automatically. --- #### 3) Step-by-Step: How to Schedule a Campaign for the Future --- #### Step 1: Set the Future Start Date 1. Open Discount Prime. 2. Go to Campaigns. 3. Create or edit your campaign. 4. In the Scheduling section, set a future Start Date and Time. Make sure the selected time aligns with your store timezone. --- #### Step 2: Confirm the Campaign Is Active A campaign must be in Active status to trigger automatically. If the campaign is Inactive, it will not start even if a future date is set. --- #### Step 3: Verify Store Timezone 1. Go to Shopify Admin. 2. Navigate to Settings → Store details. 3. Confirm your store timezone. All campaign scheduling follows this timezone. --- #### Step 4: Click Save After setting the schedule: 1. Click Save. 2. Reopen the campaign to confirm the schedule was stored correctly. Unsaved changes will not trigger automatic activation. --- #### 4) Common Issues and Solutions --- #### Issue A: Campaign Did Not Start at the Scheduled Time Most common causes: - Store timezone is different from your local time - Campaign was not saved - Conflict blocked activation Solution: Review scheduling, timezone, and conflict status. --- #### Issue B: Campaign Started Earlier Than Expected Likely cause: - Timezone difference - Daylight Saving Time adjustment Always confirm store timezone before scheduling. --- #### Issue C: Campaign Shows Active but Discount Not Applied This is usually not a scheduling issue. Check: - Product eligibility - Exclusions - App Embed activation - Conflicts with other automatic discounts --- #### Issue D: End Date Is Before Start Date If the End Date is earlier than the Start Date, the campaign will not activate. Always confirm date order. --- #### 5) Best Practices for Future Scheduling Before scheduling important campaigns: ✔ Double-check store timezone ✔ Set a clear Start and End window ✔ Avoid scheduling during DST changes ✔ Test with a short future window first ✔ Confirm no overlapping campaigns exist For major events (Black Friday, Flash Sales), verify settings at least one day before launch. --- #### 6) When to Contact Support Contact support if: - Start Date is correct - Store timezone is correct - Campaign is Active - No conflicts exist - Campaign still does not activate automatically Please provide: - Campaign name - Scheduled Start Date and Time - Store timezone - Screenshot of campaign scheduling settings - Store URL --- #### Summary Yes, you can schedule campaigns to start automatically in the future. If it does not start as expected, the cause is typically: ✔ Timezone mismatch ✔ Unsaved changes ✔ Campaign conflict ✔ Incorrect date configuration Always confirm your store timezone and save settings before relying on automatic scheduling. --- ## Combining Discount Prime with Shopify Discounts URL: https://help.discountprime.app/en/articles/9981371-combining-discount-prime-with-shopify-discounts ### WHAT IS IT Discount Prime runs automatic discounts alongside Shopify's own discounts, product discounts, order discounts, and shipping discounts and lets you control how they combine (stack) at checkout. Instead of a customer only ever getting one discount, you decide whether your campaigns stack with each other and with Shopify discount codes, so shoppers get the best possible deal without any manual work at checkout. Every campaign applies automatically once it's live. The combination setting on each campaign is what determines whether two discounts add up on the same cart or whether only the strongest one wins. ### HOW COMBINATION WORKS Discount Prime uses Shopify's native discount classes, so combinations follow Shopify's own rules: - Product class: Flat Product Discount, Tiered Quantity, Bulk Price Update, Tiered Unit Pricing - Order class: Tiered Spend Discount, Product Spend Discount - Shipping class: Free Shipping & Cart Incentives Discounts from different classes can stack (e.g. a Product discount + a Shipping discount). Whether discounts from the same class stack, or from a Shopify discount code, depends on each campaign's combination setting. - Can combine: both discounts stack, the customer gets both - Cannot combine: only the highest-value discount wins (MAX logic) ### WHEN TO USE IT - Volume discount + free shipping over a threshold: Product/Order campaign + Free Shipping campaign (different classes, stack automatically) - Let a seasonal promo stack with a coupon code: turn Can combine ON so your campaign stacks with Shopify discount codes - Prevent double-dipping on the same products: turn Cannot combine ON so only the best discount applies - Reward big carts with a stacked deal: Tiered Spend Discount + Free Shipping, both set to combine ### STEP-BY-STEP: COMBINE A PRODUCT DISCOUNT WITH FREE SHIPPING Scenario Used in This Guide Goal: Run a 20% volume discount on selected products AND give free shipping when the cart reaches $50, both applying together, automatically, at checkout. Step 1: Create the Product Discount Campaign From the Discount Prime sidebar, click Campaigns → Create Campaign and set up your product/volume discount (e.g. Tiered Quantity Discount or Flat Product Discount).  In the Combination section of the campaign, choose whether it can combine with other same-class or coded discounts: - Can combine: stacks with other product discounts / codes - Cannot combine: only the highest discount wins Save the campaign. Step 2: Create the Free Shipping Campaign Create a second campaign of type Free Shipping & Cart Incentives, with a minimum spend of $50 and discount Free Shipping (100%).  Because Shipping is a different class from Product, this shipping discount stacks with your product discount automatically. Step 3: Check the Combination Setting Open the campaign's Combination Setting and make sure it's allowed to combine with product/order discounts running at the same time.  IMPORTANT: If the combination option is not checked, the discounts may apply exclusively (only one wins). To let multiple discounts apply together, the combination option must be enabled. Step 4: Mind the Execution Order (Advanced) Under Advanced Settings, the shipping campaign's minimum check can run: - Before: checks the cart subtotal before product discounts are applied - After: checks the subtotal after product discounts are applied If your 20% product discount would drop the cart below $50, choose Before so the product discount doesn't cost the customer their free shipping. Step 5: Save Both campaigns are now live and will apply together whenever a cart qualifies. No further action is needed. ### STEP-BY-STEP: VERIFY THE COMBINATION WORKS Test Scenario Product discount: 20% off selected products Shipping: Free shipping over $50 Store shipping rates: Standard $8.99, Express $18.99 Verification Table - $30 of discounted products: product discount applied, full shipping rate (below $50 threshold) - $60 of discounted products: product discount applied, shipping $0.00 (both discounts stack) - $60, product discount set to Cannot combine with a code: only the higher of the two applies, shipping $0.00 (same-class MAX logic) Step 1: Add Below Threshold Add $30 of discounted products in an Incognito tab. At checkout, confirm the product discount applies but shipping is still full price. Step 2: Cross the Threshold Add products until the cart reaches $60. Go to checkout after entering the shipping address. You should see both: - The product discount line (−20%) - Shipping showing $0.00 for all rates Step 3: Test a Non-Combining Case Set the product campaign to Cannot combine and add a Shopify discount code at checkout. Confirm only the highest discount is applied, not both. ### TIPS & COMMON MISTAKES - Combination must be checked. The single most common mistake: leaving the combination option off, so discounts apply exclusively instead of stacking. If a customer isn't getting both, check this first. - Same class vs. different class. Product + Shipping stacks naturally (different classes). Product + Product only stacks if Can combine is ON. - Execution order changes qualifying spend. With After mode, a product discount that lowers the cart below the shipping threshold will also remove free shipping. Use Before to protect the threshold. - Codes follow the campaign. Whether a Shopify discount code stacks with your automatic campaign is governed by the campaign's combination setting, not by the code itself. - No technical setup needed. Once campaigns are saved, the app manages all combinations in the background, no checkout scripts or manual adjustments. ### MINI FAQ **## Do Shopify discount codes automatically stack with Discount Prime campaigns?** Not automatically, whether they stack depends on that campaign's own Combination Setting, not the code itself. **## What's the difference between combining across classes and combining within the same class?** Different classes (like a Product discount and a Shipping discount) can stack naturally. Two discounts in the same class (like two Product discounts) only stack if Can Combine is explicitly turned on. **## Where do I turn combination on or off for a campaign?** In that campaign's Combination Setting section, choose Can combine or Cannot combine depending on whether you want it to stack with other discounts or codes. --- ## Configuration of Price Changes URL: https://help.discountprime.app/en/articles/8276298-configuration-of-price-changes The **"different price configurations"** feature in Discount Prime enables you to tailor the way discounts are implemented on your products, taking into account their current **"price"** and **"compare at price"** values. You have four choices available to you:  ##### **1.** "Price" is discounted, and "compare at price" is replaced by the original price. **(Recommended)** This option reduces the products' prices, and the updated discounted prices are configured. The initial **"price"** is placed in the **"Compare at price"** field. In your store, the original prices will be crossed out, and the new prices will be displayed alongside them, following your theme settings.  ##### **2.** Only the **"price"** is discounted. With this option, the products' prices are reduced, and the reduced amount becomes the new product price. However, the previous **"price"** is not replaced in the **"Compare at price"** field. If a product doesn't have a **"Compare at price"** set, the **"Compare at price"** field remains empty after the campaign is executed, resulting in the discounted price not being displayed with a strikethrough over the original price in the store. Only the new price will be displayed as the primary price. You can **tick the checkbox** at the bottom to showcase the discounted prices for these products in your store.  ##### **3. "price"** and **"compare at price"** are discounted. This option applies the discount to both the product price and the **"Compare at price".** The previous **"Compare at price"** of the product is discounted, and the discounted amount replaces the previous value. Therefore, if a product doesn't have a **"Compare at price"** set, the **"Compare at price"** field will remain empty after the discount is applied unless the checkbox at the bottom is selected to apply Option 1 for these products.  ##### **4. "Compare at price"** is discounted and filled in the **"price"** field. With this option, the product's existing **"Compare at price"** is reduced, and the discounted amount takes the place of the value in the product **"price"** field. If a product lacks a **"Compare at price"** setting, it won't receive a discount unless you choose to apply Option 1 for these products by checking the checkbox at the bottom.  --- ## Configuring Low Stock Alerts and Scarcity Badges URL: https://help.discountprime.app/en/articles/11533542-configuring-low-stock-alerts-and-scarcity-badges #### **Overview** This guide explains how to set up low stock alerts and manual scarcity badges on your store. These features help create urgency for customers by displaying stock availability messages with customizable text, colors, and placement.  #### **1. Setting Up Low Stock Alerts** Low stock alerts notify customers when inventory is running low. You can configure the minimum stock threshold, message content, and display position. #### **Steps to Configure Low Stock Alerts** 1. **Enable the Widget** - Navigate to the "Display widget on store" section. - Toggle the widget **ON** to activate stock alerts. 2. **Set the Placement** - Go to the "Placement" section. - Choose whether the alert appears **below** or **above** the product price. 3. **Define the Stock Threshold & Message** - In the "Content" section, set the minimum stock level (e.g., **less than 4**). - Customize the alert message using `{live_stock_count}` to dynamically show the remaining stock. - Example: `"Only {live_stock_count} in stock!"` 4. **Customize the Style** - Adjust the **text color** and **background color** in the "Style" section. - Example: - Text Color: `#8E1F0B` - Background Color: `#FEDAD9` #### **2. Using the Manual Scarcity Badge** If a store does not track live inventory or prefers to display a static message, the **Manual Scarcity Badge** can be used. #### **Steps to Enable Manual Scarcity Badge** 1. **Activate the Badge** - Navigate to the "Manual Scarcity Badge" section. - Toggle the badge **ON** to display a custom message. 2. **Set the Badge Message** - Enter a fixed text (e.g., `"Only 1 in stock!"`). - This message will appear regardless of actual inventory levels. 3. **Adjust Badge Styling** - Customize the **text color** and **background color** to match your store’s theme. #### **3. Previewing Your Changes** The preview section on the right side of the configuration page shows how the badge will appear on product pages. Use this to fine-tune your settings before applying them. #### **4. Best Practices** - **Use urgency wisely**: Avoid misleading customers with false scarcity. - **Match store design**: Choose colors that blend well with your store’s theme. - **Test placement**: Try different positions to see what works best for conversions. By following these steps, you can effectively display stock alerts and scarcity badges to encourage purchases while maintaining transparency with your customers. --- ## Countdown Timer Widget URL: https://help.discountprime.app/en/articles/16000417-countdown-timer-widget The Countdown timer widget shows a live, ticking countdown on the product page for campaigns with a scheduled end date and the Countdown timer option turned on, most commonly Flat Product Discount flash sales. ### WHERE TO FIND IT Go to Widgets in your Discount Prime admin, then open the Countdown timer card.  ### WHAT YOU CAN CONFIGURE #### Display - Display widget on store: master on/off switch #### Content - Footer text: a line of text shown below the countdown digits - Days label: label under the days digit, e.g. "Days" - Hours label: label under the hours digit - Minutes label: label under the minutes digit - Seconds label: label under the seconds digit - Show product name (checkbox): adds the product's title into the countdown header - Text before product name: only shown if "Show product name" is on - Text after product name (or Header text, if product name is off): the main heading line #### Style - Text color: color of labels and header text - Numbers color: color of the countdown digits - Numbers background color: background behind each digit - Progress bar color: fill color of the countdown's progress bar - Progress bar border color: border color of the progress bar A live preview shows a running countdown using sample start/end times, exactly matching the storefront's look.  ### MULTI-LANGUAGE SUPPORT If your store publishes more than one language in Shopify (Settings -> Languages), a Language dropdown appears above the Content fields, covering the footer text, all four time-unit labels, and the before/after product name text. - Hidden when your store only publishes one language. - Untranslated fields fall back to your default language's text on the storefront. - A dot next to a language name flags untranslated content for that language. ### STEP-BY-STEP: CONFIGURE THE WIDGET 1. Go to Widgets -> Countdown timer. 2. Toggle "Display widget on store" ON. 3. Fill in the footer text and the four time-unit labels (and translations, if applicable). 4. Optionally enable Show product name and set the before/after text. 5. Adjust the digit and progress bar colors under Style. 6. Check the live preview, then click Save. ### STEP-BY-STEP: VERIFY IT WORKS 1. Create or open a Flat Product Discount campaign, set an end date, and enable Countdown timer in its schedule section. 2. In an Incognito tab, open that product's page and confirm the countdown is ticking with your custom labels and colors.  3. Wait for (or simulate) the campaign's end date passing, and confirm the countdown and discount both end together. ### TIPS & COMMON MISTAKES - The countdown only shows when the campaign actually has an end date and Countdown timer enabled, turning on this widget alone doesn't create a countdown; it styles the one your campaign schedule produces. - Requires the app embed to be active, same as every other Discount Prime widget. - Content and style edits need countdown-settings access, locked without the relevant plan permission. ### MINI FAQ **## Does enabling this widget start a countdown automatically?** No, you also need an active campaign with an end date and Countdown timer turned on in its schedule section. This page only styles the countdown, it doesn't create one. **## Can I use a circular countdown style instead of digits?** Not currently, only the standard digit style is available in the editor today. **## What happens to the countdown when the campaign ends?** It disappears from the storefront along with the discount once the campaign's end date passes. --- ## Countdown Widget Customizations URL: https://help.discountprime.app/en/articles/9896795-countdown-widget-customizations In the dynamic world of e-commerce, creating a sense of urgency can be a powerful tool to boost conversions and sales. One effective method to achieve this is through the use of countdown timers on product pages. These timers can signal the end of a sale, the closing of a registration window, or the limited availability of a hot item, compelling customers to take action before time runs out. Countdown timers are not just about ticking clocks; they're a strategic addition that can enhance the user experience and guide customer behavior. By integrating a countdown timer theme extension on your product page, you can leverage the psychological principle of scarcity and the fear of missing out (FOMO) to your advantage. Here's how you can add a countdown timer theme extension to your product page: 1- Create and activate at least one campaign with end date and set countdown on the campaign.  2- Here’s how you can customize countdown timer on the app on widget page:  You can customize colors of digits as well as background of digits and progress bar. 3- you can enable to show products in count down and text shows on product countdown page.  In conclusion, countdown timers are a valuable addition to any e-commerce site looking to improve conversion rates and create a sense of urgency. With the right plugin and approach, you can set up a theme extension that not only looks great but also drives sales and customer engagement. Happy selling! --- ## Customizing Widget Text & Translations URL: https://help.discountprime.app/en/articles/15859245-customizing-widget-text-translations Every storefront widget in Discount Prime, badges, progress bars, cart totals, countdown timers, and BOGO popups, has its own editable text fields, usually with variable placeholders like {{amount}} or {{discount}} that fill in live data. Most of these fields also support per-language translations matching the languages your store publishes in Shopify. This article lists where to edit the copy for each widget and how the translation system works.  ### WHERE EACH WIDGET'S TEXT LIVES - **Saving on Cart**: Subtotal label, Saved label. Widgets -> Saving on cart. Translatable: Yes. - **Quantity/Value Table**: Title, "Buy"/"Get" text, "Off" text, new-price text. Widgets -> Quantity/Value table. Translatable: Yes. - **Countdown Timer**: Footer text, day/hour/min/sec labels, before/after product name text. Widgets -> Countdown timer. Translatable: Yes. - **Low Stock Badge**: Alert text. Widgets -> Stock badge. Translatable: Yes. - **Sales Badge**: Badge text. Widgets -> Sales badge. Translatable: Yes. - **Shipping Progress Bar**: Initial / in-progress / threshold messages. Widgets -> Shipping progress bar. Translatable: Yes. - **Discount Progress Bar**: Initial / in-progress / threshold messages. Widgets -> Discount progress bar. Translatable: Yes. - **Buy X Get Y Popup**: Title, subtitle, three button labels. Widgets -> Buy X Get Y pop-up. Translatable: Yes. - **Buy X Get Y Floating Button**: None, icon and color only. Widgets -> Buy X Get Y floating button. Translatable: No text to translate. All of these use standard text fields, type your copy, use the listed variables where offered, and save. ### USING VARIABLES IN WIDGET TEXT Most message fields support variables that get replaced with live values on your storefront: - {{amount}}: the remaining amount/quantity needed to unlock the reward - {{discount}}: the discount or reward itself (e.g. "25% off", "Free shipping") - {live_stock_count}: the current live inventory count (Low Stock Badge) - {{Discount}} / {{new-price}}: the discount value or new price (Quantity/Value Table) Example: "You're {{amount}} away from {{discount}}" -> "You're $12.00 away from Free shipping".  ### TRANSLATING WIDGET TEXT (MULTI-LANGUAGE SUPPORT) Widget settings pages read your store's published languages directly from Shopify (Settings -> Languages). When your store publishes 2 or more languages, a Language dropdown appears above the text fields on every translatable widget. #### How It Works 1. Your default (primary) language is where you type the "main" version of every field, exactly as you always have. 2. Switch the Language dropdown to any other published language to enter a translation for that language's fields only. 3. A language showing a dot next to its name still has one or more untranslated fields. 4. Reset to default buttons are scoped to whichever language tab is active, resetting a translation only clears that language's override, not your default text.  #### How It Renders on the Storefront Each shopper automatically sees the widget text matching their own storefront locale, no manual switching needed on their end. If a shopper's locale has no translation entered for a field, the storefront quietly falls back to your default-language text instead of showing something blank.  #### What's Not Covered - Product titles, descriptions, and other theme content are outside Discount Prime's widget text system, use Shopify's own Translate & Adapt app for general storefront translation. - The Buy X Get Y floating button has no text at all (icon and colors only), so there's nothing to translate there. ### MINI FAQ **## Do I need a certain plan to translate widget text?** No, the language dropdown and translation fields are available on every plan, they simply don't appear if your store only publishes one language. **## Why doesn't the Language dropdown show up?** It only renders when your store has 2 or more published languages in Shopify Settings -> Languages. With just one language, there's nothing to switch between. **## Why doesn't my variable show a value?** Double-check the exact variable spelling for that widget ({{amount}} vs {live_stock_count} differ by widget) and confirm the field you're editing is the one rendered in that widget's current state (initial vs. in-progress vs. reached). **## Do widget text changes apply immediately?** Yes, once saved, the new copy (and any translations) is live on your storefront right away; no theme republish is required for embed-based widgets. --- ## Discount & Pricing Campaign Types URL: https://help.discountprime.app/en/articles/12942616-discount-pricing-campaign-types ### WHAT IS IT Discount Prime gives you a full toolbox of campaign types, from simple percentage-off sales to wholesale price ladders and profit-safe dropshipping repricing. When you click Create Campaign, the types are organized into two groups so you can quickly find the right one: - Discounts & Promotions (short-term): reward customers at checkout with automatic or code-based discounts. Your product's real price never changes; the saving is applied on top. - Pricing / Direct Price Update (long-term): update the product's actual price directly, for wholesale tiers, bulk repricing, or long-term strategy. Every type can be scoped to specific products, collections, or your whole store, and customized with conditions, customer eligibility, and start/end dates.  ### DISCOUNTS & PROMOTIONS (SHORT-TERM)  Reward customers at checkout. The listed price stays the same, the discount is applied on top. - **Flat Product Discount**: a flat % or fixed amount off selected products or collections. Example: 20% off selected products. Best for: seasonal sales, clearance, VIP offers. - **Tiered Quantity Discount**: bigger discount as the customer buys more of the same item. Example: Buy 3+, save 10%; Buy 5+, save 20%. Best for: "buy more, save more", bulk buying. - **Product Spend Discoun**t: tiered discount based on the amount spent on selected products. Example: Spend $100+ on selected items: 10% off. Best for: AOV lifting within a product group. - **Tiered Spend Discount (Cart-level)**: tiered % or fixed discount based on the total cart value. Example: Spend $100+: $5 off; Spend $150+: 20% off. Best for: raising overall cart size. - **Buy X Get Y**: a free or discounted product when a required quantity is bought. Example: Buy 2 shirts, get 1 free. Best for: BOGO, bundles, cross-sell. - **Free Shipping / Cart Incentives**: free or discounted shipping when a condition is met. Example: Spend $50, get free shipping. Best for: reducing cart abandonment, AOV. - **Wholesale / B2B Pricing**: tiered prices and quantity breaks unlocked only for B2B customers. Example: Tagged "wholesale": 10+ items = $42 each. Best for: gated B2B / reseller pricing. - **Anchor Pricing (Coming soon)**: show a higher reference price to raise perceived value. Example: Was $150, now $80. Best for: perceived-value & conversion boosts. ### PRICING, DIRECT PRICE UPDATE (LONG-TERM)  Change the product's actual price. Useful for wholesale, bulk repricing, and long-term strategy. - **Bulk Price Update**: update product prices in bulk or on a schedule. Example: Reduce prices by 20%; +$5 next month. Best for: clearance repricing, seasonal price changes. - **Tiered Unit Pricing**: fixed unit prices by quantity bracket. Example: 3+ items = $8 each; 5+ items = $5 each. Best for: wholesale / B2B volume pricing. - **Dropshipping Pricing**: profit-safe repricing from your product cost. never below cost. Example: 20% off the margin: $500 → $480. Best for: margin control, profit-safe discounts. ### DISCOUNT VS. DIRECT PRICE UPDATE, WHAT'S THE DIFFERENCE? #### Discounts & Promotions - Product price: unchanged (saving applied at checkout) - Shows as: a discount line / saved amount - Combines with other discounts: yes (via combination settings) - Typical use: promotions, sales, seasonal offers #### Pricing (Direct Price Update) - Product price: actually changed - Shows as: the new price itself - Combines with other discounts: it IS the price, no discount label - Typical use: wholesale, bulk repricing, long-term pricing ### QUICK DECISION GUIDE Is this pricing only for B2B / wholesale customers? - Yes -> Wholesale / B2B Pricing - No -> Do you price from product cost / margin (never below cost)? - Yes -> Dropshipping Pricing - No -> Is the discount on a specific product? - Yes -> Flat Product Discount + more units -> Tiered Quantity Discount + spend threshold on those products -> Product Spend Discount + change the real price (no discount label) -> Bulk Price Update + fixed price per volume bracket -> Tiered Unit Pricing - No -> Based on cart total? -> Tiered Spend Discount Reward for buying X items? -> Buy X Get Y About shipping cost? -> Free Shipping / Cart Incentives Still unsure? In the app you can open Use Cases & Templates and we'll pick the right campaign type for you, or book a free strategy call from the campaign screen. ### HOW TO CREATE ONE 1. Go to Campaigns -> Create Campaign. 2. Pick a type from Discounts & Promotions or Pricing, or start from Use Cases & Templates. 3. Set the scope (specific products, collections, or the whole store). 4. Customize conditions, customer eligibility, and start/end dates. 5. Click Save, the campaign applies automatically. New to the app? Start with the Getting Started with Discount Prime article. ### MINI FAQ **## What's the practical difference between Discounts & Promotions and Pricing campaigns?** Discounts & Promotions show a discount line at checkout while the listed price stays the same. Pricing campaigns change the actual product price, with no separate discount label. **## Which campaign type should I start with if I'm not sure?** Flat Product Discount is the simplest starting point for a straightforward sale; use the Quick Decision Guide or the Which Discount Type Should I Use article to match your exact goal. **## Can I run a Discount campaign and a Pricing campaign at the same time?** Yes, but not on the same product; each product can only belong to one price-modifying campaign at a time, so overlaps are auto-excluded. ### NEED A HAND? Our support team is here to help. reach out anytime at